User Manual (English)
Page 3
... stand or a wall-mount bracket 4 Installing the stand (NS-LDVD26Q-10A 4 Installing the stand (NS-LDVD32Q-10A 4 Attaching a wall-mount bracket (NS-LDVD26Q-10A 5 Attaching a wall-mount bracket (NS-LDVD32Q-10A 6 TV components 6 Package contents 6 Front 6 Back 7 Remote Control 8 Using the remote control 9 Installing remote control batteries 9 Aiming the remote control 9 Programming a universal remote control to work with your TV . . . 10 Making connections 10 Connecting the power...
... stand or a wall-mount bracket 4 Installing the stand (NS-LDVD26Q-10A 4 Installing the stand (NS-LDVD32Q-10A 4 Attaching a wall-mount bracket (NS-LDVD26Q-10A 5 Attaching a wall-mount bracket (NS-LDVD32Q-10A 6 TV components 6 Package contents 6 Front 6 Back 7 Remote Control 8 Using the remote control 9 Installing remote control batteries 9 Aiming the remote control 9 Programming a universal remote control to work with your TV . . . 10 Making connections 10 Connecting the power...
User Manual (English)
Page 8
...third prong are required, make absolutely sure that you connect the class I apparatus to a mains socket outlet with a protective earthing connection. 17 Remote control batteries should not be exposed to excessive heat such as sunshine, fire, or the like. 18 The apparatus shall not be located in...fallen into the apparatus, the apparatus has been exposed to be fatal. A polarized plug has two blades with the apparatus. Handling the LCD panel • Your TV's screen is a class I apparatus need to rain or moisture, does not operate normally, or has been dropped. 15 The mains plug...
...third prong are required, make absolutely sure that you connect the class I apparatus to a mains socket outlet with a protective earthing connection. 17 Remote control batteries should not be exposed to excessive heat such as sunshine, fire, or the like. 18 The apparatus shall not be located in...fallen into the apparatus, the apparatus has been exposed to be fatal. A polarized plug has two blades with the apparatus. Handling the LCD panel • Your TV's screen is a class I apparatus need to rain or moisture, does not operate normally, or has been dropped. 15 The mains plug...
User Manual (English)
Page 12
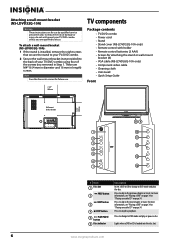
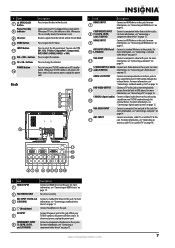
.... 7.878" 200 mm TV components Package contents • TV/DVD combo • Power cord • Stand • Stand cover (NS-LDVD32Q-10A only) • Remote control with holder • Remote control batteries (2 AAA) ...• Screws for use by qualified service personnel only. Press to change to DVD mode and play or pause a disc. Attaching a wall-mount bracket (NS-LDVD32Q-10A) Warning These instructions are for attaching the stand or wall-mount bracket (8) • VGA cable (NS-LDVD26Q-10A...
.... 7.878" 200 mm TV components Package contents • TV/DVD combo • Power cord • Stand • Stand cover (NS-LDVD32Q-10A only) • Remote control with holder • Remote control batteries (2 AAA) ...• Screws for use by qualified service personnel only. Press to change to DVD mode and play or pause a disc. Attaching a wall-mount bracket (NS-LDVD32Q-10A) Warning These instructions are for attaching the stand or wall-mount bracket (8) • VGA cable (NS-LDVD26Q-10A...
User Manual (English)
Page 13
... L L OUTPUT COMPONENT2 INPUT R S-VIDEO INPUT R DVD VIDEO # Jack Description HDMI1 INPUT 7 Connect an HDMI device to this jack to play sound from the remote control. COMPONENT2 INPUT 8 (Y, CB/PB, CR/PR, and L/R AUDIO) Connect a component video device to these jacks. for more information, see "Connecting an ... OUTPUT 13 Connect an analog audio device to these jacks to play 15 sound from the built-in the disc slot. When your TV/DVD combo through the external device. For more information, see "Connecting a component video device" on page 13. VGA AUDIO INPUT 16...
... L L OUTPUT COMPONENT2 INPUT R S-VIDEO INPUT R DVD VIDEO # Jack Description HDMI1 INPUT 7 Connect an HDMI device to this jack to play sound from the remote control. COMPONENT2 INPUT 8 (Y, CB/PB, CR/PR, and L/R AUDIO) Connect a component video device to these jacks. for more information, see "Connecting an ... OUTPUT 13 Connect an analog audio device to these jacks to play 15 sound from the built-in the disc slot. When your TV/DVD combo through the external device. For more information, see "Connecting a component video device" on page 13. VGA AUDIO INPUT 16...

User Manual (English)
Page 14
... to select digital sub-channels. You can select Normal, Zoom, Wide, Cinema, Panorama, or Auto Zoom (TV mode only). To disconnect power, unplug the power cord. For more information, see "Creating a playback loop"...19 AUDIO 20 21 (eject) INPUT 22 ZOOM 23 CH /CH 24 25 RECALL FAVORITE 26 27 INFO PICTURE 28 29 AUDIO 30 31 EXIT 32 SETUP 33 A-B 34 SLOW 35 RETURN...insigniaproducts.com Press to eject a disc from the DVD player. Press to fast-reverse or fast-forward on -screen menus. Remote Control TV DVD INPUT 1 2 3 4 5 6 7 8 9 ZOOM 0 + VOL MTS/SAP CH RECALL CCD GUIDE FAVORITE ...
... to select digital sub-channels. You can select Normal, Zoom, Wide, Cinema, Panorama, or Auto Zoom (TV mode only). To disconnect power, unplug the power cord. For more information, see "Creating a playback loop"...19 AUDIO 20 21 (eject) INPUT 22 ZOOM 23 CH /CH 24 25 RECALL FAVORITE 26 27 INFO PICTURE 28 29 AUDIO 30 31 EXIT 32 SETUP 33 A-B 34 SLOW 35 RETURN...insigniaproducts.com Press to eject a disc from the DVD player. Press to fast-reverse or fast-forward on -screen menus. Remote Control TV DVD INPUT 1 2 3 4 5 6 7 8 9 ZOOM 0 + VOL MTS/SAP CH RECALL CCD GUIDE FAVORITE ...
User Manual (English)
Page 15
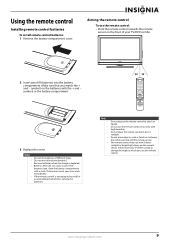
... objects, such as furniture, between the remote control and the remote sensor. www.insigniaproducts.com 9 symbols on the remote sensor. Remove batteries when the charge is not going to shock or liquids. If the remote control is depleted. Either move your TV/DVD combo or change the angle at ...which you match the + and - Aiming the remote control To use the remote control in direct sunlight. symbols in the battery compartment. 3 Replace...
... objects, such as furniture, between the remote control and the remote sensor. www.insigniaproducts.com 9 symbols on the remote sensor. Remove batteries when the charge is not going to shock or liquids. If the remote control is depleted. Either move your TV/DVD combo or change the angle at ...which you match the + and - Aiming the remote control To use the remote control in direct sunlight. symbols in the battery compartment. 3 Replace...
User Manual (English)
Page 16
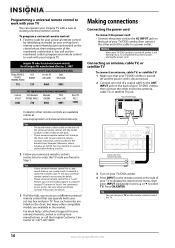
... COAXIAL Y CB/PB CR/PR R AUDIO L L R AUDIO L L OUTPUT COMPONENT2 INPUT R S-VIDEO INPUT R DVD VIDEO Antenna, cable TV, or satellite TV connection 3 Turn on your universal remote control's instructions for details. 3 If all Insignia TVs manufactured after Jan. 1, 2007) Universal remote control manufacturers and models Philips PHDVD5, PH5DSS, PMDVR8, PDVR8 RCA RCU807 One for other end of...
... COAXIAL Y CB/PB CR/PR R AUDIO L L R AUDIO L L OUTPUT COMPONENT2 INPUT R S-VIDEO INPUT R DVD VIDEO Antenna, cable TV, or satellite TV connection 3 Turn on your universal remote control's instructions for details. 3 If all Insignia TVs manufactured after Jan. 1, 2007) Universal remote control manufacturers and models Philips PHDVD5, PH5DSS, PMDVR8, PDVR8 RCA RCU807 One for other end of...
User Manual (English)
Page 17
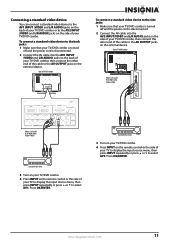
...R S-VIDEO INPUT R DVD VIDEO White=Left audio Red=Right audio Yellow=Video Standard video device 3 Turn on your TV/DVD combo. 4 Press INPUT on the remote control or the side of your TV to display the input source menu, then press INPUT repeatedly or press or to select AV2. To connect a standard...audio Yellow=Video HDMI3 INPUT FOR SERVICE ONLY VIDEO L AUDIO R AV2 INPUT Standard video device 3 Turn on your TV/DVD combo. 4 Press INPUT on the remote control or the side of your TV to display the input source menu, then press INPUT repeatedly or press or to select AV1. Connecting a standard ...
...R S-VIDEO INPUT R DVD VIDEO White=Left audio Red=Right audio Yellow=Video Standard video device 3 Turn on your TV/DVD combo. 4 Press INPUT on the remote control or the side of your TV to display the input source menu, then press INPUT repeatedly or press or to select AV2. To connect a standard...audio Yellow=Video HDMI3 INPUT FOR SERVICE ONLY VIDEO L AUDIO R AV2 INPUT Standard video device 3 Turn on your TV/DVD combo. 4 Press INPUT on the remote control or the side of your TV to display the input source menu, then press INPUT repeatedly or press or to select AV1. Connecting a standard ...
User Manual (English)
Page 18
... connect the other end of the cable to the corresponding audio jacks on the external device. 4 Turn on your TV/DVD combo. 5 Press INPUT on the remote control or the side of your TV to display the input source menu, then press INPUT repeatedly or press or to the corresponding component video jacks... connect the other end of the cable to the corresponding audio jacks on the external device. 4 Turn on your TV/DVD combo. 5 Press INPUT on the remote control or the side of your TV to display the input source menu, then press INPUT repeatedly or press or to the S-VIDEO OUT jack on...
... connect the other end of the cable to the corresponding audio jacks on the external device. 4 Turn on your TV/DVD combo. 5 Press INPUT on the remote control or the side of your TV to display the input source menu, then press INPUT repeatedly or press or to the corresponding component video jacks... connect the other end of the cable to the corresponding audio jacks on the external device. 4 Turn on your TV/DVD combo. 5 Press INPUT on the remote control or the side of your TV to display the input source menu, then press INPUT repeatedly or press or to the S-VIDEO OUT jack on...
User Manual (English)
Page 19
...HDMI2 VGA INPUT ANT. Connecting an HDMI device To connect an HDMI device: 1 Make sure that your TV/DVD combo is turned off and the power cord is disconnected. 2 Connect one end of an HDMI ... other end of the cable to the DVI OUT jack on the remote control or the side of your TV/DVD combo. 3 Turn on your TV to display the input source menu, then press INPUT repeatedly or press... or HDMI3. Separate analog audio cables are required. 4 Turn on your TV/DVD combo. 5 Press INPUT on the remote control or the side of TV/DVD combo ~ 120V 60Hz AC INPUT HDMI1 INPUT HDMI2 VGA INPUT ANT. ...
...HDMI2 VGA INPUT ANT. Connecting an HDMI device To connect an HDMI device: 1 Make sure that your TV/DVD combo is turned off and the power cord is disconnected. 2 Connect one end of an HDMI ... other end of the cable to the DVI OUT jack on the remote control or the side of your TV/DVD combo. 3 Turn on your TV to display the input source menu, then press INPUT repeatedly or press... or HDMI3. Separate analog audio cables are required. 4 Turn on your TV/DVD combo. 5 Press INPUT on the remote control or the side of TV/DVD combo ~ 120V 60Hz AC INPUT HDMI1 INPUT HDMI2 VGA INPUT ANT. ...
User Manual (English)
Page 20
... the LINE OUT jack on the computer. 4 Turn on your TV/DVD combo. 5 Press INPUT on the remote control or the side of your TV/DVD combo, then connect the other end of the cable into ...the LINE OUT jack on the computer. Back of TV/DVD combo ~ 120V 60Hz ...and audio. To connect a computer using an HDMI connection. To connect a computer: 1 Make sure that your TV/DVD combo is turned off and the power cord is disconnected. 2 Connect a VGA cable to select VGA. INPUT...
... the LINE OUT jack on the computer. 4 Turn on your TV/DVD combo. 5 Press INPUT on the remote control or the side of your TV/DVD combo, then connect the other end of the cable into ...the LINE OUT jack on the computer. Back of TV/DVD combo ~ 120V 60Hz ...and audio. To connect a computer using an HDMI connection. To connect a computer: 1 Make sure that your TV/DVD combo is turned off and the power cord is disconnected. 2 Connect a VGA cable to select VGA. INPUT...
User Manual (English)
Page 21
...~ 120V 60Hz AC INPUT HDMI1 INPUT HDMI2 VGA INPUT ANT. Connecting a standard sound system To connect a standard sound system: 1 Make sure that your TV/DVD combo is turned off and the power cord is disconnected. 2 Connect one end of a coaxial cable to the COAXIAL OUTPUT jack on the back... L COMPONENT2 INPUT White=Left audio Red=Right audio L R AUDIO L L OUTPUT LL R S-VIDEIONPIUNTP3UT R DVD VIDEO HDMI1 INPUT HDMI2 VGA INPUT ANT. 4 Turn on your TV/DVD combo. 5 Press INPUT on the remote control or the side of the cable to the COAXIAL IN jack on the external device.
...~ 120V 60Hz AC INPUT HDMI1 INPUT HDMI2 VGA INPUT ANT. Connecting a standard sound system To connect a standard sound system: 1 Make sure that your TV/DVD combo is turned off and the power cord is disconnected. 2 Connect one end of a coaxial cable to the COAXIAL OUTPUT jack on the back... L COMPONENT2 INPUT White=Left audio Red=Right audio L R AUDIO L L OUTPUT LL R S-VIDEIONPIUNTP3UT R DVD VIDEO HDMI1 INPUT HDMI2 VGA INPUT ANT. 4 Turn on your TV/DVD combo. 5 Press INPUT on the remote control or the side of the cable to the COAXIAL IN jack on the external device.
User Manual (English)
Page 22
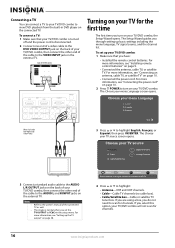
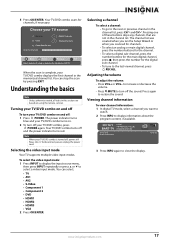
...when you do not need to scan for the first time The first time you have: • Installed the remote control batteries. For more information, see "Installing remote control batteries" on your TV/DVD combo. For more information, see "Connecting the power cord" on page 10. 2 Press POWER to ...turn on the external TV. If you are using an antenna for channels. 16 www.insigniaproducts.com If you through setting up the TV output" on ...
...when you do not need to scan for the first time The first time you have: • Installed the remote control batteries. For more information, see "Installing remote control batteries" on your TV/DVD combo. For more information, see "Connecting the power cord" on page 10. 2 Press POWER to ...turn on the external TV. If you are using an antenna for channels. 16 www.insigniaproducts.com If you through setting up the TV output" on ...
User Manual (English)
Page 23
... combo on and off your TV/DVD combo is complete, your TV source Antenna 0 Cable 0 Cable/Satellite box Scan for channels Digital Channels Analog Channels Move OK Select ENTER MENU Previous EXIT Exit Select Antenna if using the remote control. You can stop the scan by pressing EXIT. Adjusting the volume... To adjust the volume: • Press VOL+ or VOL- to increase or decrease the volume. • Press MUTE to turn off To turn your TV/DVD combo on using an antenna...
... combo on and off your TV/DVD combo is complete, your TV source Antenna 0 Cable 0 Cable/Satellite box Scan for channels Digital Channels Analog Channels Move OK Select ENTER MENU Previous EXIT Exit Select Antenna if using the remote control. You can stop the scan by pressing EXIT. Adjusting the volume... To adjust the volume: • Press VOL+ or VOL- to increase or decrease the volume. • Press MUTE to turn off To turn your TV/DVD combo on using an antenna...
User Manual (English)
Page 26
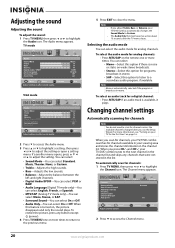
...TV mode only)-You can select Mono, Stereo, or SAP. • Surround Sound-You can select On or Off. • Audio Only-You can select: • Mono-Select this option if there is turned on the remote... one or more times. To restore the picture, press any channels that were not stored in stereo. • SAP-Select this feature is noise or static on page 16. Selecting the audio mode You can select the audio mode for channels unless the available channels changed after the TV...When you adjust Treble, Bass, or Balance, your TV/DVD combo tunes to Custom. Channel Antenna/Cable ...
...TV mode only)-You can select Mono, Stereo, or SAP. • Surround Sound-You can select On or Off. • Audio Only-You can select: • Mono-Select this option if there is turned on the remote... one or more times. To restore the picture, press any channels that were not stored in stereo. • SAP-Select this feature is noise or static on page 16. Selecting the audio mode You can select the audio mode for channels unless the available channels changed after the TV...When you adjust Treble, Bass, or Balance, your TV/DVD combo tunes to Custom. Channel Antenna/Cable ...
User Manual (English)
Page 40
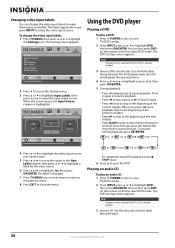
... Input Source column is changed. 7 Press TV MENU one or more times to return to the previous menu. 8 Press EXIT to turn on the remote control to highlight Yes, then press OK/...ENTER. The label is highlighted. When you want to label. 5 Press or to move the cursor to the New Label column, then press or to highlight a label for the devices connected to your TV...labels to make them easier to play a DVD: 1 Press POWER to turn on the remote control to highlight DVD, then press OK/ENTER. Settings Parental Controls Time Menu Settings Input ...
... Input Source column is changed. 7 Press TV MENU one or more times to return to the previous menu. 8 Press EXIT to turn on the remote control to highlight Yes, then press OK/...ENTER. The label is highlighted. When you want to label. 5 Press or to move the cursor to the New Label column, then press or to highlight a label for the devices connected to your TV...labels to make them easier to play a DVD: 1 Press POWER to turn on the remote control to highlight DVD, then press OK/ENTER. Settings Parental Controls Time Menu Settings Input ...
User Manual (English)
Page 50
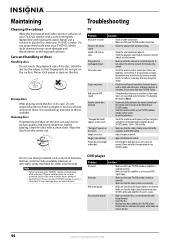
... features because it to dry out. 44 www.insigniaproducts.com Picture has snow • Check the antenna and its case. "No Signal" appears on an LCD screen are problems, correct them. Picture has a few bright or dark dots • A few bright or dark dots on the screen • Make ... screen • Check the resolution and frequency of heat, and never leave it may have condensed in the DVD player. Remote control does not work • Remove obstacles between your TV/DVD combo in such a situation, it in its connection. Remove the disc and leave the player on the front of...
... features because it to dry out. 44 www.insigniaproducts.com Picture has snow • Check the antenna and its case. "No Signal" appears on an LCD screen are problems, correct them. Picture has a few bright or dark dots • A few bright or dark dots on the screen • Make ... screen • Check the resolution and frequency of heat, and never leave it may have condensed in the DVD player. Remote control does not work • Remove obstacles between your TV/DVD combo in such a situation, it in its connection. Remove the disc and leave the player on the front of...
User Manual (English)
Page 51
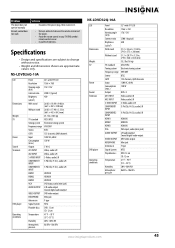
... remote control and the player. • Point the remote control at your TV/DVD combo's remote control sensor. • Install fresh batteries. Specifications • Design and specifications are subject to change without notice. • Weight and dimensions shown are approximate values only. NS-LDVD26Q-10A LCD Dimensions Weight TV ...Antenna in Signal System Playable discs Temperature Humidity Atmospheric pressure 26"-wide TFT LCD 1366 × 768 176°/176° 2500:1 (typical) 450 26.02 × 18.98 × 9.06 in. (661 × 482 × 230 mm) 26.02 × 17.40 × 3.33 in...
... remote control and the player. • Point the remote control at your TV/DVD combo's remote control sensor. • Install fresh batteries. Specifications • Design and specifications are subject to change without notice. • Weight and dimensions shown are approximate values only. NS-LDVD26Q-10A LCD Dimensions Weight TV ...Antenna in Signal System Playable discs Temperature Humidity Atmospheric pressure 26"-wide TFT LCD 1366 × 768 176°/176° 2500:1 (typical) 450 26.02 × 18.98 × 9.06 in. (661 × 482 × 230 mm) 26.02 × 17.40 × 3.33 in...


