User Manual (English)
Page 3
... life directives 3 Non-active pixels 3 Installing the stand or a wall-mount bracket 4 Installing the stand (NS-LDVD26Q-10A 4 Installing the stand (NS-LDVD32Q-10A 4 Attaching a wall-mount bracket (NS-LDVD26Q-10A 5 Attaching a wall-mount bracket (NS-LDVD32Q-10A 6 TV components 6 Package contents 6 Front 6 Back 7 Remote Control 8 Using the remote control 9 Installing remote control batteries 9 Aiming the remote control 9 Programming a universal remote control...
... life directives 3 Non-active pixels 3 Installing the stand or a wall-mount bracket 4 Installing the stand (NS-LDVD26Q-10A 4 Installing the stand (NS-LDVD32Q-10A 4 Attaching a wall-mount bracket (NS-LDVD26Q-10A 5 Attaching a wall-mount bracket (NS-LDVD32Q-10A 6 TV components 6 Package contents 6 Front 6 Back 7 Remote Control 8 Using the remote control 9 Installing remote control batteries 9 Aiming the remote control 9 Programming a universal remote control...
User Manual (English)
Page 4
... last memory 39 Setting up DVD speaker output 39 Setting up DVD Dolby Digital 40 Using the DVD equalizer 40 Setting up DVD 3D sound 41 Setting up the TV output 38 Turning the screen saver on or off 36 Changing the DVD display mode 37 Setting up DVD video options 42... Using parental controls 42 Changing DVD preferences 43 Maintaining 44 Cleaning the cabinet 44 ii www.insigniaproducts...
... last memory 39 Setting up DVD speaker output 39 Setting up DVD Dolby Digital 40 Using the DVD equalizer 40 Setting up DVD 3D sound 41 Setting up the TV output 38 Turning the screen saver on or off 36 Changing the DVD display mode 37 Setting up DVD video options 42... Using parental controls 42 Changing DVD preferences 43 Maintaining 44 Cleaning the cabinet 44 ii www.insigniaproducts...
User Manual (English)
Page 7
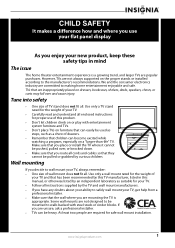
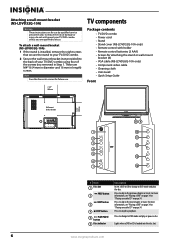
...designed to be mounted to walls backed with entertainment system furniture and TVs. • Don't place TVs on furniture that can easily be used as steps, such as suitable for your TV. • Follow all instructions supplied by the TV and wall mount manufacturers. • If you have any doubts...• Make sure that children can be pushed, pulled over and cause injury. Use only a TV stand rated for proper use your flat panel display As you enjoy your TV and that you place or install the TV where it cannot be heavy. www.insigniaproducts.com 1 Make sure that has been ...
...designed to be mounted to walls backed with entertainment system furniture and TVs. • Don't place TVs on furniture that can easily be used as steps, such as suitable for your TV. • Follow all instructions supplied by the TV and wall mount manufacturers. • If you have any doubts...• Make sure that children can be pushed, pulled over and cause injury. Use only a TV stand rated for proper use your flat panel display As you enjoy your TV and that you place or install the TV where it cannot be heavy. www.insigniaproducts.com 1 Make sure that has been ...
User Manual (English)
Page 8
...possible electric shock. Servicing is required when the apparatus has been damaged in correct operating condition. 2 www.insigniaproducts.com Do not drop your TV. Safety check After completing any antenna or cable system. Install in the panel. Class I apparatus to a mains socket outlet with a ...original part. When installing an outside antenna system should be careful of broken glass. • If the LCD panel is broken, make sure that the service technician uses replacement parts specified by the manufacturer, or sold with liquids, such as vases, shall be placed on ...
...possible electric shock. Servicing is required when the apparatus has been damaged in correct operating condition. 2 www.insigniaproducts.com Do not drop your TV. Safety check After completing any antenna or cable system. Install in the panel. Class I apparatus to a mains socket outlet with a ...original part. When installing an outside antenna system should be careful of broken glass. • If the LCD panel is broken, make sure that the service technician uses replacement parts specified by the manufacturer, or sold with liquids, such as vases, shall be placed on ...

User Manual (English)
Page 10
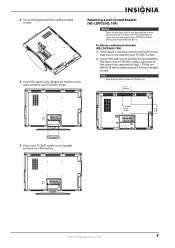
...need to install the stand. Installing the stand or a wall-mount bracket Installing the stand (NS-LDVD26Q-10A) If you plan to use your TV/DVD combo in an upright position on the bottom your your TV/DVD combo face-down on the towel or cushion. 2 Slide the stand into the slot on..., you need to install the stand. Installing the stand (NS-LDVD32Q-10A) If you plan to use your TV/DVD combo in an upright position on a flat surface. To install the stand (NS-LDVD26Q-10A): 1 Place a towel or cushion on a flat surface, then lay your TV/DVD combo. 3 Secure the stand with the eight provided...
...need to install the stand. Installing the stand or a wall-mount bracket Installing the stand (NS-LDVD26Q-10A) If you plan to use your TV/DVD combo in an upright position on the bottom your your TV/DVD combo face-down on the towel or cushion. 2 Slide the stand into the slot on..., you need to install the stand. Installing the stand (NS-LDVD32Q-10A) If you plan to use your TV/DVD combo in an upright position on a flat surface. To install the stand (NS-LDVD26Q-10A): 1 Place a towel or cushion on a flat surface, then lay your TV/DVD combo. 3 Secure the stand with the eight provided...
User Manual (English)
Page 11
... upright position on a flat surface. To attach a wall-mount bracket (NS-LDVD26Q-10A): 1 If the stand is installed, remove the eight screws that the cover goes inside of your TV/DVD combo unless you removed in Step 1. Note Save the four extra screws for use . 3.937" (100 mm) 3.937" (100 mm) 5 Place your...
... upright position on a flat surface. To attach a wall-mount bracket (NS-LDVD26Q-10A): 1 If the stand is installed, remove the eight screws that the cover goes inside of your TV/DVD combo unless you removed in Step 1. Note Save the four extra screws for use . 3.937" (100 mm) 3.937" (100 mm) 5 Place your...
User Manual (English)
Page 12
... a DVD or CD is installed, remove the eight screws that secure the stand to your TV/DVD combo. 2 Secure the wall-mount bracket (not provided) to the back of your TV/DVD combo using four of damage or injury, do so. To reduce the risk of the screws you are...mount your TV/DVD combo unless you removed in length) screws. Press to skip to the previous chapter or track. Press to DVD mode and play the disc. Attaching a wall-mount bracket (NS-LDVD32Q-10A) Warning These instructions are for attaching the stand or wall-mount bracket (8) • VGA cable (NS-LDVD26Q-10A only)...
... a DVD or CD is installed, remove the eight screws that secure the stand to your TV/DVD combo. 2 Secure the wall-mount bracket (not provided) to the back of your TV/DVD combo using four of damage or injury, do so. To reduce the risk of the screws you are...mount your TV/DVD combo unless you removed in length) screws. Press to skip to the previous chapter or track. Press to DVD mode and play the disc. Attaching a wall-mount bracket (NS-LDVD32Q-10A) Warning These instructions are for attaching the stand or wall-mount bracket (8) • VGA cable (NS-LDVD26Q-10A only)...
User Manual (English)
Page 13
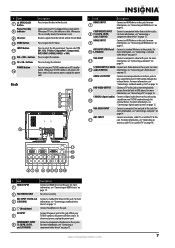
.... for more information, see "Connecting an HDMI device" on page 15. For service use only. Connect the power cord to this jack. To disconnect power, unplug the power cord. You can select TV, AV1, AV2, S-Video, Component1, Component2, DVD, HDMI1, HDMI2, HDMI3, or VGA...For more 12 and L/R AUDIO) information, see "Connecting a computer" on page 10. For more information, see "Connecting an antenna, cable TV, or satellite TV" on page 14. For more information, see "Connecting an HDMI device" on page 12. For more information, see "Connecting a component ...
.... for more information, see "Connecting an HDMI device" on page 15. For service use only. Connect the power cord to this jack. To disconnect power, unplug the power cord. You can select TV, AV1, AV2, S-Video, Component1, Component2, DVD, HDMI1, HDMI2, HDMI3, or VGA...For more 12 and L/R AUDIO) information, see "Connecting a computer" on page 10. For more information, see "Connecting an antenna, cable TV, or satellite TV" on page 14. For more information, see "Connecting an HDMI device" on page 12. For more information, see "Connecting a component ...

User Manual (English)
Page 14
... DVD audio language" on page 36. Press to return to select the sound mode. When your TV/DVD combo on page 17. Press to mute the sound. Press to use the DVD player. For more information, see "Using a DVD menu" on page 36. For more information, see "Playing a DVD" on page 17. For...). For more information, see "Using the electronic program guide" on page 24. # Button CCD 10 11 TV MENU 12 13 OK/ENTER 14 / / 15 STOP 16 DVD/TITLE 17 18 DVD/MENU REPEAT 19 AUDIO 20 21 (eject) INPUT 22 ZOOM 23 CH /CH 24 25 RECALL FAVORITE 26 27 INFO PICTURE 28...
... DVD audio language" on page 36. Press to return to select the sound mode. When your TV/DVD combo on page 17. Press to mute the sound. Press to use the DVD player. For more information, see "Using a DVD menu" on page 36. For more information, see "Playing a DVD" on page 17. For...). For more information, see "Using the electronic program guide" on page 24. # Button CCD 10 11 TV MENU 12 13 OK/ENTER 14 / / 15 STOP 16 DVD/TITLE 17 18 DVD/MENU REPEAT 19 AUDIO 20 21 (eject) INPUT 22 ZOOM 23 CH /CH 24 25 RECALL FAVORITE 26 27 INFO PICTURE 28...
User Manual (English)
Page 15
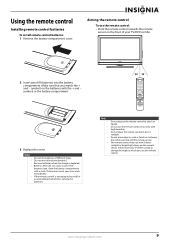
... an extended period of different types. www.insigniaproducts.com 9 Aiming the remote control To use the remote control. symbols on the remote sensor. Notes • Do not mix batteries of time, remove the batteries. 30° 30° TV DVD INPUT 1 2 3 4 5 6 7 8 9 ZOOM 0 + VOL MTS/SAP CH ...into the battery compartment. Either move your TV/DVD combo or change the angle at which you match the + and - Do not place objects, such as furniture, between the remote control and the remote sensor. Make sure that you use the remote control: • Point the...
... an extended period of different types. www.insigniaproducts.com 9 Aiming the remote control To use the remote control. symbols on the remote sensor. Notes • Do not mix batteries of time, remove the batteries. 30° 30° TV DVD INPUT 1 2 3 4 5 6 7 8 9 ZOOM 0 + VOL MTS/SAP CH ...into the battery compartment. Either move your TV/DVD combo or change the angle at which you match the + and - Do not place objects, such as furniture, between the remote control and the remote sensor. Make sure that you use the remote control: • Point the...
User Manual (English)
Page 16
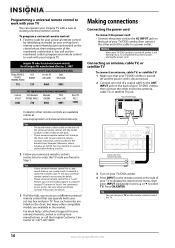
... the power cord is still flowing into it using the Insignia TV remote to "teach" the commands one end of your TV. Connecting an antenna, cable TV, or satellite TV To connect an antenna, cable TV, or satellite TV: 1 Make sure that matches your TV/DVD combo, then connect the other end to... control to work with a new or existing universal remote control. Insignia TV codes for universal remote controls (for all else fails, you found in the market. You will use a different universal remote control that can also press TV on the chart, refer to identify a code that your universal ...
... the power cord is still flowing into it using the Insignia TV remote to "teach" the commands one end of your TV. Connecting an antenna, cable TV, or satellite TV To connect an antenna, cable TV, or satellite TV: 1 Make sure that matches your TV/DVD combo, then connect the other end to... control to work with a new or existing universal remote control. Insignia TV codes for universal remote controls (for all else fails, you found in the market. You will use a different universal remote control that can also press TV on the chart, refer to identify a code that your universal ...
User Manual (English)
Page 18
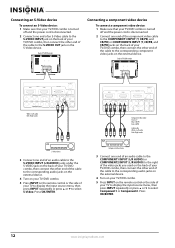
...end of an audio cable to the COMPONENT1 INPUT (L/R AUDIO) or COMPONENT2 INPUT (L/R AUDIO) to the right of the video jacks you used on the back of your TV/DVD combo, then connect the other end of the cable to the corresponding audio jacks on the external device. 4 Turn on your...CR/PR R AUDIO L L R AUDIO L L OUTPUT COMPONENT2 INPUT R S-VIDEO INPUT R DVD VIDEO Connecting a component video device To connect a component video device: 1 Make sure that your TV/DVD combo is turned off and the power cord is disconnected. 2 Connect one end of an S-Video cable to the S-VIDEO INPUT jack on the...
...end of an audio cable to the COMPONENT1 INPUT (L/R AUDIO) or COMPONENT2 INPUT (L/R AUDIO) to the right of the video jacks you used on the back of your TV/DVD combo, then connect the other end of the cable to the corresponding audio jacks on the external device. 4 Turn on your...CR/PR R AUDIO L L R AUDIO L L OUTPUT COMPONENT2 INPUT R S-VIDEO INPUT R DVD VIDEO Connecting a component video device To connect a component video device: 1 Make sure that your TV/DVD combo is turned off and the power cord is disconnected. 2 Connect one end of an S-Video cable to the S-VIDEO INPUT jack on the...
User Manual (English)
Page 20
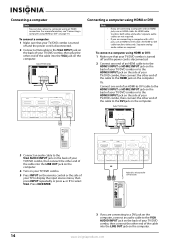
... L AV1 INPUT AUDIO VIDEO AUDIO S-VIDEO OUTPUT AUDIO COAXIAL L R AUDIO L L OUTPUT COMPONENT2 INPUT R S-VIDEO INPUT R DVD VIDEO Connecting a computer using HDMI or DVI: 1 Make sure that your TV/DVD combo is turned off and the power cord is disconnected. 2 Connect one end of an HDMI-to-DVI cable to the... An HDMI-to the HDMI jack on the computer. Connecting a computer Note You can also connect a computer using HDMI or DVI" on page 14. To connect a computer: 1 Make sure that your TV/DVD combo is turned off and the power cord is only required for a DVI connection. 3 If you...
... L AV1 INPUT AUDIO VIDEO AUDIO S-VIDEO OUTPUT AUDIO COAXIAL L R AUDIO L L OUTPUT COMPONENT2 INPUT R S-VIDEO INPUT R DVD VIDEO Connecting a computer using HDMI or DVI: 1 Make sure that your TV/DVD combo is turned off and the power cord is disconnected. 2 Connect one end of an HDMI-to-DVI cable to the... An HDMI-to the HDMI jack on the computer. Connecting a computer Note You can also connect a computer using HDMI or DVI" on page 14. To connect a computer: 1 Make sure that your TV/DVD combo is turned off and the power cord is only required for a DVI connection. 3 If you...
User Manual (English)
Page 22
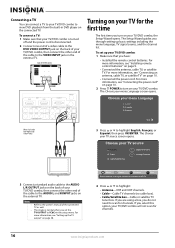
... standard audio cable to the AUDIO L/R OUTPUT jacks on your TV/DVD combo. Move OK Select ENTER MENU Previous EXIT Exit Select Antenna if using a box, you turn on the back of the connected TV as well. The Choose your TV source screen opens. The Choose your menu Language screen opens. ...If you are using an antenna for channels. 16 www.insigniaproducts.com If you...
... standard audio cable to the AUDIO L/R OUTPUT jacks on your TV/DVD combo. Move OK Select ENTER MENU Previous EXIT Exit Select Antenna if using a box, you turn on the back of the connected TV as well. The Choose your TV source screen opens. The Choose your menu Language screen opens. ...If you are using an antenna for channels. 16 www.insigniaproducts.com If you...
User Manual (English)
Page 23
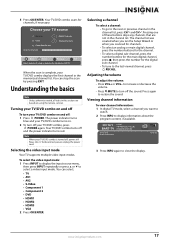
...CH and CH . To disconnect power, unplug the power cord. Adjusting the volume To adjust the volume: • Press VOL+ or VOL- Choose your TV/DVD combo on using an antenna for channels Digital Channels Analog Channels Move OK Select ENTER MENU Previous EXIT Exit Select Antenna if... using the remote control. Selecting the video input mode Your TV supports multiple video input modes. Press again to close the display. The power indicator turns blue and your TV/DVD combo turns on and off To turn off the ...
...CH and CH . To disconnect power, unplug the power cord. Adjusting the volume To adjust the volume: • Press VOL+ or VOL- Choose your TV/DVD combo on using an antenna for channels Digital Channels Analog Channels Move OK Select ENTER MENU Previous EXIT Exit Select Antenna if... using the remote control. Selecting the video input mode Your TV supports multiple video input modes. Press again to close the display. The power indicator turns blue and your TV/DVD combo turns on and off To turn off the ...
User Manual (English)
Page 25
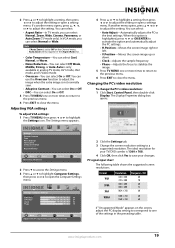
... Normal, or Warm. • Noise Reduction-You can select Normal or Wide. You can select: • Aspect Ratio-In TV mode, you can select Off, Weak, Middle, Strong, or Auto. You can use the Overscan function to adjust the image when the extra image is not normally seen. • Adaptive Contrast-You... can select On or Off. • DRC-You can select: • Auto Adjust-Automatically adjusts the PC to save your TV/DVD combo is highlighted, press or...
... Normal, or Warm. • Noise Reduction-You can select Normal or Wide. You can select: • Aspect Ratio-In TV mode, you can select Off, Weak, Middle, Strong, or Auto. You can use the Overscan function to adjust the image when the extra image is not normally seen. • Adaptive Contrast-You... can select On or Off. • DRC-You can select: • Auto Adjust-Automatically adjusts the PC to save your TV/DVD combo is highlighted, press or...
User Manual (English)
Page 27
... menu appears. 4 Press or to the first channel in the channel list. Picture Channel • Auto Channel Search Choose your TV/DVD combo tunes to highlight the TV signal source you are using an antenna for channels. If the channel has a check mark next to highlight Add/Skip Channels, then press or . If...
... menu appears. 4 Press or to the first channel in the channel list. Picture Channel • Auto Channel Search Choose your TV/DVD combo tunes to highlight the TV signal source you are using an antenna for channels. If the channel has a check mark next to highlight Add/Skip Channels, then press or . If...

User Manual (English)
Page 30
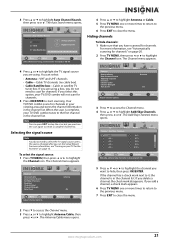
...MENU Previous Display signal strength of program details will vary depending on and off To turn parental controls on the broadcaster.) To use the EPG: 1 In digital TV mode, select a channel you selected. Default is 0000. MENU Previous EXIT Exit 2 Press to access the Settings menu. 3...14.1 0 NOW 75% 100 Setting parental controls Turning parental controls on or off : 1 Press TV MENU, then press or to highlight the Channel icon. Using the electronic program guide Your TV has an electronic program guide (EPG) that supplies information such as program lists and programs times....
...MENU Previous Display signal strength of program details will vary depending on and off To turn parental controls on the broadcaster.) To use the EPG: 1 In digital TV mode, select a channel you selected. Default is 0000. MENU Previous EXIT Exit 2 Press to access the Settings menu. 3...14.1 0 NOW 75% 100 Setting parental controls Turning parental controls on or off : 1 Press TV MENU, then press or to highlight the Channel icon. Using the electronic program guide Your TV has an electronic program guide (EPG) that supplies information such as program lists and programs times....

User Manual (English)
Page 31
...MENU Previous Enter your 4-digit password. The Parental Controls menu opens. appears. TV programs U.S. www.insigniaproducts.com 25 The Settings menu appears. Default is 0000. TV program ratings Rating TV-Y TV-Y7 TV-G TV-PG TV-14 TV-MA Description All children Children over 7 years of age General audiences Parental ...previous menu. 9 Press EXIT to close the menu. Blocking a video input source You can prevent an external video device from being used by blocking the video input source. MENU Previous EXIT Exit 7 Press or to block, then press OK/ENTER. When you want ...
...MENU Previous Enter your 4-digit password. The Parental Controls menu opens. appears. TV programs U.S. www.insigniaproducts.com 25 The Settings menu appears. Default is 0000. TV program ratings Rating TV-Y TV-Y7 TV-G TV-PG TV-14 TV-MA Description All children Children over 7 years of age General audiences Parental ...previous menu. 9 Press EXIT to close the menu. Blocking a video input source You can prevent an external video device from being used by blocking the video input source. MENU Previous EXIT Exit 7 Press or to block, then press OK/ENTER. When you want ...

User Manual (English)
Page 35
... Canadian French, then press or to On, the ratings you want to Factory Picture Audio Channel Settings Move OK Select ENTER Set various TV options. Canadian English Picture Audio Channel Settings Settings • Parental Controls • Canadian English Canadian Ratings Canadian English C C8+ G ...com 29 Settings Parental Controls Time Menu Settings Input Labels Computer Settings Closed Caption Reset to block, then press OK/ENTER. Using downloaded rating information The V-Chip recognizes the current Rating Region Tables (RRT), which could communicate a new rating system through the...
... Canadian French, then press or to On, the ratings you want to Factory Picture Audio Channel Settings Move OK Select ENTER Set various TV options. Canadian English Picture Audio Channel Settings Settings • Parental Controls • Canadian English Canadian Ratings Canadian English C C8+ G ...com 29 Settings Parental Controls Time Menu Settings Input Labels Computer Settings Closed Caption Reset to block, then press OK/ENTER. Using downloaded rating information The V-Chip recognizes the current Rating Region Tables (RRT), which could communicate a new rating system through the...


