User Manual (English)
Page 3
... the stand (NS-LDVD26Q-10A 4 Installing the stand (NS-LDVD32Q-10A 4 Attaching a wall-mount bracket (NS-LDVD26Q-10A 5 Attaching a wall-mount bracket (NS-LDVD32Q-10A 6 TV components 6 Package contents 6 Front 6 Back 7 Remote Control 8 Using the remote control 9 Installing remote control batteries 9 Aiming the remote control 9 Programming a universal remote control to work with your TV . . . 10 Making connections 10 Connecting the power cord 10...
... the stand (NS-LDVD26Q-10A 4 Installing the stand (NS-LDVD32Q-10A 4 Attaching a wall-mount bracket (NS-LDVD26Q-10A 5 Attaching a wall-mount bracket (NS-LDVD32Q-10A 6 TV components 6 Package contents 6 Front 6 Back 7 Remote Control 8 Using the remote control 9 Installing remote control batteries 9 Aiming the remote control 9 Programming a universal remote control to work with your TV . . . 10 Making connections 10 Connecting the power cord 10...
User Manual (English)
Page 8
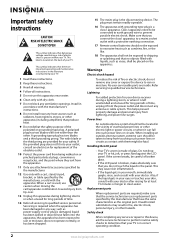
.... Make sure that you do not remove any antenna or cable system. Lightning For added protection for your TV. Handling the LCD panel • Your TV's screen is made of time, unplug it from the power outlet and disconnect any cover or expose the device to avoid injury from touching such... power lines or circuits as the original part. This may result in fire, electric shock, personal injury, or other hazards....
.... Make sure that you do not remove any antenna or cable system. Lightning For added protection for your TV. Handling the LCD panel • Your TV's screen is made of time, unplug it from the power outlet and disconnect any cover or expose the device to avoid injury from touching such... power lines or circuits as the original part. This may result in fire, electric shock, personal injury, or other hazards....

User Manual (English)
Page 9
... conductors, location of the antenna-discharge unit, connection to grounding electrodes, and requirements for correct grounding. Non-active pixels The LCD panel contains almost 3 million thin film transistors, which provide exceptionally sharp video quality. Cautions Damage requiring service Unplug this , let the... These non-active pixels do not adversely affect the performance of other controls may appear on the TV if the TV is connected to your TV, and are not sure of the type of power source indicated on , or make sure that can be impaired. Specifically, it on the marking...
... conductors, location of the antenna-discharge unit, connection to grounding electrodes, and requirements for correct grounding. Non-active pixels The LCD panel contains almost 3 million thin film transistors, which provide exceptionally sharp video quality. Cautions Damage requiring service Unplug this , let the... These non-active pixels do not adversely affect the performance of other controls may appear on the TV if the TV is connected to your TV, and are not sure of the type of power source indicated on , or make sure that can be impaired. Specifically, it on the marking...
User Manual (English)
Page 12
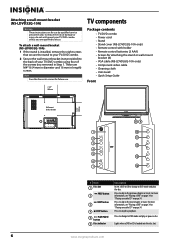
...and play or pause a disc. Note Save the four extra screws for attaching the stand or wall-mount bracket (8) • VGA cable (NS-LDVD26Q-10A only) • Component video cable • Cleaning cloth • User Guide • Quick Setup Guide Front Wall-mount bracket location 7.878... combo unless you removed in length) screws. These are for use . 7.878" 200 mm TV components Package contents • TV/DVD combo • Power cord • Stand • Stand cover (NS-LDVD32Q-10A only) • Remote control with holder • Remote control batteries (2 AAA) • Screws for ...
...and play or pause a disc. Note Save the four extra screws for attaching the stand or wall-mount bracket (8) • VGA cable (NS-LDVD26Q-10A only) • Component video cable • Cleaning cloth • User Guide • Quick Setup Guide Front Wall-mount bracket location 7.878... combo unless you removed in length) screws. These are for use . 7.878" 200 mm TV components Package contents • TV/DVD combo • Power cord • Stand • Stand cover (NS-LDVD32Q-10A only) • Remote control with holder • Remote control batteries (2 AAA) • Screws for ...
User Manual (English)
Page 13
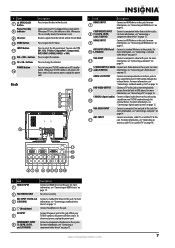
... HDMI device to this jack. For more information, see "Connecting a standard video device" on page 13. When your TV is blue. To disconnect power, unplug the power cord. AV1 INPUT (VIDEO and Connect a standard AV device to these jacks. INPUT button 11 12 VOL+/VOL- ... a standard video device" on page 16. When your TV/DVD combo is off, power still flows into a power outlet. For more information, see "Connecting a TV" on page 11. Press to open the TV menu. # Item 7 OPEN/CLOSE button Power/Standby 8 indicator 9 IR sensor Description Press to this ...
... HDMI device to this jack. For more information, see "Connecting a standard video device" on page 13. When your TV is blue. To disconnect power, unplug the power cord. AV1 INPUT (VIDEO and Connect a standard AV device to these jacks. INPUT button 11 12 VOL+/VOL- ... a standard video device" on page 16. When your TV/DVD combo is off, power still flows into a power outlet. For more information, see "Connecting a TV" on page 11. Press to open the TV menu. # Item 7 OPEN/CLOSE button Power/Standby 8 indicator 9 IR sensor Description Press to this ...

User Manual (English)
Page 14
... 19 AUDIO 20 21 (eject) INPUT 22 ZOOM 23 CH /CH 24 25 RECALL FAVORITE 26 27 INFO PICTURE 28 29 AUDIO 30 31 EXIT 32 SETUP 33 A-B 34 SLOW 35 RETURN 36 SUBTITLE... Description Press to turn your TV/DVD combo is off, power still flows into it. Press to play " on -screen menu. For more information, see .... Press to display information about closed captioning, see "Adjusting the sound" on -screen menu. To disconnect power, unplug the power cord. Press to select options and to open a DVD menu, if available. Press to go the last...
... 19 AUDIO 20 21 (eject) INPUT 22 ZOOM 23 CH /CH 24 25 RECALL FAVORITE 26 27 INFO PICTURE 28 29 AUDIO 30 31 EXIT 32 SETUP 33 A-B 34 SLOW 35 RETURN 36 SUBTITLE... Description Press to turn your TV/DVD combo is off, power still flows into it. Press to play " on -screen menu. For more information, see .... Press to display information about closed captioning, see "Adjusting the sound" on -screen menu. To disconnect power, unplug the power cord. Press to select options and to open a DVD menu, if available. Press to go the last...
User Manual (English)
Page 16
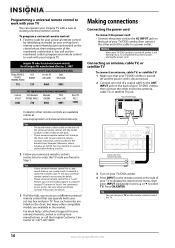
...Zenith. You will use a different universal remote control that your TV/DVD combo is turned off , power is often visible on the back. • If your universal remote control isn't listed on the charts below it using the Insignia TV remote to "teach" the commands one end of the cable to... a power outlet. Connecting an antenna, cable TV, or satellite TV To connect an antenna, cable TV, or satellite TV: 1 Make sure that can also press TV on the chart, but many other end of...
...Zenith. You will use a different universal remote control that your TV/DVD combo is turned off , power is often visible on the back. • If your universal remote control isn't listed on the charts below it using the Insignia TV remote to "teach" the commands one end of the cable to... a power outlet. Connecting an antenna, cable TV, or satellite TV To connect an antenna, cable TV, or satellite TV: 1 Make sure that can also press TV on the chart, but many other end of...
User Manual (English)
Page 17
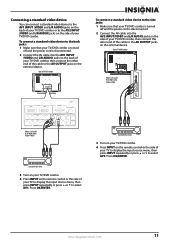
... a standard video device to the back jacks: 1 Make sure that your TV/DVD combo is turned off and the power cord is disconnected. 2 Connect the AV cable into the AV1 INPUT (VIDEO and L/R AUDIO) jacks on the back of your TV/DVD combo, then connect the other end of the cable to the... ~ 120V 60Hz AC INPUT HDMI1 INPUT HDMI2 VGA INPUT ANT. To connect a standard video device to the side jacks: 1 Make sure that your TV/DVD combo is turned off and the power cord is disconnected. 2 Connect the AV cable into the AV2 INPUT(VIDEO and L/R AUDIO) jacks on the side of your...
... a standard video device to the back jacks: 1 Make sure that your TV/DVD combo is turned off and the power cord is disconnected. 2 Connect the AV cable into the AV1 INPUT (VIDEO and L/R AUDIO) jacks on the back of your TV/DVD combo, then connect the other end of the cable to the... ~ 120V 60Hz AC INPUT HDMI1 INPUT HDMI2 VGA INPUT ANT. To connect a standard video device to the side jacks: 1 Make sure that your TV/DVD combo is turned off and the power cord is disconnected. 2 Connect the AV cable into the AV2 INPUT(VIDEO and L/R AUDIO) jacks on the side of your...
User Manual (English)
Page 18
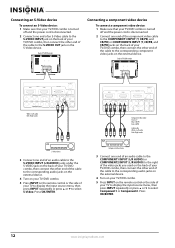
...R AUDIO L L OUTPUT COMPONENT2 INPUT R S-VIDEO INPUT R DVD VIDEO Connecting a component video device To connect a component video device: 1 Make sure that your TV/DVD combo is turned off and the power cord is disconnected. 2 Connect one end of an S-Video cable to the S-VIDEO INPUT jack on the back of your... HDMI1 INPUT HDMI2 VGA INPUT ANT. Connecting an S-Video device To connect an S-Video device: 1 Make sure that your TV/DVD combo is turned off and the power cord is disconnected. 2 Connect one end of the component video cable to the COMPONENT1 INPUT (Y, CB/PB, and CR/PR...
...R AUDIO L L OUTPUT COMPONENT2 INPUT R S-VIDEO INPUT R DVD VIDEO Connecting a component video device To connect a component video device: 1 Make sure that your TV/DVD combo is turned off and the power cord is disconnected. 2 Connect one end of an S-Video cable to the S-VIDEO INPUT jack on the back of your... HDMI1 INPUT HDMI2 VGA INPUT ANT. Connecting an S-Video device To connect an S-Video device: 1 Make sure that your TV/DVD combo is turned off and the power cord is disconnected. 2 Connect one end of the component video cable to the COMPONENT1 INPUT (Y, CB/PB, and CR/PR...
User Manual (English)
Page 19
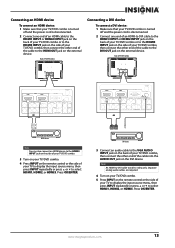
... on the external device. Note An HDMI-to-DVI cable transfers video only. Back of TV/DVD combo Connecting a DVI device To connect a DVI device: 1 Make sure that your TV/DVD combo is turned off and the power cord is disconnected. 2 Connect one end of an HDMI-to DVI cable to the HDMI1... press or to select HDMI1, HDMI2, or HDMI3. Connecting an HDMI device To connect an HDMI device: 1 Make sure that your TV/DVD combo is turned off and the power cord is disconnected. 2 Connect one end of an HDMI cable to the HDMI1 INPUT or HDMI2 INPUT jack on the back of...
... on the external device. Note An HDMI-to-DVI cable transfers video only. Back of TV/DVD combo Connecting a DVI device To connect a DVI device: 1 Make sure that your TV/DVD combo is turned off and the power cord is disconnected. 2 Connect one end of an HDMI-to DVI cable to the HDMI1... press or to select HDMI1, HDMI2, or HDMI3. Connecting an HDMI device To connect an HDMI device: 1 Make sure that your TV/DVD combo is turned off and the power cord is disconnected. 2 Connect one end of an HDMI cable to the HDMI1 INPUT or HDMI2 INPUT jack on the back of...
User Manual (English)
Page 20
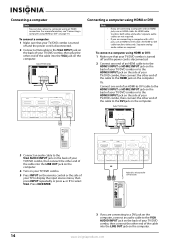
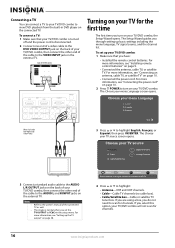
...AUDIO COAXIAL L R AUDIO L L OUTPUT COMPONENT2 INPUT R S-VIDEO INPUT R DVD VIDEO Connecting a computer using HDMI or DVI: 1 Make sure that your TV/DVD combo is turned off and the power cord is only required for a DVI connection. 3 If you are connecting to a DVI jack on the computer, connect an audio cable to... HDMI2 VGA INPUT ANT. To connect a computer: 1 Make sure that your TV/DVD combo is turned off and the power cord is disconnected. 2 Connect a VGA cable to the VGA INPUT jack on the back of your TV/DVD combo, then plug the other end of the cable into the LINE OUT...
...AUDIO COAXIAL L R AUDIO L L OUTPUT COMPONENT2 INPUT R S-VIDEO INPUT R DVD VIDEO Connecting a computer using HDMI or DVI: 1 Make sure that your TV/DVD combo is turned off and the power cord is only required for a DVI connection. 3 If you are connecting to a DVI jack on the computer, connect an audio cable to... HDMI2 VGA INPUT ANT. To connect a computer: 1 Make sure that your TV/DVD combo is turned off and the power cord is disconnected. 2 Connect a VGA cable to the VGA INPUT jack on the back of your TV/DVD combo, then plug the other end of the cable into the LINE OUT...
User Manual (English)
Page 21
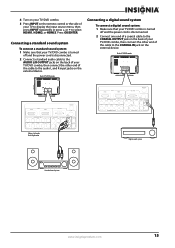
... the audio L and R input jacks on the external device. Connecting a standard sound system To connect a standard sound system: 1 Make sure that your TV/DVD combo is turned off and the power cord is disconnected. 2 Connect one end of a coaxial cable to select HDMI1, HDMI2, or HDMI3. Back of... TV/DVD combo Connecting a digital sound system To connect a digital sound system: 1 Make sure that your TV/DVD combo is turned off and the power cord is disconnected. 2 Connect a standard audio cable to the AUDIO L/R OUTPUT jacks on...
... the audio L and R input jacks on the external device. Connecting a standard sound system To connect a standard sound system: 1 Make sure that your TV/DVD combo is turned off and the power cord is disconnected. 2 Connect one end of a coaxial cable to select HDMI1, HDMI2, or HDMI3. Back of... TV/DVD combo Connecting a digital sound system To connect a digital sound system: 1 Make sure that your TV/DVD combo is turned off and the power cord is disconnected. 2 Connect a standard audio cable to the AUDIO L/R OUTPUT jacks on...
User Manual (English)
Page 22
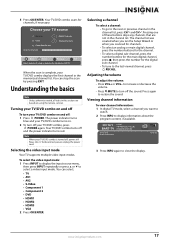
.... The Setup Wizard guides you through setting up your TV/DVD combo: 1 Make sure that your TV/DVD combo is turned off and the power cord is normal when you turn on page 9. • Connected the antenna, cable TV, or satellite TV. The image is disconnected. 2 Connect one end of... source, and the channel list. For more information, see "Connecting the power cord" on page 10. 2 Press POWER to turn on the external TV. Choose your TV source Antenna Cable Cable/Satellite box 0 Digital Channels 0 Analog Channels TV 3 Connect a standard audio cable to the AUDIO L/R OUTPUT jacks on the ...
.... The Setup Wizard guides you through setting up your TV/DVD combo: 1 Make sure that your TV/DVD combo is turned off and the power cord is normal when you turn on page 9. • Connected the antenna, cable TV, or satellite TV. The image is disconnected. 2 Connect one end of... source, and the channel list. For more information, see "Connecting the power cord" on page 10. 2 Press POWER to turn on the external TV. Choose your TV source Antenna Cable Cable/Satellite box 0 Digital Channels 0 Analog Channels TV 3 Connect a standard audio cable to the AUDIO L/R OUTPUT jacks on the ...
User Manual (English)
Page 23
...;480 Audio 1/1(L | R) 05/20/2005 08:00 AM TV-14 / IQ-NL No Event Information Sound On TV-14 / NL 3 Press INFO again to the last viewed channel, press RECALL. Your TV/DVD combo turns off : 1 Press POWER. The power indicator turns blue and your TV/DVD combo turns on using an antenna for the...OK/ENTER. Understanding the basics Note Unless otherwise noted, all tasks in this section are not in the channel list. Note When your TV/DVD combo on and off , power still flows into it. To select the video input mode: 1 Press INPUT to display the input source menu, then press INPUT ...
...;480 Audio 1/1(L | R) 05/20/2005 08:00 AM TV-14 / IQ-NL No Event Information Sound On TV-14 / NL 3 Press INFO again to the last viewed channel, press RECALL. Your TV/DVD combo turns off : 1 Press POWER. The power indicator turns blue and your TV/DVD combo turns on using an antenna for the...OK/ENTER. Understanding the basics Note Unless otherwise noted, all tasks in this section are not in the channel list. Note When your TV/DVD combo on and off , power still flows into it. To select the video input mode: 1 Press INPUT to display the input source menu, then press INPUT ...
User Manual (English)
Page 26
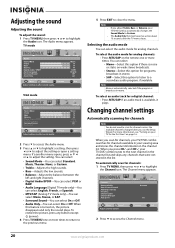
...stores the channel information in stereo. • SAP-Select this option for channels available in your TV/DVD combo tunes to the next channel in the channel list and skips any button except (power). 4 Press TV MENU one or more times to return to the previous menu. 5 Press EXIT to close ...the menu. The Channel menu appears. Note • • If you ran the Setup Wizard. For more information, see "Turning on your TV/DVD combo automatically changes the ...
...stores the channel information in stereo. • SAP-Select this option for channels available in your TV/DVD combo tunes to the next channel in the channel list and skips any button except (power). 4 Press TV MENU one or more times to return to the previous menu. 5 Press EXIT to close ...the menu. The Channel menu appears. Note • • If you ran the Setup Wizard. For more information, see "Turning on your TV/DVD combo automatically changes the ...
User Manual (English)
Page 38
Note • If a power failure occurs or the TV is available. Settings Parental Controls Time Menu Settings Input Labels Computer ... The Settings menu appears. 6 Press EXIT to Factory Picture Audio Channel Settings Move OK Select ENTER Set various TV options. Settings • Time Settings Mode Time Zone Daylight Savings Time Format Date / Time Sleep Timer Wake ...is unplugged, all the times are reset. • The Date/Time option only displays the time when your TV/DVD combo to wait before it automatically turns off. MENU Previous EXIT Exit 2 Press to access the Settings menu...
Note • If a power failure occurs or the TV is available. Settings Parental Controls Time Menu Settings Input Labels Computer ... The Settings menu appears. 6 Press EXIT to Factory Picture Audio Channel Settings Move OK Select ENTER Set various TV options. Settings • Time Settings Mode Time Zone Daylight Savings Time Format Date / Time Sleep Timer Wake ...is unplugged, all the times are reset. • The Date/Time option only displays the time when your TV/DVD combo to wait before it automatically turns off. MENU Previous EXIT Exit 2 Press to access the Settings menu...
User Manual (English)
Page 40
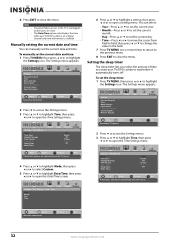
.... You can also press DVD on the remote control to select DVD mode. Using the DVD player Playing a DVD To play a DVD: 1 Press POWER to turn on your TV/DVD combo. 2 Press INPUT, press or to pause playback. Playing an audio CD To play /pause) to highlight DVD, then press OK/ENTER... displays the opening menu. 4 Press or to highlight a menu item, then press OK/ENTER. 5 During playback: • Press (play an audio CD: 1 Press POWER to turn on your TV/DVD combo. 2 Press INPUT, press or to the beginning of the next chapter. • Press SLOW to play in slow motion (forward or...
.... You can also press DVD on the remote control to select DVD mode. Using the DVD player Playing a DVD To play a DVD: 1 Press POWER to turn on your TV/DVD combo. 2 Press INPUT, press or to pause playback. Playing an audio CD To play /pause) to highlight DVD, then press OK/ENTER... displays the opening menu. 4 Press or to highlight a menu item, then press OK/ENTER. 5 During playback: • Press (play an audio CD: 1 Press POWER to turn on your TV/DVD combo. 2 Press INPUT, press or to the beginning of the next chapter. • Press SLOW to play in slow motion (forward or...
User Manual (English)
Page 51
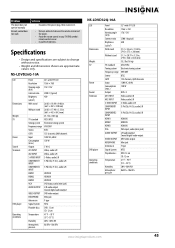
...Remove obstacles between the remote control and the player. • Point the remote control at your TV/DVD combo's remote control sensor. • Install fresh batteries. NS-LDVD26Q-10A LCD Dimensions Weight TV Power Sound Terminals DVD player Operating conditions Panel Resolution Viewing angle (H/V) Contrast ratio Brightness (cd/m2) ...Antenna in Signal System Playable discs Temperature Humidity Atmospheric pressure 26"-wide TFT LCD 1366 × 768 176°/176° 2500:1 (typical) 450 26.02 × 18.98 × 9.06 in. (661 × 482 × 230 mm) 26.02 × 17.40 × 3.33 in. ...
...Remove obstacles between the remote control and the player. • Point the remote control at your TV/DVD combo's remote control sensor. • Install fresh batteries. NS-LDVD26Q-10A LCD Dimensions Weight TV Power Sound Terminals DVD player Operating conditions Panel Resolution Viewing angle (H/V) Contrast ratio Brightness (cd/m2) ...Antenna in Signal System Playable discs Temperature Humidity Atmospheric pressure 26"-wide TFT LCD 1366 × 768 176°/176° 2500:1 (typical) 450 26.02 × 18.98 × 9.06 in. (661 × 482 × 230 mm) 26.02 × 17.40 × 3.33 in. ...

User Manual (English)
Page 52
... to try to correct the interference by Macrovision Corporation and other intellectual property rights owned by one or more than that the equivalent isotropically radiated power (e.i.r.p.) is connected. • Consult the dealer or an experienced technician for successful communication. Use of the FCC Rules. Legal notices FCC Part 15 This device...
... to try to correct the interference by Macrovision Corporation and other intellectual property rights owned by one or more than that the equivalent isotropically radiated power (e.i.r.p.) is connected. • Consult the dealer or an experienced technician for successful communication. Use of the FCC Rules. Legal notices FCC Part 15 This device...


