FAQs (English)
Page 3
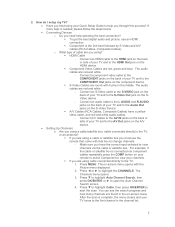
...; Connecting Devices o Do you need help you through this process? o What type of your TV and to the TV: 1. Make sure you tried using cable connected directly to the AV Out jacks on the HDMI device. Component Video Cables are found in the on the SVideo device. - Press ... followed by S-Video and A/V cables (RCA Cables, Composite Cables). Connect a component video cable to the COMPONENT jacks on the back of your TV and to the HDMI Out jack on the A/V device. Setting Up Channels: o Are you using a cable/satellite box, cable connected directly to change channels...
...; Connecting Devices o Do you need help you through this process? o What type of your TV and to the TV: 1. Make sure you tried using cable connected directly to the AV Out jacks on the HDMI device. Component Video Cables are found in the on the SVideo device. - Press ... followed by S-Video and A/V cables (RCA Cables, Composite Cables). Connect a component video cable to the COMPONENT jacks on the back of your TV and to the HDMI Out jack on the A/V device. Setting Up Channels: o Are you using a cable/satellite box, cable connected directly to change channels...
FAQs (English)
Page 4
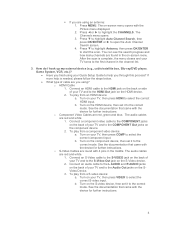
... Turn on -screen menu opens with the Picture menu displayed. 2. Connect an S-Video cable to the S-VIDEO jack on the back of your TV, then press HDMI to the first channel in the middle. Press ▼ to highlight Auto Channel Search, then press OK/ENTER or ► to highlight the ...channel list. 3. Press ▼ to highlight Antenna, then press OK/ENTER to help is complete, the menu closes and your TV tunes to select the correct HDMI input. Turn on your TV and to select the correct S-video input. The audio cables are red, green and blue. To play from a S-video ...
... Turn on -screen menu opens with the Picture menu displayed. 2. Connect an S-Video cable to the S-VIDEO jack on the back of your TV, then press HDMI to the first channel in the middle. Press ▼ to highlight Auto Channel Search, then press OK/ENTER or ► to highlight the ...channel list. 3. Press ▼ to highlight Antenna, then press OK/ENTER to help is complete, the menu closes and your TV tunes to select the correct HDMI input. Turn on your TV and to select the correct S-video input. The audio cables are red, green and blue. To play from a S-video ...
User Manual (English)
Page 3
... Connecting the power 10 Connecting an outdoor antenna 10 Connecting an indoor antenna 10 Connecting cable TV 10 Connecting satellite TV via a satellite TV box 11 Connecting a VCR 12 Connecting a camcorder or game console 12 Connecting an HDMI device 13 Connecting a component video device 13 Connecting an S-Video device 14 Connecting a computer 14 Connecting...
... Connecting the power 10 Connecting an outdoor antenna 10 Connecting an indoor antenna 10 Connecting cable TV 10 Connecting satellite TV via a satellite TV box 11 Connecting a VCR 12 Connecting a camcorder or game console 12 Connecting an HDMI device 13 Connecting a component video device 13 Connecting an S-Video device 14 Connecting a computer 14 Connecting...

User Manual (English)
Page 10
... 10 or "Connecting cable TV" on page 14. For more information, see "Connecting a computer" on page 10. For more information, see "Connecting a VCR" on page 12. Connect the video for a component video device to this jack. Connect an HDMI device to these jacks...."Connecting a VCR" on page 15. Connect headphones to this jack. For more information, see "Connecting an analog audio amplifier" on page 12. # Jack 1 SERVICE PORT 2 HDMI 4 3 HDMI 3 4 AV IN 2 VIDEO 5 AV IN 2 L/R 6 (headphone) 1 2 3 4 5 6 Description For service only. Connect the video (VGA) for a computer to...
... 10 or "Connecting cable TV" on page 14. For more information, see "Connecting a computer" on page 10. For more information, see "Connecting a VCR" on page 12. Connect the video for a component video device to this jack. Connect an HDMI device to these jacks...."Connecting a VCR" on page 15. Connect headphones to this jack. For more information, see "Connecting an analog audio amplifier" on page 12. # Jack 1 SERVICE PORT 2 HDMI 4 3 HDMI 3 4 AV IN 2 VIDEO 5 AV IN 2 L/R 6 (headphone) 1 2 3 4 5 6 Description For service only. Connect the video (VGA) for a computer to...
User Manual (English)
Page 11
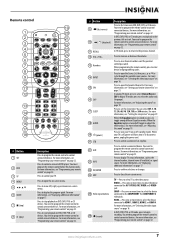
...need to program the remote control to turn your TV. VIDEO- For more information, see "Adjusting the sound" on page 17. Remote control 19 1 20 2 21 3 22 4 23 5 24 6 TV VIDEO COMP HDMI 25 7 26 8 27 9 28 10 29 11 30 12 31 32 13 14 33 15 34 16 35 17 ...36 18 37 # Button 1 SET 2 DVD 3 TV 4 MENU 5 6 GUIDE 7 (stop playback on -screen menu. For more information, see "...
...need to program the remote control to turn your TV. VIDEO- For more information, see "Adjusting the sound" on page 17. Remote control 19 1 20 2 21 3 22 4 23 5 24 6 TV VIDEO COMP HDMI 25 7 26 8 27 9 28 10 29 11 30 12 31 32 13 14 33 15 34 16 35 17 ...36 18 37 # Button 1 SET 2 DVD 3 TV 4 MENU 5 6 GUIDE 7 (stop playback on -screen menu. For more information, see "...

User Manual (English)
Page 14
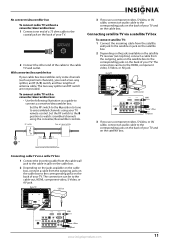
...; If you do not require a converter/descrambler box, you can also connect cable TV using an RF switch (not included). Or, If your cable TV provider. You can connect your cable TV using an HDMI, component video, S-Video, or AV connection, depending on page 11 and contact your antenna ... • Make sure that you need a converter/descrambler box. For more information, see "No converter/descrambler box" on the back of your TV, then plug the other end of time, unplug the power cord from the transmitting source, a man-made shelter, or natural atmospheric conditions might ...
...; If you do not require a converter/descrambler box, you can also connect cable TV using an RF switch (not included). Or, If your cable TV provider. You can connect your cable TV using an HDMI, component video, S-Video, or AV connection, depending on page 11 and contact your antenna ... • Make sure that you need a converter/descrambler box. For more information, see "No converter/descrambler box" on the back of your TV, then plug the other end of time, unplug the power cord from the transmitting source, a man-made shelter, or natural atmospheric conditions might ...
User Manual (English)
Page 15
Set the RF switch to the B position to the HDMI, component video, S-Video, or AV jack. The connection can be to watch scrambled channels using your TV remote control. Back of TV Satellite receiver HDMI Video or S-Video Component 3 If you use a component video, S-Video, or AV cable, connect an audio ...converter/descrambler box: 1 Connect one end of a 75 ohm cable to the coaxial jack on the back of your TV. 2 Connect the other end of the cable to the cable-out, HDMI, component video, S-Video, or AV jack. With converter/descrambler box If your cable box descrambles only some channels (...
Set the RF switch to the B position to the HDMI, component video, S-Video, or AV jack. The connection can be to watch scrambled channels using your TV remote control. Back of TV Satellite receiver HDMI Video or S-Video Component 3 If you use a component video, S-Video, or AV cable, connect an audio ...converter/descrambler box: 1 Connect one end of a 75 ohm cable to the coaxial jack on the back of your TV. 2 Connect the other end of the cable to the cable-out, HDMI, component video, S-Video, or AV jack. With converter/descrambler box If your cable box descrambles only some channels (...

User Manual (English)
Page 17
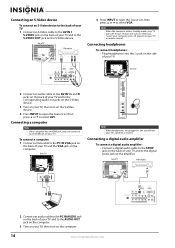
...13 Note You cannot connect a DVI device to select HDMI 1 or HDMI 2. Connecting an HDMI device You can connect a DVI device to the HDMI 1 jack on the back of your TV using an HDMI-to the HDMI 3 or HDMI 4 jack on the side of your TV and to the COMPONENT AUDIO OUT jacks on the ... 3 Press INPUT to open the Source List, then press or to the audio out jack on the HDMI device. To connect an HDMI device to the side of your TV: 1 Connect an HDMI cable to the HDMI 3 or HDMI 4 jack on the component video device. Connecting a component video device To connect a component video device: ...
...13 Note You cannot connect a DVI device to select HDMI 1 or HDMI 2. Connecting an HDMI device You can connect a DVI device to the HDMI 1 jack on the back of your TV using an HDMI-to the HDMI 3 or HDMI 4 jack on the side of your TV and to the COMPONENT AUDIO OUT jacks on the ... 3 Press INPUT to open the Source List, then press or to the audio out jack on the HDMI device. To connect an HDMI device to the side of your TV: 1 Connect an HDMI cable to the HDMI 3 or HDMI 4 jack on the component video device. Connecting a component video device To connect a component video device: ...
User Manual (English)
Page 18
... to the AUDIO OUT jack on the computer. 3 Turn on your TV. If your TV does not turn on the S-Video device. 4 Press INPUT to open the Source List, then press or to an HDMI jack on your TV, then turn on the computer. 14 www.insigniaproducts.com Connecting headphones To connect headphones...: • Plug headphones into the jack on the side of your TV or remote control. To connect a computer: 1 Connect a VGA ...
... to the AUDIO OUT jack on the computer. 3 Turn on your TV. If your TV does not turn on the S-Video device. 4 Press INPUT to open the Source List, then press or to an HDMI jack on your TV, then turn on the computer. 14 www.insigniaproducts.com Connecting headphones To connect headphones...: • Plug headphones into the jack on the side of your TV or remote control. To connect a computer: 1 Connect a VGA ...
User Manual (English)
Page 20
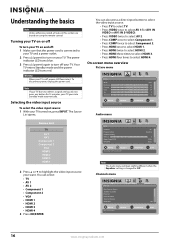
...+5 MOVE OK ENTER SELECT Adjust settings to affect picture quality MENU PREVIOUS EXIT EXIT Audio menu Source List TV AV 1 AV 2 Component 1 Component 2 VGA HDMI 1 HDMI 2 HDMI 3 HDMI 4 2 Press or to turn off , power still flows into Standby mode automatically. Audio Equalizer Equalizer ...to highlight the video input source your TV. You can select: • TV • AV 1 • AV 2 • Component 1 • Component 2 • VGA • HDMI 1 • HDMI 2 • HDMI 3 • HDMI 4 3 Press OK/ENTER. Warning When your TV is off your TV turned on using the remote control. ...
...+5 MOVE OK ENTER SELECT Adjust settings to affect picture quality MENU PREVIOUS EXIT EXIT Audio menu Source List TV AV 1 AV 2 Component 1 Component 2 VGA HDMI 1 HDMI 2 HDMI 3 HDMI 4 2 Press or to turn off , power still flows into Standby mode automatically. Audio Equalizer Equalizer ...to highlight the video input source your TV. You can select: • TV • AV 1 • AV 2 • Component 1 • Component 2 • VGA • HDMI 1 • HDMI 2 • HDMI 3 • HDMI 4 3 Press OK/ENTER. Warning When your TV is off your TV turned on using the remote control. ...

User Manual (English)
Page 22
...PREVIOUS EXIT EXIT 2 Press to highlight an option, then press OK/ENTER to access the sub-menu. In VGA mode or HDMI mode when a computer is connected to the HDMI jack, only Wide and Normal are based on page 18. • Reset Picture Settings-Resets all picture settings to make ...picture. The Advanced Video menu opens. Caution Do not freeze the picture for long periods of 0~30. • Noise Reduction-Controls video noise. Adjusting the TV picture To adjust the picture: 1 Press MENU. For more information, see all tasks in this option, a confirmation box opens. Note • You ...
...PREVIOUS EXIT EXIT 2 Press to highlight an option, then press OK/ENTER to access the sub-menu. In VGA mode or HDMI mode when a computer is connected to the HDMI jack, only Wide and Normal are based on page 18. • Reset Picture Settings-Resets all picture settings to make ...picture. The Advanced Video menu opens. Caution Do not freeze the picture for long periods of 0~30. • Noise Reduction-Controls video noise. Adjusting the TV picture To adjust the picture: 1 Press MENU. For more information, see all tasks in this option, a confirmation box opens. Note • You ...
User Manual (English)
Page 53
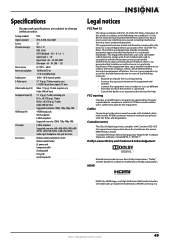
Specifications Design and specifications are subject to change without notice. AA ~ ZZ, AAA, BBB Ultra band - 65 ~ 94, 100 ~ 135 AC 120 V ~ 60 Hz 150 W with TV on A-8 ~ A-1, A ~ I Super band - J ~ W Hyper band - Analog standard Digital standard Screen Channel coverage Power source Power consumption Audio power S-Video input Video/audio input (2) Component input (2) HDMI input (4) VGA input Accessories NTSC ATSC, 8-VSB, Clear-QAM 32" VHF: 2-13 UHF: 14-69 CATV: Mid band -
Specifications Design and specifications are subject to change without notice. AA ~ ZZ, AAA, BBB Ultra band - 65 ~ 94, 100 ~ 135 AC 120 V ~ 60 Hz 150 W with TV on A-8 ~ A-1, A ~ I Super band - J ~ W Hyper band - Analog standard Digital standard Screen Channel coverage Power source Power consumption Audio power S-Video input Video/audio input (2) Component input (2) HDMI input (4) VGA input Accessories NTSC ATSC, 8-VSB, Clear-QAM 32" VHF: 2-13 UHF: 14-69 CATV: Mid band -

