
Quick Setup Guide (English)
Page 1
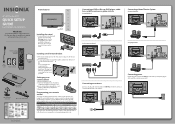
...the table below for common codes. If you enjoy the quality and reliability of your TV using four M8 screws. Install the base cover using four M8 screws. Quick Setup Guide Programming your remote control To program an existing universal remote control to work with your ...batteries into the AC IN jack on the antenna. Front features 42"/50" Plasma HDTV QUICK SETUP GUIDE NS-42P650A11/NS-50P650A11 Thank You for purchasing this product for years to come. non-Insignia wall mount Setting up your user guide or visit www.insigniaproducts.com. Installing a wall-mount bracket 1 ...
...the table below for common codes. If you enjoy the quality and reliability of your TV using four M8 screws. Install the base cover using four M8 screws. Quick Setup Guide Programming your remote control To program an existing universal remote control to work with your ...batteries into the AC IN jack on the antenna. Front features 42"/50" Plasma HDTV QUICK SETUP GUIDE NS-42P650A11/NS-50P650A11 Thank You for purchasing this product for years to come. non-Insignia wall mount Setting up your user guide or visit www.insigniaproducts.com. Installing a wall-mount bracket 1 ...
Quick Setup Guide (English)
Page 2
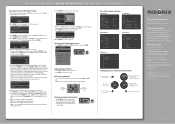
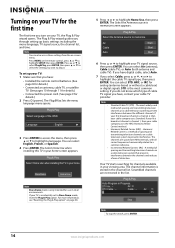
... which type of their respective owners. The Set the time zone screen opens. HDMI1 ---- HDMI2/DVI- All other Insignia TV owners. 42"/50" PLASMA HDTV I QUICK SETUP GUIDE I NS-42P650A11/NS-50P650A11 Turning on your TV for the rst time 1 Connect the power cord, then press (power) to turn... -Turns o the daylight saving time feature. • On-Turns on the daylight saving time feature. • Auto-Sets the daylight saving time feature based on -screen menu Press to con rm a selection or to enter a sub-menu Press to use. You can select English, French, or Spanish. 4...
... which type of their respective owners. The Set the time zone screen opens. HDMI1 ---- HDMI2/DVI- All other Insignia TV owners. 42"/50" PLASMA HDTV I QUICK SETUP GUIDE I NS-42P650A11/NS-50P650A11 Turning on your TV for the rst time 1 Connect the power cord, then press (power) to turn... -Turns o the daylight saving time feature. • On-Turns on the daylight saving time feature. • Auto-Sets the daylight saving time feature based on -screen menu Press to con rm a selection or to enter a sub-menu Press to use. You can select English, French, or Spanish. 4...
User Manual (English)
Page 7
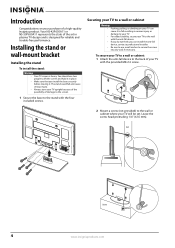
To secure your TV to a wall or cabinet: 1 Attach the anti-fall device to the back of a high-quality Insignia product. Securing your TV to a wall or cabinet Warnings • Pushing, pulling, or climbing on your purchase of your TV with the anti-fall device... TV design and is heavy. Wall Cabinet 4 www.insigniaproducts.com Leave the screw head protruding 1/4" (6.35 mm). Your NS-42P650A11 or NS-50P650A11 represents the state of damage to the screen. 1 Secure the base to the stand with the four included screws. Installing the stand or wall-mount bracket Installing the stand To...
To secure your TV to a wall or cabinet: 1 Attach the anti-fall device to the back of a high-quality Insignia product. Securing your TV to a wall or cabinet Warnings • Pushing, pulling, or climbing on your purchase of your TV with the anti-fall device... TV design and is heavy. Wall Cabinet 4 www.insigniaproducts.com Leave the screw head protruding 1/4" (6.35 mm). Your NS-42P650A11 or NS-50P650A11 represents the state of damage to the screen. 1 Secure the base to the stand with the four included screws. Installing the stand or wall-mount bracket Installing the stand To...
User Manual (English)
Page 8
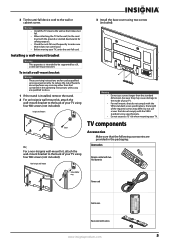
... install a wall-mount bracket: Warning These servicing instructions are qualified to do not comply with screws www.insigniaproducts.com 5 Non-Insignia wall mount 3 Install the base cover using four M8 screws (not included). Installing a wall-mount bracket Warning This apparatus is installed, remove the stand. 2... For an Insignia wall-mount kit, attach the wall-mount bracket to the back of the required screws may cause damage to...
... install a wall-mount bracket: Warning These servicing instructions are qualified to do not comply with screws www.insigniaproducts.com 5 Non-Insignia wall mount 3 Install the base cover using four M8 screws (not included). Installing a wall-mount bracket Warning This apparatus is installed, remove the stand. 2... For an Insignia wall-mount kit, attach the wall-mount bracket to the back of the required screws may cause damage to...
User Manual (English)
Page 17
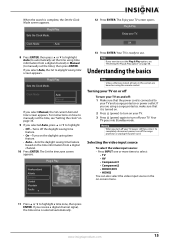
... channel list, and time. If your TV is only intended for use in retail environments. You can select STD, HRC, or IRC for analog (antenna-based or without a cable box) or digital signals. You can select Air (antenna), Cable (cable TV), or Auto (both antenna and cable TV). If your first...
... channel list, and time. If your TV is only intended for use in retail environments. You can select STD, HRC, or IRC for analog (antenna-based or without a cable box) or digital signals. You can select Air (antenna), Cable (cable TV), or Auto (both antenna and cable TV). If your first...
User Manual (English)
Page 18
...to turn off the daylight saving time feature. • On-Turns on the daylight saving time feature. • Auto-Sets the daylight saving time feature based on the time information from a digital channel) or Manual (to your TV and a surge protector or power outlet. Plug & Play Sets the Clock... Mode. Clock Mode : Auto 12 Press ENTER. Plug & Play Newfoundland Atlantic Eastern Central Mountain Pacific ▼ 13 Press ENTER. If you are based on using a surge protector, make sure that the power cord is connected to manually set the time, see "Resetting the Plug & Play option" on...
...to turn off the daylight saving time feature. • On-Turns on the daylight saving time feature. • Auto-Sets the daylight saving time feature based on the time information from a digital channel) or Manual (to your TV and a surge protector or power outlet. Plug & Play Sets the Clock... Mode. Clock Mode : Auto 12 Press ENTER. Plug & Play Newfoundland Atlantic Eastern Central Mountain Pacific ▼ 13 Press ENTER. If you are based on using a surge protector, make sure that the power cord is connected to manually set the time, see "Resetting the Plug & Play option" on...
User Manual (English)
Page 21
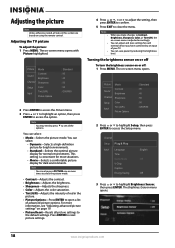
...-Adjusts the brightness. • Sharpness-Adjusts the sharpness. • Color-Adjusts the color saturation. • Tint (G/R)-Adjusts the intensity of red in this section are based on -screen menu opens. The on using the remote control. Note You can select: • Dynamic-Selects a high-definition picture for bright environments. • Standard...
...-Adjusts the brightness. • Sharpness-Adjusts the sharpness. • Color-Adjusts the color saturation. • Tint (G/R)-Adjusts the intensity of red in this section are based on -screen menu opens. The on using the remote control. Note You can select: • Dynamic-Selects a high-definition picture for bright environments. • Standard...
User Manual (English)
Page 25
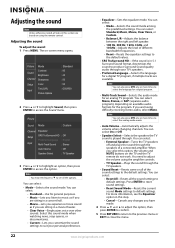
.... 5 Press RETURN to return to the previous menu or EXIT to see the Equalizer option in this step. • Cancel-Cancels any changes you are based on available audio formats for a digital TV program, if multiple tracks are sitting in 5.1 Surround Sound format, downmixes the sound to the default settings. You...
.... 5 Press RETURN to return to the previous menu or EXIT to see the Equalizer option in this step. • Cancel-Cancels any changes you are based on available audio formats for a digital TV program, if multiple tracks are sitting in 5.1 Surround Sound format, downmixes the sound to the default settings. You...
User Manual (English)
Page 26
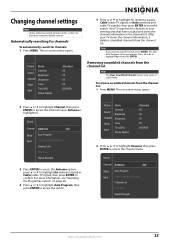
... Auto Program, then press ENTER to start the search. After your viewing area that have a signal and stores the channel information in this section are based on -screen menu opens. 2 Press or to highlight Channel, then press ENTER to stop the search, press ENTER. The Stop Auto Program? message appears. Press...
... Auto Program, then press ENTER to start the search. After your viewing area that have a signal and stores the channel information in this section are based on -screen menu opens. 2 Press or to highlight Channel, then press ENTER to stop the search, press ENTER. The Stop Auto Program? message appears. Press...
User Manual (English)
Page 30
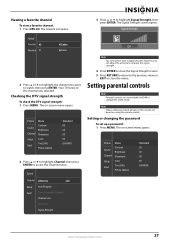
... signal strength. 4 Press ENTER to close the menu. The on-screen menu opens. The Signal Strength screen opens. Setting parental controls Note Parental controls are based on -screen menu opens.
... signal strength. 4 Press ENTER to close the menu. The on-screen menu opens. The Signal Strength screen opens. Setting parental controls Note Parental controls are based on -screen menu opens.

User Manual (English)
Page 32
... NC-17 Not suitable for children 13 and older R Parental guidance suggested Parents strongly cautioned Mature audiences only Some of the age-based TV parental guidelines ratings also have content-based ratings. TV parental control levels U.S. The default password is 0000. 5 Press or to highlight V-Chip Lock, then press ENTER. 6 Press or...
... NC-17 Not suitable for children 13 and older R Parental guidance suggested Parents strongly cautioned Mature audiences only Some of the age-based TV parental guidelines ratings also have content-based ratings. TV parental control levels U.S. The default password is 0000. 5 Press or to highlight V-Chip Lock, then press ENTER. 6 Press or...
User Manual (English)
Page 35
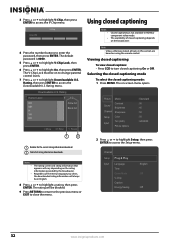
... MH H VH EH ► 1/2 Allow All Block All Move Enter Return Using closed captioning On or Off. Regardless of all tasks in this section are based on -screen menu opens. Enter PIN V-Chip 4 Press the number buttons to highlight On, then press ENTER. Notes • • The rating screen and rating...
... MH H VH EH ► 1/2 Allow All Block All Move Enter Return Using closed captioning On or Off. Regardless of all tasks in this section are based on -screen menu opens. Enter PIN V-Chip 4 Press the number buttons to highlight On, then press ENTER. Notes • • The rating screen and rating...
User Manual (English)
Page 37
... caption background. • Return to transparent. The foreground opacity and background opacity cannot both be set to Default-Returns all tasks in this section are based on using the remote control. The font color and background color cannot be set to highlight Setup, then press ENTER.
... caption background. • Return to transparent. The foreground opacity and background opacity cannot both be set to Default-Returns all tasks in this section are based on using the remote control. The font color and background color cannot be set to highlight Setup, then press ENTER.
User Manual (English)
Page 40
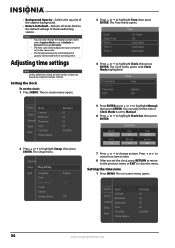
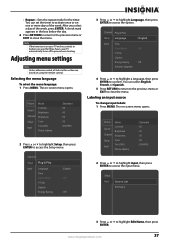
... select the menu language: 1 Press MENU. The on -screen menu opens. Note If the timer turns on your TV and no controls or buttons are based on one or more days of the week, press ENTER. A check mark appears in this section are used for the timer. The on -screen menu...
... select the menu language: 1 Press MENU. The on -screen menu opens. Note If the timer turns on your TV and no controls or buttons are based on one or more days of the week, press ENTER. A check mark appears in this section are used for the timer. The on -screen menu...


