
User Manual (English)
Page 1
... MODEL NUMBER READY PRIOR TO THE CALL CUSTOMER SERVICE - 1-877-467-4289 INSIGNIA WEBSITE FOR INFORMATION ON OUR OTHER PRODUCTS, PLEASE VISIT OUR WEBSITE AT www.insignia-products.com Before operating the unit, please read this menu option to the "CABLE" (Cable Television) mode. If not using Cable TV, set to the "TV" position. OWNER'S MANUAL 26" WIDE FLAT DIGITAL TELEVISION IS-TV040927 ATTENTION If you purchase a universal remote control from the factory, the TV/CABLE menu option is set...
... MODEL NUMBER READY PRIOR TO THE CALL CUSTOMER SERVICE - 1-877-467-4289 INSIGNIA WEBSITE FOR INFORMATION ON OUR OTHER PRODUCTS, PLEASE VISIT OUR WEBSITE AT www.insignia-products.com Before operating the unit, please read this menu option to the "CABLE" (Cable Television) mode. If not using Cable TV, set to the "TV" position. OWNER'S MANUAL 26" WIDE FLAT DIGITAL TELEVISION IS-TV040927 ATTENTION If you purchase a universal remote control from the factory, the TV/CABLE menu option is set...

User Manual (English)
Page 3
... often require extensive work by following conditions: a. OVERLOADING Do not overload wall outlets and extension cords as practical. When the power-supply cord or plug is left unattended and unused for the grounding electrode. 18. 13. POWER LINES An outside antenna system, extreme care should be sure the service technician uses replacement parts specified by the manufacturer or those controls that are required...
... often require extensive work by following conditions: a. OVERLOADING Do not overload wall outlets and extension cords as practical. When the power-supply cord or plug is left unattended and unused for the grounding electrode. 18. 13. POWER LINES An outside antenna system, extreme care should be sure the service technician uses replacement parts specified by the manufacturer or those controls that are required...

User Manual (English)
Page 4
... Setting the V-Chip 22 Setting the front panel lock 25 Labeling channels 26 Labeling the video input source 27 Setting the clock 28 Setting the on timer 29 Setting the off timer 30 Setting the picture size 31 Setting the picture scroll 33 Adjusting the picture preference 34 Picture control adjustment 35 Selecting the color temperature 36 Selecting the Scan Velocity Modulation (SVM 36 Resetting your picture adjustment 36 Closed Caption 37 CC advanced 38 Selecting stereo 39 Second Audio Program (SAP 39 Sound control adjustment 39 Selecting the BBE 40 Selecting the digital...
... Setting the V-Chip 22 Setting the front panel lock 25 Labeling channels 26 Labeling the video input source 27 Setting the clock 28 Setting the on timer 29 Setting the off timer 30 Setting the picture size 31 Setting the picture scroll 33 Adjusting the picture preference 34 Picture control adjustment 35 Selecting the color temperature 36 Selecting the Scan Velocity Modulation (SVM 36 Resetting your picture adjustment 36 Closed Caption 37 CC advanced 38 Selecting stereo 39 Second Audio Program (SAP 39 Sound control adjustment 39 Selecting the BBE 40 Selecting the digital...

User Manual (English)
Page 5
...-Screen display allows precise remote control adjustment of Dolby Laboratories. V-chip will allow you vivid sound with this unit. • Video Input Jacks - BBE gives you to set a restriction level. • Stereo/SAP Reception - A VCR, DVD player, satellite receiver or other than the specified voltage (120V 60Hz). The component video in jacks and S-video in . Insert the AC cord plug into a non-polarized AC outlet, do not attempt to turn...
...-Screen display allows precise remote control adjustment of Dolby Laboratories. V-chip will allow you vivid sound with this unit. • Video Input Jacks - BBE gives you to set a restriction level. • Stereo/SAP Reception - A VCR, DVD player, satellite receiver or other than the specified voltage (120V 60Hz). The component video in jacks and S-video in . Insert the AC cord plug into a non-polarized AC outlet, do not attempt to turn...
User Manual (English)
Page 7
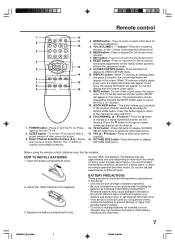
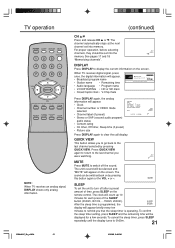
... SELECTION menu to a lower numbered channel set into memory. 14. When TV receives an analog signal and press this button, the current information will appear. Press this button. 3. Press the ▲ button to change to select the video input source. 15. Use two "AAA" size batteries. Install two "AAA" batteries (not supplied). 3. BATTERY PRECAUTIONS These precautions should be installed. Remote control 1 10 2 11 12 3 4 13 5 14 6 7 15 8 9 16 1. VOL (VOLUME) + / - MENU button - CLOSED CAPTION button - Press to turn...
... SELECTION menu to a lower numbered channel set into memory. 14. When TV receives an analog signal and press this button, the current information will appear. Press this button. 3. Press the ▲ button to change to select the video input source. 15. Use two "AAA" size batteries. Install two "AAA" batteries (not supplied). 3. BATTERY PRECAUTIONS These precautions should be installed. Remote control 1 10 2 11 12 3 4 13 5 14 6 7 15 8 9 16 1. VOL (VOLUME) + / - MENU button - CLOSED CAPTION button - Press to turn...

User Manual (English)
Page 9
... a Cable TV service in the "B" position, you may wish to use a signal Splitter and an A/B Switch box (available from the Cable TV company or an electronics supply store). FOR SUBSCRIBERS TO SCRAMBLED CABLE TV SERVICE If you subscribe to a Cable TV service which basic channels are unscrambled and premium channels require the use of a Converter/Descrambler box, you can tune most cable channels without using a Cable TV Converter box. Using another 75 ohm Coaxial Cable, connect the output jack of the Converter/Descrambler box...
... a Cable TV service in the "B" position, you may wish to use a signal Splitter and an A/B Switch box (available from the Cable TV company or an electronics supply store). FOR SUBSCRIBERS TO SCRAMBLED CABLE TV SERVICE If you subscribe to a Cable TV service which basic channels are unscrambled and premium channels require the use of a Converter/Descrambler box, you can tune most cable channels without using a Cable TV Converter box. Using another 75 ohm Coaxial Cable, connect the output jack of the Converter/Descrambler box...

User Manual (English)
Page 10
... need to modify them to change). Pressing TV/AV on the rear of the TV, you used to each jack at the same time, the S-video cord takes precedence over the video cord. 10 Rear of the TV. COMPONENT2 SELECT : /0-5 SET : ENTER To Audio/Video OUT Audio/Video cord (not supplied) To AUDIO/VIDEO IN 1 (or 2) To connect the TV to a VCR with an S-Video cord Rear of components. To Audio OUT To S-Video OUT To S-VIDEO IN 1 (or 2) S-Video cord (not supplied) Audio cord (not supplied) To AUDIO...
... need to modify them to change). Pressing TV/AV on the rear of the TV, you used to each jack at the same time, the S-video cord takes precedence over the video cord. 10 Rear of the TV. COMPONENT2 SELECT : /0-5 SET : ENTER To Audio/Video OUT Audio/Video cord (not supplied) To AUDIO/VIDEO IN 1 (or 2) To connect the TV to a VCR with an S-Video cord Rear of components. To Audio OUT To S-Video OUT To S-VIDEO IN 1 (or 2) S-Video cord (not supplied) Audio cord (not supplied) To AUDIO...

User Manual (English)
Page 13
... the speakers. 3R90401C_En_p10-14 13 3/26/05, 2:46 PM 13 Rear of Dolby Laboratories. Connections to other equipment Using an Audio Amplifier (continued) AUDIO (L) OUTPUT Amplifier AUDIO (R) OUTPUT Rear of the TV To Audio (L) Input Audio cord (not supplied) To Audio (R) Input Using an AV Amplifier with built-in digital surround If you are trademarks of the TV COAXIAL DIGITAL AUDIO OUTPUT Coaxial digital cable (not supplied) To Coaxial Digital Audio Input Front Speaker (Left) Front Speaker...
... the speakers. 3R90401C_En_p10-14 13 3/26/05, 2:46 PM 13 Rear of Dolby Laboratories. Connections to other equipment Using an Audio Amplifier (continued) AUDIO (L) OUTPUT Amplifier AUDIO (R) OUTPUT Rear of the TV To Audio (L) Input Audio cord (not supplied) To Audio (R) Input Using an AV Amplifier with built-in digital surround If you are trademarks of the TV COAXIAL DIGITAL AUDIO OUTPUT Coaxial digital cable (not supplied) To Coaxial Digital Audio Input Front Speaker (Left) Front Speaker...

User Manual (English)
Page 15
... press EXIT to select your changes. • When you select the menu language, specify the TV/CABLE setting, and program channels automatically. Starting setup The STARTING SETUP menu appears the first time you turn on the screen. Press ▲ or ▼ to see your desired language, then press ENTER. After the starting setup function begins and the Language setup menu appears on the TV, and helps you are finished...
... press EXIT to select your changes. • When you select the menu language, specify the TV/CABLE setting, and program channels automatically. Starting setup The STARTING SETUP menu appears the first time you turn on the screen. Press ▲ or ▼ to see your desired language, then press ENTER. After the starting setup function begins and the Language setup menu appears on the TV, and helps you are finished...
User Manual (English)
Page 17
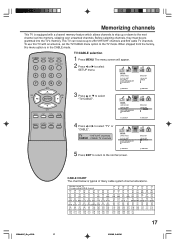
... screen. :ADJUST CABLE CHART The chart below is typical of many cable system channel allocations. 3R90401C_En_p15-18 17 3/26/05, 2:46 PM 17 When shipped from the factory, this TV with a channel memory feature which allows channels to skip up to select SETUP menu. VHF/UHF channels CABLE - Memorizing channels This TV is equipped with an antenna, set into the TV's memory. To use this menu option is in the CABLE mode. CABLE TV channels SETUP LANGUAGE CLOCK SET TV/CABLE...
... screen. :ADJUST CABLE CHART The chart below is typical of many cable system channel allocations. 3R90401C_En_p15-18 17 3/26/05, 2:46 PM 17 When shipped from the factory, this TV with a channel memory feature which allows channels to skip up to select SETUP menu. VHF/UHF channels CABLE - Memorizing channels This TV is equipped with an antenna, set into the TV's memory. To use this menu option is in the CABLE mode. CABLE TV channels SETUP LANGUAGE CLOCK SET TV/CABLE...
User Manual (English)
Page 18
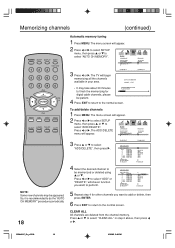
... 5 ANALOG 5-001 DIGITAL 5-002 DIGITAL CLEAR ALL SETUP MENU :SELECT :ADJUST DELETE ADD DELETE DELETE ADD ADD ADD :ADJUST ADD / DELETE ADD / DELETE CH SIGNAL 1 ANALOG 2 ANALOG 3 ANALOG 4 ANALOG 5 ANALOG 5-001 DIGITAL 5-002 DIGITAL CLEAR ALL SETUP MENU :SELECT ADD/DELETE ADD DELETE DELETE ADD ADD ADD :ADJUST 5 Repeat step 4 for digtal cable channels, please be patient. 4 Press EXIT to return to the normal screen. So, it...
... 5 ANALOG 5-001 DIGITAL 5-002 DIGITAL CLEAR ALL SETUP MENU :SELECT :ADJUST DELETE ADD DELETE DELETE ADD ADD ADD :ADJUST ADD / DELETE ADD / DELETE CH SIGNAL 1 ANALOG 2 ANALOG 3 ANALOG 4 ANALOG 5 ANALOG 5-001 DIGITAL 5-002 DIGITAL CLEAR ALL SETUP MENU :SELECT ADD/DELETE ADD DELETE DELETE ADD ADD ADD :ADJUST 5 Repeat step 4 for digtal cable channels, please be patient. 4 Press EXIT to return to the normal screen. So, it...

User Manual (English)
Page 19
... 3/26/05, 2:46 PM FAVORITE CH:CH 23-100 SET / CLEAR 123-456 13 0 0 OPTION MENU TV CABLE 15-001 23-100 0 0 6-001 0 0 0 :SELECT CLEAR:ENTER :ADJUST END :EXIT 4 Press EXIT to return to select "FAVORITE CH", then press or . You can still use CH ▲ or ▼ to scan through all the channels you programmed in your favorite channel list. 2 Press MENU, then...
... 3/26/05, 2:46 PM FAVORITE CH:CH 23-100 SET / CLEAR 123-456 13 0 0 OPTION MENU TV CABLE 15-001 23-100 0 0 6-001 0 0 0 :SELECT CLEAR:ENTER :ADJUST END :EXIT 4 Press EXIT to return to select "FAVORITE CH", then press or . You can still use CH ▲ or ▼ to scan through all the channels you programmed in your favorite channel list. 2 Press MENU, then...

User Manual (English)
Page 20
... CHANNELS 1-9: Press 0 twice, then 1-9 as needed. cally shut itself off after 15 minutes. TV operation 1 To turn on the screen by green bars. The volume level will automati- CABLE TV channels 4 Press the Direct Channel Selection buttons to select ANT 12 ABCD channel 2, press 0 0 2. 10-99: Press 0, then the remaining 2 digits. Example, to se- If the volume decreases, the number of VOLUME 32 bars. TV - Example, to select channel 120, press 1 2 0. VHF/UHF/CABLE CHANNELS TV...
... CHANNELS 1-9: Press 0 twice, then 1-9 as needed. cally shut itself off after 15 minutes. TV operation 1 To turn on the screen by green bars. The volume level will automati- CABLE TV channels 4 Press the Direct Channel Selection buttons to select ANT 12 ABCD channel 2, press 0 0 2. 10-99: Press 0, then the remaining 2 digits. Example, to se- If the volume decreases, the number of VOLUME 32 bars. TV - Example, to select channel 120, press 1 2 0. VHF/UHF/CABLE CHANNELS TV...
User Manual (English)
Page 21
... -. When TV receives digital signal, press once, the digital information will appear. • Clock • Channel number or VIDEO mode selected • Channel label (if preset) • Stereo or SAP (second audio program) audio status • Content rating • On timer, Off timer, Sleep time (if preset) • Picture size STEREO SAP TV-PG L V ON TIMER 8:30AM OFF TIMER 11:30PM SLEEP TIMER 2h00m FULL CLOCK 12:00AM Press DISPLAY again to turn off the sound. QUICK...
... -. When TV receives digital signal, press once, the digital information will appear. • Clock • Channel number or VIDEO mode selected • Channel label (if preset) • Stereo or SAP (second audio program) audio status • Content rating • On timer, Off timer, Sleep time (if preset) • Picture size STEREO SAP TV-PG L V ON TIMER 8:30AM OFF TIMER 11:30PM SLEEP TIMER 2h00m FULL CLOCK 12:00AM Press DISPLAY again to turn off the sound. QUICK...

User Manual (English)
Page 29
... OPTION MENU : ADJUST 7 Press EXIT to return to select OPTION menu. OPTION ON/OFF TIMER FAVORITE CH CH LABEL VIDEO LABEL ON / OFF / SET 2 Press or to select "ON/ OFF TIMER". To continue watching the TV, press any button to cancel the one hour automatic shut off after the ON TIMER turns on the TV to set . Press EXIT to return to normal screen. • After a power failure...
... OPTION MENU : ADJUST 7 Press EXIT to return to select OPTION menu. OPTION ON/OFF TIMER FAVORITE CH CH LABEL VIDEO LABEL ON / OFF / SET 2 Press or to select "ON/ OFF TIMER". To continue watching the TV, press any button to cancel the one hour automatic shut off after the ON TIMER turns on the TV to set . Press EXIT to return to normal screen. • After a power failure...

User Manual (English)
Page 30
... 3/26/05, 2:47 PM Please note if the hour is enabled. Enable or disable the ON/OFF TIMER function 1 Press MENU. OPTION VCFOAIHNDV/ELOOOARFBFILTEATELBIMCEHELRANNEL ON / OFF / SET ON: Timer setting is AM or PM, and choose desired setting. OFF: Timer setting is disabled. :SELECT 2 Press EXIT to return to select "SET", then press ENTER. If you program the OFF TIMER once, the TV will automatically shut...
... 3/26/05, 2:47 PM Please note if the hour is enabled. Enable or disable the ON/OFF TIMER function 1 Press MENU. OPTION VCFOAIHNDV/ELOOOARFBFILTEATELBIMCEHELRANNEL ON / OFF / SET ON: Timer setting is AM or PM, and choose desired setting. OFF: Timer setting is disabled. :SELECT 2 Press EXIT to return to select "SET", then press ENTER. If you program the OFF TIMER once, the TV will automatically shut...
User Manual (English)
Page 31
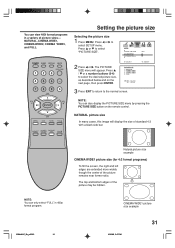
... a number buttons (0-4) to the normal screen. NATURAL, CINEMA WIDE1, CINEMA WIDE2, CINEMA WIDE3, and FULL. NOTE: You can also display the PICTURE SIZE menu by pressing the PICTURE SIZE button on the next page, then press ENTER. : SELECT PICTURE SIZE 0 : NATURAL 1 : CINEMA WIDE1 2 : CINEMA WIDE2 3 : CINEMA WIDE3 4 : FULL SELECT : [0-4] SET : ENTER 3 Press EXIT to return to select the desired picture size, as described below and on the remote control. SETUP CLOSED CAPTION...
... a number buttons (0-4) to the normal screen. NATURAL, CINEMA WIDE1, CINEMA WIDE2, CINEMA WIDE3, and FULL. NOTE: You can also display the PICTURE SIZE menu by pressing the PICTURE SIZE button on the next page, then press ENTER. : SELECT PICTURE SIZE 0 : NATURAL 1 : CINEMA WIDE1 2 : CINEMA WIDE2 3 : CINEMA WIDE3 4 : FULL SELECT : [0-4] SET : ENTER 3 Press EXIT to return to select the desired picture size, as described below and on the remote control. SETUP CLOSED CAPTION...

User Manual (English)
Page 36
... (SVM) The SVM feature enhances picture contrast and sharpness. center (25) CONTRAST max (50) COLOR center (25) TINT center (0) SHARPNESS ........ PICTURE COLOR T E M P E R AT U R E SVM RESET : SELECT COOL HIGH / LOW / OFF : ADJUST To turn off the SVM: Select "OFF" in the PICTURE menu, the picture adjustments return to the normal screen. Selecting the color temperature/Selecting the Scan Velocity Modulation (SVM)/Resetting your picture quality adjustments to the following factory settings: MODE sports BRIGHTNESS .....
... (SVM) The SVM feature enhances picture contrast and sharpness. center (25) CONTRAST max (50) COLOR center (25) TINT center (0) SHARPNESS ........ PICTURE COLOR T E M P E R AT U R E SVM RESET : SELECT COOL HIGH / LOW / OFF : ADJUST To turn off the SVM: Select "OFF" in the PICTURE menu, the picture adjustments return to the normal screen. Selecting the color temperature/Selecting the Scan Velocity Modulation (SVM)/Resetting your picture quality adjustments to the following factory settings: MODE sports BRIGHTNESS .....

User Manual (English)
Page 37
... information. 1 Tune the TV to the desired program. 2 Press MENU, then press or to display the SETUP menu. 3 Press ▲ or ▼ to the normal screen. Closed Caption WHAT IS CLOSED CAPTIONING? Generally, Closed Captions in English are also entered live. SETUP CLOSED CAPTION CC ADVANCED PICTURE SIZE PICTURE SCROLL OFF C1 / C2 /T1 / T2 / OFF : SELECT : ADJUST When Digital signal is received, no captions will appear, but may interfere with Closed Captions. • Some Cable TV systems...
... information. 1 Tune the TV to the desired program. 2 Press MENU, then press or to display the SETUP menu. 3 Press ▲ or ▼ to the normal screen. Closed Caption WHAT IS CLOSED CAPTIONING? Generally, Closed Captions in English are also entered live. SETUP CLOSED CAPTION CC ADVANCED PICTURE SIZE PICTURE SCROLL OFF C1 / C2 /T1 / T2 / OFF : SELECT : ADJUST When Digital signal is received, no captions will appear, but may interfere with Closed Captions. • Some Cable TV systems...

User Manual (English)
Page 43
...; Set closed captioned. Digital broadcasting screen problem. • Check digital signal strength. No reception above channel 13. • Make sure TV/CABLE menu option is weak, adjust antenna to another station. Be sure all Cable TV connections. • Set TV/CABLE menu option to TV (within 15 feet). • Make sure Remote is aimed at sensor. • Confirm there are no color. • Station or Cable TV experiencing problems, tune to another station. • Make sure channels are set . • Power...
...; Set closed captioned. Digital broadcasting screen problem. • Check digital signal strength. No reception above channel 13. • Make sure TV/CABLE menu option is weak, adjust antenna to another station. Be sure all Cable TV connections. • Set TV/CABLE menu option to TV (within 15 feet). • Make sure Remote is aimed at sensor. • Confirm there are no color. • Station or Cable TV experiencing problems, tune to another station. • Make sure channels are set . • Power...


