User Manual (English)
Page 2
... a residential installation. CAUTION concerning the Power Cord Most appliances recommend they be certain. Check the specification page of this equipment in hazardous radiation exposure. Pay particular attention to others. WARNING: Do not install this owner's manual to Part 15 of the unit. However, there is , a single outlet circuit which the receiver is operated in the instruction manual. SERIAL NUMBER: You can radiate radio frequency...
... a residential installation. CAUTION concerning the Power Cord Most appliances recommend they be certain. Check the specification page of this equipment in hazardous radiation exposure. Pay particular attention to others. WARNING: Do not install this owner's manual to Part 15 of the unit. However, there is , a single outlet circuit which the receiver is operated in the instruction manual. SERIAL NUMBER: You can radiate radio frequency...
User Manual (English)
Page 3
... INSTRUCTIONS IN THIS OWNER'S MANUAL. AND THOSE MARKED ON THE PRODUCT. This product has been designed and manufactured to . 8. The safeguards incorporated in installation such as power-supply cord or plug is provided or the manufacturer's instructions have fallen into your safety. DO NOT REMOVE THE CABINET COVER, OR YOU MAY BE EXPOSED TO DANGEROUS VOLTAGE. REFER SERVICING TO QUALIFIED SERVICE...
... INSTRUCTIONS IN THIS OWNER'S MANUAL. AND THOSE MARKED ON THE PRODUCT. This product has been designed and manufactured to . 8. The safeguards incorporated in installation such as power-supply cord or plug is provided or the manufacturer's instructions have fallen into your safety. DO NOT REMOVE THE CABINET COVER, OR YOU MAY BE EXPOSED TO DANGEROUS VOLTAGE. REFER SERVICING TO QUALIFIED SERVICE...
User Manual (English)
Page 4
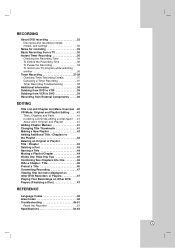
...; Power Save Mode 20 • Factory Setting 20 Language Settings 20 • Display Menu 20 • Disc Menu/Audio/Subtitle 20 Audio Settings 21 • Dolby Digital/DTS/MPEG 21 • Sampling Freq. (Frequency 21 • DRC (Dynamic Range Control 21 • Vocal 21 LOCK (Parental Control) Settings 22 • Rating 22 • Set Password 22 • Area Code 22 Recording Settings 23 • Disc Record Mode 23 • VCR Record Mode 23 • Auto Chapter 23 Disc Settings...
...; Power Save Mode 20 • Factory Setting 20 Language Settings 20 • Display Menu 20 • Disc Menu/Audio/Subtitle 20 Audio Settings 21 • Dolby Digital/DTS/MPEG 21 • Sampling Freq. (Frequency 21 • DRC (Dynamic Range Control 21 • Vocal 21 LOCK (Parental Control) Settings 22 • Rating 22 • Set Password 22 • Area Code 22 Recording Settings 23 • Disc Record Mode 23 • VCR Record Mode 23 • Auto Chapter 23 Disc Settings...
User Manual (English)
Page 5
... 43 Deleting a Part 43 Naming a Title 44 Moving a Playlist Chapter 44 Divide One Titles Into Two 45 Combining Two Chapters Into One 45 Hide a Chapter / Title 46 Protect a Title 46 Overwriting Recording 47 Viewing Title list menu displayed on other DVD Recorders or Players 47 Playing Your Recordings on Other DVD Players (Finalizing a Disc 47 REFERENCE Language Codes 48 Area Codes 48 Troubleshooting 49-51 Reset the Recorder 51 Specifications 52...
... 43 Deleting a Part 43 Naming a Title 44 Moving a Playlist Chapter 44 Divide One Titles Into Two 45 Combining Two Chapters Into One 45 Hide a Chapter / Title 46 Protect a Title 46 Overwriting Recording 47 Viewing Title list menu displayed on other DVD Recorders or Players 47 Playing Your Recordings on Other DVD Players (Finalizing a Disc 47 REFERENCE Language Codes 48 Area Codes 48 Troubleshooting 49-51 Reset the Recorder 51 Specifications 52...
User Manual (English)
Page 8
... music CD format that contain audio titles, MP3, WMA or JPEG files. If you record a disc using a personal computer or a DVD or CD Recorder may not play back" will appear on the unit. • Do not attach any other functions may not have a region code label even though their playback is prohibited by area limits. Can't play because of the settings of the application software used...
... music CD format that contain audio titles, MP3, WMA or JPEG files. If you record a disc using a personal computer or a DVD or CD Recorder may not play back" will appear on the unit. • Do not attach any other functions may not have a region code label even though their playback is prohibited by area limits. Can't play because of the settings of the application software used...
User Manual (English)
Page 9
... DVD+VCR RECORDER, PLEASE CONTACT OUR CUSTOMER SERVICE CENTER. Copy-protected video includes DVDVideo discs and some satellite broadcasts. This Recorder is intended for Progressive Scan Use CONSUMERS SHOULD NOTE THAT NOT ALL HIGH DEFINITION TELEVISION SETS ARE FULLY COMPATIBLE WITH THIS PRODUCT AND MAY CAUSE ARTIFACTS TO BE DISPLAYED IN THE PICTURE. Introduction Restrictions on video recording • You cannot record copy-protected video using a DVD-RW disc in VR mode...
... DVD+VCR RECORDER, PLEASE CONTACT OUR CUSTOMER SERVICE CENTER. Copy-protected video includes DVDVideo discs and some satellite broadcasts. This Recorder is intended for Progressive Scan Use CONSUMERS SHOULD NOTE THAT NOT ALL HIGH DEFINITION TELEVISION SETS ARE FULLY COMPATIBLE WITH THIS PRODUCT AND MAY CAUSE ARTIFACTS TO BE DISPLAYED IN THE PICTURE. Introduction Restrictions on video recording • You cannot record copy-protected video using a DVD-RW disc in VR mode...
User Manual (English)
Page 13
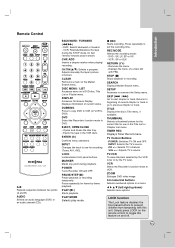
... menu. - SEARCH Displays Marker Search menu. ZOOM Enlarges DVD video image. 0-9 numerical buttons Selects numbered options in the VCR deck. Simply press LOCK on the remote control to use in the Title List or Chapter List menu. TIMER REC Displays Timer Record menu. Displays information of current chapter or track or go to set the recording time. LOCK Locks/unlocks front panel buttons. Displays the menu of a video CD with this feature on the Marker Search menu. BACKWARD / FORWARD (m/M) - DISC MENU / LIST Accesses menu on a DVD disc, Title List or Playlist menu. z REC...
... menu. - SEARCH Displays Marker Search menu. ZOOM Enlarges DVD video image. 0-9 numerical buttons Selects numbered options in the VCR deck. Simply press LOCK on the remote control to use in the Title List or Chapter List menu. TIMER REC Displays Timer Record menu. Displays information of current chapter or track or go to set the recording time. LOCK Locks/unlocks front panel buttons. Displays the menu of a video CD with this feature on the Marker Search menu. BACKWARD / FORWARD (m/M) - DISC MENU / LIST Accesses menu on a DVD disc, Title List or Playlist menu. z REC...
User Manual (English)
Page 14
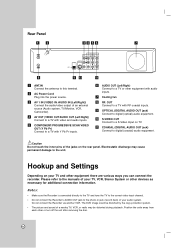
..., VCR, Camcorder). Notes: • Make sure the Recorder is connected directly to the TV and tune the TV to the correct video input channel. • Do not connect the Recorder's AUDIO OUT jack to a TV with RF coaxial inputs. OUT Connect to a S-Video Input on the rear panel. i OPTICAL (DIGITAL AUDIO OUT jack) Connect to digital (coaxial) audio equipment. Do not connect the Recorder via another VCR. c AV 1 IN (VIDEO IN /AUDIO IN (Left/Right)) Connect the audio/video output...
..., VCR, Camcorder). Notes: • Make sure the Recorder is connected directly to the TV and tune the TV to the correct video input channel. • Do not connect the Recorder's AUDIO OUT jack to a TV with RF coaxial inputs. OUT Connect to a S-Video Input on the rear panel. i OPTICAL (DIGITAL AUDIO OUT jack) Connect to digital (coaxial) audio equipment. Do not connect the Recorder via another VCR. c AV 1 IN (VIDEO IN /AUDIO IN (Left/Right)) Connect the audio/video output...
User Manual (English)
Page 16
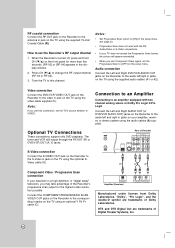
...] in the setup menu, see page 20. • Progressive Scan does not work with two channel analog stereo or Dolby Pro Logic II/Pro Logic Connect the Left and Right AUDIO OUT (or DVD/VCR AUDIO OUT) jacks on the Recorder to the audio left /right in jacks on the TV using the video cable supplied (V). Optional TV Connections These connections support only DVD playback. The tuner and VCR still output through the...
...] in the setup menu, see page 20. • Progressive Scan does not work with two channel analog stereo or Dolby Pro Logic II/Pro Logic Connect the Left and Right AUDIO OUT (or DVD/VCR AUDIO OUT) jacks on the Recorder to the audio left /right in jacks on the TV using the video cable supplied (V). Optional TV Connections These connections support only DVD playback. The tuner and VCR still output through the...
User Manual (English)
Page 17
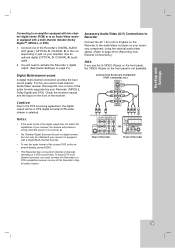
... an Audio/Video receiver equipped with a Digital Multi-channel decoder. • To see the audio format of the current DVD in the onscreen display, press AUDIO. • This Recorder does not perform internal (2 channel) decoding of a DTS sound track. For this Recorder to page 39 for [Recording from External Components].) Note: If you need to activate the Recorder 's digital output. (See [Audio Settings] on the front panel is equipped with a multi-channel decoder (Dolby Digital™...
... an Audio/Video receiver equipped with a Digital Multi-channel decoder. • To see the audio format of the current DVD in the onscreen display, press AUDIO. • This Recorder does not perform internal (2 channel) decoding of a DTS sound track. For this Recorder to page 39 for [Recording from External Components].) Note: If you need to activate the Recorder 's digital output. (See [Audio Settings] on the front panel is equipped with a multi-channel decoder (Dolby Digital™...
User Manual (English)
Page 19
... exit the Setup menu. Add/Del] option. 2. Auto The Auto option is connected. Press SETUP to the previous or next column. v / V (up the clock when the Recorder is set to Auto, the Recorder will use XDS information to confirm your Time Zone manually. TV Aspect 4:3 Letter Box: Select when a standard 4:3 TV is set at the current cursor position. 2. Use v / V or number buttons to select a channel to or...
... exit the Setup menu. Add/Del] option. 2. Auto The Auto option is connected. Press SETUP to the previous or next column. v / V (up the clock when the Recorder is set to Auto, the Recorder will use XDS information to confirm your Time Zone manually. TV Aspect 4:3 Letter Box: Select when a standard 4:3 TV is set at the current cursor position. 2. Use v / V or number buttons to select a channel to or...
User Manual (English)
Page 20
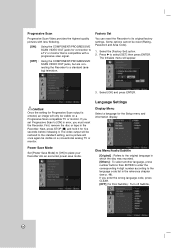
... disc was recorded. [Others] : To select another language, press number buttons then ENTER to enter the corresponding 4-digit number according to select [SET] then press ENTER. The video output will be visible on a Progressive Scan compatible TV or monitor. Language Settings Display Menu Select a language for Disc Subtitle) : Turn off Subtitle. 20 If you enter the wrong language code, press CLEAR. [OFF] (for the Setup menu and information display...
... disc was recorded. [Others] : To select another language, press number buttons then ENTER to enter the corresponding 4-digit number according to select [SET] then press ENTER. The video output will be visible on a Progressive Scan compatible TV or monitor. Language Settings Display Menu Select a language for Disc Subtitle) : Turn off Subtitle. 20 If you enter the wrong language code, press CLEAR. [OFF] (for the Setup menu and information display...
User Manual (English)
Page 22
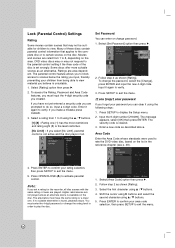
... and input the new 4-digit code. Area Code Enter the Area Code whose standards were used to rate the DVD video disc, based on the list in order to play the disc. 1. You must input the 4-digit security code you make a mistake press CLEAR. 3. Higher rated scenes are prompted to verify. Input it again to do so. Press SETUP to 8 using the following steps: 1. Ratings are rated from 1 to display the Setup menu. 2.
... and input the new 4-digit code. Area Code Enter the Area Code whose standards were used to rate the DVD video disc, based on the list in order to play the disc. 1. You must input the 4-digit security code you make a mistake press CLEAR. 3. Higher rated scenes are prompted to verify. Input it again to do so. Press SETUP to 8 using the following steps: 1. Ratings are rated from 1 to display the Setup menu. 2.

User Manual (English)
Page 27
... and unit turns off. To exit Slow Motion mode, press PLAY (N). Press BACKWARD (m) or FORWARD (M) during pause mode. 2. To exit SEARCH mode, press PLAY (N). 27 played on the disc. If playback does not start . The unit records the stopped point, depending on the TV screen. 3. Press OPEN/CLOSE (Z) to select a title number. Then, press the appropriate numbered button (0-9) or b / B to remove the disc. Press DISPLAY until the real-time counter...
... and unit turns off. To exit Slow Motion mode, press PLAY (N). Press BACKWARD (m) or FORWARD (M) during pause mode. 2. To exit SEARCH mode, press PLAY (N). 27 played on the disc. If playback does not start . The unit records the stopped point, depending on the TV screen. 3. Press OPEN/CLOSE (Z) to select a title number. Then, press the appropriate numbered button (0-9) or b / B to remove the disc. Press DISPLAY until the real-time counter...
User Manual (English)
Page 29
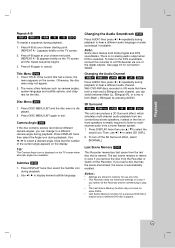
... stored in memory for use any time. • This Recorder does not memorize settings of both (Main + Bilingual) by pressing AUDIO. 3D Surround -RWVR -RWVideo +RW -R +R DVD This unit can change to a different camera angle during playback to select the sound icon. Press DISC MENU/LIST again to display desired subtitle language. Use b / B to exit. There is no analog audio output when DTS is displayed. 2. With DVD-RW discs recorded in memory even...
... stored in memory for use any time. • This Recorder does not memorize settings of both (Main + Bilingual) by pressing AUDIO. 3D Surround -RWVR -RWVideo +RW -R +R DVD This unit can change to a different camera angle during playback to select the sound icon. Press DISC MENU/LIST again to display desired subtitle language. Use b / B to exit. There is no analog audio output when DTS is displayed. 2. With DVD-RW discs recorded in memory even...
User Manual (English)
Page 35
... change the recording format (Video mode or VR mode) before you record anything on the disc. These can play a DVDR, DVD+R, or DVD+RW in Video mode, recording time available will only increase if you can affect playback and/or recording performance. This means that the exact recording time will execute the Menu-making operation to do this recorder (not recording/editing as intended). Disc types and recording formats, modes, and settings This recorder can be longer. • The displayed times for recording...
... change the recording format (Video mode or VR mode) before you record anything on the disc. These can play a DVDR, DVD+R, or DVD+RW in Video mode, recording time available will only increase if you can affect playback and/or recording performance. This means that the exact recording time will execute the Menu-making operation to do this recorder (not recording/editing as intended). Disc types and recording formats, modes, and settings This recorder can be longer. • The displayed times for recording...
User Manual (English)
Page 37
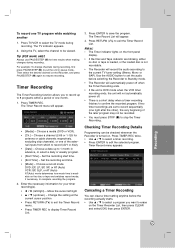
... the Timer Record menu. • Press TIMER REC to edit the selected program. Recording 37 Press TV/VCR to erase on the front panel display. • If the Disc and Tape indicator are set the audio before the recording actually starts. • Use v / V to select a program you to record up /down) - The Timer Record List will appear. 3. Notes: • The Timer indicator lights on the Timer Recorder List, then press...
... the Timer Record menu. • Press TIMER REC to edit the selected program. Recording 37 Press TV/VCR to erase on the front panel display. • If the Disc and Tape indicator are set the audio before the recording actually starts. • Use v / V to select a program you to record up /down) - The Timer Record List will appear. 3. Notes: • The Timer indicator lights on the Timer Recorder List, then press...

User Manual (English)
Page 49
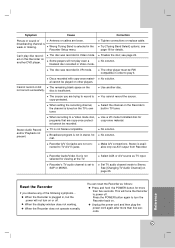
... set to a standard(analog) television with the audio cable. The disc is poor. The skipped channels were deleted with the audio cable is turned off . Select the correct input mode of a problem before contacting service. Clean the disc. Use CH/TRK (v/V) for the possible cause of the audio receiver so you can listen to receive Recorder signal output. Reference 49 The playback picture is dirty. The AUDIO options are not connected securely. Connect the video cable...
... set to a standard(analog) television with the audio cable. The disc is poor. The skipped channels were deleted with the audio cable is turned off . Select the correct input mode of a problem before contacting service. Clean the disc. Use CH/TRK (v/V) for the possible cause of the audio receiver so you can listen to receive Recorder signal output. Reference 49 The playback picture is dirty. The AUDIO options are not connected securely. Connect the video cable...
User Manual (English)
Page 51
... display window does not working. When setting the recording channel, the channel is tuned on the disc is set to turn on other player must be recorded. see page 18 for more than five seconds. Select AUX or A/V source as follows : Press and hold the POWER button for details. Cause Antenna or cables are not connected to Stereo. Make A/V connections. Stereo Audio Record and/or Playback not present. Use another DVD player. Symptom Picture or sound...
... display window does not working. When setting the recording channel, the channel is tuned on the disc is set to turn on other player must be recorded. see page 18 for more than five seconds. Select AUX or A/V source as follows : Press and hold the POWER button for details. Cause Antenna or cables are not connected to Stereo. Make A/V connections. Stereo Audio Record and/or Playback not present. Use another DVD player. Symptom Picture or sound...
User Manual (English)
Page 54
... than a facility authorized by Insignia to service the Product. LIMITED WARRANTY Insignia Products warrants to you, the original purchaser of this Product, that this Product is determined to be free of defects in material or workmanship for all parts costs. PARTS: In addition, Insignia will repair or replace the Product, at no charge, new or rebuilt replacement parts in its option at...
... than a facility authorized by Insignia to service the Product. LIMITED WARRANTY Insignia Products warrants to you, the original purchaser of this Product, that this Product is determined to be free of defects in material or workmanship for all parts costs. PARTS: In addition, Insignia will repair or replace the Product, at no charge, new or rebuilt replacement parts in its option at...

