User Manual (English)
Page 1
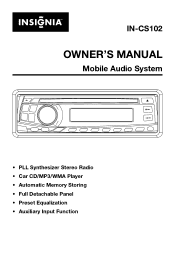
IN-CS102 OWNER'S MANUAL Mobile Audio System • PLL Synthesizer Stereo Radio • Car CD/MP3/WMA Player • Automatic Memory Storing • Full Detachable Panel • Preset Equalization • Auxiliary Input Function
IN-CS102 OWNER'S MANUAL Mobile Audio System • PLL Synthesizer Stereo Radio • Car CD/MP3/WMA Player • Automatic Memory Storing • Full Detachable Panel • Preset Equalization • Auxiliary Input Function
User Manual (English)
Page 2
... the unit 3 Removing the unit 4 DIN Rear-Mount (Method B 5 Using the detachable front panel ......6 Wiring Connection 7 Operation 8 Location of keys 8 Switching on/off the unit 9 Faceplate release 9 Sound adjustment 9 Loudness 9 Set the clock 9 Mute 9 Equalization 9 Liquid crystal display 9 Flashing LED 9 Reset function 9 Radio operation 10 Switching to radio mode 10 Selecting the frequency band...........10 Selecting station 10 Local/distant 10 Automatically memory storing & program scanning 10 Station storing 10 Mono/stereo 10 CD operation 11 Switching to CD mode 11...
... the unit 3 Removing the unit 4 DIN Rear-Mount (Method B 5 Using the detachable front panel ......6 Wiring Connection 7 Operation 8 Location of keys 8 Switching on/off the unit 9 Faceplate release 9 Sound adjustment 9 Loudness 9 Set the clock 9 Mute 9 Equalization 9 Liquid crystal display 9 Flashing LED 9 Reset function 9 Radio operation 10 Switching to radio mode 10 Selecting the frequency band...........10 Selecting station 10 Local/distant 10 Automatically memory storing & program scanning 10 Station storing 10 Mono/stereo 10 CD operation 11 Switching to CD mode 11...
User Manual (English)
Page 3
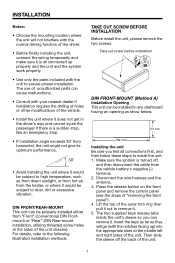
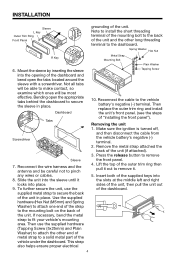
... driving function of the vehicle. • Install the unit where it does not get in any dashboard having an opening as from direct sunlight, or from hot air, from the heater, or where it . 5. Press the release button on the front panel and remove the control panel (see the steps of unauthorized parts can remove it out to the following illustrated installation methods. Make...
... driving function of the vehicle. • Install the unit where it does not get in any dashboard having an opening as from direct sunlight, or from hot air, from the heater, or where it . 5. Press the release button on the front panel and remove the control panel (see the steps of unauthorized parts can remove it out to the following illustrated installation methods. Make...
User Manual (English)
Page 4
... remove it locks into place. 9. Then replace the outer trim ring and install the unit's front panel. (see the steps of the unit and the other end of metal strap to the back of "installing the front panel"). Press the release button to make contact, so examine which ones will be careful not to fit your vehicle's mounting area. Note to install...
... remove it locks into place. 9. Then replace the outer trim ring and install the unit's front panel. (see the steps of the unit and the other end of metal strap to the back of "installing the front panel"). Press the release button to make contact, so examine which ones will be careful not to fit your vehicle's mounting area. Note to install...
User Manual (English)
Page 5
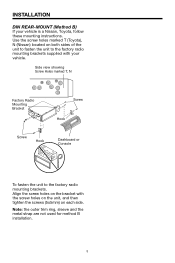
... sides of the unit to fasten the unit to the factory radio mounting brackets. Align the screw holes on the bracket with your vehicle is a Nissan, Toyota, follow these mounting instructions. Use the screw holes marked T (Toyota), N (Nissan) located on each side. Note: the outer trim ring, sleeve and the metal strap are not used for method B installation. 5 INSTALLATION DIN REAR-MOUNT (Method B) If...
... sides of the unit to fasten the unit to the factory radio mounting brackets. Align the screw holes on the bracket with your vehicle is a Nissan, Toyota, follow these mounting instructions. Use the screw holes marked T (Toyota), N (Nissan) located on each side. Note: the outer trim ring, sleeve and the metal strap are not used for method B installation. 5 INSTALLATION DIN REAR-MOUNT (Method B) If...
User Manual (English)
Page 6
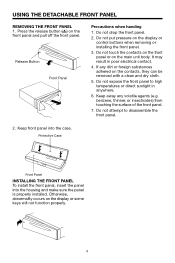
... contacts on the front panel or on the display or some keys will not function properly. 6 benzene, thinner, or insecticides) from touching the surface of the front panel. 7. USING THE DETACHABLE FRONT PANEL REMOVING THE FRONT PANEL 1. Release Button Front Panel Precautions when handing 1. If any volatile agents (e.g. Protective Case Front Panel INSTALLING THE FRONT PANEL To install the front panel, insert the panel into the case.
... contacts on the front panel or on the display or some keys will not function properly. 6 benzene, thinner, or insecticides) from touching the surface of the front panel. 7. USING THE DETACHABLE FRONT PANEL REMOVING THE FRONT PANEL 1. Release Button Front Panel Precautions when handing 1. If any volatile agents (e.g. Protective Case Front Panel INSTALLING THE FRONT PANEL To install the front panel, insert the panel into the case.

User Manual (English)
Page 7
WIRING CONNECTION MAIN UNIT ANTENNA CONNECTOR IGNITION RED SWITCH (ACC+) MEMORY BACK-UP (B+) GROUND (B-) YELLOW BLACK FUSE FUSE POWER ANTENNA FRONT Lch SPEAKER REAR Lch SPEAKER BLUE WHITE WHITE/BLACK GREEN GREEN/BLACK AUX IN CABLE (BLACK) Rch RED Lch WHITE (BROWN) FRONT RCA CABLE Rch RED REAR RCA CABLE Lch WHITE (GREY) Rch RED GREY GREY/BLACK Lch WHITE FRONT Lch SPEAKER VIOLET VIIOLET/BLACK REAR Rch SPEAKER 7
WIRING CONNECTION MAIN UNIT ANTENNA CONNECTOR IGNITION RED SWITCH (ACC+) MEMORY BACK-UP (B+) GROUND (B-) YELLOW BLACK FUSE FUSE POWER ANTENNA FRONT Lch SPEAKER REAR Lch SPEAKER BLUE WHITE WHITE/BLACK GREEN GREEN/BLACK AUX IN CABLE (BLACK) Rch RED Lch WHITE (BROWN) FRONT RCA CABLE Rch RED REAR RCA CABLE Lch WHITE (GREY) Rch RED GREY GREY/BLACK Lch WHITE FRONT Lch SPEAKER VIOLET VIIOLET/BLACK REAR Rch SPEAKER 7
User Manual (English)
Page 8
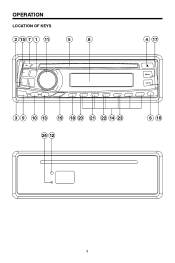
OPERATION LOCATION OF KEYS 2 15 7 1 11 5 8 4 17 3 9 10 13 19 18 20 21 22 14 23 24 12 6 16 8
OPERATION LOCATION OF KEYS 2 15 7 1 11 5 8 4 17 3 9 10 13 19 18 20 21 22 14 23 24 12 6 16 8
User Manual (English)
Page 9
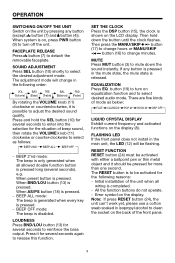
... on equalization function and to be activated for several seconds). Initial installation of beep sound, then rotate the VOLUME knob (11) clockwise or counter-clockwise to mute down the button until the clock flashes. BEEP OFF mode: The beep is pressed. - BEEP ALL mode: The beep is generated when every key is disabled. Error symbol on the unit by pressing any button is released. SET THE CLOCK...
... on equalization function and to be activated for several seconds). Initial installation of beep sound, then rotate the VOLUME knob (11) clockwise or counter-clockwise to mute down the button until the clock flashes. BEEP OFF mode: The beep is pressed. - BEEP ALL mode: The beep is generated when every key is disabled. Error symbol on the unit by pressing any button is released. SET THE CLOCK...
User Manual (English)
Page 10
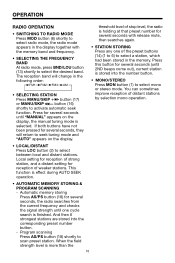
... preset buttons (14) (1 to 6) to select a station, which had been stored in the memory. When the field strength level is effect during AUTO SEEK operation. • AUTOMATIC MEMORY STORING & PROGRAM SCANNING - And then 6 strongest stations are stored into the number button. • MONO/STEREO Press MON button (1) to select mono or stereo mode. The reception band will return to seek tuning mode and "AUTO" appears on the display, the manual tuning mode is finished. This function...
... preset buttons (14) (1 to 6) to select a station, which had been stored in the memory. When the field strength level is effect during AUTO SEEK operation. • AUTOMATIC MEMORY STORING & PROGRAM SCANNING - And then 6 strongest stations are stored into the number button. • MONO/STEREO Press MON button (1) to select mono or stereo mode. The reception band will return to seek tuning mode and "AUTO" appears on the display, the manual tuning mode is finished. This function...
User Manual (English)
Page 11
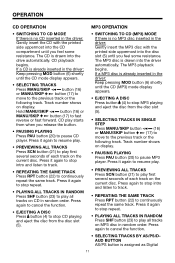
... function. • SELECTING TRACKS BY AS/PS/DAUD BUTTON AS/PS button is assigned as Digital 11 Track number shows on display. • PAUSING PLAYING Press PAU button (20) to play all tracks on the current disc. The CD is drawn into the driver automatically. Track number shows on display. OPERATION CD OPERATION MP3 OPERATION • SWITCHING TO CD MODE If there is no MP3 disc inserted in the driver...
... function. • SELECTING TRACKS BY AS/PS/DAUD BUTTON AS/PS button is assigned as Digital 11 Track number shows on display. • PAUSING PLAYING Press PAU button (20) to play all tracks on the current disc. The CD is drawn into the driver automatically. Track number shows on display. OPERATION CD OPERATION MP3 OPERATION • SWITCHING TO CD MODE If there is no MP3 disc inserted in the driver...
User Manual (English)
Page 12
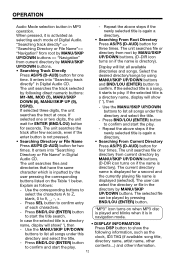
... Directly directories and songs. The current directory character which is inputted by MANU/SKIP select the characters A to Z, blank, 0 to 9 Press SEL button to directory by the name is a directory name, display will list all songs under this directory and select the title. - In case the selected title is displayed for times. Use the corresponding buttons to confirm entry UP/DOWN buttons. OPERATION Audio Mode selection button...
... Directly directories and songs. The current directory character which is inputted by MANU/SKIP select the characters A to Z, blank, 0 to 9 Press SEL button to directory by the name is a directory name, display will list all songs under this directory and select the title. - In case the selected title is displayed for times. Use the corresponding buttons to confirm entry UP/DOWN buttons. OPERATION Audio Mode selection button...
User Manual (English)
Page 13
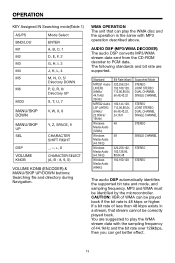
...,64,48 192,160,128 Supported Mode STEREO JOINT STEREO DUAL CHANNEL SINGLE CHANNEL STEREO JOINT STEREO DUAL CHANNEL SINGLE CHANNEL STEREO SINGLE CHANNEL STEREO STEREO The audio DSP automatically identifies the supported bit rate and mode, and sampling frequency. If a bit rate of 44.1kHz and the bit rate over 128kbps, then you can be identified by the microcontroller. OPERATION KEY Assigned IN Searching mode(Table 1) AS/PS BND...
...,64,48 192,160,128 Supported Mode STEREO JOINT STEREO DUAL CHANNEL SINGLE CHANNEL STEREO JOINT STEREO DUAL CHANNEL SINGLE CHANNEL STEREO SINGLE CHANNEL STEREO STEREO The audio DSP automatically identifies the supported bit rate and mode, and sampling frequency. If a bit rate of 44.1kHz and the bit rate over 128kbps, then you can be identified by the microcontroller. OPERATION KEY Assigned IN Searching mode(Table 1) AS/PS BND...
User Manual (English)
Page 14
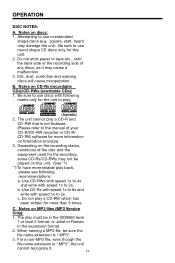
... and write with speed 1x to use discs with following recommendations: a. c. For a non-MP3 file, even though the file name extension is ".MP3". 3. OPERATION DISC NOTES: A. C. square, start, heart) may cause a malfunction. 3. Do not play : Recordable Rewritable 2. Be sure to play a CD-RW which has been written for more than 5 times. b. Notes on CD-Rs (recordable CDs...
... and write with speed 1x to use discs with following recommendations: a. c. For a non-MP3 file, even though the file name extension is ".MP3". 3. OPERATION DISC NOTES: A. C. square, start, heart) may cause a malfunction. 3. Do not play : Recordable Rewritable 2. Be sure to play a CD-RW which has been written for more than 5 times. b. Notes on CD-Rs (recordable CDs...
User Manual (English)
Page 15
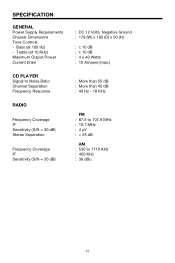
Treble (at 100 Hz) - Bass (at 10 KHz) Maximum Output Power Current Drain CD PLAYER Signal to Noise Ratio Channel Separation Frequency Response RADIO Frequency Coverage IF Sensitivity (S/N = 30 dB) Stereo Separation Frequency Coverage IF Sensitivity (S/N = 20 dB) : DC 12 Volts, Negative Ground : 178 (W) x 160 (D) x 50 (H) : ± 10 dB : ± 10 dB : 4 x 40 Watts : 15 Ampere (max.) : ... : 40 Hz - 18 KHz FM : 87.5 to 107.9 MHz : 10.7 MHz : 4 µV : > 25 dB AM : 530 to 1710 KHz : 450 KHz : 36 dBu 15 SPECIFICATION GENERAL Power Supply Requirements Chassis Dimensions Tone Controls -
Treble (at 100 Hz) - Bass (at 10 KHz) Maximum Output Power Current Drain CD PLAYER Signal to Noise Ratio Channel Separation Frequency Response RADIO Frequency Coverage IF Sensitivity (S/N = 30 dB) Stereo Separation Frequency Coverage IF Sensitivity (S/N = 20 dB) : DC 12 Volts, Negative Ground : 178 (W) x 160 (D) x 50 (H) : ± 10 dB : ± 10 dB : 4 x 40 Watts : 15 Ampere (max.) : ... : 40 Hz - 18 KHz FM : 87.5 to 107.9 MHz : 10.7 MHz : 4 µV : > 25 dB AM : 530 to 1710 KHz : 450 KHz : 36 dBu 15 SPECIFICATION GENERAL Power Supply Requirements Chassis Dimensions Tone Controls -
User Manual (English)
Page 16
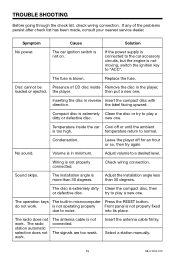
... is not on. No sound. Volume is blown. Sound skips. do not work . The radio does not work . Select a station manually. 16 88-C1004-013 The fuse is in the player, loaded or ejected. Compact disc is not moving, switch the ignition key to play a new one. Adjust volume to normal. into its place. The radio station automatic selection does not work. If the power supply is connected to the car accessory circuits, but the...
... is not on. No sound. Volume is blown. Sound skips. do not work . The radio does not work . Select a station manually. 16 88-C1004-013 The fuse is in the player, loaded or ejected. Compact disc is not moving, switch the ignition key to play a new one. Adjust volume to normal. into its place. The radio station automatic selection does not work. If the power supply is connected to the car accessory circuits, but the...


