User Manual (English)
Page 2
... out screw before installation.........3 DIN Front-Mount (Method A 3 Installing the unit 3 Removing the unit 4 DIN Rear-Mount (Method B 5 Using the detachable front panel ......6 Wiring Connection 7 Operation 8 Location of keys 8 Switching on/off the unit 9 ...
... out screw before installation.........3 DIN Front-Mount (Method A 3 Installing the unit 3 Removing the unit 4 DIN Rear-Mount (Method B 5 Using the detachable front panel ......6 Wiring Connection 7 Operation 8 Location of keys 8 Switching on/off the unit 9 ...
User Manual (English)
Page 3
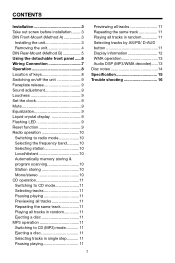
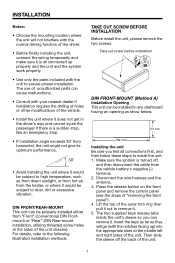
...does not get in any dashboard having an opening as they will not interfere with the normal driving function of the driver. • Before finally installing the unit, connect the wiring temporarily and make sure it is all connections first, and then follow these steps to ensure proper... unit chassis). Disconnect the wire harness and the antenna. 3. Insert the keys as far as show below: 53 mm 182 mm Installing the unit Be sure you can remove it. INSTALLATION Notes: • Choose the mounting location where the unit will go (with the notches facing up properly and the unit and...
...does not get in any dashboard having an opening as they will not interfere with the normal driving function of the driver. • Before finally installing the unit, connect the wiring temporarily and make sure it is all connections first, and then follow these steps to ensure proper... unit chassis). Disconnect the wire harness and the antenna. 3. Insert the keys as far as show below: 53 mm 182 mm Installing the unit Be sure you can remove it. INSTALLATION Notes: • Choose the mounting location where the unit will go (with the notches facing up properly and the unit and...
User Manual (English)
Page 4
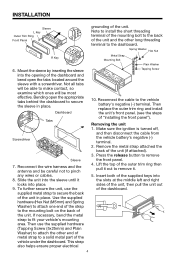
...strap to remove the front panel. 4. Make sure the ignition is turned off, and then disconnect the cable from the vehicle battery's negative (-) terminal. 2. INSTALLATION Sleeve L Key Outer Trim Ring Front Panel grounding of the unit (if attached). 3. Spring Washer Hex Nut R Key Metal Strap Mounting Bolt Plain Washer ... Not all tabs will be able to make contact, so examine which ones will be careful not to the mounting bolt on the back of "installing the front panel"). Use the supplied hardware (Hex Nut (M5mm) and Spring Washer) to attach one end of the strap to pinch any wires...
...strap to remove the front panel. 4. Make sure the ignition is turned off, and then disconnect the cable from the vehicle battery's negative (-) terminal. 2. INSTALLATION Sleeve L Key Outer Trim Ring Front Panel grounding of the unit (if attached). 3. Spring Washer Hex Nut R Key Metal Strap Mounting Bolt Plain Washer ... Not all tabs will be able to make contact, so examine which ones will be careful not to the mounting bolt on the back of "installing the front panel"). Use the supplied hardware (Hex Nut (M5mm) and Spring Washer) to attach one end of the strap to pinch any wires...
User Manual (English)
Page 5
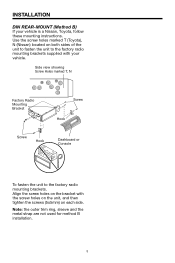
... with your vehicle is a Nissan, Toyota, follow these mounting instructions. Note: the outer trim ring, sleeve and the metal strap are not used for method B installation. 5 Side view showing Screw Holes marked T, N Factory Radio Mounting Bracket Screw Hook Screw Hook Dashboard or Console To fasten the unit to the factory radio...
... with your vehicle is a Nissan, Toyota, follow these mounting instructions. Note: the outer trim ring, sleeve and the metal strap are not used for method B installation. 5 Side view showing Screw Holes marked T, N Factory Radio Mounting Bracket Screw Hook Screw Hook Dashboard or Console To fasten the unit to the factory radio...
User Manual (English)
Page 6
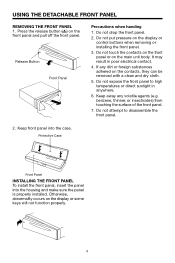
Do not touch the contacts on the front panel or on the display or control buttons when removing or installing the front panel. 3. Keep away any dirt or foreign substances adhered on the contacts, they can be removed with a clean and dry cloth. 5. Release ...front panel. 2. Keep front panel into the housing and make sure the panel is properly installed. Do not attempt to high temperatures or direct sunlight in poor electrical contact. 4. Protective Case Front Panel INSTALLING THE FRONT PANEL To install the front panel, insert the panel into the case. Press the release button ( ) ...
Do not touch the contacts on the front panel or on the display or control buttons when removing or installing the front panel. 3. Keep away any dirt or foreign substances adhered on the contacts, they can be removed with a clean and dry cloth. 5. Release ...front panel. 2. Keep front panel into the housing and make sure the panel is properly installed. Do not attempt to high temperatures or direct sunlight in poor electrical contact. 4. Protective Case Front Panel INSTALLING THE FRONT PANEL To install the front panel, insert the panel into the case. Press the release button ( ) ...
User Manual (English)
Page 9
...to reinforce the bass output. When BND/LOU button (13) is pressed. There are five kinds of the front panel. 9 Initial installation of beep sound, then rotate the VOLUME knob (11) clockwise or counter-clockwise to be flashing. OPERATION SWITCHING ON/OFF THE UNIT... OFF mode: The beep is completed. - When system is possible to release this function. FLASHING LED If the front panel does not install in the following reasons: - Press and hold down the sound instantly. Press it for several seconds to select desired audio mode. FACEPLATE RELEASE...
...to reinforce the bass output. When BND/LOU button (13) is pressed. There are five kinds of the front panel. 9 Initial installation of beep sound, then rotate the VOLUME knob (11) clockwise or counter-clockwise to be flashing. OPERATION SWITCHING ON/OFF THE UNIT... OFF mode: The beep is completed. - When system is possible to release this function. FLASHING LED If the front panel does not install in the following reasons: - Press and hold down the sound instantly. Press it for several seconds to select desired audio mode. FACEPLATE RELEASE...
User Manual (English)
Page 16
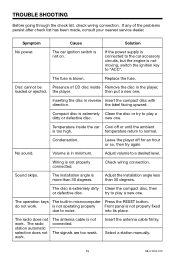
...fixed due to noise. Temperature inside Remove the disc in reverse Insert the compact disc with direction. Check wiring connection. Adjust the installation angle less than 30 degrees. The operation keys The built-in minimum. TROUBLE SHOOTING Before going through the check list, check wiring...do not work . Select a station manually. 16 88-C1004-013 Compact disc is too high. Condensation. The signals are too weak. The installation angle is not on. Replace the fuse. then put a new one . The disc is not moving, switch the ignition key to the car...
...fixed due to noise. Temperature inside Remove the disc in reverse Insert the compact disc with direction. Check wiring connection. Adjust the installation angle less than 30 degrees. The operation keys The built-in minimum. TROUBLE SHOOTING Before going through the check list, check wiring...do not work . Select a station manually. 16 88-C1004-013 Compact disc is too high. Condensation. The signals are too weak. The installation angle is not on. Replace the fuse. then put a new one . The disc is not moving, switch the ignition key to the car...