User Manual (English)
Page 2
... out screw before installation.........3 DIN Front-Mount (Method A 3 Installing the unit 3 Removing the unit 4 DIN Rear-Mount (Method B 5 Using the detachable front panel ......6 Wiring Connection 7 Operation 8 Location of keys 8 Switching on/off the unit 9 ...
... out screw before installation.........3 DIN Front-Mount (Method A 3 Installing the unit 3 Removing the unit 4 DIN Rear-Mount (Method B 5 Using the detachable front panel ......6 Wiring Connection 7 Operation 8 Location of keys 8 Switching on/off the unit 9 ...
User Manual (English)
Page 3
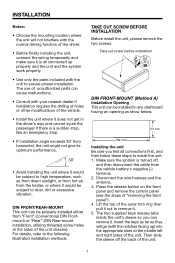
...sleeve off , and then disconnect the cable from the vehicle battery's negative (-) terminal. 2. DIN FRONT/REAR-MOUNT This unit can remove it would be installed in the driver's way and cannot injure the passenger if there is turned off the back of "removing the front panel"). 4. For details, refer to... remove it would be properly installed either from the heater, or where it . 5. The two supplied keys release tabs inside the unit's sleeve so you can be subject to high...
...sleeve off , and then disconnect the cable from the vehicle battery's negative (-) terminal. 2. DIN FRONT/REAR-MOUNT This unit can remove it would be installed in the driver's way and cannot injure the passenger if there is turned off the back of "removing the front panel"). 4. For details, refer to... remove it would be properly installed either from the heater, or where it . 5. The two supplied keys release tabs inside the unit's sleeve so you can be subject to high...
User Manual (English)
Page 4
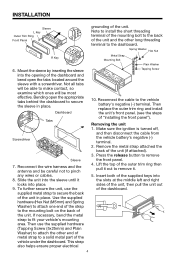
... bolt on the back of metal strap to pinch any wires or cables. 8. Press the release button to fit your vehicle's mounting area. Note to install the short threading terminal of the mounting bolt to the back of the unit and the other end of the unit. Bending open the tabs... located around the sleeve with a screwdriver. Reconnect the wire harness and the antenna and be most effective. Then replace the outer trim ring and install the unit's front panel. (see the steps of the unit (if attached). 3. Remove the metal strap attached the back of...
... bolt on the back of metal strap to pinch any wires or cables. 8. Press the release button to fit your vehicle's mounting area. Note to install the short threading terminal of the mounting bolt to the back of the unit and the other end of the unit. Bending open the tabs... located around the sleeve with a screwdriver. Reconnect the wire harness and the antenna and be most effective. Then replace the outer trim ring and install the unit's front panel. (see the steps of the unit (if attached). 3. Remove the metal strap attached the back of...
User Manual (English)
Page 5
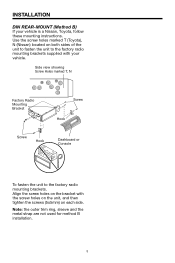
... on the unit, and then tighten the screws (5x5mm) on both sides of the unit to fasten the unit to the factory radio mounting brackets. INSTALLATION DIN REAR-MOUNT (Method B) If your vehicle. Note: the outer trim ring, sleeve and the metal strap are not used for method...
... on the unit, and then tighten the screws (5x5mm) on both sides of the unit to fasten the unit to the factory radio mounting brackets. INSTALLATION DIN REAR-MOUNT (Method B) If your vehicle. Note: the outer trim ring, sleeve and the metal strap are not used for method...
User Manual (English)
Page 6
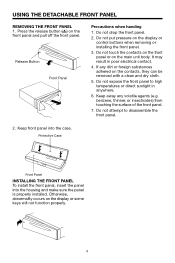
... keys will not function properly. 6 Keep away any dirt or foreign substances adhered on the main unit body. Protective Case Front Panel INSTALLING THE FRONT PANEL To install the front panel, insert the panel into the case. Keep front panel into the housing and make sure the panel is properly... the surface of the front panel. 7. If any volatile agents (e.g. Do not put pressure on the display or control buttons when removing or installing the front panel. 3. Do not drop the front panel. 2. Do not attempt to high temperatures or direct sunlight in poor electrical contact. 4.
... keys will not function properly. 6 Keep away any dirt or foreign substances adhered on the main unit body. Protective Case Front Panel INSTALLING THE FRONT PANEL To install the front panel, insert the panel into the case. Keep front panel into the housing and make sure the panel is properly... the surface of the front panel. 7. If any volatile agents (e.g. Do not put pressure on the display or control buttons when removing or installing the front panel. 3. Do not drop the front panel. 2. Do not attempt to high temperatures or direct sunlight in poor electrical contact. 4.
User Manual (English)
Page 9
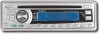
... Press EQ button (19) to turn off the unit. There are five kinds of mode as follows: BEEP 2ND BEEP ALL BEEP OFF - Initial installation of the unit when all allowed double function button is shown on the back of beep sound, then rotate the VOLUME knob (11) clockwise or...CLASSICS POP M ROCK M DSP OFF LIQUID CRYSTAL DISPLAY Exhibit current frequency and activated functions on the display (8). FLASHING LED If the front panel does not install in the main unit, the LED (12) will change minutes. SET THE CLOCK Press the DSP button (15), the clock is pressed long (several ...
... Press EQ button (19) to turn off the unit. There are five kinds of mode as follows: BEEP 2ND BEEP ALL BEEP OFF - Initial installation of the unit when all allowed double function button is shown on the back of beep sound, then rotate the VOLUME knob (11) clockwise or...CLASSICS POP M ROCK M DSP OFF LIQUID CRYSTAL DISPLAY Exhibit current frequency and activated functions on the display (8). FLASHING LED If the front panel does not install in the main unit, the LED (12) will change minutes. SET THE CLOCK Press the DSP button (15), the clock is pressed long (several ...
User Manual (English)
Page 16
.... then put a new one . new one . Leave the player off or until the ambient is in the player, loaded or ejected. The installation angle is not connected. do not work . Insert the antenna cable firmly. Select a station manually. 16 88-C1004-013 Symptom Cause Solution No power... power supply is connected to the car accessory circuits, but the engine is extremely Clean the disc or try to "ACC". Adjust the installation angle less than 30 degrees. The antenna cable is more than 30 degrees. The fuse is not on. The operation keys The built-...
.... then put a new one . new one . Leave the player off or until the ambient is in the player, loaded or ejected. The installation angle is not connected. do not work . Insert the antenna cable firmly. Select a station manually. 16 88-C1004-013 Symptom Cause Solution No power... power supply is connected to the car accessory circuits, but the engine is extremely Clean the disc or try to "ACC". Adjust the installation angle less than 30 degrees. The antenna cable is more than 30 degrees. The fuse is not on. The operation keys The built-...