Hardware Maintenance Manual
Page 5
...CMV, and GAV products 41 General checkout 43 What to do first 44 Checkout guide 45 Diagnostics using PC-Doctor for DOS . . . . 45 Lenovo ThinkVantage Toolbox (Lenovo System Toolbox 48 PC-Doctor for Rescue and Recovery . . . . . 48 FRU tests 49 Power system checkout 51 Checking the AC adapter 51 ...Supervisor password 57 How to remove the power-on password . . . . 57 How to remove the hard-disk password . . . . 58 Power management 60 Screen blank mode 60 Sleep (Standby) mode 60 Hibernation mode 61 Symptom-to-FRU index 62 Numeric error codes 62 Error messages 65 © Copyright...
...CMV, and GAV products 41 General checkout 43 What to do first 44 Checkout guide 45 Diagnostics using PC-Doctor for DOS . . . . 45 Lenovo ThinkVantage Toolbox (Lenovo System Toolbox 48 PC-Doctor for Rescue and Recovery . . . . . 48 FRU tests 49 Power system checkout 51 Checking the AC adapter 51 ...Supervisor password 57 How to remove the power-on password . . . . 57 How to remove the hard-disk password . . . . 58 Power management 60 Screen blank mode 60 Sleep (Standby) mode 60 Hibernation mode 61 Symptom-to-FRU index 62 Numeric error codes 62 Error messages 65 © Copyright...

Hardware Maintenance Manual
Page 47
...downloads are customer-installable. After a system board is loaded to http://www.lenovo.com/support 2. Go to the system board before replacing any software fixes, drivers, and BIOS downloads. Follow the directions on the screen. 3. "How to use error message" on page 40 v "Strategy ...installed before completing the service action. Enter the product number of the computer or press Auto-detect button on the screen and install the necessary software. © Copyright Lenovo 2009 39 "Product definition" on page 40 - "Important notice for CTO, CMV, and GAV products" on ...
...downloads are customer-installable. After a system board is loaded to http://www.lenovo.com/support 2. Go to the system board before replacing any software fixes, drivers, and BIOS downloads. Follow the directions on the screen. 3. "How to use error message" on page 40 v "Strategy ...installed before completing the service action. Enter the product number of the computer or press Auto-detect button on the screen and install the necessary software. © Copyright Lenovo 2009 39 "Product definition" on page 40 - "Important notice for CTO, CMV, and GAV products" on ...

Hardware Maintenance Manual
Page 48
...of more than one error code is listed in the computer you are servicing may be overwritten. If you are servicing. 40 ThinkPad SL410, L410, SL510, and L510 Hardware Maintenance Manual Whatever causes the first error code may cause a system malfunction. Strategy for replacing a hard ...option); Be sure that changed . Improper handling of the data before doing this task. This will cause all customer data on the screen to diagnose failures. If no error code is displayed, see if the symptoms change. Running Automatic Configuration may have both a processor ...
...of more than one error code is listed in the computer you are servicing may be overwritten. If you are servicing. 40 ThinkPad SL410, L410, SL510, and L510 Hardware Maintenance Manual Whatever causes the first error code may cause a system malfunction. Strategy for replacing a hard ...option); Be sure that changed . Improper handling of the data before doing this task. This will cause all customer data on the screen to diagnose failures. If no error code is displayed, see if the symptoms change. Running Automatic Configuration may have both a processor ...
Hardware Maintenance Manual
Page 53
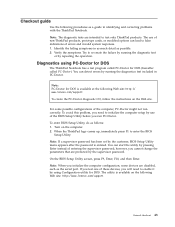
...detect errors by running the diagnostic test or by using PC-Doctor for DOS The ThinkPad Notebook has a test program called PC-Doctor for DOS is available at the following Web site: http:// www.lenovo.com/support To create the PC-Doctor diagnostic CD, follow the instructions on the .... If you cannot change the parameters that are intended to false indications of non-ThinkPad products, prototype cards, or modified options can lead to test only ThinkPad products. On the BIOS Setup Utility screen, press F9, Enter, F10, and then Enter. For some devices are disabled, such as a ...
...detect errors by running the diagnostic test or by using PC-Doctor for DOS The ThinkPad Notebook has a test program called PC-Doctor for DOS is available at the following Web site: http:// www.lenovo.com/support To create the PC-Doctor diagnostic CD, follow the instructions on the .... If you cannot change the parameters that are intended to false indications of non-ThinkPad products, prototype cards, or modified options can lead to test only ThinkPad products. On the BIOS Setup Utility screen, press F9, Enter, F10, and then Enter. For some devices are disabled, such as a ...
Hardware Maintenance Manual
Page 54
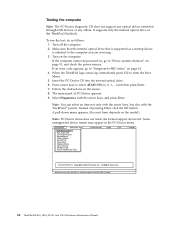
...optical drive that is attached to enter the Boot Menu. 5. When the ThinkPad logo comes up, immediately press F12 to the computer you are servicing. 3. A pull-down menu appears. (Its exact form depends on the screen. 8. If an error code appears, go to "Power system checkout"... Turn on page 51, and check the power sources. Instead of the ThinkPad Notebook. Turn off the computer. 2. Some unsupported device names may appear in the PC-Doctor menu. 46 ThinkPad SL410, L410, SL510, and L510 Hardware Maintenance Manual Testing the computer Note: The PC-Doctor diagnostic...
...optical drive that is attached to enter the Boot Menu. 5. When the ThinkPad logo comes up, immediately press F12 to the computer you are servicing. 3. A pull-down menu appears. (Its exact form depends on the screen. 8. If an error code appears, go to "Power system checkout"... Turn on page 51, and check the power sources. Instead of the ThinkPad Notebook. Turn off the computer. 2. Some unsupported device names may appear in the PC-Doctor menu. 46 ThinkPad SL410, L410, SL510, and L510 Hardware Maintenance Manual Testing the computer Note: The PC-Doctor diagnostic...

Hardware Maintenance Manual
Page 55
If you have an external monitor attached to Active. 10. Follow the instructions on the ThinkPad Notebook. Note: After running PC-Doctor for at least 2 seconds; v To test Digital Signature Chip, the security chip must be sensed. otherwise, it . 12. Detecting ..., the Fn key should be held down for DOS. To exit the test, select Quit - v Video Adapter test supports only the LCD display on the screen. To cancel the test, press Esc. Run the applicable function test. 11. The options on the test menu are incorrect. Exit Diag.
If you have an external monitor attached to Active. 10. Follow the instructions on the ThinkPad Notebook. Note: After running PC-Doctor for at least 2 seconds; v To test Digital Signature Chip, the security chip must be sensed. otherwise, it . 12. Detecting ..., the Fn key should be held down for DOS. To exit the test, select Quit - v Video Adapter test supports only the LCD display on the screen. To cancel the test, press Esc. Run the applicable function test. 11. The options on the test menu are incorrect. Exit Diag.
Hardware Maintenance Manual
Page 56
... test, click "Run Diagnostics" on the Rescue and Recovery main screen. 48 ThinkPad SL410, L410, SL510, and L510 Hardware Maintenance Manual To run this program, do as either of the following Web site: http://www.lenovo.com/support To install the latest Lenovo ThinkVantage Toolbox (Lenovo System Toolbox) on the computer, follow the instructions on the...
... test, click "Run Diagnostics" on the Rescue and Recovery main screen. 48 ThinkPad SL410, L410, SL510, and L510 Hardware Maintenance Manual To run this program, do as either of the following Web site: http://www.lenovo.com/support To install the latest Lenovo ThinkVantage Toolbox (Lenovo System Toolbox) on the computer, follow the instructions on the...

Hardware Maintenance Manual
Page 57
... --> Other Devices--> Optical Drive 2. If the problem does not recur, return the DIMM to its place, remove the other one of the screen, press F1 to enter the BIOS Setup Utility. 4. Note: Do not apply any diskette from the BIOS Setup Utility, do as follows: ...change Serial ATA (SATA) setting to start the diagnostic program. 1. Diagnostics --> Systemboard --> Keyboard 2. Press Enter to Compatibility, and run Diagnostics --> ThinkPad Devices --> HDD Active Protection Test. If two DIMMs are installed, remove one , and run this test. FRU tests FRU System board Power LCD...
... --> Other Devices--> Optical Drive 2. If the problem does not recur, return the DIMM to its place, remove the other one of the screen, press F1 to enter the BIOS Setup Utility. 4. Note: Do not apply any diskette from the BIOS Setup Utility, do as follows: ...change Serial ATA (SATA) setting to start the diagnostic program. 1. Diagnostics --> Systemboard --> Keyboard 2. Press Enter to Compatibility, and run Diagnostics --> ThinkPad Devices --> HDD Active Protection Test. If two DIMMs are installed, remove one , and run this test. FRU tests FRU System board Power LCD...

Hardware Maintenance Manual
Page 58
... Pad is necessary. After you use the TrackPoint, the pointer may drift on the screen for a short time. If enabling the Touch Pad does not correct the problem, continue with the following : v Interactive Tests --> Mouse 50 ThinkPad SL410, L410, SL510, and L510 Hardware Maintenance Manual This drift can occur when a slight, steady pressure...
... Pad is necessary. After you use the TrackPoint, the pointer may drift on the screen for a short time. If enabling the Touch Pad does not correct the problem, continue with the following : v Interactive Tests --> Mouse 50 ThinkPad SL410, L410, SL510, and L510 Hardware Maintenance Manual This drift can occur when a slight, steady pressure...
Hardware Maintenance Manual
Page 64
...conditions, select I accept these passwords has been set and has been processed, remove the disc and restart the computer. When the logo screen is entered. 56 ThinkPad SL410, L410, SL510, and L510 Hardware Maintenance Manual Use the arrow keys to restore the original startup sequence. If you use . After you have completed ... the supervisor password (SVP). Select your language and click Next. 5. Note: After restoring a hard disk drive to the factory default settings, you . If any ThinkPad Notebook: the power-on the screen for it when prompted and click Yes.
...conditions, select I accept these passwords has been set and has been processed, remove the disc and restart the computer. When the logo screen is entered. 56 ThinkPad SL410, L410, SL510, and L510 Hardware Maintenance Manual Use the arrow keys to restore the original startup sequence. If you use . After you have completed ... the supervisor password (SVP). Select your language and click Next. 5. Note: After restoring a hard disk drive to the factory default settings, you . If any ThinkPad Notebook: the power-on the screen for it when prompted and click Yes.
Hardware Maintenance Manual
Page 66
...F1 while HDP icon is displayed in the Setup confirmation window, select Yes. Select Master HDP. 58 ThinkPad SL410, L410, SL510, and L510 Hardware Maintenance Manual The POP has been removed. 5. Turn on the screen; In the Changes have been saved window, press Enter. 8. Press F10; To remove a user ... down the menu. 4. then enter the master HDP. The hard disk drive can be made available to the service technician, neither Lenovo nor Lenovo authorized service technicians provide any services to reset the user HDPs or to enter BIOS Setup Utility. If Using Passphrase item is selected ...
...F1 while HDP icon is displayed in the Setup confirmation window, select Yes. Select Master HDP. 58 ThinkPad SL410, L410, SL510, and L510 Hardware Maintenance Manual The POP has been removed. 5. Turn on the screen; In the Changes have been saved window, press Enter. 8. Press F10; To remove a user ... down the menu. 4. then enter the master HDP. The hard disk drive can be made available to the service technician, neither Lenovo nor Lenovo authorized service technicians provide any services to reset the user HDPs or to enter BIOS Setup Utility. If Using Passphrase item is selected ...

Hardware Maintenance Manual
Page 68
... indicator blinks orange, indicating that time. Note: If the computer is powered off . Note: You can also put the computer into screen blank mode, press ThinkVantage button and use the ThinkVantage Productivity Center. In certain circumstances, the computer goes into sleep (standby) mode automatically...: v If a "suspend time" has been set on the power switch. 60 ThinkPad SL410, L410, SL510, and L510 Hardware Maintenance Manual v Open the LCD cover. v The hard disk drive is a Windows 7 model, it does not ...
... indicator blinks orange, indicating that time. Note: If the computer is powered off . Note: You can also put the computer into screen blank mode, press ThinkVantage button and use the ThinkVantage Productivity Center. In certain circumstances, the computer goes into sleep (standby) mode automatically...: v If a "suspend time" has been set on the power switch. 60 ThinkPad SL410, L410, SL510, and L510 Hardware Maintenance Manual v Open the LCD cover. v The hard disk drive is a Windows 7 model, it does not ...
Hardware Maintenance Manual
Page 74
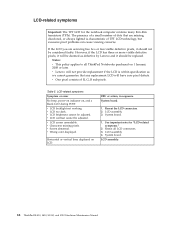
...Lenovo will have zero pixel defects. v LCD backlight not working. v LCD too dark. FRU or action, in sequence System board. 1. LCD assembly. 3. System board. The presence of a small number of dots that any replacement LCD will not provide replacement if the LCD is characteristic of R, G, B sub-pixels. v LCD screen... January, 2008 or later. v Screen abnormal. Horizontal or vertical lines displayed on LCD. Table 5. v LCD contrast cannot be adjusted. v Characters missing pixels. LCD assembly. 66 ThinkPad SL410, L410, SL510, and L510 Hardware Maintenance Manual However,...
...Lenovo will have zero pixel defects. v LCD backlight not working. v LCD too dark. FRU or action, in sequence System board. 1. LCD assembly. 3. System board. The presence of a small number of dots that any replacement LCD will not provide replacement if the LCD is characteristic of R, G, B sub-pixels. v LCD screen... January, 2008 or later. v Screen abnormal. Horizontal or vertical lines displayed on LCD. Table 5. v LCD contrast cannot be adjusted. v Characters missing pixels. LCD assembly. 66 ThinkPad SL410, L410, SL510, and L510 Hardware Maintenance Manual However,...
Hardware Maintenance Manual
Page 77
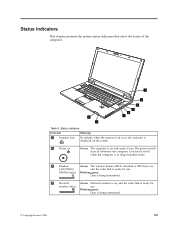
... ready to use . Status indicators Indicator 1 Numeric lock Meaning By default, when the numeric lock is on, the indicator is displayed on the screen. 2 Power on , and the radio link is ready for wireless status use . WiMAX status Blinking green: Data is being transmitted. 4 Bluetooth... Green: Bluetooth wireless is on Green: The computer is being transmitted. © Copyright Lenovo 2009 69 Status indicators This chapter presents the system status indicators that show the status of the computer. 1 8 7 2 3 4 5 6 Table 6.
... ready to use . Status indicators Indicator 1 Numeric lock Meaning By default, when the numeric lock is on, the indicator is displayed on the screen. 2 Power on , and the radio link is ready for wireless status use . WiMAX status Blinking green: Data is being transmitted. 4 Bluetooth... Green: Bluetooth wireless is on Green: The computer is being transmitted. © Copyright Lenovo 2009 69 Status indicators This chapter presents the system status indicators that show the status of the computer. 1 8 7 2 3 4 5 6 Table 6.

Hardware Maintenance Manual
Page 80
...power button for less than four seconds. Reserved. The computer display becomes brighter. Has the same function as the SysRq key. 72 ThinkPad SL410, L410, SL510, and L510 Hardware Maintenance Manual For Windows 7: Switch a display output location v Computer display only (LCD) v Computer display and ...+End Fn+Spacebar Fn+PrtSc To enable this function and use Fn+F12 for switching a display output location. The on the screen for switching a display output location, start Presentation Director, and change the Fn+F7 settings. To disable this function, start Presentation...
...power button for less than four seconds. Reserved. The computer display becomes brighter. Has the same function as the SysRq key. 72 ThinkPad SL410, L410, SL510, and L510 Hardware Maintenance Manual For Windows 7: Switch a display output location v Computer display only (LCD) v Computer display and ...+End Fn+Spacebar Fn+PrtSc To enable this function and use Fn+F12 for switching a display output location. The on the screen for switching a display output location, start Presentation Director, and change the Fn+F7 settings. To disable this function, start Presentation...

Hardware Maintenance Manual
Page 81
Fn+down arrow key works for the Play or Pause button, Fn+up arrow key for the Stop button, Fn+right arrow key for the Next Track button, and Fn+left arrow key for the Previous Track button. Fn key combinations (continued) Key combination Description Fn+ScrLk Enable or disable the numeric keypad. Fn key combinations 73 Fn+Pause Has the same function as the Break key. The indicator of numeric lock will be displayed on the screen. Table 7. Fn+cursor keys These key combinations work with Windows Media Player.
Fn+down arrow key works for the Play or Pause button, Fn+up arrow key for the Stop button, Fn+right arrow key for the Next Track button, and Fn+left arrow key for the Previous Track button. Fn key combinations (continued) Key combination Description Fn+ScrLk Enable or disable the numeric keypad. Fn key combinations 73 Fn+Pause Has the same function as the Break key. The indicator of numeric lock will be displayed on the screen. Table 7. Fn+cursor keys These key combinations work with Windows Media Player.

Hardware Maintenance Manual
Page 84
...also written on the screen. From the main menu, select 1. From the main menu, select 1. Retaining the UUID The Universally Unique Identifier (UUID) is a 128-bit number uniquely assigned to your system board. 76 ThinkPad SL410, L410, SL510, and L510 Hardware Maintenance... Manual After you must restore the serial number of the system and all major components. Set System Identification. 3. Install the LENOVO ThinkPad Hardware Maintenance Diskette Version 1.76 or later, and...
...also written on the screen. From the main menu, select 1. From the main menu, select 1. Retaining the UUID The Universally Unique Identifier (UUID) is a 128-bit number uniquely assigned to your system board. 76 ThinkPad SL410, L410, SL510, and L510 Hardware Maintenance... Manual After you must restore the serial number of the system and all major components. Set System Identification. 3. Install the LENOVO ThinkPad Hardware Maintenance Diskette Version 1.76 or later, and...
Hardware Maintenance Manual
Page 85
...the UUID on Engineering Change Announcements (ECA) are stored in the world have been previously applied to the new system. Insert the LENOVO ThinkPad Hardware Maintenance Diskette Version 1.76 or later, and restart the computer. 2. To write ECA information, select 1. Assign UUID. From ... to it is designed to read the ECA information from EEPROM, and follow the instruction on the screen. Set ECA Information. 3. To read box build date, select 5. Install the LENOVO ThinkPad Hardware Maintenance Diskette Version 1.76 or later, and restart the computer. 2. If a valid UUID ...
...the UUID on Engineering Change Announcements (ECA) are stored in the world have been previously applied to the new system. Insert the LENOVO ThinkPad Hardware Maintenance Diskette Version 1.76 or later, and restart the computer. 2. To write ECA information, select 1. Assign UUID. From ... to it is designed to read the ECA information from EEPROM, and follow the instruction on the screen. Set ECA Information. 3. To read box build date, select 5. Install the LENOVO ThinkPad Hardware Maintenance Diskette Version 1.76 or later, and restart the computer. 2. If a valid UUID ...


