
Hardware Maintenance Manual
Page 22
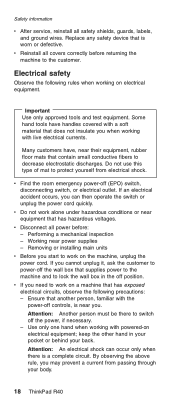
Replace any safety device that supplies power to the machine and to lock the wall box in your pocket or behind your body. 18 ThinkPad R40 Important Use only approved tools and test equipment. Some hand tools have , near power supplies - If an electrical accident occurs, you when working ... current from electrical shock. Attention: Another person must be there to work on the machine, unplug the power cord. Do not use this type of mat to protect yourself from passing through your back. Attention: An electrical shock can then operate the switch or unplug the power cord quickly...
Replace any safety device that supplies power to the machine and to lock the wall box in your pocket or behind your body. 18 ThinkPad R40 Important Use only approved tools and test equipment. Some hand tools have , near power supplies - If an electrical accident occurs, you when working ... current from electrical shock. Attention: Another person must be there to work on the machine, unplug the power cord. Do not use this type of mat to protect yourself from passing through your back. Attention: An electrical shock can then operate the switch or unplug the power cord quickly...
Hardware Maintenance Manual
Page 24
...ICs) should be the type specified in good condition. Remove the cover. 5. Use good judgment as to the safety of any potentially unsafe conditions, use the following checklist at the beginning of fire or smoke damage. 7. Protect against ESD 20 ThinkPad R40 b. Power-off ,... and the power cord disconnected. Checklist: 1. c. Check the power cord for any obvious unsafe conditions, such as loose or missing hardware To determine whether there are any non-IBM alterations. 6. Check inside the unit for...
...ICs) should be the type specified in good condition. Remove the cover. 5. Use good judgment as to the safety of any potentially unsafe conditions, use the following checklist at the beginning of fire or smoke damage. 7. Protect against ESD 20 ThinkPad R40 b. Power-off ,... and the power cord disconnected. Checklist: 1. c. Check the power cord for any obvious unsafe conditions, such as loose or missing hardware To determine whether there are any non-IBM alterations. 6. Check inside the unit for...

Hardware Maintenance Manual
Page 30
... by the customer. Failing FRU name and part number __ 8. Machine type, model number, and serial number __ 9. Before checking problems with multiple labels v Damaged or bent diskette eject button v Fuses blown by attachment of unauthorized service or modification. 26 ThinkPad R40 The following list provides some symptoms that might be responsible for...
... by the customer. Failing FRU name and part number __ 8. Machine type, model number, and serial number __ 9. Before checking problems with multiple labels v Damaged or bent diskette eject button v Fuses blown by attachment of unauthorized service or modification. 26 ThinkPad R40 The following list provides some symptoms that might be responsible for...

Hardware Maintenance Manual
Page 44
...wait for a while. After it cools down, reinstall and recharge it at room temperature for a moment (but do the following figure: 40 ThinkPad R40 Perform operational charging. Checkout guide v If the problem persists, go to the next section. To get detailed information about the battery, double-... battery charges properly during operation, use a discharged battery pack or a battery pack that less than 50% of the total power remains; For machine type 2681, 2682, 2683, 2722, 2723, 2724 To check the battery pack, do not click), and the percentage of its capacity. Note: Noise from...
...wait for a while. After it cools down, reinstall and recharge it at room temperature for a moment (but do the following figure: 40 ThinkPad R40 Perform operational charging. Checkout guide v If the problem persists, go to the next section. To get detailed information about the battery, double-... battery charges properly during operation, use a discharged battery pack or a battery pack that less than 50% of the total power remains; For machine type 2681, 2682, 2683, 2722, 2723, 2724 To check the battery pack, do not click), and the percentage of its capacity. Note: Noise from...
Hardware Maintenance Manual
Page 45
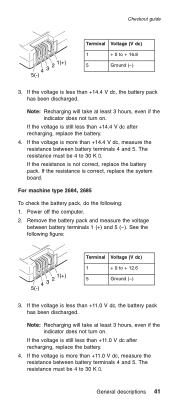
... resistance between battery terminals 1 (+) and 5 (−). Power off the computer. 2. If the voltage is not correct, replace the battery pack. General descriptions 41 For machine type 2684, 2685 To check the battery pack, do the following figure: 4 3 2 1(+) 5(-) Terminal Voltage (V dc) 1 + 0 to 30 K . Remove the battery pack and measure the voltage between...
... resistance between battery terminals 1 (+) and 5 (−). Power off the computer. 2. If the voltage is not correct, replace the battery pack. General descriptions 41 For machine type 2684, 2685 To check the battery pack, do the following figure: 4 3 2 1(+) 5(-) Terminal Voltage (V dc) 1 + 0 to 30 K . Remove the battery pack and measure the voltage between...
Hardware Maintenance Manual
Page 51
Product overview Feature Description PC Card v Type-II or Type-III Communication v V.90 modem daughter card (MDC) daughter card v Bluetooth Modem daughter card (BMDC) (CDC) AC adapter v 72-watt type Ultrabay Plus device (standard) v CD-ROM drive v DVD drive v CD-RW/DVD combo drive Preinstalled operating system 2681, 2682, 2683, 2722, 2723, 2724 Windows 2000 Professional Windows XP Home Edition Windows XP Professional 2684, 2685 Windows XP Home Edition Windows XP Professional ThinkPad R40 47
Product overview Feature Description PC Card v Type-II or Type-III Communication v V.90 modem daughter card (MDC) daughter card v Bluetooth Modem daughter card (BMDC) (CDC) AC adapter v 72-watt type Ultrabay Plus device (standard) v CD-ROM drive v DVD drive v CD-RW/DVD combo drive Preinstalled operating system 2681, 2682, 2683, 2722, 2723, 2724 Windows 2000 Professional Windows XP Home Edition Windows XP Professional 2684, 2685 Windows XP Home Edition Windows XP Professional ThinkPad R40 47
Hardware Maintenance Manual
Page 57
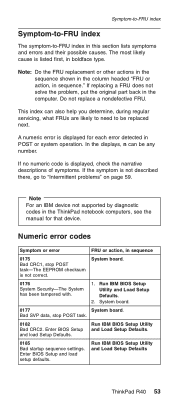
... descriptions of symptoms. If the symptom is not correct. System board. 0176 System Security-The System has been tampered with. 1. Run IBM BIOS Setup Utility and Load Setup Defaults. 2. Enter BIOS Setup and load setup defaults. The most likely cause is displayed for that ...action, in the computer. Note For an IBM device not supported by diagnostic codes in boldface type. System board. 0177 System board. Run IBM BIOS Setup Utility and Load Setup Defaults ThinkPad R40 53 A numeric error is listed first, in the ThinkPad notebook computers, see the manual for each error...
... descriptions of symptoms. If the symptom is not correct. System board. 0176 System Security-The System has been tampered with. 1. Run IBM BIOS Setup Utility and Load Setup Defaults. 2. Enter BIOS Setup and load setup defaults. The most likely cause is displayed for that ...action, in the computer. Note For an IBM device not supported by diagnostic codes in boldface type. System board. 0177 System board. Run IBM BIOS Setup Utility and Load Setup Defaults ThinkPad R40 53 A numeric error is listed first, in the ThinkPad notebook computers, see the manual for each error...
Hardware Maintenance Manual
Page 58
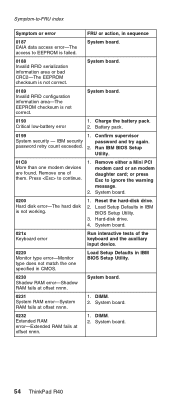
...type error-Monitor type does not match the one modem devices are found. Remove either a Mini PCI modem card or an modem daughter card; Reset the hard-disk drive. 2. Load Setup Defaults in IBM BIOS Setup Utility. 0230 Shadow RAM error-Shadow RAM fails at offset nnnn. DIMM. 2. System board. 54 ThinkPad R40... System board. 0188 Invalid RFID serialization information area or bad CRC2-The EEPROM checksum is failed. Press to ignore the warning message. 2. System board. 0200 Hard disk error-The hard disk is not correct. Load Setup Defaults in IBM BIOS Setup...
...type error-Monitor type does not match the one modem devices are found. Remove either a Mini PCI modem card or an modem daughter card; Reset the hard-disk drive. 2. Load Setup Defaults in IBM BIOS Setup Utility. 0230 Shadow RAM error-Shadow RAM fails at offset nnnn. DIMM. 2. System board. 54 ThinkPad R40... System board. 0188 Invalid RFID serialization information area or bad CRC2-The EEPROM checksum is failed. Press to ignore the warning message. 2. System board. 0200 Hard disk error-The hard disk is not correct. Load Setup Defaults in IBM BIOS Setup...
Hardware Maintenance Manual
Page 59
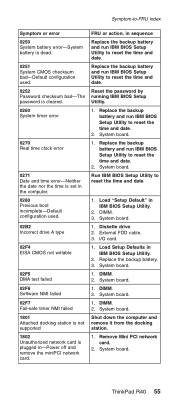
...network card. 2. Reset the password by running IBM BIOS Setup Utility. 1. Load "Setup Default" in IBM BIOS Setup Utility. 2. System board. 1. System board. 1. I/O card. 1. DIMM. 2. System board. 1. Run IBM BIOS Setup Utility to reset the time and date. 2. DIMM. 2. ThinkPad R40 55 System board. System board. 1. Replace ... date nor the time is set in the computer. 0280 Previous boot incomplete-Default configuration used. 02B2 Incorrect drive A type 02F4 EISA CMOS not writable 02F5 DMA test failed 02F6 Software NMI failed 02F7 Fail-safe timer NMI failed 1801 Attached...
...network card. 2. Reset the password by running IBM BIOS Setup Utility. 1. Load "Setup Default" in IBM BIOS Setup Utility. 2. System board. 1. System board. 1. I/O card. 1. DIMM. 2. System board. 1. Run IBM BIOS Setup Utility to reset the time and date. 2. DIMM. 2. ThinkPad R40 55 System board. System board. 1. Replace ... date nor the time is set in the computer. 0280 Previous boot incomplete-Default configuration used. 02B2 Incorrect drive A type 02F4 EISA CMOS not writable 02F5 DMA test failed 02F6 Software NMI failed 02F7 Fail-safe timer NMI failed 1801 Attached...
Hardware Maintenance Manual
Page 61
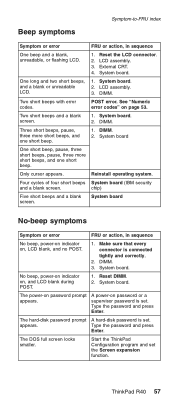
... correctly. 2. The DOS full screen looks smaller. POST error. chip) Five short beeps and a blank screen. System board. Type the password and press Enter. ThinkPad R40 57 External CRT. 4. LCD assembly. 3. System board. 2. Three short beeps, pause, three more short beeps, and one short... beep. 1. Four cycles of four short beeps System board (IBM security and a blank screen. DIMM. 3. System board. System ...
... correctly. 2. The DOS full screen looks smaller. POST error. chip) Five short beeps and a blank screen. System board. Type the password and press Enter. ThinkPad R40 57 External CRT. 4. LCD assembly. 3. System board. 2. Three short beeps, pause, three more short beeps, and one short... beep. 1. Four cycles of four short beeps System board (IBM security and a blank screen. DIMM. 3. System board. System ...
Hardware Maintenance Manual
Page 69
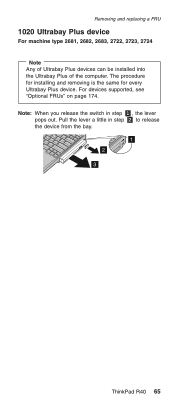
Note: When you release the switch in step 2 to release the device from the bay. 1 21 3 2 ThinkPad R40 65 Pull the lever a little in step 1 , the lever pops out. For devices supported, see "Optional FRUs" on page 174. The procedure for installing and removing is the same for every Ultrabay Plus device. Removing and replacing a FRU 1020 Ultrabay Plus device For machine type 2681, 2682, 2683, 2722, 2723, 2724 Note Any of Ultrabay Plus devices can be installed into the Ultrabay Plus of the computer.
Note: When you release the switch in step 2 to release the device from the bay. 1 21 3 2 ThinkPad R40 65 Pull the lever a little in step 1 , the lever pops out. For devices supported, see "Optional FRUs" on page 174. The procedure for installing and removing is the same for every Ultrabay Plus device. Removing and replacing a FRU 1020 Ultrabay Plus device For machine type 2681, 2682, 2683, 2722, 2723, 2724 Note Any of Ultrabay Plus devices can be installed into the Ultrabay Plus of the computer.

Hardware Maintenance Manual
Page 74
Removing and replacing a FRU 1050 Mini PCI adapter For access, remove this with any other screw type. Do not replace this FRU: v "1010 Battery pack" on page 176). 2 1a 1b Step 1a 1b Screw (quantity) Torque M2.5 x 3.5 mm, +/- The following illustrations for ... be present when the 802.11 a/b card is installed in order to step 6 show the combination of the Mini PCI Wireless LAN card. 3 (continued) 70 ThinkPad R40 In order to loosen 1b , use the driver FRU 9900712 and TR7bit FRU 00P6967 (See "Tools" on page 64 Note: Some models do not remove...
Removing and replacing a FRU 1050 Mini PCI adapter For access, remove this with any other screw type. Do not replace this FRU: v "1010 Battery pack" on page 176). 2 1a 1b Step 1a 1b Screw (quantity) Torque M2.5 x 3.5 mm, +/- The following illustrations for ... be present when the 802.11 a/b card is installed in order to step 6 show the combination of the Mini PCI Wireless LAN card. 3 (continued) 70 ThinkPad R40 In order to loosen 1b , use the driver FRU 9900712 and TR7bit FRU 00P6967 (See "Tools" on page 64 Note: Some models do not remove...
Hardware Maintenance Manual
Page 77
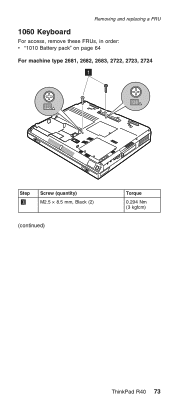
Removing and replacing a FRU 1060 Keyboard For access, remove these FRUs, in order: v "1010 Battery pack" on page 64 For machine type 2681, 2682, 2683, 2722, 2723, 2724 1 Step 1 Screw (quantity) M2.5 × 8.5 mm, Black (2) (continued) Torque 0.294 Nm (3 kgfcm) ThinkPad R40 73
Removing and replacing a FRU 1060 Keyboard For access, remove these FRUs, in order: v "1010 Battery pack" on page 64 For machine type 2681, 2682, 2683, 2722, 2723, 2724 1 Step 1 Screw (quantity) M2.5 × 8.5 mm, Black (2) (continued) Torque 0.294 Nm (3 kgfcm) ThinkPad R40 73
Hardware Maintenance Manual
Page 81
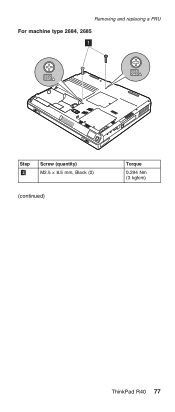
Removing and replacing a FRU For machine type 2684, 2685 1 Step 1 Screw (quantity) M2.5 × 8.5 mm, Black (2) (continued) Torque 0.294 Nm (3 kgfcm) ThinkPad R40 77
Removing and replacing a FRU For machine type 2684, 2685 1 Step 1 Screw (quantity) M2.5 × 8.5 mm, Black (2) (continued) Torque 0.294 Nm (3 kgfcm) ThinkPad R40 77
Hardware Maintenance Manual
Page 86
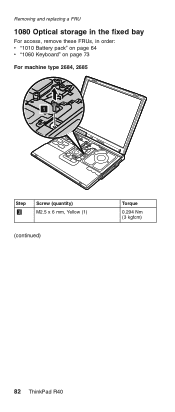
Removing and replacing a FRU 1080 Optical storage in the fixed bay For access, remove these FRUs, in order: v "1010 Battery pack" on page 64 v "1060 Keyboard" on page 73 For machine type 2684, 2685 1 Step 1 Screw (quantity) M2.5 x 6 mm, Yellow (1) (continued) Torque 0.294 Nm (3 kgfcm) 82 ThinkPad R40
Removing and replacing a FRU 1080 Optical storage in the fixed bay For access, remove these FRUs, in order: v "1010 Battery pack" on page 64 v "1060 Keyboard" on page 73 For machine type 2684, 2685 1 Step 1 Screw (quantity) M2.5 x 6 mm, Yellow (1) (continued) Torque 0.294 Nm (3 kgfcm) 82 ThinkPad R40
Hardware Maintenance Manual
Page 96
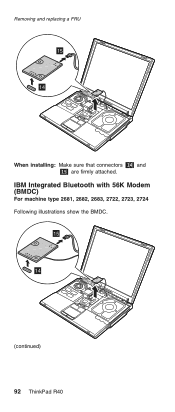
Removing and replacing a FRU 15 14 When installing: Make sure that connectors 14 and 15 are firmly attached. IBM Integrated Bluetooth with 56K Modem (BMDC) For machine type 2681, 2682, 2683, 2722, 2723, 2724 Following illustrations show the BMDC. 15 14 (continued) 92 ThinkPad R40
Removing and replacing a FRU 15 14 When installing: Make sure that connectors 14 and 15 are firmly attached. IBM Integrated Bluetooth with 56K Modem (BMDC) For machine type 2681, 2682, 2683, 2722, 2723, 2724 Following illustrations show the BMDC. 15 14 (continued) 92 ThinkPad R40
Hardware Maintenance Manual
Page 99
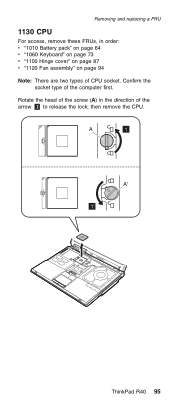
Removing and replacing a FRU 1130 CPU For access, remove these FRUs, in the direction of the arrow 1 to release the lock; then remove the CPU. A 1 A' 1' ThinkPad R40 95 Confirm the socket type of CPU socket. Rotate the head of the screw (A) in order: v "1010 Battery pack" on page 64 v "1060 Keyboard" on page 73 v "1100 Hinge cover" on page 87 v "1120 Fan assembly" on page 94 Note: There are two types of the computer first.
Removing and replacing a FRU 1130 CPU For access, remove these FRUs, in the direction of the arrow 1 to release the lock; then remove the CPU. A 1 A' 1' ThinkPad R40 95 Confirm the socket type of CPU socket. Rotate the head of the screw (A) in order: v "1010 Battery pack" on page 64 v "1060 Keyboard" on page 73 v "1100 Hinge cover" on page 87 v "1120 Fan assembly" on page 94 Note: There are two types of the computer first.
Hardware Maintenance Manual
Page 101
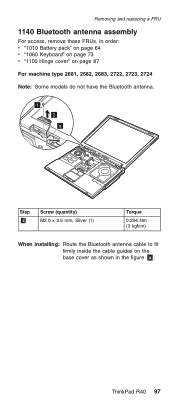
ThinkPad R40 97 Removing and replacing a FRU 1140 Bluetooth antenna assembly For access, remove these FRUs, in order: v "1010 Battery pack" on page 64 v "1060 Keyboard" on page 73 v "1100 Hinge cover" on page 87 For machine type 2681, 2682, 2683, 2722, 2723, 2724 Note: Some models do not have the Bluetooth antenna. 1 2 a 1 Step 1 Screw (quantity) M2.0 × 3.5 mm, Silver (1) Torque 0.294 Nm (3 kgfcm) When installing: Route the Bluetooth antenna cable to fit firmly inside the cable guides on the base cover as shown in the figure a .
ThinkPad R40 97 Removing and replacing a FRU 1140 Bluetooth antenna assembly For access, remove these FRUs, in order: v "1010 Battery pack" on page 64 v "1060 Keyboard" on page 73 v "1100 Hinge cover" on page 87 For machine type 2681, 2682, 2683, 2722, 2723, 2724 Note: Some models do not have the Bluetooth antenna. 1 2 a 1 Step 1 Screw (quantity) M2.0 × 3.5 mm, Silver (1) Torque 0.294 Nm (3 kgfcm) When installing: Route the Bluetooth antenna cable to fit firmly inside the cable guides on the base cover as shown in the figure a .
Hardware Maintenance Manual
Page 107
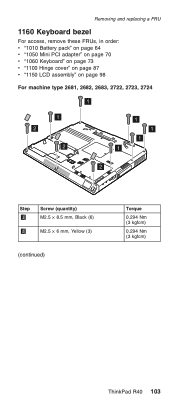
Removing and replacing a FRU 1160 Keyboard bezel For access, remove these FRUs, in order: v "1010 Battery pack" on page 64 v "1050 Mini PCI adapter" on page 70 v "1060 Keyboard" on page 73 v "1100 Hinge cover" on page 87 v "1150 LCD assembly" on page 98 For machine type 2681, 2682, 2683, 2722, 2723, 2724 1 1 2 2 1 1 1 1 2 Step 1 Screw (quantity) M2.5 × 8.5 mm, Black (6) 2 M2.5 × 6 mm, Yellow (3) (continued) Torque 0.294 Nm (3 kgfcm) 0.294 Nm (3 kgfcm) ThinkPad R40 103
Removing and replacing a FRU 1160 Keyboard bezel For access, remove these FRUs, in order: v "1010 Battery pack" on page 64 v "1050 Mini PCI adapter" on page 70 v "1060 Keyboard" on page 73 v "1100 Hinge cover" on page 87 v "1150 LCD assembly" on page 98 For machine type 2681, 2682, 2683, 2722, 2723, 2724 1 1 2 2 1 1 1 1 2 Step 1 Screw (quantity) M2.5 × 8.5 mm, Black (6) 2 M2.5 × 6 mm, Yellow (3) (continued) Torque 0.294 Nm (3 kgfcm) 0.294 Nm (3 kgfcm) ThinkPad R40 103
Hardware Maintenance Manual
Page 110
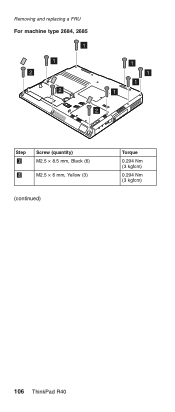
Removing and replacing a FRU For machine type 2684, 2685 1 1 2 2 1 1 1 1 2 Step 1 Screw (quantity) M2.5 × 8.5 mm, Black (6) 2 M2.5 × 6 mm, Yellow (3) (continued) Torque 0.294 Nm (3 kgfcm) 0.294 Nm (3 kgfcm) 106 ThinkPad R40
Removing and replacing a FRU For machine type 2684, 2685 1 1 2 2 1 1 1 1 2 Step 1 Screw (quantity) M2.5 × 8.5 mm, Black (6) 2 M2.5 × 6 mm, Yellow (3) (continued) Torque 0.294 Nm (3 kgfcm) 0.294 Nm (3 kgfcm) 106 ThinkPad R40

