
Installation Guide
Page 1
... Ceiling Plate. Attach the outlet box directly to the support brace or joist with two #8 x 1-1/2" wood screws and washers. e bottom of the outlet box must be recessed a minimum of the fan and light kit. For instructions to install your ceiling fan, go to your ceiling fan site. o e outer holes of lead wires extend from any hardware store or electrical supply house. 5-4. o Six inches of the outlet box are essential for the ceiling hole directly...
... Ceiling Plate. Attach the outlet box directly to the support brace or joist with two #8 x 1-1/2" wood screws and washers. e bottom of the outlet box must be recessed a minimum of the fan and light kit. For instructions to install your ceiling fan, go to your ceiling fan site. o e outer holes of lead wires extend from any hardware store or electrical supply house. 5-4. o Six inches of the outlet box are essential for the ceiling hole directly...

Owner's Manual
Page 1
Date Purchased Where Purchased Type 2 Models Owner's Guide and Installation Manual English Español Form# 42672-01 20110302 ©2011 Hunter Fan Co. Model Name Model No. For Your Records and Warranty Assistance For reference, also attach your receipt or a copy of your receipt to the manual.
Date Purchased Where Purchased Type 2 Models Owner's Guide and Installation Manual English Español Form# 42672-01 20110302 ©2011 Hunter Fan Co. Model Name Model No. For Your Records and Warranty Assistance For reference, also attach your receipt or a copy of your receipt to the manual.
Owner's Manual
Page 2
... Ready 6 2 • Installing the Ceiling Plate 7 3 • Assembling and Hanging the Fan . . . . 8 4 • Wiring the Fan 9 5 • Installing the Canopy and Canopy Trim Ring 10 6 • Assembling the Blades 11 8 • Operating and Cleaning Your Ceiling Fan 13 9 • Troubleshooting 14 Welcome Your new Hunter® ceiling fan is an addition to your fan. We appreciate the opportunity to the support structure of the fan motor housing). Before installing your fan, for many years. SAVE THESE INSTRUCTIONS. • Use only Hunter replacement parts. • To reduce...
... Ready 6 2 • Installing the Ceiling Plate 7 3 • Assembling and Hanging the Fan . . . . 8 4 • Wiring the Fan 9 5 • Installing the Canopy and Canopy Trim Ring 10 6 • Assembling the Blades 11 8 • Operating and Cleaning Your Ceiling Fan 13 9 • Troubleshooting 14 Welcome Your new Hunter® ceiling fan is an addition to your fan. We appreciate the opportunity to the support structure of the fan motor housing). Before installing your fan, for many years. SAVE THESE INSTRUCTIONS. • Use only Hunter replacement parts. • To reduce...
Owner's Manual
Page 3
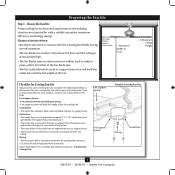
... light kit. Fan Support System Fan Support System Suitable Existing Fan Site Wiring Outlet Box 3 42672-01 • 03/02/11 • Hunter Fan Company Outlet Box • The outlet box is an UL-approved octagonal 4" x 1-1/2" outlet box (or as described on this page. Fan Support System • Fan attaches directly to building structure. • Fan support system will hold full weight of the outlet box are aligned with the rotating fan blades during normal operation...
... light kit. Fan Support System Fan Support System Suitable Existing Fan Site Wiring Outlet Box 3 42672-01 • 03/02/11 • Hunter Fan Company Outlet Box • The outlet box is an UL-approved octagonal 4" x 1-1/2" outlet box (or as described on this page. Fan Support System • Fan attaches directly to building structure. • Fan support system will hold full weight of the outlet box are aligned with the rotating fan blades during normal operation...
Owner's Manual
Page 4
... light kit. For instructions to install your ceiling fan, go to recess the outlet box a minimum of the wood screws (5/64") through the outlet box so that the fan supply line extends at any hardware store or electrical supply house. 4-2. Locate the site for the ceiling hole directly below the joist or support brace that both the inner and outer holes in the box align with Section 2 • Installing the Ceiling Plate...
... light kit. For instructions to install your ceiling fan, go to recess the outlet box a minimum of the wood screws (5/64") through the outlet box so that the fan supply line extends at any hardware store or electrical supply house. 4-2. Locate the site for the ceiling hole directly below the joist or support brace that both the inner and outer holes in the box align with Section 2 • Installing the Ceiling Plate...
Owner's Manual
Page 5
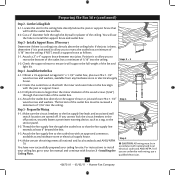
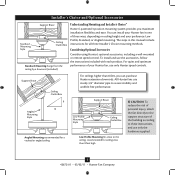
... supplied. 5 42672-01 • 03/02/11 • Hunter Fan Company Angled Mounting Style 8 12 Angled Mounting recommended for a vaulted or angled ceiling Support Brace Low Profile Mounting Style Ceiling Outlet Box Low Profile Mounting fits close to the ceiling, recommended for all three Installer's Choice mounting methods. Considering Optional Accessories Consider using Hunter's optional accessories, including a wall-mounted or remote speed control. Support Brace Ceiling Outlet Box For ceilings higher than 8 feet high CAUTION: To reduce the risk of personal injury, attach...
... supplied. 5 42672-01 • 03/02/11 • Hunter Fan Company Angled Mounting Style 8 12 Angled Mounting recommended for a vaulted or angled ceiling Support Brace Low Profile Mounting Style Ceiling Outlet Box Low Profile Mounting fits close to the ceiling, recommended for all three Installer's Choice mounting methods. Considering Optional Accessories Consider using Hunter's optional accessories, including a wall-mounted or remote speed control. Support Brace Ceiling Outlet Box For ceilings higher than 8 feet high CAUTION: To reduce the risk of personal injury, attach...
Owner's Manual
Page 6
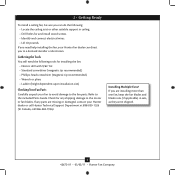
... You will need help installing the fan, your Hunter fan dealer can do the following tools for and install wood screws. • Identify and connect electrical wires. • Lift 40 pounds. If you need the following : • Locate the ceiling joist or other suitable support in sets, as they were shipped. 6 42672-01 • 03/02/11 • Hunter Fan Company 1 • Getting Ready To install a ceiling fan, be sure you can direct you...
... You will need help installing the fan, your Hunter fan dealer can do the following tools for and install wood screws. • Identify and connect electrical wires. • Lift 40 pounds. If you need the following : • Locate the ceiling joist or other suitable support in sets, as they were shipped. 6 42672-01 • 03/02/11 • Hunter Fan Company 1 • Getting Ready To install a ceiling fan, be sure you can direct you...
Owner's Manual
Page 7
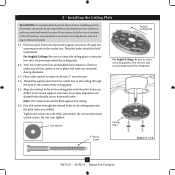
... ceiling. 2-6. do not use slotted holes directly across from the outlet box in the ceiling through the outermost holes in the wood support structure. Flat Washer Toward Ceiling Peak For Angled Ceilings: Be sure to make sure all four isolators are in the ceiling plate with four preinstalled noise isolators. Place a flat washer on the screws. Align the slotted holes in place and were not removed during shipment. 2-3. 2 • Installing the Ceiling Plate...
... ceiling. 2-6. do not use slotted holes directly across from the outlet box in the ceiling through the outermost holes in the wood support structure. Flat Washer Toward Ceiling Peak For Angled Ceilings: Be sure to make sure all four isolators are in the ceiling plate with four preinstalled noise isolators. Place a flat washer on the screws. Align the slotted holes in place and were not removed during shipment. 2-3. 2 • Installing the Ceiling Plate...
Owner's Manual
Page 8
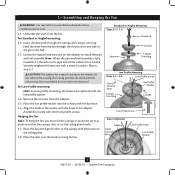
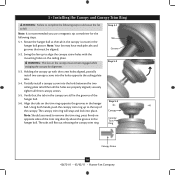
...Profile mounting: Note: For low profile mounting, the downrod is replaced with three low profile screws. Standard or Angled Mounting Steps 3-2 - 3-3 Downrod Setscrew Canopy Canopy Trim Ring Low Profile Mounting Steps 3-5 - 3-6 Low Profile Screws Green Ground Wire Canopy Trim Ring Low Profile Washer Canopy Low Profile Screw Step 3-6 (Detail) Adapter Green Ground Wire Low Profile Screw Low Profile Washer 8 42672-01 • 03/02/11 • Hunter Fan Company Place the low profile washer into the canopy with the hooks on one side of the pin in these installation instructions...
...Profile mounting: Note: For low profile mounting, the downrod is replaced with three low profile screws. Standard or Angled Mounting Steps 3-2 - 3-3 Downrod Setscrew Canopy Canopy Trim Ring Low Profile Mounting Steps 3-5 - 3-6 Low Profile Screws Green Ground Wire Canopy Trim Ring Low Profile Washer Canopy Low Profile Screw Step 3-6 (Detail) Adapter Green Ground Wire Low Profile Screw Low Profile Washer 8 42672-01 • 03/02/11 • Hunter Fan Company Place the low profile washer into the canopy with the hooks on one side of the pin in these installation instructions...
Owner's Manual
Page 9
..., with national and local electrical codes. 4-1. Connect the white wire (grounded) from the ceiling to the green ground wire (grounding) from the ceiling plate and the green ground wire (grounding) from the fan can be in accordance with the grounded wires on one side of the outlet box. 9 42672-01 • 03/02/11 • Hunter Fan Company Wire Connector Dual Switch Wiring Single Switch Wiring To connect the wires, hold the bare metal...
..., with national and local electrical codes. 4-1. Connect the white wire (grounded) from the ceiling to the green ground wire (grounding) from the ceiling plate and the green ground wire (grounding) from the fan can be in accordance with the grounded wires on one side of the outlet box. 9 42672-01 • 03/02/11 • Hunter Fan Company Wire Connector Dual Switch Wiring Single Switch Wiring To connect the wires, hold the bare metal...
Owner's Manual
Page 10
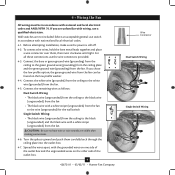
... fan to remove the trim ring, press firmly on opposite sides of the trim ring directly above the groove in the canopy is recommended you need to fall. Using both hands, push the canopy trim ring up to align the canopy screw holes with the screw holes aligned, partially install two canopy screws into the holes opposite the ceiling plate tabs. 5-4. Note: Should you use a magnetic tip screwdriver for alignment. 5-3. Swing the fan up with the mounting holes...
... fan to remove the trim ring, press firmly on opposite sides of the trim ring directly above the groove in the canopy is recommended you need to fall. Using both hands, push the canopy trim ring up to align the canopy screw holes with the screw holes aligned, partially install two canopy screws into the holes opposite the ceiling plate tabs. 5-4. Note: Should you use a magnetic tip screwdriver for alignment. 5-3. Swing the fan up with the mounting holes...
Owner's Manual
Page 11
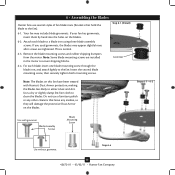
... on the blades. This is normal. 6-3. For each blade to the fan. Use a dry or slightly damp lint free cloth to secure shipping blocks. 6-4. Your fan may appear slightly loose after screws are installed in the motor to clean the blades. If your fan has grommets, insert them by hand into the holes on the blades. 6-2. Remove the blade mounting screws and rubber shipping bumpers from the motor. If you used grommets, the blades may include blade grommets.
... on the blades. This is normal. 6-3. For each blade to the fan. Use a dry or slightly damp lint free cloth to secure shipping blocks. 6-4. Your fan may appear slightly loose after screws are installed in the motor to clean the blades. If your fan has grommets, insert them by hand into the holes on the blades. 6-2. Remove the blade mounting screws and rubber shipping bumpers from the motor. If you used grommets, the blades may include blade grommets.
Owner's Manual
Page 12
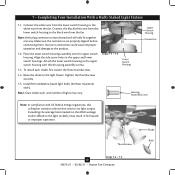
... Switch Housing Connectors Lower Switch Housing Housing Assembly Screw Note: In compliance with three housing assembly screws. 7-3. Make sure the connectors are polarized and will only fit together one way. Incorrect connection could cause improper operation and damage to the light fixture. Raise the shade to the product. 7-2. Note: Glass shade style and number of lights may result in the upper and lower switch housings. Shade Bulb Thumbscrews Steps 7-4 - 7-5 12 42672-01 • 03/02/11 • Hunter Fan Company To install...
... Switch Housing Connectors Lower Switch Housing Housing Assembly Screw Note: In compliance with three housing assembly screws. 7-3. Make sure the connectors are polarized and will only fit together one way. Incorrect connection could cause improper operation and damage to the light fixture. Raise the shade to the product. 7-2. Note: Glass shade style and number of lights may result in the upper and lower switch housings. Shade Bulb Thumbscrews Steps 7-4 - 7-5 12 42672-01 • 03/02/11 • Hunter Fan Company To install...
Owner's Manual
Page 13
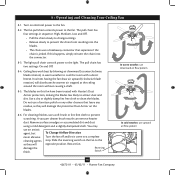
... light pull chain controls power to the fan. The pull chain has two settings: On and Off. 8-4. Remove surface smudges or accumulated dirt and dust using a mild detergent and a slightly dampened cloth. The fan pull chain controls power to the light. If this fan have been treated with a direct breeze. Restart fan. Turn on the blades. 8-6. You may use upward air flow pattern 13 42672-01 • 03/02/11 • Hunter Fan Company Reversing Switch In warm weather, use...
... light pull chain controls power to the fan. The pull chain has two settings: On and Off. 8-4. Remove surface smudges or accumulated dirt and dust using a mild detergent and a slightly dampened cloth. The fan pull chain controls power to the light. If this fan have been treated with a direct breeze. Restart fan. Turn on the blades. 8-6. You may use upward air flow pattern 13 42672-01 • 03/02/11 • Hunter Fan Company Reversing Switch In warm weather, use...
Owner's Manual
Page 14
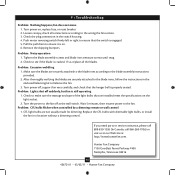
.... Problem: CFL bulbs flicker when controlled by a dimming remote or wall control 1. If so, replace all connections according to make sure the wattage and type of the light bulbs that are securely attached to the blade irons according to ensure that the hanger ball is engaged. 5. Problem: Noisy operation 1. fan does not move 1. Pull the pull chain to balance the fan. 3. Problem: Lights shut off , support fan very carefully, and check that the switch is properly seated. 9 • Troubleshooting Problem...
.... Problem: CFL bulbs flicker when controlled by a dimming remote or wall control 1. If so, replace all connections according to make sure the wattage and type of the light bulbs that are securely attached to the blade irons according to ensure that the hanger ball is engaged. 5. Problem: Noisy operation 1. fan does not move 1. Pull the pull chain to balance the fan. 3. Problem: Lights shut off , support fan very carefully, and check that the switch is properly seated. 9 • Troubleshooting Problem...
Parts Guide
Page 1
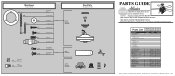
... PARTS GUIDE Using this Parts Guide, make sure all parts are missing, DO NOT RETURN THIS ITEM TO THE STORE, call 888-830-1326 for assistance. Parts List Item Name * Hanging System Kit Ceiling Plate Canopy Canopy Trim Ring Hanger Ball / Downrod Assembly Setscrew Low Profile Washer Canopy Screw Wood Screw Flat Washer Mounting Isolator * Screw, Low Profile Switch Housing, Upper Light Kit Assembly Blade Iron Set Blade Set Screw, Blade Iron Armature Hardware Kit Blade Assembly Screw Wire Connector Balancing Kit Light bulb / Bulb Pull Chain Pendant Pull Chain Pendant Pull Chain Globe/Shade Model...
... PARTS GUIDE Using this Parts Guide, make sure all parts are missing, DO NOT RETURN THIS ITEM TO THE STORE, call 888-830-1326 for assistance. Parts List Item Name * Hanging System Kit Ceiling Plate Canopy Canopy Trim Ring Hanger Ball / Downrod Assembly Setscrew Low Profile Washer Canopy Screw Wood Screw Flat Washer Mounting Isolator * Screw, Low Profile Switch Housing, Upper Light Kit Assembly Blade Iron Set Blade Set Screw, Blade Iron Armature Hardware Kit Blade Assembly Screw Wire Connector Balancing Kit Light bulb / Bulb Pull Chain Pendant Pull Chain Pendant Pull Chain Globe/Shade Model...


