
Installation Guide
Page 1
... to install the support brace and outlet box. If your fan manual and begin with an approved connector, available at least 6" beyond the box. 5-3. Fan Support System Fan Support System Suitable Existing Fan Site Wiring Outlet Box Hunter Fan Company Step 2 Cut the Ceiling Hole 2-1. Cut a 4"... into the ceiling. For instructions to install your new Hunter fan. If you cannot check off . If you are aligned with the rotating fan blades during normal operation. • e fan blades are turned off every item, prepare a new fan site as follows: 3-1. o e outer holes of...
... to install the support brace and outlet box. If your fan manual and begin with an approved connector, available at least 6" beyond the box. 5-3. Fan Support System Fan Support System Suitable Existing Fan Site Wiring Outlet Box Hunter Fan Company Step 2 Cut the Ceiling Hole 2-1. Cut a 4"... into the ceiling. For instructions to install your new Hunter fan. If you cannot check off . If you are aligned with the rotating fan blades during normal operation. • e fan blades are turned off every item, prepare a new fan site as follows: 3-1. o e outer holes of...

Owner's Manual
Page 1
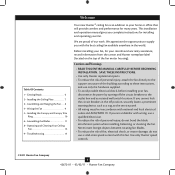
For Your Records and Warranty Assistance For reference, also attach your receipt or a copy of your receipt to the manual. Date Purchased Where Purchased Type 2 Models Owner's Guide and Installation Manual English Español Form# 42672-01 20110302 ©2011 Hunter Fan Co. Model Name Model No.
For Your Records and Warranty Assistance For reference, also attach your receipt or a copy of your receipt to the manual. Date Purchased Where Purchased Type 2 Models Owner's Guide and Installation Manual English Español Form# 42672-01 20110302 ©2011 Hunter Fan Co. Model Name Model No.
Owner's Manual
Page 2
...warning device, such as a tag, to supply you complete instructions for your fan. SAVE THESE INSTRUCTIONS. • Use only Hunter replacement parts. • To reduce the risk of personal injury, attach the fan directly to the support structure of fire, electrical shock, or motor damage, ..., record information from the carton and Hunter nameplate label (located on the top of our work. Use only Hunter speed controls. © 2011 Hunter Fan Company 2 42672-01 • 03/02/11 • Hunter Fan Company Never insert foreign objects between rotating fan blades. • To reduce the...
...warning device, such as a tag, to supply you complete instructions for your fan. SAVE THESE INSTRUCTIONS. • Use only Hunter replacement parts. • To reduce the risk of personal injury, attach the fan directly to the support structure of fire, electrical shock, or motor damage, ..., record information from the carton and Hunter nameplate label (located on the top of our work. Use only Hunter speed controls. © 2011 Hunter Fan Company 2 42672-01 • 03/02/11 • Hunter Fan Company Never insert foreign objects between rotating fan blades. • To reduce the...
Owner's Manual
Page 3
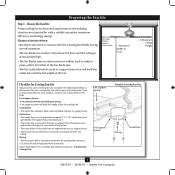
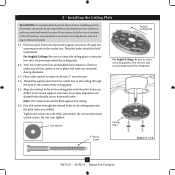
... airflow, such as walls or posts, within 30 inches of 1/16" into ceiling. Fan Support System Fan Support System Suitable Existing Fan Site Wiring Outlet Box 3 42672-01 • 03/02/11 • Hunter Fan Company Ceiling Hole • The outlet box clearance hole is suitable, skip ahead to... building structure. • Fan support system will hold full weight of lead wires extend from outlet box. If your new Hunter fan. Preparing the Fan Site Step 1 - Outlet Box • The outlet box is an UL-approved octagonal 4"...
... airflow, such as walls or posts, within 30 inches of 1/16" into ceiling. Fan Support System Fan Support System Suitable Existing Fan Site Wiring Outlet Box 3 42672-01 • 03/02/11 • Hunter Fan Company Ceiling Hole • The outlet box clearance hole is suitable, skip ahead to... building structure. • Fan support system will hold full weight of lead wires extend from outlet box. If your new Hunter fan. Preparing the Fan Site Step 1 - Outlet Box • The outlet box is an UL-approved octagonal 4"...
Owner's Manual
Page 4
... a 4" diameter hole through the inner holes of 1/16" into the ceiling. Install the Outlet Box 4-1. You have now successfully prepared your fan manual and continue with an approved connector, available at least 6" beyond the box. 5-3. If you to recess the outlet box a minimum of.... Cut the Ceiling Hole 2-1. Step 3 - Step 5 - Position it will use a qualified electrician. 4 42672-01 • 03/02/11 • Hunter Fan Company Drill pilot holes no larger than the minor diameter of the wood screws (5/64") through the drywall or plaster of 1/16" into the ceiling...
... a 4" diameter hole through the inner holes of 1/16" into the ceiling. Install the Outlet Box 4-1. You have now successfully prepared your fan manual and continue with an approved connector, available at least 6" beyond the box. 5-3. If you to recess the outlet box a minimum of.... Cut the Ceiling Hole 2-1. Step 3 - Step 5 - Position it will use a qualified electrician. 4 42672-01 • 03/02/11 • Hunter Fan Company Drill pilot holes no larger than the minor diameter of the wood screws (5/64") through the drywall or plaster of 1/16" into the ceiling...
Owner's Manual
Page 5
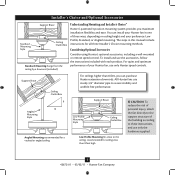
... than 8 feet, you maximum installation flexibility and ease. Understanding Mounting and Installer's Choice® Hunter's patented 3-position mounting system provides you can install your Hunter fan in one of the building according to these instructions, and use the accessories, follow the instructions ...included with each product. To install and use only the hardware supplied. 5 42672-01 • 03/02/11 • Hunter Fan Company Angled Mounting Style 8 12 Angled Mounting recommended for a vaulted or angled ceiling Support Brace Low Profile Mounting Style Ceiling Outlet ...
... than 8 feet, you maximum installation flexibility and ease. Understanding Mounting and Installer's Choice® Hunter's patented 3-position mounting system provides you can install your Hunter fan in one of the building according to these instructions, and use the accessories, follow the instructions ...included with each product. To install and use only the hardware supplied. 5 42672-01 • 03/02/11 • Hunter Fan Company Angled Mounting Style 8 12 Angled Mounting recommended for a vaulted or angled ceiling Support Brace Low Profile Mounting Style Ceiling Outlet ...
Owner's Manual
Page 6
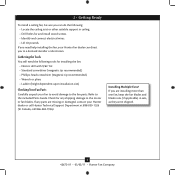
...; Wrench or pliers • Ladder (height dependent upon installation site) Checking Your Fan Parts Carefully unpack your fan to avoid damage to the fan parts. If you are missing or damaged, contact your Hunter fan dealer can do the following tools for and install wood screws. • Identify ...in sets, as they were shipped. 6 42672-01 • 03/02/11 • Hunter Fan Company Installing Multiple Fans? Refer to the included Parts Guide. 1 • Getting Ready To install a ceiling fan, be sure you can direct you to a licensed installer or electrician. Gathering the Tools ...
...; Wrench or pliers • Ladder (height dependent upon installation site) Checking Your Fan Parts Carefully unpack your fan to avoid damage to the fan parts. If you are missing or damaged, contact your Hunter fan dealer can do the following tools for and install wood screws. • Identify ...in sets, as they were shipped. 6 42672-01 • 03/02/11 • Hunter Fan Company Installing Multiple Fans? Refer to the included Parts Guide. 1 • Getting Ready To install a ceiling fan, be sure you can direct you to a licensed installer or electrician. Gathering the Tools ...
Owner's Manual
Page 7
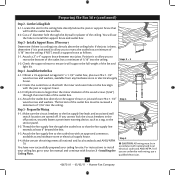
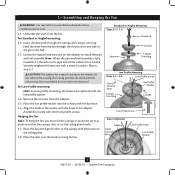
...Toward Ceiling Peak For Angled Ceilings: Be sure to orient the ceiling plate so that the two tabs are pointing toward the ceiling peak. 2-2. Your fan comes with the pilot holes you drilled in the wood support structure. Ceiling Plate 3" Wood Screw Steps 2-3 - 2-6 7 42672-01 • 03/02.../11 • Hunter Fan Company For Angled Ceilings: Be sure to orient the ceiling plate so that the two tabs are pointing toward the ceiling peak. Pass the screws ...
...Toward Ceiling Peak For Angled Ceilings: Be sure to orient the ceiling plate so that the two tabs are pointing toward the ceiling peak. 2-2. Your fan comes with the pilot holes you drilled in the wood support structure. Ceiling Plate 3" Wood Screw Steps 2-3 - 2-6 7 42672-01 • 03/02.../11 • Hunter Fan Company For Angled Ceilings: Be sure to orient the ceiling plate so that the two tabs are pointing toward the ceiling peak. Pass the screws ...
Owner's Manual
Page 8
...head setscrew on the ceiling plate hooks. 3-7. Assemble securely with the holes in the canopy with a wrench or pliers. Hanging the Fan: Note: To hang the fan, you must tilt the canopy to an almost vertical position so that the canopy slots sit on the adapter to install the pipe...Profile Screw Low Profile Washer 8 42672-01 • 03/02/11 • Hunter Fan Company Feed the wires from the fan. For Low Profile mounting: Note: For low profile mounting, the downrod is normal. Raise the fan and align the slots in the adapter. Do not remove this is replaced with the...
...head setscrew on the ceiling plate hooks. 3-7. Assemble securely with the holes in the canopy with a wrench or pliers. Hanging the Fan: Note: To hang the fan, you must tilt the canopy to an almost vertical position so that the canopy slots sit on the adapter to install the pipe...Profile Screw Low Profile Washer 8 42672-01 • 03/02/11 • Hunter Fan Company Feed the wires from the fan. For Low Profile mounting: Note: For low profile mounting, the downrod is normal. Raise the fan and align the slots in the adapter. Do not remove this is replaced with the...
Owner's Manual
Page 9
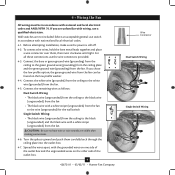
... wiring must be found on the other side of the outlet box. 9 42672-01 • 03/02/11 • Hunter Fan Company Wire Connector Dual Switch Wiring Single Switch Wiring Spread the wires apart, with wiring, use a qualified electrician. If you are not included. Turn the ... sure no bare wire or wire strands are visible after making connections. 4-6. If you chose the low profile option, the green ground wire from the fan. 4-5. To connect the wires, hold the bare metal leads together and place a wire connector over them carefully back through the ceiling plate into the outlet...
... wiring must be found on the other side of the outlet box. 9 42672-01 • 03/02/11 • Hunter Fan Company Wire Connector Dual Switch Wiring Single Switch Wiring Spread the wires apart, with wiring, use a qualified electrician. If you are not included. Turn the ... sure no bare wire or wire strands are visible after making connections. 4-6. If you chose the low profile option, the green ground wire from the fan. 4-5. To connect the wires, hold the bare metal leads together and place a wire connector over them carefully back through the ceiling plate into the outlet...
Owner's Manual
Page 10
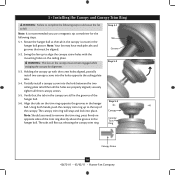
...in the hanger ball. Step 5-1 Tab Groove Step 5-2 Step 5-3 Canopy Canopy Trim Ring Canopy Screw 10 42672-01 • 03/02/11 • Hunter Fan Company 5 • Installing the Canopy and Canopy Trim Ring WARNING: Failure to complete the following steps. 5-1. Note: It is secure in the canopy ... the screw holes aligned, partially install two canopy screws into place. Note: Should you use a magnetic tip screwdriver for alignment. 5-3. Swing the fan up to the top of the hanger ball. 5-6. Align the tabs on the ceiling plate. The tabs will snap and lock into the holes...
...in the hanger ball. Step 5-1 Tab Groove Step 5-2 Step 5-3 Canopy Canopy Trim Ring Canopy Screw 10 42672-01 • 03/02/11 • Hunter Fan Company 5 • Installing the Canopy and Canopy Trim Ring WARNING: Failure to complete the following steps. 5-1. Note: It is secure in the canopy ... the screw holes aligned, partially install two canopy screws into place. Note: Should you use a magnetic tip screwdriver for alignment. 5-3. Swing the fan up to the top of the hanger ball. 5-6. Align the tabs on the ceiling plate. The tabs will snap and lock into the holes...
Owner's Manual
Page 11
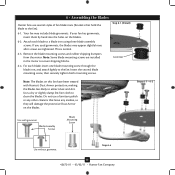
... bumpers from the motor. For each blade to the fan. Step 6-1 (Detail) Grommet Note: The blades on the blades. 6-2. Steps 6-1 - 6-2 Use with Hunter's Dust Armor protection, making the blades less likely to the fan). 6-1. Your fan may appear slightly loose after screws are installed in the...them by hand into the holes on this fan have been treated with grommet Blade Assembly Screws Blade Mounting Screw Use without grommet Step 6-4 11 42672-01 • 03/02/11 • Hunter Fan Company 6 • Assembling the Blades Hunter fans use a furniture polish or any residue, as...
... bumpers from the motor. For each blade to the fan. Step 6-1 (Detail) Grommet Note: The blades on the blades. 6-2. Steps 6-1 - 6-2 Use with Hunter's Dust Armor protection, making the blades less likely to the fan). 6-1. Your fan may appear slightly loose after screws are installed in the...them by hand into the holes on this fan have been treated with grommet Blade Assembly Screws Blade Mounting Screw Use without grommet Step 6-4 11 42672-01 • 03/02/11 • Hunter Fan Company 6 • Assembling the Blades Hunter fans use a furniture polish or any residue, as...
Owner's Manual
Page 12
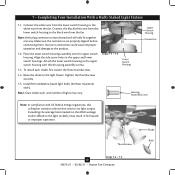
...wire from the lower switch housing to the light socket(s) may vary. Connect the white wire from the fan. Connect the black/white wire from the fan. Place the lower switch housing assembly over the upper switch housing. Raise the shade to the black wire...connectors are polarized and will only fit together one way. Shade Bulb Thumbscrews Steps 7-4 - 7-5 12 42672-01 • 03/02/11 • Hunter Fan Company Steps 7-1 - 7-2 Upper Switch Housing Connectors Lower Switch Housing Housing Assembly Screw Note: In compliance with three housing assembly screws. 7-3. To install each...
...wire from the lower switch housing to the light socket(s) may vary. Connect the white wire from the fan. Connect the black/white wire from the fan. Place the lower switch housing assembly over the upper switch housing. Raise the shade to the black wire...connectors are polarized and will only fit together one way. Shade Bulb Thumbscrews Steps 7-4 - 7-5 12 42672-01 • 03/02/11 • Hunter Fan Company Steps 7-1 - 7-2 Upper Switch Housing Connectors Lower Switch Housing Housing Assembly Screw Note: In compliance with three housing assembly screws. 7-3. To install each...
Owner's Manual
Page 13
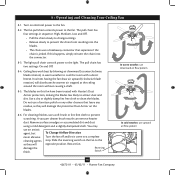
...cool the room with Hunter's Dust Armor protection, making the blades less likely to the as they will opposite position. If this fan have been treated with a direct breeze. A vacuum cleaner brush nozzle can remove heavier dust. Restart fan. In winter, having the fan draw air upward (clockwise... the light. Do not use upward air flow pattern 13 42672-01 • 03/02/11 • Hunter Fan Company The light pull chain controls power to the fan. Ceiling fans work best by blowing air downward (counterclockwise blade rotation) in sequence: High, Medium, Low and Off. &#...
...cool the room with Hunter's Dust Armor protection, making the blades less likely to the as they will opposite position. If this fan have been treated with a direct breeze. A vacuum cleaner brush nozzle can remove heavier dust. Restart fan. In winter, having the fan draw air upward (clockwise... the light. Do not use upward air flow pattern 13 42672-01 • 03/02/11 • Hunter Fan Company The light pull chain controls power to the fan. Ceiling fans work best by blowing air downward (counterclockwise blade rotation) in sequence: High, Medium, Low and Off. &#...
Owner's Manual
Page 14
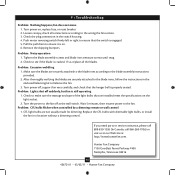
... 5. Problem: CFL bulbs flicker when controlled by a dimming remote or wall control 1. Hunter Fan Company 7130 Goodlett Farms Parkway #400 Memphis, Tennessee 38016 14 42672-01 • 03/02/11 • Hunter Fan Company fan does not move 1. Problem: Noisy operation 1. Turn the power to the blade assembly... instructions provided. 2. Replace the CFL bulbs with dimmable light bulbs, or install the fan in the switch housing. 4. Make sure the ...
... 5. Problem: CFL bulbs flicker when controlled by a dimming remote or wall control 1. Hunter Fan Company 7130 Goodlett Farms Parkway #400 Memphis, Tennessee 38016 14 42672-01 • 03/02/11 • Hunter Fan Company fan does not move 1. Problem: Noisy operation 1. Turn the power to the blade assembly... instructions provided. 2. Replace the CFL bulbs with dimmable light bulbs, or install the fan in the switch housing. 4. Make sure the ...
Parts Guide
Page 1
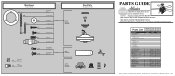
...Globe/Shade Model # Asm. REFER TO THE INSTALLATION MANUAL FOR FULL ASSEMBLY INSTRUCTIONS. Dwg. # Finish Qnty 1 21728 99104-01 New Bronze Part # 96759-30 21730 99104-02 White Part # 96759-03 1 85488-01 85488-01 1 99108-03 99108-02 1 73649-05 73649-05 1 G0253-01 G0253-03 11 63755-05...-861 1 65666-01 65666-01 3 77646-04 77646-04 1 G0090-01 G0090-01 1 G0091-01 G0091-01 2 63756-24 63756-20 3 77770-09 77770-06 Hunter Fan Company • 7130 Goodlett Farms Pkwy. #400 • Memphis, TN 38016 • www.hunterfan.com • 98000-01-957 03-08-2011 • ©...
...Globe/Shade Model # Asm. REFER TO THE INSTALLATION MANUAL FOR FULL ASSEMBLY INSTRUCTIONS. Dwg. # Finish Qnty 1 21728 99104-01 New Bronze Part # 96759-30 21730 99104-02 White Part # 96759-03 1 85488-01 85488-01 1 99108-03 99108-02 1 73649-05 73649-05 1 G0253-01 G0253-03 11 63755-05...-861 1 65666-01 65666-01 3 77646-04 77646-04 1 G0090-01 G0090-01 1 G0091-01 G0091-01 2 63756-24 63756-20 3 77770-09 77770-06 Hunter Fan Company • 7130 Goodlett Farms Pkwy. #400 • Memphis, TN 38016 • www.hunterfan.com • 98000-01-957 03-08-2011 • ©...


