

User Manual
Page 13
....BACK ** Returns to the live programme or recording. OPT+ Displays the channel attributes whilst watching a programme. b. LIST ** Displays the channel list. ** 7. WIDE Sets the Display Format. Before Using the Product ** 1. Each time you press this button the fast forward speed is increased. 1. e. NUMERICAL BUTTONS ** Enters a TV/Radio channel number or menu...
....BACK ** Returns to the live programme or recording. OPT+ Displays the channel attributes whilst watching a programme. b. LIST ** Displays the channel list. ** 7. WIDE Sets the Display Format. Before Using the Product ** 1. Each time you press this button the fast forward speed is increased. 1. e. NUMERICAL BUTTONS ** Enters a TV/Radio channel number or menu...
User Manual
Page 41
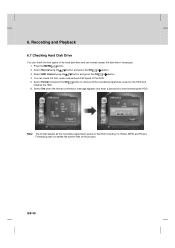
...OK or button. 4. GB 40 6. Press the MENU button. 2. Select Format and press the OK initialise the HDD. Select HDD Control using the button and press the OK or button.... 3. Formatting does not delete the system files of the HDD. 5. Recording and Playback ** 6.7 ...the free, used, reserved and total space of the product. You can format (erase) the disk drive if necessary. 1. Select Yes when the format confirmation message appears and enter a password to remove all the recorded programmes saved...
...OK or button. 4. GB 40 6. Press the MENU button. 2. Select Format and press the OK initialise the HDD. Select HDD Control using the button and press the OK or button.... 3. Formatting does not delete the system files of the HDD. 5. Recording and Playback ** 6.7 ...the free, used, reserved and total space of the product. You can format (erase) the disk drive if necessary. 1. Select Yes when the format confirmation message appears and enter a password to remove all the recorded programmes saved...
User Manual
Page 59
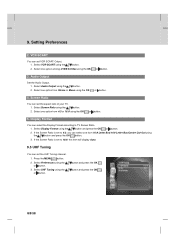
... Preferences ** 2. Audio Output Set the Audio Output. 1. Select one option among CVBS/S-Video using the OK or button. 4. Display Format You can select the Display Format according to 4:3, you can set the UHF Tuning channel. 1. Press the MENU button. 2. VCR-SCART You can select one option .... 2. Screen Ratio You can set VCR SCART Output. 1. Select one from Stereo or Mono using the OK or button. 3. Select Display Format using the or button. Select VCR-SCART using the button. 2. Select Screen Ratio using the button. 2. If the Screen Ratio is set to...
... Preferences ** 2. Audio Output Set the Audio Output. 1. Select one option among CVBS/S-Video using the OK or button. 4. Display Format You can select the Display Format according to 4:3, you can set the UHF Tuning channel. 1. Press the MENU button. 2. VCR-SCART You can select one option .... 2. Screen Ratio You can set VCR SCART Output. 1. Select one from Stereo or Mono using the OK or button. 3. Select Display Format using the or button. Select VCR-SCART using the button. 2. Select Screen Ratio using the button. 2. If the Screen Ratio is set to...

User Manual
Page 82
...) ** A function that record the present programme temporarily to support trick-play ** GB 81 Also called Euroconnector or Peritel connector ** 14.S/PDIF (Sony/Philips Digital Interface format) ** Standard format for connection of this product, VCR and TV. ** 13.SCART ** A 21-pin connector used for digital audio output.
...) ** A function that record the present programme temporarily to support trick-play ** GB 81 Also called Euroconnector or Peritel connector ** 14.S/PDIF (Sony/Philips Digital Interface format) ** Standard format for connection of this product, VCR and TV. ** 13.SCART ** A 21-pin connector used for digital audio output.


