
User Manual
Page 3
... 2 For your safety, follow the instructions thoroughly upon use and to qualified service personnel. ** This symbol indicates dangerous voltage inside . Refer servicing to maintain the installation. ** To reduce the risk of electric shock, do not remove cover (or back). Notice ** Read this manual carefully and make the user aware of possible problems and information of any importance to...
... 2 For your safety, follow the instructions thoroughly upon use and to qualified service personnel. ** This symbol indicates dangerous voltage inside . Refer servicing to maintain the installation. ** To reduce the risk of electric shock, do not remove cover (or back). Notice ** Read this manual carefully and make the user aware of possible problems and information of any importance to...
User Manual
Page 7
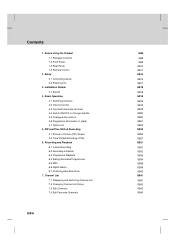
...GB41 ** GB41 GB42 GB42 GB45 Installation Wizard 3.1 Search 4. Recording and Playback 6.1 Instant Recording 6.2 Recording schedule 6.3 Programme Playback 6.4 Editing Recorded Programmes 6.5 MP3 6.6 Digital Album 6.7 Checking Hard Disk Drive 7. Basic Operation 4.1 Switching Channel 4.2 Volume Control 4.3 Text and Interactive Services 4.4 Switch ON/OFF or Change Subtitle 4.5 Change Audio options 4.6 Programme Information (I- Setup 2.1 Connecting Aerial 2.2 Powering On 3. Before Using the Product 1.1 Package Contents 1.2 Front Panel 1.3 Rear Panel 1.4 Remote Control 2. PIP and Time Shifted...
...GB41 ** GB41 GB42 GB42 GB45 Installation Wizard 3.1 Search 4. Recording and Playback 6.1 Instant Recording 6.2 Recording schedule 6.3 Programme Playback 6.4 Editing Recorded Programmes 6.5 MP3 6.6 Digital Album 6.7 Checking Hard Disk Drive 7. Basic Operation 4.1 Switching Channel 4.2 Volume Control 4.3 Text and Interactive Services 4.4 Switch ON/OFF or Change Subtitle 4.5 Change Audio options 4.6 Programme Information (I- Setup 2.1 Connecting Aerial 2.2 Powering On 3. Before Using the Product 1.1 Package Contents 1.2 Front Panel 1.3 Rear Panel 1.4 Remote Control 2. PIP and Time Shifted...
User Manual
Page 8
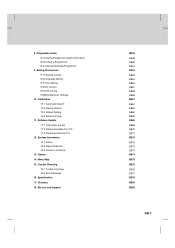
Installation 10.1 Automatic Search 10.2 Manual Search 10.3 Default Setting 10.4 Antenna Power 11. System Information 12.1 Status 12.2 Signal Detection 12.3 Common Interface 13. Trouble Shooting 15.1 Trouble Shooting 15.2 Error Message 16. Software Update 11.1 OTA (Over the Air) 11.2 Software Update from PC 11.3 File Download from PC 12. Service and Support GB48 ** GB48 GB50 GB51 GB53 ** GB53 GB54 GB56 GB57 GB58 GB59 GB61 ** GB61...
Installation 10.1 Automatic Search 10.2 Manual Search 10.3 Default Setting 10.4 Antenna Power 11. System Information 12.1 Status 12.2 Signal Detection 12.3 Common Interface 13. Trouble Shooting 15.1 Trouble Shooting 15.2 Error Message 16. Software Update 11.1 OTA (Over the Air) 11.2 Software Update from PC 11.3 File Download from PC 12. Service and Support GB48 ** GB48 GB50 GB51 GB53 ** GB53 GB54 GB56 GB57 GB58 GB59 GB61 ** GB61...

User Manual
Page 9
... before using your product. ** ** Remote Control SCART Cable Batteries User's Manual Quick Guide CD-ROM ** Note: • Since faults may occur if the remote control is being left without a battery for problems caused by user. • This product provides best performance with Seagate ST3160022ACE(160G) Hard Disk Drive. • The company shall not be liable for a long time, always keep the battery inserted in the remote control. • CD-ROM contains USB driver...
... before using your product. ** ** Remote Control SCART Cable Batteries User's Manual Quick Guide CD-ROM ** Note: • Since faults may occur if the remote control is being left without a battery for problems caused by user. • This product provides best performance with Seagate ST3160022ACE(160G) Hard Disk Drive. • The company shall not be liable for a long time, always keep the battery inserted in the remote control. • CD-ROM contains USB driver...

User Manual
Page 10
GB 9 USB DEVICE ** Connect to the PC port. 9. PAUSE Button ** Pauses programme. 6. CH-/CH+ ** Moves the TV/Radio channel up/down. 8. STOP Button ** Stops recording. 4. ** 1.2 Front Panel ** ** 1. STANDBY Button ** Switches between TV and the product. 7. CAM SLOT ** To be used with a CA Module and smartcard for Pay TV channels. RECORD Button ** Records programme. 3. PLAY Button ** Plays programme. 5. SOURCE Button ** Selects the input source between Operation and Standby modes. 2.
GB 9 USB DEVICE ** Connect to the PC port. 9. PAUSE Button ** Pauses programme. 6. CH-/CH+ ** Moves the TV/Radio channel up/down. 8. STOP Button ** Stops recording. 4. ** 1.2 Front Panel ** ** 1. STANDBY Button ** Switches between TV and the product. 7. CAM SLOT ** To be used with a CA Module and smartcard for Pay TV channels. RECORD Button ** Records programme. 3. PLAY Button ** Plays programme. 5. SOURCE Button ** Selects the input source between Operation and Standby modes. 2.

User Manual
Page 13
...+ ** Adjusts the volume level. ** 10.i (INFORMATION) ** Displays the information about the channel and programme. ** 11.TEXT ** Enter Digital Text service. ** 12.GUIDE ** Display or Exit the Programme Guide. ** 13.OK ** Displays the channel list while watching a channel or confirms a selected menu option ** 14.BACK ** Returns to the live programme or recording. WIDE Sets the Display Format. b. PLAY Play at high speed. STOP Stop a recording or go to the previous channel or menu option...
...+ ** Adjusts the volume level. ** 10.i (INFORMATION) ** Displays the information about the channel and programme. ** 11.TEXT ** Enter Digital Text service. ** 12.GUIDE ** Display or Exit the Programme Guide. ** 13.OK ** Displays the channel list while watching a channel or confirms a selected menu option ** 14.BACK ** Returns to the live programme or recording. WIDE Sets the Display Format. b. PLAY Play at high speed. STOP Stop a recording or go to the previous channel or menu option...
User Manual
Page 19
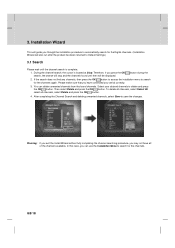
... 18 You can use the Installation Menu to search for the channels again. Therefore, if you through the installation procedure to automatically search for the Digital channels. (Installation Wizard will also run after the product has been returned to search for the channels. If the search does not find any channels, then press the OK button to access the installation menu to Default Settings.) 3.1 Search Please...
... 18 You can use the Installation Menu to search for the channels again. Therefore, if you through the installation procedure to automatically search for the Digital channels. (Installation Wizard will also run after the product has been returned to search for the channels. If the search does not find any channels, then press the OK button to access the installation menu to Default Settings.) 3.1 Search Please...
User Manual
Page 23
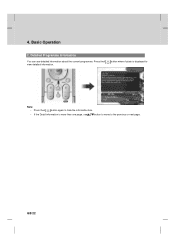
Detailed Programme Information You can see detailed information about the current programme. Press the i view detailed information. GB 22 Basic Operation ** 2. button where I-plate is displayed to Note: • Press the i button again to hide the information box. • If the Detail information is more than one page, use button to move to the previous or next page. 4.
Detailed Programme Information You can see detailed information about the current programme. Press the i view detailed information. GB 22 Basic Operation ** 2. button where I-plate is displayed to Note: • Press the i button again to hide the information box. • If the Detail information is more than one page, use button to move to the previous or next page. 4.
User Manual
Page 32
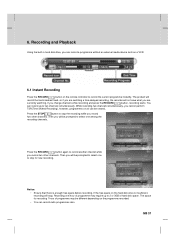
... button to two channels simultaneously. Recording and Playback ** Using the built-in hard disk drive, you can record up to record another channel while you record two other channels. Press the RECORD button again to 2 or 3GB of programme may be different depending on the hard disk drive is enough free space before recording. GB 31 While recording two channels simultaneously, you cannot perform TSR(Time Shifted Recording), however, programmes on the remote controller...
... button to two channels simultaneously. Recording and Playback ** Using the built-in hard disk drive, you can record up to record another channel while you record two other channels. Press the RECORD button again to 2 or 3GB of programme may be different depending on the hard disk drive is enough free space before recording. GB 31 While recording two channels simultaneously, you cannot perform TSR(Time Shifted Recording), however, programmes on the remote controller...
User Manual
Page 35
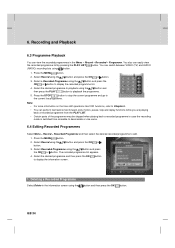
... button to Chapter 5. • You can switch between VIDEO (TV) and AUDIO (RADIO) recording lists using the button. Note: • For more information on the time shift operations like VCR functions, refer to display the recorded programme list. 4. Select Record using button. 1. The recorded programme list appears. 4. Deleting a Recorded Programme Select Delete in case the recording mode is switched from scramble to descramble or vice versa. 6.4 Editing Recorded Programmes Select Menu...
... button to Chapter 5. • You can switch between VIDEO (TV) and AUDIO (RADIO) recording lists using the button. Note: • For more information on the time shift operations like VCR functions, refer to display the recorded programme list. 4. Select Record using button. 1. The recorded programme list appears. 4. Deleting a Recorded Programme Select Delete in case the recording mode is switched from scramble to descramble or vice versa. 6.4 Editing Recorded Programmes Select Menu...

User Manual
Page 46
... Favourite Channel List. ** ** ** Sort Sorts channels by number or name in all TV/Radio channel list. ** ** ** Unselect All Unselects all menu items using the button and press the OK or button. 4. Press the MENU button. 2. Add Moves to the previous menu. Press the MENU - 3 2 in the following table. Select Edit Favourite Channels using the assigned numerical button for editing the Favourite channel list are described in order on the remote controller to...
... Favourite Channel List. ** ** ** Sort Sorts channels by number or name in all TV/Radio channel list. ** ** ** Unselect All Unselects all menu items using the button and press the OK or button. 4. Press the MENU button. 2. Add Moves to the previous menu. Press the MENU - 3 2 in the following table. Select Edit Favourite Channels using the assigned numerical button for editing the Favourite channel list are described in order on the remote controller to...

User Manual
Page 52
... editing. 7. Select Edit using the button and press the OK button to display channel and date lists and select one item using the button and the NUMERICAL (0~9) button. 4. Change Repeat mode using the button. 6. Select Cancel and press the OK button to 1. Select Save and press the OK button to display Schedule screen. 3. You can add or edit recording-reserved programme by schedule screen. 1. Change Lock mode using the button. Press YELLOW button to complete the...
... editing. 7. Select Edit using the button and press the OK button to display channel and date lists and select one item using the button and the NUMERICAL (0~9) button. 4. Change Repeat mode using the button. 6. Select Cancel and press the OK button to 1. Select Save and press the OK button to display Schedule screen. 3. You can add or edit recording-reserved programme by schedule screen. 1. Change Lock mode using the button. Press YELLOW button to complete the...

User Manual
Page 53
... your Password to complete the reservation. ** Note: • The recoding schedule can be overlapped with up to add a new recording schedule. 2. Select one item using the button and the NUMERICAL (0~9) button. 4. Adding a Reservation 1. Press the button to display channel and date lists and select one of Repeat mode options among Once, Daily and Weekly using the button. 6. GB 52 Programme Guide ** 2. 8. Change Time using button and OK button.
... your Password to complete the reservation. ** Note: • The recoding schedule can be overlapped with up to add a new recording schedule. 2. Select one item using the button and the NUMERICAL (0~9) button. 4. Adding a Reservation 1. Press the button to display channel and date lists and select one of Repeat mode options among Once, Daily and Weekly using the button. 6. GB 52 Programme Guide ** 2. 8. Change Time using button and OK button.

User Manual
Page 55
.... 9.2 Language Setting You can set the language for Audio and Subtitle. 1. GB 54 button and press the OK 3. Audio/Subtitle Language You can change the current password into a new one. 1. Note: The Default Password is English. 1. Press the MENU button. 2. Select Change Password using the NUMERICAL (0-9)button and select OK and press the OK button. 3. Enter New Password using the OK or button. Select Audio/Subtitle Language using the OK or button. Default language is 0000. Select Language Setting using the button...
.... 9.2 Language Setting You can set the language for Audio and Subtitle. 1. GB 54 button and press the OK 3. Audio/Subtitle Language You can change the current password into a new one. 1. Note: The Default Password is English. 1. Press the MENU button. 2. Select Change Password using the NUMERICAL (0-9)button and select OK and press the OK button. 3. Enter New Password using the OK or button. Select Audio/Subtitle Language using the OK or button. Default language is 0000. Select Language Setting using the button...
User Manual
Page 56
... change the audio language. 3. Select your desired option using the OK or button. Select Audio Priority using the button. 2. Select your desired option using the button. 2. However, if you select Dolby Digital, you select the subtitle language by pressing the SUBTITLE button at remote controller. 4. Select Subtitle Display using the button. 2. Fixed Uses the fixed Subtitle Font. GB 55 Language Dolby Digital You can select to display the Subtitle automatically or not. 1. Auto Manual Subtitles are displayed...
... change the audio language. 3. Select your desired option using the OK or button. Select Audio Priority using the button. 2. Select your desired option using the button. 2. However, if you select Dolby Digital, you select the subtitle language by pressing the SUBTITLE button at remote controller. 4. Select Subtitle Display using the button. 2. Fixed Uses the fixed Subtitle Font. GB 55 Language Dolby Digital You can select to display the Subtitle automatically or not. 1. Auto Manual Subtitles are displayed...

User Manual
Page 65
... Installation Wizard, refer to start loading default setting. Confirm again to 3. Warning: Please note that once you perform Default Setting, all setting to Factory Default. Select Yes and press the OK button to restore all data such as Channel List and User Configured data are deleted, no information on the HDD will be lost. ** To perform Factory Default: 1. GB 64 Enter Password using the NUMERICAL (0-9) button to the previous menu...
... Installation Wizard, refer to start loading default setting. Confirm again to 3. Warning: Please note that once you perform Default Setting, all setting to Factory Default. Select Yes and press the OK button to restore all data such as Channel List and User Configured data are deleted, no information on the HDD will be lost. ** To perform Factory Default: 1. GB 64 Enter Password using the NUMERICAL (0-9) button to the previous menu...

User Manual
Page 72
... CD-ROM to install the USB driver and application program. You can enjoy the music and view the photos by downloading the items from www.humaxdigital.com. 2. Connect USB on the product to start USB application. ** 11.3 File Download from PC You can also download the setup file from your PC to the product with 'Media-e linker' program. (USB cables used for external HDDs are purchasable.) ** Follow the instructions to download files: 1.
... CD-ROM to install the USB driver and application program. You can enjoy the music and view the photos by downloading the items from www.humaxdigital.com. 2. Connect USB on the product to start USB application. ** 11.3 File Download from PC You can also download the setup file from your PC to the product with 'Media-e linker' program. (USB cables used for external HDDs are purchasable.) ** Follow the instructions to download files: 1.
User Manual
Page 77
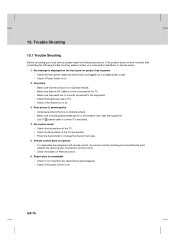
... operate ** • To manipulate the equipment with remote control, the remote control's emitting part should directly point towards the receiving part of product's remote control. • Check the battery of the TV and product. • Press the Audio button to change the Sound Track type. 5. Poor picture & sound quality ** • Install aerial where there is no power ** • Check the main power cable and check that it is more than...
... operate ** • To manipulate the equipment with remote control, the remote control's emitting part should directly point towards the receiving part of product's remote control. • Check the battery of the TV and product. • Press the Audio button to change the Sound Track type. 5. Poor picture & sound quality ** • Install aerial where there is no power ** • Check the main power cable and check that it is more than...
User Manual
Page 79
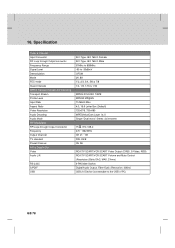
Specification ** Tuner & Channel Input Connector RF Loop through Output connector Frequency Range Signal Level Demodulation Mode FEC mode Guard Intervals MPEG Transport Stream A/V Decoding Transport Stream Profile Level Input Rate Aspect Ratio Video Resolution Audio Decoding Audio Mode RF-Modulator RF/Loop-through Output Connector Frequency Output Channel TV standard Preset Channel A/V & Data In/Out Video Audio L/R RS-232C S/PDIF USB IEC-Type, IEC 169-2, Female IEC-Type, IEC 169...
Specification ** Tuner & Channel Input Connector RF Loop through Output connector Frequency Range Signal Level Demodulation Mode FEC mode Guard Intervals MPEG Transport Stream A/V Decoding Transport Stream Profile Level Input Rate Aspect Ratio Video Resolution Audio Decoding Audio Mode RF-Modulator RF/Loop-through Output Connector Frequency Output Channel TV standard Preset Channel A/V & Data In/Out Video Audio L/R RS-232C S/PDIF USB IEC-Type, IEC 169-2, Female IEC-Type, IEC 169...
User Manual
Page 81
... downloaded with a ferromagnetic material ** 6. These services may transmit a service information table(network information) that informs the Product about the monitor that can transport signals with different or same content. ** 7. Coaxial cable ** A specially designed and shields cable that displays the information about all available services in the unit of hertz ** 4. OSD (On Screen Display) ** The function that can record and play back programmes directly using the embedded hard disk drive...
... downloaded with a ferromagnetic material ** 6. These services may transmit a service information table(network information) that informs the Product about the monitor that can transport signals with different or same content. ** 7. Coaxial cable ** A specially designed and shields cable that displays the information about all available services in the unit of hertz ** 4. OSD (On Screen Display) ** The function that can record and play back programmes directly using the embedded hard disk drive...


