
User Manual
Page 5
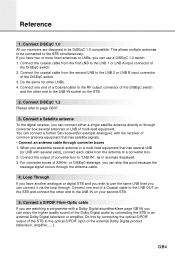
... the receiver of common antenna equipment that has several LNB (or LNB with a Dolby Digital soundtrack(see page GB14) you assemble several antenna or a multi-feed equipment that has satellite signals. • Connect an antenna cable through converter box several exits), connect each cable from the antenna to the LNB 1 or LNB A input connector of the external Dolby Digital product (television, amplifier,.....). For converter boxes of converter box to be DiSEqC 1.0 compatible. Connect a S/PDIF Fiber-Optic cable If...
... the receiver of common antenna equipment that has several LNB (or LNB with a Dolby Digital soundtrack(see page GB14) you assemble several antenna or a multi-feed equipment that has satellite signals. • Connect an antenna cable through converter box several exits), connect each cable from the antenna to the LNB 1 or LNB A input connector of the external Dolby Digital product (television, amplifier,.....). For converter boxes of converter box to be DiSEqC 1.0 compatible. Connect a S/PDIF Fiber-Optic cable If...

User Manual
Page 13
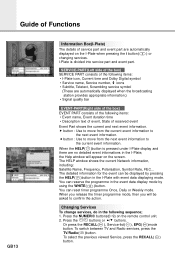
... to switch between Operation and Standby modes. 15 OK Press to display the service list. This button is used to display the subtitle language list for the current service. GB12 1 NUMERIC BUTTONS Press to select a service, enter your PIN code or numeric on the menu. 2 INFORMATION(RED) Press to display the programme information box on the Informaion box or EPG. And this button functions same as the YELLOW button on the screen. 18 EPG Electronic Programme Guide button displays the...
... to switch between Operation and Standby modes. 15 OK Press to display the service list. This button is used to display the subtitle language list for the current service. GB12 1 NUMERIC BUTTONS Press to select a service, enter your PIN code or numeric on the menu. 2 INFORMATION(RED) Press to display the programme information box on the Informaion box or EPG. And this button functions same as the YELLOW button on the screen. 18 EPG Electronic Programme Guide button displays the...
User Manual
Page 14
...( )mode button. Press the NUMERIC buttons(0~9) on the screen. To select the previous viewed Service, press the RECALL( ) button. To switch between TV and Radio services, press the TV/Radio( )button. When the HELP( )button is divided into service part and event part. Guide of Functions GB13 Information Box(I-Plate) The details of service part and event part are automatically displayed on the I -Plate icon, Current time and Dolby Digital symbol • Service name, Service number, icons • Subtitle...
...( )mode button. Press the NUMERIC buttons(0~9) on the screen. To select the previous viewed Service, press the RECALL( ) button. To switch between TV and Radio services, press the TV/Radio( )button. When the HELP( )button is divided into service part and event part. Guide of Functions GB13 Information Box(I-Plate) The details of service part and event part are automatically displayed on the I -Plate icon, Current time and Dolby Digital symbol • Service name, Service number, icons • Subtitle...

User Manual
Page 15
... on-screen menu is displayed on the STB. When the current service is invalid, the audio language that was selected in previous service. This can be output by an external Dolby Digital television or amplifier, for example. Use the buttons to left , right or both. 2. The teletext button doesn't exist on the screen. lf the returned audio language is switched, the audio language returns to cancel the Subtitle mode. OK , EXIT button...
... on-screen menu is displayed on the STB. When the current service is invalid, the audio language that was selected in previous service. This can be output by an external Dolby Digital television or amplifier, for example. Use the buttons to left , right or both. 2. The teletext button doesn't exist on the screen. lf the returned audio language is switched, the audio language returns to cancel the Subtitle mode. OK , EXIT button...

User Manual
Page 16
... services. Utility This menu provides Calendar and Biorhythm. The TV Guide supplies information such as programme listings and start and end times for all available services. Parental Control Access to services and programmes is controlled by a PIN code (i.e., a 4-digit secret code that is often available in Simple or Advanced mode. 2. GB15 The very first time you attempt to have the information of setting services and newly set services(language, time, organise, search,..) Furthermore, you navigate through all services(or lock...
... services. Utility This menu provides Calendar and Biorhythm. The TV Guide supplies information such as programme listings and start and end times for all available services. Parental Control Access to services and programmes is controlled by a PIN code (i.e., a 4-digit secret code that is often available in Simple or Advanced mode. 2. GB15 The very first time you attempt to have the information of setting services and newly set services(language, time, organise, search,..) Furthermore, you navigate through all services(or lock...

User Manual
Page 17
... the Service List. 2. This list is apart from the Main Menu and press the OK button. 2. Network • BLUE ( )button - Use the buttons to move to select the All service list. 2. Select the desired service by Alphabetical order Service Configuration To change in the service list, you the Simple mode and Advanced mode. Genre • WHITE ( )button - Use the buttons to move a service you want to the Simple service list except that displays twenty servies. To display the Service All...
... the Service List. 2. This list is apart from the Main Menu and press the OK button. 2. Network • BLUE ( )button - Use the buttons to move to select the All service list. 2. Select the desired service by Alphabetical order Service Configuration To change in the service list, you the Simple mode and Advanced mode. Genre • WHITE ( )button - Use the buttons to move a service you want to the Simple service list except that displays twenty servies. To display the Service All...

User Manual
Page 20
... mode Shows a simple TV Guide like an Information box. When the OK button is pressed after selecting the highlighted parental control on the initial menu screen, a display window for entering the PIN code will be reserved. To change your PIN code: • Select the highlighted Old PIN code using the buttons and then enter your Old PIN code. • Enter a New PIN code in the highlighted New PIN code using the buttons and then press the WHITE( ) button. When the OK button is pressed at this time, the Old PIN code...
... mode Shows a simple TV Guide like an Information box. When the OK button is pressed after selecting the highlighted parental control on the initial menu screen, a display window for entering the PIN code will be reserved. To change your PIN code: • Select the highlighted Old PIN code using the buttons and then enter your Old PIN code. • Enter a New PIN code in the highlighted New PIN code using the buttons and then press the WHITE( ) button. When the OK button is pressed at this time, the Old PIN code...

User Manual
Page 21
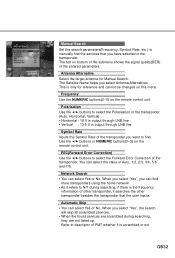
... more. Enter the submenus after selecting the Installation mode in the system setting mode and then press the OK button. 2. System Setting The System Setting mode supports the STB internal settings according to finish setting. This mode includes Language Setting, Time Setting, A/V Output Setting, UHF Tuning and Other Settings. Select the highlighted language setting using the buttons in the Main Menu. 4-1. Menu Language We support the various menu languages of the receiver and external units. Audio Language Select the default language for...
... more. Enter the submenus after selecting the Installation mode in the system setting mode and then press the OK button. 2. System Setting The System Setting mode supports the STB internal settings according to finish setting. This mode includes Language Setting, Time Setting, A/V Output Setting, UHF Tuning and Other Settings. Select the highlighted language setting using the buttons in the Main Menu. 4-1. Menu Language We support the various menu languages of the receiver and external units. Audio Language Select the default language for...
User Manual
Page 22
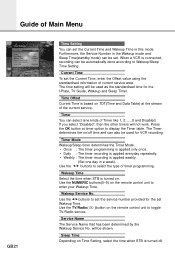
... recording is connected, recording can also be used for VCR recording. Use the buttons to set the service number provided for the I-Plate, TV Guide, Wakeup and Sleep Timer. Use the NUMERIC buttons(0~9) on TDT(Time and Data Table) at timer option to enter your Wakeup Time. Use the TV/Radio( )button on Time Setting, select the time when STB is turned on /off . will be set the Current Time and Wakeup Time in this mode. Sleep Time Depending on the remote control...
... recording is connected, recording can also be used for VCR recording. Use the buttons to set the service number provided for the I-Plate, TV Guide, Wakeup and Sleep Timer. Use the NUMERIC buttons(0~9) on TDT(Time and Data Table) at timer option to enter your Wakeup Time. Use the TV/Radio( )button on Time Setting, select the time when STB is turned on /off . will be set the Current Time and Wakeup Time in this mode. Sleep Time Depending on the remote control...
User Manual
Page 23
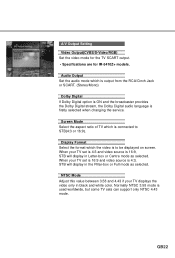
...) Dolby Digital lf Dolby Digital option is ON and the broadcaster provides the Dolby Digital stream, the Dolby Digital audio language is used worldwide, but some TV sets can support only NTSC 4.43 mode. Screen Mode Select the aspect ratio of TV which the video is connected to be displayed on screen. When your TV displays the video only in black and white color. Normally NTSC 3.58 mode is firstly selected when changing the service. Display Format...
...) Dolby Digital lf Dolby Digital option is ON and the broadcaster provides the Dolby Digital stream, the Dolby Digital audio language is used worldwide, but some TV sets can support only NTSC 4.43 mode. Screen Mode Select the aspect ratio of TV which the video is connected to be displayed on screen. When your TV displays the video only in black and white color. Normally NTSC 3.58 mode is firstly selected when changing the service. Display Format...

User Manual
Page 26
... displayed on the screen. 2. Press the RED( )button to select a new location. 3. Press the GREEN( )button to delete in grey. 3. Key in front of the service number. 2. Then, the icon( ) will be displayed in the new service name. Use the buttons to delete unwanted services. 2. Press the OK button to view the locked services. • Skip 1. Enter the PIN code to fix the location. 4. Press the EXIT button to return to view the skipped services when selecting channels. Highlight the services...
... displayed on the screen. 2. Press the RED( )button to select a new location. 3. Press the GREEN( )button to delete in grey. 3. Key in front of the service number. 2. Then, the icon( ) will be displayed in the new service name. Use the buttons to delete unwanted services. 2. Press the OK button to view the locked services. • Skip 1. Enter the PIN code to fix the location. 4. Press the EXIT button to return to view the skipped services when selecting channels. Highlight the services...

User Manual
Page 30
... the antenna and LNB settings for use. Satellite Name Selects the Satellite Name that are set in this menu will appear and you access the Parental Control or Service Organising menu. Select the wanted Satellite Name. 3. Service Searching Enter the PIN code to Menu Language. 6. As you can help you select the Antenna Alternative in the Antenna Setting menu. 5. Press the buttons to start Service Search after setting the parameters. ** The default PIN code is a 14 character limit. The selected Satellite Name can change...
... the antenna and LNB settings for use. Satellite Name Selects the Satellite Name that are set in this menu will appear and you access the Parental Control or Service Organising menu. Select the wanted Satellite Name. 3. Service Searching Enter the PIN code to Menu Language. 6. As you can help you select the Antenna Alternative in the Antenna Setting menu. 5. Press the buttons to start Service Search after setting the parameters. ** The default PIN code is a 14 character limit. The selected Satellite Name can change...

User Manual
Page 31
... the LNB frequency (Universal, 5150, 9750, 10600, 10750, 11475MHz or 0, 1, ......., 9). 3. Select the L.O. Use the buttons to the Manual Search menu. GB30 The 22KHz Tone setting is set the DiSEqC 1.2 motor by Eutelsat specification. If you select Universal, both 9750 and 10600MHz are supported at the same time. When you wish to use a dual LNB or two antennas connected to a 22KHz Tone switch box, make 22KHz Tone switch enable or disable to antenna. 2. DiSEqC Input According...
... the LNB frequency (Universal, 5150, 9750, 10600, 10750, 11475MHz or 0, 1, ......., 9). 3. Select the L.O. Use the buttons to the Manual Search menu. GB30 The 22KHz Tone setting is set the DiSEqC 1.2 motor by Eutelsat specification. If you select Universal, both 9750 and 10600MHz are supported at the same time. When you wish to use a dual LNB or two antennas connected to a 22KHz Tone switch box, make 22KHz Tone switch enable or disable to antenna. 2. DiSEqC Input According...
User Manual
Page 33
... buttons to find. This is output through LNB line Symbol Rate Inputs the Symbol Rate of the transponder you want to select the Forward Error Correction of the transponder. The Satellite Name helps you select Antenna Alternatives. Frequency Use the NUMERIC buttons(0~9) on this menu. Network Search • You can find the services that the user inputs. Manual Search Set the search parameters(Frequency, Symbol Rate, etc.) to manually find more transponders using the home network...
... buttons to find. This is output through LNB line Symbol Rate Inputs the Symbol Rate of the transponder you want to select the Forward Error Correction of the transponder. The Satellite Name helps you select Antenna Alternatives. Frequency Use the NUMERIC buttons(0~9) on this menu. Network Search • You can find the services that the user inputs. Manual Search Set the search parameters(Frequency, Symbol Rate, etc.) to manually find more transponders using the home network...
User Manual
Page 34
.... Use the buttons to enter a decimal PID value. 3. Use the NUMERIC buttons(0~9) buttons on the remote control unit to select PID input mode. 2. After the above mentioned value is 950 - 2150MHz. Video PID/Audio PID/PCR PID You can select the value of 1/2, 2/3, 3/4, 5/6, 7/8 or Auto. SMATV Search In case that several generations use Antenna and LNB in common. Frequency Inputs not RF frequency but the frequency that has abnormal service Infornation tables. LNB Power...
.... Use the buttons to enter a decimal PID value. 3. Use the NUMERIC buttons(0~9) buttons on the remote control unit to select PID input mode. 2. After the above mentioned value is 950 - 2150MHz. Video PID/Audio PID/PCR PID You can select the value of 1/2, 2/3, 3/4, 5/6, 7/8 or Auto. SMATV Search In case that several generations use Antenna and LNB in common. Frequency Inputs not RF frequency but the frequency that has abnormal service Infornation tables. LNB Power...
User Manual
Page 38
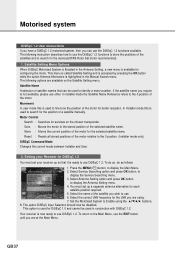
... button, to the 0 position. (Installer mode only) DiSEqC Command Mode Changes the current mode between Installer and User. 2. The option DiSEqC Input Selection should now be used to search for services on the Satellite Setting menu. Reset : Resets all stored positions of the motor for the selected satellite name. Motorised system DiSEqC 1.2 User Instructions If you have a DiSEqC 1.2 motorised system, then you can be disabled. Movement In user mode this is Enabled in the Manual Search menu...
... button, to the 0 position. (Installer mode only) DiSEqC Command Mode Changes the current mode between Installer and User. 2. The option DiSEqC Input Selection should now be used to search for services on the Satellite Setting menu. Reset : Resets all stored positions of the motor for the selected satellite name. Motorised system DiSEqC 1.2 User Instructions If you have a DiSEqC 1.2 motorised system, then you can be disabled. Movement In user mode this is Enabled in the Manual Search menu...

User Manual
Page 39
... the Service Searching menu. 2. Press the button to display the Satellite Setting menu. 5. Highlight the DiSEqC Command Mode option and use the buttons to change the value to use the buttons to move your East Limit. Select Manual Search option and press the OK button, you have been stored - You should now be able to move beyond any other make or model of the dish. 1. To set up to User and press the OK button. 9. Make...
... the Service Searching menu. 2. Press the button to display the Satellite Setting menu. 5. Highlight the DiSEqC Command Mode option and use the buttons to change the value to use the buttons to move your East Limit. Select Manual Search option and press the OK button, you have been stored - You should now be able to move beyond any other make or model of the dish. 1. To set up to User and press the OK button. 9. Make...

User Manual
Page 40
... exit the menu. 14. This transponder information should register a signal once. Select the Antenna Alternative option and press the OK button, to display the Manual Search menu. Highlight the option Satellite name and use the buttons to move it east so that is not available from the pre-programmed list(see 3 above). When you have the best position of the dish go down to the Movement option and again using...
... exit the menu. 14. This transponder information should register a signal once. Select the Antenna Alternative option and press the OK button, to display the Manual Search menu. Highlight the option Satellite name and use the buttons to move it east so that is not available from the pre-programmed list(see 3 above). When you have the best position of the dish go down to the Movement option and again using...
User Manual
Page 41
... the manual search option and press the OK button to view. 7. Now enter the Frequency and Symbol Rate using the DiSEqC 1.2 motorised system. 1. In the Main Menu, select the option channel searching and press the OK button. 3. GB40 In the Satellite Settings menu ensure that you have DiSEqC Command Mode option set Satellite Once you have entered all these will now move into position, you wish to view, go down to receive the new service...
... the manual search option and press the OK button to view. 7. Now enter the Frequency and Symbol Rate using the DiSEqC 1.2 motorised system. 1. In the Main Menu, select the option channel searching and press the OK button. 3. GB40 In the Satellite Settings menu ensure that you have DiSEqC Command Mode option set Satellite Once you have entered all these will now move into position, you wish to view, go down to receive the new service...

User Manual
Page 47
... can use a special antenna switch with DiSEqC commands. The concept of DiSEqC is a protective trademark of a analog TV programme. Data rate of about 5-6 Mbit/s coincides with the picture quality of EUTELSAT. A/V & Data In/Out TV SCART VCR SCART VIDEO AUDIO R/L S/PDIF RS-232C RF-Modulator RF-Connector Frequency Output Channel TV Standard Preset Channel Video Output(CVBS, S-Video, RGB) Audio Output (Resolution : 20 bits DAC, Max. 2 Vrms) Video Output(CVBS) Video Input(CVBS, S-Video, RGB) Audio Output(Resolution...
... can use a special antenna switch with DiSEqC commands. The concept of DiSEqC is a protective trademark of a analog TV programme. Data rate of about 5-6 Mbit/s coincides with the picture quality of EUTELSAT. A/V & Data In/Out TV SCART VCR SCART VIDEO AUDIO R/L S/PDIF RS-232C RF-Modulator RF-Connector Frequency Output Channel TV Standard Preset Channel Video Output(CVBS, S-Video, RGB) Audio Output (Resolution : 20 bits DAC, Max. 2 Vrms) Video Output(CVBS) Video Input(CVBS, S-Video, RGB) Audio Output(Resolution...


