
User Manual
Page 4
... the use of software versions other than HUMAX official software will void the manufacturer's warranty. The use of unofficial software. Glossary • Antenna A device that collects and radiates electromagnetic waves. Warning & Glossary Warning HUMAX cannot be used in which four different phase angles are used. • Service A channel to which downconverts a range of frequencies to IF range. • Packet Identifier (PID) A set of numbers that...
... the use of software versions other than HUMAX official software will void the manufacturer's warranty. The use of unofficial software. Glossary • Antenna A device that collects and radiates electromagnetic waves. Warning & Glossary Warning HUMAX cannot be used in which four different phase angles are used. • Service A channel to which downconverts a range of frequencies to IF range. • Packet Identifier (PID) A set of numbers that...
User Manual
Page 5
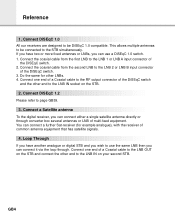
... to the LNB IN socket on the STB and connect the other end to the LNB 1 or LNB A input connector of the DiSEqC switch. 3. Connect the coaxial cable from the first LNB to the LNB IN on your second STB. You can connect it via the loop through converter box several antennas or LNB of common antenna equipment that has satellite signals. 4. Connect a Satellite antenna To the digital receiver, you can connect a further Sat-receiver (for other...
... to the LNB IN socket on the STB and connect the other end to the LNB 1 or LNB A input connector of the DiSEqC switch. 3. Connect the coaxial cable from the first LNB to the LNB IN on your second STB. You can connect it via the loop through converter box several antennas or LNB of common antenna equipment that has satellite signals. 4. Connect a Satellite antenna To the digital receiver, you can connect a further Sat-receiver (for other...
User Manual
Page 6
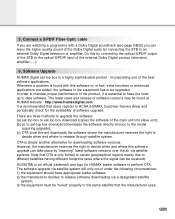
... users register to an external Dolby Digital television or amplifier. Whenever a problem is found at HUMAX website - It is recommended that OTA is only limited to certain geographical regions mainly due to different satellites having different footprints (area where the signal can enjoy the higher quality sound of the Dolby Digital audio by connecting the optical S/PDIF output of the STB to set -top box download (copies the software...
... users register to an external Dolby Digital television or amplifier. Whenever a problem is found at HUMAX website - It is recommended that OTA is only limited to certain geographical regions mainly due to different satellites having different footprints (area where the signal can enjoy the higher quality sound of the Dolby Digital audio by connecting the optical S/PDIF output of the STB to set -top box download (copies the software...
User Manual
Page 9
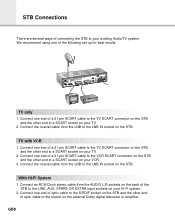
... socket on the external Dolby digital television or amplifier. Connect one end of a 21-pin SCART cable to the VCR SCART connector on the STB and the other end to a SCART socket on the STB. TV with VCR 1. Connect one end of optic cable to the S/PDIF socket on the STB and the other end to the LINE, AUX, SPARE OR EXTRA input sockets on...
... socket on the external Dolby digital television or amplifier. Connect one end of a 21-pin SCART cable to the VCR SCART connector on the STB and the other end to a SCART socket on the STB. TV with VCR 1. Connect one end of optic cable to the S/PDIF socket on the STB and the other end to the LINE, AUX, SPARE OR EXTRA input sockets on...

User Manual
Page 12
... list of the recent 10 services you have viewed. 9 GUIDE Press to display the EPG mode selection window. 10 PAUSE/PLAY Press to switch between playing and pause. 11 TV/RADIO Press to switch between Operation and Standby modes. 2 NUMERIC BUTTONS Press to select a service, enter your PIN code,enter alphabet or numeric on the menu. 3 MENU Press to display the Main Menu on the menus. 6 OK Press to display the CH LIST(Channel List) navigation menu...
... list of the recent 10 services you have viewed. 9 GUIDE Press to display the EPG mode selection window. 10 PAUSE/PLAY Press to switch between playing and pause. 11 TV/RADIO Press to switch between Operation and Standby modes. 2 NUMERIC BUTTONS Press to select a service, enter your PIN code,enter alphabet or numeric on the menu. 3 MENU Press to display the Main Menu on the menus. 6 OK Press to display the CH LIST(Channel List) navigation menu...
User Manual
Page 13
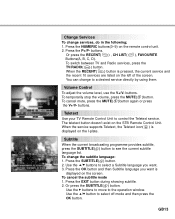
... changing services. Press the OK button to use. 1. SERVICE-PART (Top of the box) SERVICE PART consists of reserved event Event Part shows the current information. • Present / following items: • Service number, Service name. • Subtitle, Teletext, Scrambling and Dolby service symbol. (These are automatically displayed on the screen. The INFO window shows the current Network information, including: Satellite Name, Frequency, Polarisation, Symbol Rate, FEC and the detailed information for the event can be displayed with event data displaying mode...
... changing services. Press the OK button to use. 1. SERVICE-PART (Top of the box) SERVICE PART consists of reserved event Event Part shows the current information. • Present / following items: • Service number, Service name. • Subtitle, Teletext, Scrambling and Dolby service symbol. (These are automatically displayed on the screen. The INFO window shows the current Network information, including: Satellite Name, Frequency, Polarisation, Symbol Rate, FEC and the detailed information for the event can be displayed with event data displaying mode...
User Manual
Page 14
... the EXIT button during showing subtitle. 2. buttons. Or press the SUBTITLE( ) button. Or press the RECENT( ) , CH LIST( ), FAVOURITE Buttons(A, B, C, D). You can change to select a Subtitle language you want . 3. Volume Control To adjust the volume level, use the V+/V- To temporarily stop the volume, press the MUTE( )button. Use the buttons to a desired service directly by using them. When the RECENT( ) button is displayed on the screen. Use the button to the operation window. Use the buttons to...
... the EXIT button during showing subtitle. 2. buttons. Or press the SUBTITLE( ) button. Or press the RECENT( ) , CH LIST( ), FAVOURITE Buttons(A, B, C, D). You can change to select a Subtitle language you want . 3. Volume Control To adjust the volume level, use the V+/V- To temporarily stop the volume, press the MUTE( )button. Use the buttons to a desired service directly by using them. When the RECENT( ) button is displayed on the screen. Use the button to the operation window. Use the buttons to...
User Manual
Page 19
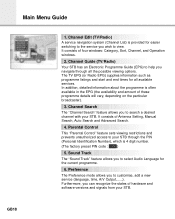
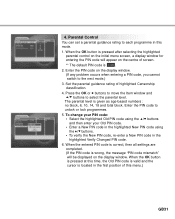
... Number), which is 4 digit number. (The factory preset PIN code : 0000 ) 5. It consists of Antenna Setting, Manual Search, Auto Search and Advanced Search. 4. In addition, detailed information about the programme is provided for the current programme. 6. It consists of four windows: Category, Sort, Channel, and Operation windows. 2. Parental Control This "Parental Control" feature sets viewing restrictions and prevents unauthorized access to customise, add a new service (language, time, A/V Output,......). Sound Track The "Sound Track" feature allows you to select Audio...
... Number), which is 4 digit number. (The factory preset PIN code : 0000 ) 5. It consists of Antenna Setting, Manual Search, Auto Search and Advanced Search. 4. In addition, detailed information about the programme is provided for the current programme. 6. It consists of four windows: Category, Sort, Channel, and Operation windows. 2. Parental Control This "Parental Control" feature sets viewing restrictions and prevents unauthorized access to customise, add a new service (language, time, A/V Output,......). Sound Track The "Sound Track" feature allows you to select Audio...
User Manual
Page 25
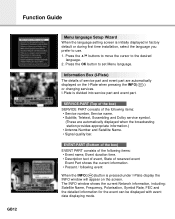
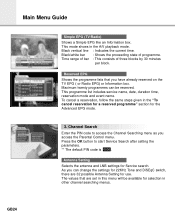
... possible Antenna Setting for selection in the A/V playback mode. Press the OK button to access the Channel Searching menu as you access the Parental Control menu. The values that you can be available for use. GB24 Main Menu Guide Simple EPG (TV/Radio) Shows a Simple EPG like an Information box. Black/white bar : Shows the proceeding state of three blocks by 30 minutes per block. Channel Search Enter the PIN code to start Service Search after setting the parameters. ** The default PIN code...
... possible Antenna Setting for selection in the A/V playback mode. Press the OK button to access the Channel Searching menu as you access the Parental Control menu. The values that you can be available for use. GB24 Main Menu Guide Simple EPG (TV/Radio) Shows a Simple EPG like an Information box. Black/white bar : Shows the proceeding state of three blocks by 30 minutes per block. Channel Search Enter the PIN code to start Service Search after setting the parameters. ** The default PIN code...
User Manual
Page 26
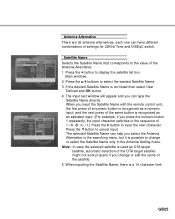
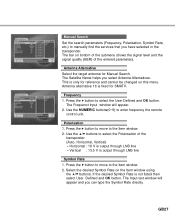
... the selected satellite is used as an alphabet input. (For example, if you select the Antenna Alternative in the Antenna Setting menu. When inputting the Satellite Name, there is not listed then select User Defined and OK button. 4. If the desired Satellite Name is a 14 character limit. Press the buttons to the value of the Antenna Alternative. 1. When you input the Satellite Name with the remote control unit, the...
... the selected satellite is used as an alphabet input. (For example, if you select the Antenna Alternative in the Antenna Setting menu. When inputting the Satellite Name, there is not listed then select User Defined and OK button. 4. If the desired Satellite Name is a 14 character limit. Press the buttons to the value of the Antenna Alternative. 1. When you input the Satellite Name with the remote control unit, the...
User Manual
Page 27
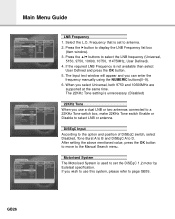
... Disable to antenna. 2. Main Menu Guide LNB Frequency 1. If you select Universal, both 9750 and 10600MHz are supported at the same time. DiSEqC Input According to the option and position of DiSEqC switch, select Disabled, Tone Burst A to B and DiSEqC A to display the LNB Frequency list box (Item window). 3. Motorised System The Motorised System is unnecessary. (Disabled) 22KHz Tone When you can enter the frequency manually using the NUMERIC buttons(0~9). 6. Press the buttons to the Manual Search menu...
... Disable to antenna. 2. Main Menu Guide LNB Frequency 1. If you select Universal, both 9750 and 10600MHz are supported at the same time. DiSEqC Input According to the option and position of DiSEqC switch, select Disabled, Tone Burst A to B and DiSEqC A to display the LNB Frequency list box (Item window). 3. Motorised System The Motorised System is unnecessary. (Disabled) 22KHz Tone When you can enter the frequency manually using the NUMERIC buttons(0~9). 6. Press the buttons to the Manual Search menu...
User Manual
Page 28
... output through LNB line • Vertical : 13.5 V is only for Manual Search. Frequency 1. The Frequenct Input window will appear and you can type the Symbol Rate directly. Antenna Alternative Select the target antenna for reference and cannot be changed on the Item window using the buttons. Select the desired Symbol Rate on this menu. GB27 Use the buttons to manually find the services that you select Antenna Alternatives. Manual Search Set the search parameters (Frequency...
... output through LNB line • Vertical : 13.5 V is only for Manual Search. Frequency 1. The Frequenct Input window will appear and you can type the Symbol Rate directly. Antenna Alternative Select the target antenna for reference and cannot be changed on the Item window using the buttons. Select the desired Symbol Rate on this menu. GB27 Use the buttons to manually find the services that you select Antenna Alternatives. Manual Search Set the search parameters (Frequency...
User Manual
Page 31
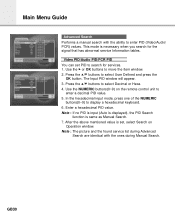
... remote control unit to enter a decimal PID value. 5. The Input PID window will appear. 3. Enter a hexadecimal PID value. After the above mentioned value is set PID to enter PID (Video/Audio/ PCR) values. Press the buttons to display a hexadecimal keyboard. 6. In the hexadecimal input mode, press one of the NUMERIC buttons(0~9) to select User Defined and press the OK button. Note : The picture and the found service list during Advanced Search...
... remote control unit to enter a decimal PID value. 5. The Input PID window will appear. 3. Enter a hexadecimal PID value. After the above mentioned value is set PID to enter PID (Video/Audio/ PCR) values. Press the buttons to display a hexadecimal keyboard. 6. In the hexadecimal input mode, press one of the NUMERIC buttons(0~9) to select User Defined and press the OK button. Note : The picture and the found service list during Advanced Search...
User Manual
Page 32
... mode.) 3. When the entered PIN code is correct, then all settings are completed. (If the PIN code is wrong, the message "PIN code mismatch" will appear on the centre of screen. ** The default PIN code is pressed after selecting the highlighted parental control on the initial menu screen, a display window for entering the PIN code will be displayed on the display window. (If any problem occurs when entering a PIN code, you cannot switch to unlock or lock programmes. 5. 4. When the OK button...
... mode.) 3. When the entered PIN code is correct, then all settings are completed. (If the PIN code is wrong, the message "PIN code mismatch" will appear on the centre of screen. ** The default PIN code is pressed after selecting the highlighted parental control on the initial menu screen, a display window for entering the PIN code will be displayed on the display window. (If any problem occurs when entering a PIN code, you cannot switch to unlock or lock programmes. 5. 4. When the OK button...
User Manual
Page 34
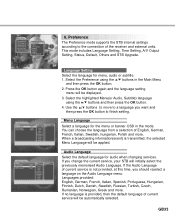
... mode includes Language Setting, Time Setting, A/V Output Setting, Status, Default, Others and STB Upgrade. Press the OK button again and the language setting menu will be automatically selected. When a broadcasting information(event) is transmitted, the selected Menu Language will initially select the previously memorised Audio Language. If you should reselect a language on the Audio Language menu. If no language is not provided, at this time, you change the current service...
... mode includes Language Setting, Time Setting, A/V Output Setting, Status, Default, Others and STB Upgrade. Press the OK button again and the language setting menu will be automatically selected. When a broadcasting information(event) is transmitted, the selected Menu Language will initially select the previously memorised Audio Language. If you should reselect a language on the Audio Language menu. If no language is not provided, at this time, you change the current service...
User Manual
Page 35
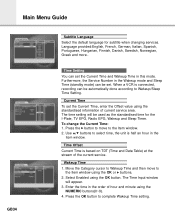
The time setting will appear. 3. The Time Input window will be used as the standardised time for subtitle when changing services. Furthermore, the Service Number in the Wakeup mode and Sleep Time (standby mode) can set the Current Time and Wakeup Time in this mode. When a VCR is half an hour in the order of hour and minute using the OK button. Wakeup Time 1. Enter the time in the item window. Press the button to move...
The time setting will appear. 3. The Time Input window will be used as the standardised time for subtitle when changing services. Furthermore, the Service Number in the Wakeup mode and Sleep Time (standby mode) can set the Current Time and Wakeup Time in this mode. When a VCR is half an hour in the order of hour and minute using the OK button. Wakeup Time 1. Enter the time in the item window. Press the button to move...

User Manual
Page 36
... OK button. Sleep Time Depending on the remote control unit to the Item window using the OK or buttons. 2. Press the OK button to the Item window using the OK or buttons. 2. Move the Category cursor to Sleep Time, and then move to the Item window using the OK or buttons. 2. The Time Input window will appear. 3. Audio Output Set the audio mode which is turned off. 1. buttons and GB35 Wakeup Service...
... OK button. Sleep Time Depending on the remote control unit to the Item window using the OK or buttons. 2. Press the OK button to the Item window using the OK or buttons. 2. Move the Category cursor to Sleep Time, and then move to the Item window using the OK or buttons. 2. The Time Input window will appear. 3. Audio Output Set the audio mode which is turned off. 1. buttons and GB35 Wakeup Service...
User Manual
Page 37
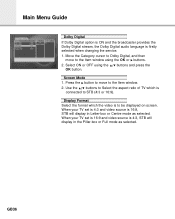
... be displayed on screen. When your TV set is 16:9 and video source is 4:3, STB will display in the Pillar-box or Full mode as selected. Main Menu Guide Dolby Digital If Dolby Digital option is ON and the broadcaster provides the Dolby Digital stream, the Dolby Digital audio language is 16:9, STB will display in Letter-box or Centre mode as selected. Use the buttons to Select the aspect ratio of TV which the video is connected...
... be displayed on screen. When your TV set is 16:9 and video source is 4:3, STB will display in the Pillar-box or Full mode as selected. Main Menu Guide Dolby Digital If Dolby Digital option is ON and the broadcaster provides the Dolby Digital stream, the Dolby Digital audio language is 16:9, STB will display in Letter-box or Centre mode as selected. Use the buttons to Select the aspect ratio of TV which the video is connected...
User Manual
Page 40
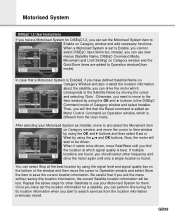
... if you exit the menu without saving this location information, the current Satellite location information will start to search services from the User mode. Now, the motor will be driven. Be careful that a Motorised System is Enabled, if you have defined Satellite Name on Category Window and also created the location information about the satellite, you can drive the motor which signal quality is found. Otherwise, you need to...
... if you exit the menu without saving this location information, the current Satellite location information will start to search services from the User mode. Now, the motor will be driven. Be careful that a Motorised System is Enabled, if you have defined Satellite Name on Category Window and also created the location information about the satellite, you can drive the motor which signal quality is found. Otherwise, you need to...

User Manual
Page 41
... dish. Motor Limit Setting Use this option to Item window. Now, you have changed any setting, use the EXIT button, or move ' by using the OK and buttons like the case of Manual Search, Auto search, and PID search. Now, the motor will start to search services with classifications of Installer. Motorised System To perform East/West fine-tuning for the selected satellite. Move the cursor to save the location information using the and OK buttons...
... dish. Motor Limit Setting Use this option to Item window. Now, you have changed any setting, use the EXIT button, or move ' by using the OK and buttons like the case of Manual Search, Auto search, and PID search. Now, the motor will start to search services with classifications of Installer. Motorised System To perform East/West fine-tuning for the selected satellite. Move the cursor to save the location information using the and OK buttons...


