
User Manual
Page 1
...) Not to be able to change without HUMAX's prior consent in this manual. ** Trademarks VIACCESS™ is a trademark of Dolby Laboratories. Keep this user manual carefully, to be copied, used or translated in ... N.V. Nagravision is a trademark of Telenor Conax AS. 'Dolby' and the double-D symbol are trademarks of France Telecom. Please read this user manual next to your receiver for future reference. Conax is a registered trademark of Mindport BV. Manufactured under license from Dolby Laboratories. ** Thank you for direct, indirect, accidental, necessary and other...
...) Not to be able to change without HUMAX's prior consent in this manual. ** Trademarks VIACCESS™ is a trademark of Dolby Laboratories. Keep this user manual carefully, to be copied, used or translated in ... N.V. Nagravision is a trademark of Telenor Conax AS. 'Dolby' and the double-D symbol are trademarks of France Telecom. Please read this user manual next to your receiver for future reference. Conax is a registered trademark of Mindport BV. Manufactured under license from Dolby Laboratories. ** Thank you for direct, indirect, accidental, necessary and other...
User Manual
Page 3
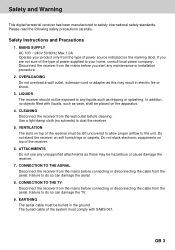
...from the aerial. OVERLOADING ** Do not overload a wall outlet, extension cord or adapter as dripping or splashing. Do not stand the receiver on top of the system must be left uncovered to allow proper airflow to your product only from the mains before you start any ...vase, shall be placed on top of power source indicated on the marking label. CONNECTION TO THE TV ** Disconnect the receiver from the aerial. CLEANING ** Disconnect the receiver from the wall outlet before connecting or disconnecting the cable from the mains before cleaning. MAINS SUPPLY ** AC 100 ~ ...
...from the aerial. OVERLOADING ** Do not overload a wall outlet, extension cord or adapter as dripping or splashing. Do not stand the receiver on top of the system must be left uncovered to allow proper airflow to your product only from the mains before you start any ...vase, shall be placed on top of power source indicated on the marking label. CONNECTION TO THE TV ** Disconnect the receiver from the aerial. CLEANING ** Disconnect the receiver from the wall outlet before connecting or disconnecting the cable from the mains before cleaning. MAINS SUPPLY ** AC 100 ~ ...
User Manual
Page 4
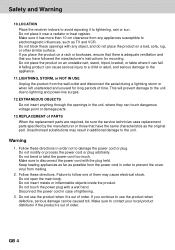
... or bookcase, ensure that there is out of order. Follow these directions. Failure to lightening, rain or sun. Safety and Warning ** 10.LOCATION ** Place the receiver indoors to avoid exposing it to follow one of them may result in additional damage to prevent the cover vinyl from the power cord in...
... or bookcase, ensure that there is out of order. Follow these directions. Failure to lightening, rain or sun. Safety and Warning ** 10.LOCATION ** Place the receiver indoors to avoid exposing it to follow one of them may result in additional damage to prevent the cover vinyl from the power cord in...
User Manual
Page 5
... ** GB12 GB14 GB15 GB16 ** GB16 GB16 GB16 GB16 GB17 GB17 GB19 GB21 ** GB21 ** GB22 GB22 GB24 GB28 GB29 ** GB29 ** GB31 GB32 GB 5 Before Using the Receiver 1.1 Package Contents 1.2 Front Panel 1.3 Rear Panel 1.4 Remote Control 2. Channel List 5.1 Displaying and Switching Channel List 5.2 Changing Channel List Group 5.3 Edit Channels 5.4 Edit Favourite Channels 5.5 Channel...
... ** GB12 GB14 GB15 GB16 ** GB16 GB16 GB16 GB16 GB17 GB17 GB19 GB21 ** GB21 ** GB22 GB22 GB24 GB28 GB29 ** GB29 ** GB31 GB32 GB 5 Before Using the Receiver 1.1 Package Contents 1.2 Front Panel 1.3 Rear Panel 1.4 Remote Control 2. Channel List 5.1 Displaying and Switching Channel List 5.2 Changing Channel List Group 5.3 Edit Channels 5.4 Edit Favourite Channels 5.5 Channel...
User Manual
Page 7
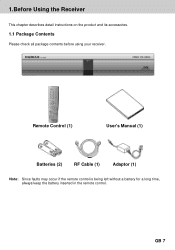
GB 7 1.Before Using the Receiver ** This chapter describes detail instructions on the product and its accessories. 1.1 Package Contents Please check all package contents before using your receiver. ** ** Remote Control (1) ** User's Manual (1) Batteries (2) RF Cable (1) Adaptor (1) ** Note: Since faults may occur if the remote control is being left without a battery for a long time, always keep the battery inserted in the remote control.
GB 7 1.Before Using the Receiver ** This chapter describes detail instructions on the product and its accessories. 1.1 Package Contents Please check all package contents before using your receiver. ** ** Remote Control (1) ** User's Manual (1) Batteries (2) RF Cable (1) Adaptor (1) ** Note: Since faults may occur if the remote control is being left without a battery for a long time, always keep the battery inserted in the remote control.
User Manual
Page 8
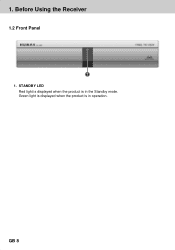
1. STANDBY LED ** Red light is displayed when the product is in the Standby mode. GB 8 Before Using the Receiver ** 1.2 Front Panel ** 1. Green light is displayed when the product is in operation.
1. STANDBY LED ** Red light is displayed when the product is in the Standby mode. GB 8 Before Using the Receiver ** 1.2 Front Panel ** 1. Green light is displayed when the product is in operation.

User Manual
Page 9
TV SCART ** Connects a TV SCART cable. 4. AC Adaptor GB 9 ANTENNA IN ** Connects a aerial to RF (ANT) input jack on the your TV or VCR. ** 3. TV / VCR ** Connects a RF signal from your receiver to a ANTENNA input jack on your receiver. ** 2. ** ** 1.3 Rear Panel ** 1.
TV SCART ** Connects a TV SCART cable. 4. AC Adaptor GB 9 ANTENNA IN ** Connects a aerial to RF (ANT) input jack on the your TV or VCR. ** 3. TV / VCR ** Connects a RF signal from your receiver to a ANTENNA input jack on your receiver. ** 2. ** ** 1.3 Rear Panel ** 1.
User Manual
Page 10
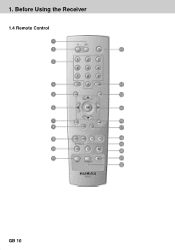
Before Using the Receiver ** 1.4 Remote Control ** GB 10 1.
Before Using the Receiver ** 1.4 Remote Control ** GB 10 1.
User Manual
Page 11
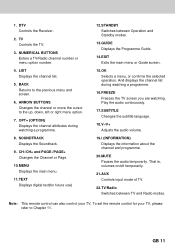
...+ and PAGE-/PAGE+ ** Changes the Channel or Page. ** 10.MENU ** Displays the main menu. ** 11.TEXT ** Displays digital text(for your TV. DTV ** Controls the Receiver. ** 2. ** ** 1. BACK ** Returns to the up, down, left or right menu option. ** 7.
...+ and PAGE-/PAGE+ ** Changes the Channel or Page. ** 10.MENU ** Displays the main menu. ** 11.TEXT ** Displays digital text(for your TV. DTV ** Controls the Receiver. ** 2. ** ** 1. BACK ** Returns to the up, down, left or right menu option. ** 7.
User Manual
Page 12
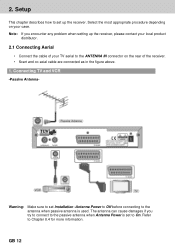
.... GB 12 Note: If you try to connect to the antenna when passive antenna is set up the receiver, please contact your local product distributor. 2.1 Connecting Aerial • Connect the cable of the receiver. • Scart and co-axial cable are connected as in the figure above. 1. Refer to the ANTENNA IN... before connecting to the passive antenna when Antenna Power is used. The antenna can cause damages if you encounter any problem when setting up the receiver. 2. Select the most appropriate procedure depending on your TV aerial to Chapter 8.4 for more information.
.... GB 12 Note: If you try to connect to the antenna when passive antenna is set up the receiver, please contact your local product distributor. 2.1 Connecting Aerial • Connect the cable of the receiver. • Scart and co-axial cable are connected as in the figure above. 1. Refer to the ANTENNA IN... before connecting to the passive antenna when Antenna Power is used. The antenna can cause damages if you encounter any problem when setting up the receiver. 2. Select the most appropriate procedure depending on your TV aerial to Chapter 8.4 for more information.

User Manual
Page 15
... the Channel Search. If the Channel Search is stopped or finished, the result of Channel Search is automatically started. Installation Wizard ** When powering on your receiver as you may not watch any broadcasting normally. When completing Channel Search, you want to stop the Channel Search, select the OK button. 3. If you...
... the Channel Search. If the Channel Search is stopped or finished, the result of Channel Search is automatically started. Installation Wizard ** When powering on your receiver as you may not watch any broadcasting normally. When completing Channel Search, you want to stop the Channel Search, select the OK button. 3. If you...
User Manual
Page 18
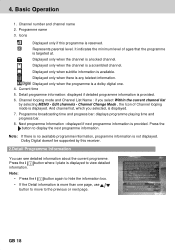
.... Channel Change Mode , the Icon of ages that the programme is displayed. 7. Dolby Digital doesn't be supported by selecting MENU - Icons Displayed only if this receiver. 2.Detail Programme Information You can see detailed information about the current programme. Displayed only when subtitle information is provided. 6. Channel looping mode and Channel List...
.... Channel Change Mode , the Icon of ages that the programme is displayed. 7. Dolby Digital doesn't be supported by selecting MENU - Icons Displayed only if this receiver. 2.Detail Programme Information You can see detailed information about the current programme. Displayed only when subtitle information is provided. 6. Channel looping mode and Channel List...
User Manual
Page 43
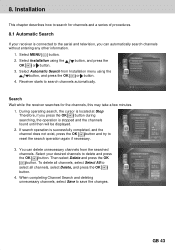
... to search channels automatically. ** Search Wait while the receiver searches for channels and a series of procedures. 8.1 Automatic Search If your desired channels to the aerial and television, you press the OK button during searching, ... displayed. 2. If search operation is located at Stop Therefore, if you can delete unnecessary channels from Installation menu using the OK or button. Select your receiver is connected to delete and press the OK button. When completing Channel Search and deleting unnecessary channels, select Save to select all channels, select Select...
... to search channels automatically. ** Search Wait while the receiver searches for channels and a series of procedures. 8.1 Automatic Search If your desired channels to the aerial and television, you press the OK button during searching, ... displayed. 2. If search operation is located at Stop Therefore, if you can delete unnecessary channels from Installation menu using the OK or button. Select your receiver is connected to delete and press the OK button. When completing Channel Search and deleting unnecessary channels, select Save to select all channels, select Select...
User Manual
Page 45
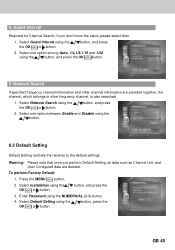
... the OK or button. button, press the GB 45 Select one option between Enable and Disable using the button. 8.3 Default Setting Default Setting restores the receiver to other channel information are deleted. button, and press 2. button, and press the 3. button, and press 2. Network Search If specified frequency channel information and other...
... the OK or button. button, press the GB 45 Select one option between Enable and Disable using the button. 8.3 Default Setting Default Setting restores the receiver to other channel information are deleted. button, and press 2. button, and press the 3. button, and press 2. Network Search If specified frequency channel information and other...
User Manual
Page 46
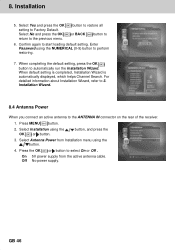
... to select On or Off . Select Installation using the button. 4. Press the OK or button to the ANTENNA IN connector on the rear of the receiver. 1. or BACK button to start loading default setting. Select Antenna Power from the active antenna cable. Confirm again to 6. button, and press the 3. On 5V...
... to select On or Off . Select Installation using the button. 4. Press the OK or button to the ANTENNA IN connector on the rear of the receiver. 1. or BACK button to start loading default setting. Select Antenna Power from the active antenna cable. Confirm again to 6. button, and press the 3. On 5V...

User Manual
Page 47
...the power is not recommendable, perform the software upgrade later. ** Caution: • Please be displayed to notify that the quality of receiving signal strength is off and on again. A message will only occur under the following circumstances. 1. Please wait until the updated is ...for the availability of software upgrade. 9.1 OTA (Over the Air) OTA, an abbreviation of receiving signal strength is essential to update software. • Scheduling operation cannot work at Humax website http://www.humaxdigital.com. However, the manufacturer reserves the right to decide when and ...
...the power is not recommendable, perform the software upgrade later. ** Caution: • Please be displayed to notify that the quality of receiving signal strength is off and on again. A message will only occur under the following circumstances. 1. Please wait until the updated is ...for the availability of software upgrade. 9.1 OTA (Over the Air) OTA, an abbreviation of receiving signal strength is essential to update software. • Scheduling operation cannot work at Humax website http://www.humaxdigital.com. However, the manufacturer reserves the right to decide when and ...

User Manual
Page 50
... information about Hardware version, Software version, Loader version, Update Data and System ID. 10.2 Signal Detection You can view the signal strength and signal quality receiving for the channel that is currently on AV. 1. Select Signal Detection using the or button. Select System using the the OK or button. Select Status...
... information about Hardware version, Software version, Loader version, Update Data and System ID. 10.2 Signal Detection You can view the signal strength and signal quality receiving for the channel that is currently on AV. 1. Select Signal Detection using the or button. Select System using the the OK or button. Select Status...
User Manual
Page 51
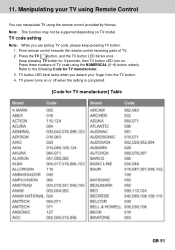
..., please keep pressing TV button. 1. 11. Manipulating your finger from the TV button. 4. Point remote control towards the remote control receiving parts of TV code using the remote control provided by Humax. Refer to the following Code for TV manufacturer] Table ** GB 51 TV power turns on or off when the setting...
..., please keep pressing TV button. 1. 11. Manipulating your finger from the TV button. 4. Point remote control towards the remote control receiving parts of TV code using the remote control provided by Humax. Refer to the following Code for TV manufacturer] Table ** GB 51 TV power turns on or off when the setting...

User Manual
Page 60
... oven near around the equipment. - Make sure that it not overlapped with remote control, the remote control's emitting part should directly point towards the receiving part of receiver's remote control. - Make sure that aerial line is not obstacle ahead. - Check whether it it is off. No message is firmly connected to the...
... oven near around the equipment. - Make sure that it not overlapped with remote control, the remote control's emitting part should directly point towards the receiving part of receiver's remote control. - Make sure that aerial line is not obstacle ahead. - Check whether it it is off. No message is firmly connected to the...

User Manual
Page 61
.... The channel is not available. Replace antenna. GB 61 Press the Audio button to have your aerial and installation tested by a professional. This digital terrestrial receiver does not support the service that enables to descramble the scrambled channels. ** ** 13.2 Error Message Error message Possible causes What to do No or bad...
.... The channel is not available. Replace antenna. GB 61 Press the Audio button to have your aerial and installation tested by a professional. This digital terrestrial receiver does not support the service that enables to descramble the scrambled channels. ** ** 13.2 Error Message Error message Possible causes What to do No or bad...


