User Guide
Page 1
Content 1 Reading Before Proceeding 1 1.1 Safety Precautions 1 1.2 Personal Information and Data Security 2 1.3 Legal Notice 3 2 Getting to Know Your Phone 6 2.1 Overview 6 2.2 Getting Started 8 2.3 Powering Your Phone On and Off 11 2.4 Using the Touchscreen 12 2.5 Locking and Unlocking the Screen 13 2.6 Home Screen 14 2.7 Using a microSD Card 18 3 Voice Services 18 3.1 Making a ...
Content 1 Reading Before Proceeding 1 1.1 Safety Precautions 1 1.2 Personal Information and Data Security 2 1.3 Legal Notice 3 2 Getting to Know Your Phone 6 2.1 Overview 6 2.2 Getting Started 8 2.3 Powering Your Phone On and Off 11 2.4 Using the Touchscreen 12 2.5 Locking and Unlocking the Screen 13 2.6 Home Screen 14 2.7 Using a microSD Card 18 3 Voice Services 18 3.1 Making a ...
User Guide
Page 3
... Settings 54 12 Other Applications 55 12.1 Calendar 55 12.2 Clock 57 12.3 Calculator 58 12.4 Sound Recorder 58 13 Managing Your Phone 59 13.1 Setting the Date and Time 59 13.2 Configuring the Display Settings 59 13.3 Configuring the Sound Settings 59 13.4 Configuring... Phone Services 60 13.5 Configuring the Text-to-Speech Settings 61 13.6 Protecting Your Phone 61 13.7 Managing Applications 62 13.8 Resetting Your Phone 63 14 Appendix 64 14.1 Warnings and Precautions 64 14.2 FAQs 71 iii
... Settings 54 12 Other Applications 55 12.1 Calendar 55 12.2 Clock 57 12.3 Calculator 58 12.4 Sound Recorder 58 13 Managing Your Phone 59 13.1 Setting the Date and Time 59 13.2 Configuring the Display Settings 59 13.3 Configuring the Sound Settings 59 13.4 Configuring... Phone Services 60 13.5 Configuring the Text-to-Speech Settings 61 13.6 Protecting Your Phone 61 13.7 Managing Applications 62 13.8 Resetting Your Phone 63 14 Appendix 64 14.1 Warnings and Precautions 64 14.2 FAQs 71 iii
User Guide
Page 5
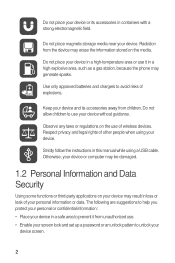
... media near your device. Do not place your device in a safe area to prevent it in a high explosive area, such as a gas station, because the phone may generate sparks. Strictly follow the instructions in this manual while using your device. Do not allow children to use . • Enable your screen lock...
... media near your device. Do not place your device in a safe area to prevent it in a high explosive area, such as a gas station, because the phone may generate sparks. Strictly follow the instructions in this manual while using your device. Do not allow children to use . • Enable your screen lock...
User Guide
Page 9
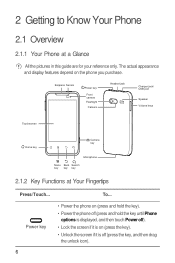
... a Glance All the pictures in this guide are for your reference only. Power key • Power the phone on (press and hold the key). • Power the phone off (press and hold the key until Phone options is displayed, and then touch Power off). • Lock the screen if it is off (press... then drag the unlock icon). 6 The actual appearance and display features depend on (press the key). • Unlock the screen if it is on the phone you purchase. 2 Getting to Know Your Phone 2.1 Overview 2.1.1 Your Phone at Your Fingertips Press/Touch...
... a Glance All the pictures in this guide are for your reference only. Power key • Power the phone on (press and hold the key). • Power the phone off (press and hold the key until Phone options is displayed, and then touch Power off). • Lock the screen if it is off (press... then drag the unlock icon). 6 The actual appearance and display features depend on (press the key). • Unlock the screen if it is on the phone you purchase. 2 Getting to Know Your Phone 2.1 Overview 2.1.1 Your Phone at Your Fingertips Press/Touch...
User Guide
Page 11
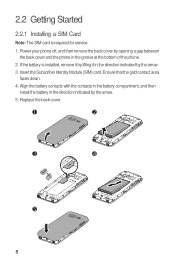
... service. 1. Align the battery contacts with the contacts in the battery compartment, and then install the battery in the groove at the bottom of the phone. 2. Insert the Subscriber Identity Module (SIM) card. 2.2 Getting Started 2.2.1 Installing a SIM Card Note: The SIM card is installed, remove it by lifting it in the... direction indicated by the arrow. 5. Replace the back cover. 1 2 3 4 5 8 Ensure that the gold contact area faces down. 4. Power your phone off, and then remove the back cover by opening a gap between the back cover and the...
... service. 1. Align the battery contacts with the contacts in the battery compartment, and then install the battery in the groove at the bottom of the phone. 2. Insert the Subscriber Identity Module (SIM) card. 2.2 Getting Started 2.2.1 Installing a SIM Card Note: The SIM card is installed, remove it by lifting it in the... direction indicated by the arrow. 5. Replace the back cover. 1 2 3 4 5 8 Ensure that the gold contact area faces down. 4. Power your phone off, and then remove the back cover by opening a gap between the back cover and the...
User Guide
Page 12
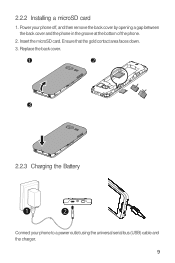
Replace the back cover. 1 2 3 4 2.2.3 Charging the Battery 1 2 Connect your phone off, and then remove the back cover by opening a gap between the back cover and the phone in the groove at the bottom of the phone. 2. Insert the microSD card. Ensure that the gold contact area faces down. 3. 2.2.2 Installing a microSD card 1. Power your phone to a power outlet using the universal serial bus (USB) cable and the charger. 9
Replace the back cover. 1 2 3 4 2.2.3 Charging the Battery 1 2 Connect your phone off, and then remove the back cover by opening a gap between the back cover and the phone in the groove at the bottom of the phone. 2. Insert the microSD card. Ensure that the gold contact area faces down. 3. 2.2.2 Installing a microSD card 1. Power your phone to a power outlet using the universal serial bus (USB) cable and the charger. 9
User Guide
Page 13
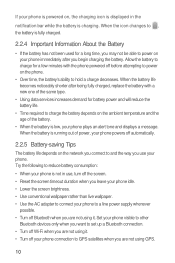
... on the network you connect to and the way you use , turn off the screen. • Reset the screen timeout duration when you leave your phone idle. • Lower the screen brightness. • Use conventional wallpaper rather than live wallpaper. • Use the AC adapter to connect your... charge for a few minutes with a new one of the battery. • When the battery is charging. Allow the battery to hold a charge decreases. Set your phone visible to other Bluetooth devices only when you want to charge the battery depends on the ambient temperature and the age of the same type...
... on the network you connect to and the way you use , turn off the screen. • Reset the screen timeout duration when you leave your phone idle. • Lower the screen brightness. • Use conventional wallpaper rather than live wallpaper. • Use the AC adapter to connect your... charge for a few minutes with a new one of the battery. • When the battery is charging. Allow the battery to hold a charge decreases. Set your phone visible to other Bluetooth devices only when you want to charge the battery depends on the ambient temperature and the age of the same type...
User Guide
Page 14
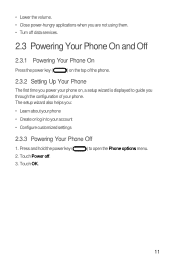
... log in to open the Phone options menu. 11 Touch Power off data services. 2.3 Powering Your Phone On and Off 2.3.1 Powering Your Phone On Press the power key ( ) on the top of the phone. 2.3.2 Setting Up Your Phone The first time you power your phone on, a setup wizard is... displayed to guide you through the configuration of your account • Configure customized settings 2.3.3 Powering Your Phone Off 1. Touch OK. ) to your phone. • Lower the volume. &#...
... log in to open the Phone options menu. 11 Touch Power off data services. 2.3 Powering Your Phone On and Off 2.3.1 Powering Your Phone On Press the power key ( ) on the top of the phone. 2.3.2 Setting Up Your Phone The first time you power your phone on, a setup wizard is... displayed to guide you through the configuration of your account • Configure customized settings 2.3.3 Powering Your Phone Off 1. Touch OK. ) to your phone. • Lower the volume. &#...
User Guide
Page 15
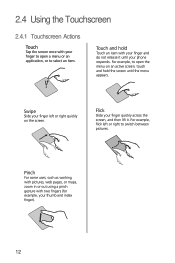
... between pictures. Flick Slide your finger quickly across the screen, and then lift it until the menu appears. Touch and hold the screen until your phone responds. For example, flick left or right quickly on an active screen, touch and hold Touch an item with two fingers (for example, your thumb...
... between pictures. Flick Slide your finger quickly across the screen, and then lift it until the menu appears. Touch and hold the screen until your phone responds. For example, flick left or right quickly on an active screen, touch and hold Touch an item with two fingers (for example, your thumb...
User Guide
Page 16
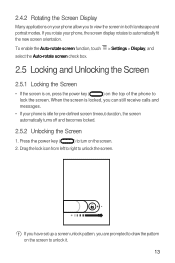
2.4.2 Rotating the Screen Display Many applications on your phone, the screen display rotates to automatically fit the new screen orientation. 6 To enable the ...Drag the lock icon from left to right to draw the pattern on the screen. 2. If you rotate your phone allow you to lock the screen. If you have set up a screen unlock pattern, you can still receive calls... and messages. • If your phone is on, press the power key ( ) on the top of the phone to view the screen in both landscape and portrait modes. When the screen is ...
2.4.2 Rotating the Screen Display Many applications on your phone, the screen display rotates to automatically fit the new screen orientation. 6 To enable the ...Drag the lock icon from left to right to draw the pattern on the screen. 2. If you rotate your phone allow you to lock the screen. If you have set up a screen unlock pattern, you can still receive calls... and messages. • If your phone is on, press the power key ( ) on the top of the phone to view the screen in both landscape and portrait modes. When the screen is ...

User Guide
Page 17
2.6 Home Screen Notification bar 10:23AM Widgets Display area Application icons Indicators of the Home screen and its extensions Touch to open the Phone application Touch to open the application list Touch to open the MetroWEB application 2.6.1 Notification and Status Icons Call in progress Missed calls Call in progress with a Bluetooth device being used USB port connected 4G data connection set up 4G data connection in use Errors Preparing a mircoSD card Downloading data Full memory Audio playback in progress Uploading data 14
2.6 Home Screen Notification bar 10:23AM Widgets Display area Application icons Indicators of the Home screen and its extensions Touch to open the Phone application Touch to open the application list Touch to open the MetroWEB application 2.6.1 Notification and Status Icons Call in progress Missed calls Call in progress with a Bluetooth device being used USB port connected 4G data connection set up 4G data connection in use Errors Preparing a mircoSD card Downloading data Full memory Audio playback in progress Uploading data 14
User Guide
Page 21
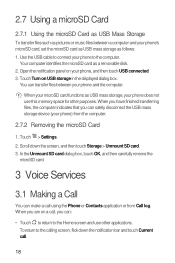
...the microSD card as a removable disk. 2. When you have finished transferring files, the computer indicates that you can transfer files between a computer and your phone, and then touch USB connected. 3. 2.7 Using a microSD Card 2.7.1 Using the microSD Card as USB Mass Storage To transfer files such as pictures ...or music files between your phone to the calling screen, flick down the screen, and then touch Storage > Unmount SD card. 3. When you are on your phone's microSD card, set the microSD card as USB mass storage as USB mass...
...the microSD card as a removable disk. 2. When you have finished transferring files, the computer indicates that you can transfer files between a computer and your phone, and then touch USB connected. 3. 2.7 Using a microSD Card 2.7.1 Using the microSD Card as USB Mass Storage To transfer files such as pictures ...or music files between your phone to the calling screen, flick down the screen, and then touch Storage > Unmount SD card. 3. When you are on your phone's microSD card, set the microSD card as USB mass storage as USB mass...
User Guide
Page 22
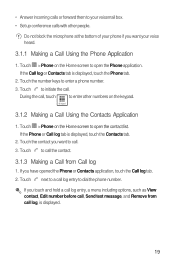
.... If you want to call. 3. Dialpad 3.1.2 Making a Call Using the Contacts Application 5 1. • Answer incoming calls or forward them to your phone if you touch and hold a call log entry, a menu including options, such as View contact, Edit number before call, Send text message, and Remove from ... block the microphone at the bottom of your voicemail box. • Set up conference calls with other numbers on the Home screen to open the Phone application. If the Call log or Contacts tab is displayed. 19 Touch next to a call log entry to enter other people.
.... If you want to call. 3. Dialpad 3.1.2 Making a Call Using the Contacts Application 5 1. • Answer incoming calls or forward them to your phone if you touch and hold a call log entry, a menu including options, such as View contact, Edit number before call, Send text message, and Remove from ... block the microphone at the bottom of your voicemail box. • Set up conference calls with other numbers on the Home screen to open the Phone application. If the Call log or Contacts tab is displayed. 19 Touch next to a call log entry to enter other people.
User Guide
Page 23
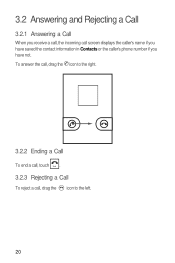
3.2 Answering and Rejecting a Call 3.2.1 Answering a Call When you receive a call, the incoming call screen displays the caller's name if you have saved the contact information in Contacts or the caller's phone number if you have not. 3 To answer the call, drag the icon to the right. 3.2.2 Ending a Call To end a call, touch +TJ . 3.2.3 Rejecting a Call To reject a call, drag the icon to the left. 20
3.2 Answering and Rejecting a Call 3.2.1 Answering a Call When you receive a call, the incoming call screen displays the caller's name if you have saved the contact information in Contacts or the caller's phone number if you have not. 3 To answer the call, drag the icon to the right. 3.2.2 Ending a Call To end a call, touch +TJ . 3.2.3 Rejecting a Call To reject a call, drag the icon to the left. 20
User Guide
Page 24
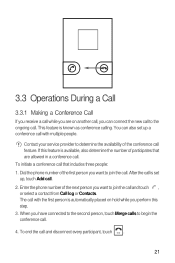
...you perform this feature is automatically placed on another call, you can also set up a conference call is known as conference calling. Enter the phone number of the next person you want to join the call. Contact your service provider to join the call and touch , or select a ... also determine the number of the conference call . When you want to determine the availability of participates that includes three people: 1. Dial the phone number of the first person you have connected to the second person, touch Merge calls to the ongoing call feature. You can connect the new...
...you perform this feature is automatically placed on another call, you can also set up a conference call is known as conference calling. Enter the phone number of the next person you want to join the call. Contact your service provider to join the call and touch , or select a ... also determine the number of the conference call . When you want to determine the availability of participates that includes three people: 1. Dial the phone number of the first person you have connected to the second person, touch Merge calls to the ongoing call feature. You can connect the new...
User Guide
Page 25
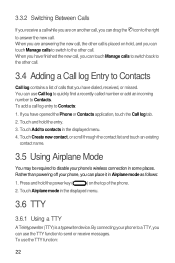
.... If you can use Call log to quickly find a recently called number or add an incoming number to Contacts Call log contains a list of the phone. 2. To use the TTY function to the other call . Touch and hold the power key ( ) on another call, you can place it in Airplane mode... Create new contact, or scroll through the contact list and touch an existing contact name. 3.5 Using Airplane Mode You may be required to disable your phone to a TTY, you have finished the new call, you are on the top of calls that you can touch Manage calls to switch back to...
.... If you can use Call log to quickly find a recently called number or add an incoming number to Contacts Call log contains a list of the phone. 2. To use the TTY function to the other call . Touch and hold the power key ( ) on another call, you can place it in Airplane mode... Create new contact, or scroll through the contact list and touch an existing contact name. 3.5 Using Airplane Mode You may be required to disable your phone to a TTY, you have finished the new call, you are on the top of calls that you can touch Manage calls to switch back to...
User Guide
Page 26
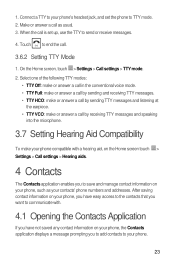
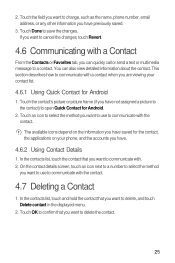
...Home screen touch > Settings > Call settings > Hearing aids. 4 Contacts The Contacts application enables you to save and manage contact information on your phone, the Contacts application displays a message prompting you have easy access to the contacts that you want to communicate with. 4.1 Opening the Contacts Application ...If you to add contacts to your phone's headset jack, and set up, use the TTY to TTY mode. 2. Select one of the following TTY modes: • TTY Off:...
...Home screen touch > Settings > Call settings > Hearing aids. 4 Contacts The Contacts application enables you to save and manage contact information on your phone, the Contacts application displays a message prompting you have easy access to the contacts that you want to communicate with. 4.1 Opening the Contacts Application ...If you to add contacts to your phone's headset jack, and set up, use the TTY to TTY mode. 2. Select one of the following TTY modes: • TTY Off:...
User Guide
Page 27
... at any time. In the contact list, touch > New contact. 6 2. In the contact list, touch > Search. 2. Enter the contact name, and add information such as a phone number or an address. 4. Enter the first letter of your contacts are displayed alphabetically in a list that start with this letter are displayed. 4.5 Editing a Contact...
... at any time. In the contact list, touch > New contact. 6 2. In the contact list, touch > Search. 2. Enter the contact name, and add information such as a phone number or an address. 4. Enter the first letter of your contacts are displayed alphabetically in a list that start with this letter are displayed. 4.5 Editing a Contact...
User Guide
Page 28
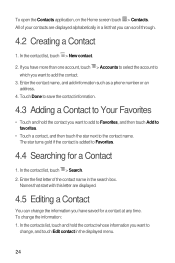
... or Favorites tab, you have previously saved. 3. Touch OK to confirm that you want to use to communicate with a contact when you are viewing your phone, and the accounts you want to a contact. The available icons depend on your contact list. 4.6.1 Using Quick Contact for the contact, the applications on the... saved for Android 1. Touch the contact's picture or picture frame (if you have not assigned a picture to the contact) to change, such as the name, phone number, email address, or any other information you want to open Quick Contact for Android. 2.
... or Favorites tab, you have previously saved. 3. Touch OK to confirm that you want to use to communicate with a contact when you are viewing your phone, and the accounts you want to a contact. The available icons depend on your contact list. 4.6.1 Using Quick Contact for the contact, the applications on the... saved for Android 1. Touch the contact's picture or picture frame (if you have not assigned a picture to the contact) to change, such as the name, phone number, email address, or any other information you want to open Quick Contact for Android. 2.
User Guide
Page 30
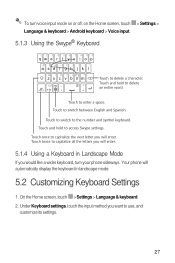
... the Swype® Keyboard 12 34 5 6 7 8 90 qwe r t y u i op asd f gh j k l Ć# = / + ? z x c v b nm Ȑ 123 EN _ +!= , Touch to enter a space. Touch to delete a character. Your phone will enter. Touch twice to use, and customize its settings. 27 Touch to the number and symbol keyboard. 5 To turn your...
... the Swype® Keyboard 12 34 5 6 7 8 90 qwe r t y u i op asd f gh j k l Ć# = / + ? z x c v b nm Ȑ 123 EN _ +!= , Touch to enter a space. Touch to delete a character. Your phone will enter. Touch twice to use, and customize its settings. 27 Touch to the number and symbol keyboard. 5 To turn your...


