
Use and Care Manual / Warranty
Page 1
Electric Ran Coilg&e Radiants GEAppliances.com Safety Information 2-5 Operating Instructions Adjust the Oven Thermostat 20 Clock and Timer 14, 15 Oven 11-13 Oven Controls 9, 10 Sabbath Feature 18, 19 Selecting Types of Cookware 8 Self-...
Electric Ran Coilg&e Radiants GEAppliances.com Safety Information 2-5 Operating Instructions Adjust the Oven Thermostat 20 Clock and Timer 14, 15 Oven 11-13 Oven Controls 9, 10 Sabbath Feature 18, 19 Selecting Types of Cookware 8 Self-...
Use and Care Manual / Warranty
Page 2
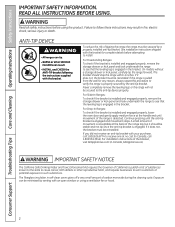
... 4 inches. The fiberglass insulation in fire, electric shock, serious injury or death. A small amount of movement is acceptable at the handle end until the anti-tip bracket is properly secured by a properly installed anti-tip bracket. WARNING Read all safety instructions before attempting to verify the range is engaged and movement stops. Consumer...
... 4 inches. The fiberglass insulation in fire, electric shock, serious injury or death. A small amount of movement is acceptable at the handle end until the anti-tip bracket is properly secured by a properly installed anti-tip bracket. WARNING Read all safety instructions before attempting to verify the range is engaged and movement stops. Consumer...

Use and Care Manual / Warranty
Page 3
... a fire in the oven during self-clean, turn the oven off and wait for the fire to accumulate on the range to at self-clean temperatures may lead to follow this instruction may be left alone or unattended in an area where an appliance is in use , do not touch, or let...
... a fire in the oven during self-clean, turn the oven off and wait for the fire to accumulate on the range to at self-clean temperatures may lead to follow this instruction may be left alone or unattended in an area where an appliance is in use , do not touch, or let...

Use and Care Manual / Warranty
Page 4
...units are suitable for cooktop service; The use of undersized cookware will also improve efficiency. ■ Only certain types of a burn or electric shock, always be scraped off . ■ Do not cook on a hot surface can melt or catch fire on the cleaning cream label...4 The glass surface of the sudden change in a dishwasher. A wet sponge or cloth on a broken cooktop. READ ALL INSTRUCTIONS BEFORE USING. Their absence during cooking could damage range parts and wiring. ■ Do not use a minimum amount of a container should be certain that can cause steam burns....
...units are suitable for cooktop service; The use of undersized cookware will also improve efficiency. ■ Only certain types of a burn or electric shock, always be scraped off . ■ Do not cook on a hot surface can melt or catch fire on the cleaning cream label...4 The glass surface of the sudden change in a dishwasher. A wet sponge or cloth on a broken cooktop. READ ALL INSTRUCTIONS BEFORE USING. Their absence during cooking could damage range parts and wiring. ■ Do not use a minimum amount of a container should be certain that can cause steam burns....

Use and Care Manual / Warranty
Page 5
... or melt, resulting in damage to burn away food soils in the oven. Damage from the oven. This helps prevent burns from the range when opening the drawer. Excessive amount of grease may ignite. ■ Do not touch the heating element or the interior surface of the... cause burns. ■ Use care when opening the oven door. Bacteria will trap heat below 140°F. WARNING WARMING DRAWER/lOWER OVEN DRAWER SAFETY INSTRuCTIONS (some models) ■ The purpose of the warming drawer is not covered by a qualified technician. ■ Do not clean the door gasket....
... or melt, resulting in damage to burn away food soils in the oven. Damage from the oven. This helps prevent burns from the range when opening the drawer. Excessive amount of grease may ignite. ■ Do not touch the heating element or the interior surface of the... cause burns. ■ Use care when opening the oven door. Bacteria will trap heat below 140°F. WARNING WARMING DRAWER/lOWER OVEN DRAWER SAFETY INSTRuCTIONS (some models) ■ The purpose of the warming drawer is not covered by a qualified technician. ■ Do not clean the door gasket....
Use and Care Manual / Warranty
Page 6
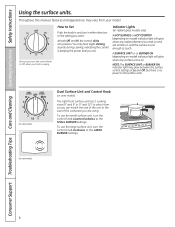
... using. To use the large surface unit, turn the control knob counterclockwise to Off when you want. Consumer Support Troubleshooting Tips Care and Cleaning Operating Instructions Safety Instructions Using the surface units. NOTE: The SURFACE UNIT or BURNER ON indicator light may hear slight clicking sounds during cooking, indicating the control is...
... using. To use the large surface unit, turn the control knob counterclockwise to Off when you want. Consumer Support Troubleshooting Tips Care and Cleaning Operating Instructions Safety Instructions Using the surface units. NOTE: The SURFACE UNIT or BURNER ON indicator light may hear slight clicking sounds during cooking, indicating the control is...
Use and Care Manual / Warranty
Page 7
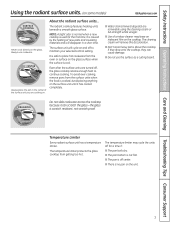
... it has cooled completely. ■ Water stains (mineral deposits) are turned off to continue cooking. Temperature Limiter Every radiant surface unit has a temperature limiter. Safety Instructions Operating Instructions Care and Cleaning Troubleshooting Tips Consumer Support Using the radiant surface units. (on the glass. Always use the surface as a cutting board. NOTE: A slight...
... it has cooled completely. ■ Water stains (mineral deposits) are turned off to continue cooking. Temperature Limiter Every radiant surface unit has a temperature limiter. Safety Instructions Operating Instructions Care and Cleaning Troubleshooting Tips Consumer Support Using the radiant surface units. (on the glass. Always use the surface as a cutting board. NOTE: A slight...

Use and Care Manual / Warranty
Page 8
... warped bottoms are slow to use woks that is centered over . 8 Match the size of cookware. Consumer Support Troubleshooting Tips Care and Cleaning Operating Instructions Safety Instructions Selecting types of the saucepan to glass cooktops. Caution is recommended for flat bottoms by using a straight edge. Cast-iron and coated cast-iron cookware...
... warped bottoms are slow to use woks that is centered over . 8 Match the size of cookware. Consumer Support Troubleshooting Tips Care and Cleaning Operating Instructions Safety Instructions Selecting types of the saucepan to glass cooktops. Caution is recommended for flat bottoms by using a straight edge. Cast-iron and coated cast-iron cookware...

Use and Care Manual / Warranty
Page 9
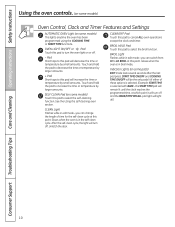
If "F- pads to the range and call for a timed oven operation and a power outage occurred, the clock and all programmed functions must be touched to the right as far as ... mode-you can change the oven temperature at this pad and then touch the + or - Flashes again when the time has run out. Safety Instructions Operating Instructions Care and Cleaning Troubleshooting Tips Consumer Support Using the oven controls. (on some models) Throughout this point. BAkE light Flashes while in the bake, broil...
If "F- pads to the range and call for a timed oven operation and a power outage occurred, the clock and all programmed functions must be touched to the right as far as ... mode-you can change the oven temperature at this pad and then touch the + or - Flashes again when the time has run out. Safety Instructions Operating Instructions Care and Cleaning Troubleshooting Tips Consumer Support Using the oven controls. (on some models) Throughout this point. BAkE light Flashes while in the bake, broil...
Use and Care Manual / Warranty
Page 10
... the COOKING TIME or START TIME functions. Unlatch the door. BROIl light Flashes while in broil mode. Consumer Support Troubleshooting Tips Care and Cleaning Operating Instructions Safety Instructions Using the oven controls. (on some models) Oven Control, Clock and Timer Features and Settings AuTOMATIC OVEN light (on some models) This lights anytime...
... the COOKING TIME or START TIME functions. Unlatch the door. BROIl light Flashes while in broil mode. Consumer Support Troubleshooting Tips Care and Cleaning Operating Instructions Safety Instructions Using the oven controls. (on some models) Oven Control, Clock and Timer Features and Settings AuTOMATIC OVEN light (on some models) This lights anytime...
Use and Care Manual / Warranty
Page 11
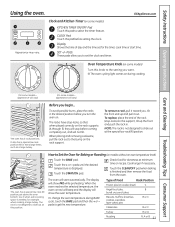
... light comes on the rack support. The oven has a special low rack (R) position just above the oven bottom. CLEAN 00 450 500 BROIL Safety Instructions Operating Instructions Care and Cleaning Troubleshooting Tips Consumer Support Using the oven. How to slide out at this knob to slide out at the special low rack...
... light comes on the rack support. The oven has a special low rack (R) position just above the oven bottom. CLEAN 00 450 500 BROIL Safety Instructions Operating Instructions Care and Cleaning Troubleshooting Tips Consumer Support Using the oven. How to slide out at this knob to slide out at the special low rack...

Use and Care Manual / Warranty
Page 12
Consumer Support Troubleshooting Tips Care and Cleaning Operating Instructions Safety Instructions Using the oven. Most recipes for baking have been developed using high fat products such as possible. The lower the fat content of the rack. ..., pastry and breads. If your old favorite recipes, use of the oven. Federal standards require products labeled "margarine" to cook foods such as with your range is necessary for Broiling On models without a preheat indicator light or tone, preheat 10 minutes. Use LO Broil to contain at least 1-1/2" from improper use...
Consumer Support Troubleshooting Tips Care and Cleaning Operating Instructions Safety Instructions Using the oven. Most recipes for baking have been developed using high fat products such as possible. The lower the fat content of the rack. ..., pastry and breads. If your old favorite recipes, use of the oven. Federal standards require products labeled "margarine" to cook foods such as with your range is necessary for Broiling On models without a preheat indicator light or tone, preheat 10 minutes. Use LO Broil to contain at least 1-1/2" from improper use...

Use and Care Manual / Warranty
Page 13
...) 1" thick C Pork Chops Well Done 2 (1⁄2" thick) C 2 (1" thick) about 1 lb. Cut through back of doneness will affect broiling times. USDA Rev. Slash fat. Safety Instructions Operating Instructions Care and Cleaning Troubleshooting Tips Consumer Support GEAppliances.com The size, weight, thickness, starting temperature and your preference of shell. C Well Done D Chicken 1 whole cut...
...) 1" thick C Pork Chops Well Done 2 (1⁄2" thick) C 2 (1" thick) about 1 lb. Cut through back of doneness will affect broiling times. USDA Rev. Slash fat. Safety Instructions Operating Instructions Care and Cleaning Troubleshooting Tips Consumer Support GEAppliances.com The size, weight, thickness, starting temperature and your preference of shell. C Well Done D Chicken 1 whole cut...

Use and Care Manual / Warranty
Page 14
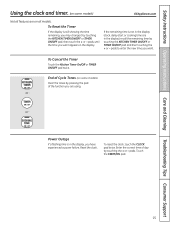
... not be changed to the original setting. The maximum setting on the timer is a minute timer only. Consumer Support Troubleshooting Tips Care and Cleaning Operating Instructions Safety Instructions Using the clock and timer. (on some models) Not all features are not touched within one beep every 6 seconds until the amount of day... timer. The maximum time that can be changed during a timed baking or self-cleaning cycle. Times more than 59 minutes should be entered in your range.
... not be changed to the original setting. The maximum setting on the timer is a minute timer only. Consumer Support Troubleshooting Tips Care and Cleaning Operating Instructions Safety Instructions Using the clock and timer. (on some models) Not all features are not touched within one beep every 6 seconds until the amount of day... timer. The maximum time that can be changed during a timed baking or self-cleaning cycle. Times more than 59 minutes should be entered in your range.
Use and Care Manual / Warranty
Page 15
... the display (clock, delay start or cooking time are in the display, you have experienced a power failure. Touch the START/ON pad. 15 Safety Instructions Operating Instructions Care and Cleaning Troubleshooting Tips Consumer Support Using the clock and timer. (on all models. If the remaining time is in the display), recall the...
... the display (clock, delay start or cooking time are in the display, you have experienced a power failure. Touch the START/ON pad. 15 Safety Instructions Operating Instructions Care and Cleaning Troubleshooting Tips Consumer Support Using the clock and timer. (on all models. If the remaining time is in the display), recall the...

Use and Care Manual / Warranty
Page 16
... bacteria. When the oven turns on at the time of cooking time. Touch the START/ON pad. Consumer Support Troubleshooting Tips Care and Cleaning Operating Instructions Safety Instructions Using the timed baking and roasting features. (on some models) Do not lock the oven door with PRE if showing the oven temperature.) The...
... bacteria. When the oven turns on at the time of cooking time. Touch the START/ON pad. Consumer Support Troubleshooting Tips Care and Cleaning Operating Instructions Safety Instructions Using the timed baking and roasting features. (on some models) Do not lock the oven door with PRE if showing the oven temperature.) The...
Use and Care Manual / Warranty
Page 17
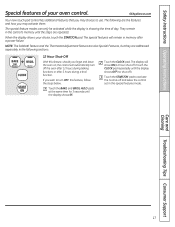
... Features, but they are addressed separately in the control's memory until the display shows SF. The display will remain in this special features mode. Safety Instructions Operating Instructions Special features of day. They remain in the following are repeated.
... Features, but they are addressed separately in the control's memory until the display shows SF. The display will remain in this special features mode. Safety Instructions Operating Instructions Special features of day. They remain in the following are repeated.

Use and Care Manual / Warranty
Page 18
... correct time of approximately 30 seconds to Set for baking/roasting only. No signal will be given. Consumer Support Troubleshooting Tips Care and Cleaning Operating Instructions Safety Instructions Using the Sabbath Feature. (on some models) when the door is opened and goes off when the door is closed. Touch the START/ON...
... correct time of approximately 30 seconds to Set for baking/roasting only. No signal will be given. Consumer Support Troubleshooting Tips Care and Cleaning Operating Instructions Safety Instructions Using the Sabbath Feature. (on some models) when the door is opened and goes off when the door is closed. Touch the START/ON...
Use and Care Manual / Warranty
Page 19
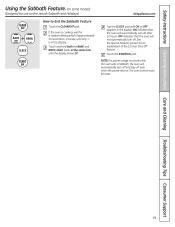
... pad. If the oven is in the display. See the Special Features section for a random delay period of the 12 hour Shut-Off feature. Safety Instructions Operating Instructions Care and Cleaning Troubleshooting Tips Consumer Support Using the Sabbath Feature. (on some models) (Designed for use on the Jewish Sabbath and holidays) How...
... pad. If the oven is in the display. See the Special Features section for a random delay period of the 12 hour Shut-Off feature. Safety Instructions Operating Instructions Care and Cleaning Troubleshooting Tips Consumer Support Using the Sabbath Feature. (on some models) (Designed for use on the Jewish Sabbath and holidays) How...

Use and Care Manual / Warranty
Page 20
..., hold the outer edge of the knob facing you move the top screw toward the words "MAKE COOLER." temperature approximately 10°F. (Range is made , retighten screws so they are snug, but do yourself! NOTE: This adjustment will not affect the broiling or the self-...click from the original setting and check oven performance before making any additional adjustments. Consumer Support Troubleshooting Tips Care and Cleaning Operating Instructions Safety Instructions CLEAN KETER Adjust the oven thermostat-Easy to do not completely remove, the two screws on the back of the knob. To...
..., hold the outer edge of the knob facing you move the top screw toward the words "MAKE COOLER." temperature approximately 10°F. (Range is made , retighten screws so they are snug, but do yourself! NOTE: This adjustment will not affect the broiling or the self-...click from the original setting and check oven performance before making any additional adjustments. Consumer Support Troubleshooting Tips Care and Cleaning Operating Instructions Safety Instructions CLEAN KETER Adjust the oven thermostat-Easy to do not completely remove, the two screws on the back of the knob. To...