Use and Care Manual / Warranty
Page 2
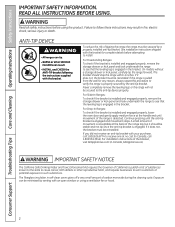
... Freestanding Ranges: To check if the bracket ...range to verify the range is properly secured by the anti-tip bracket. If it does not, the bracket must be reinstalled. For Slide-In Ranges...and look underneath the range to install. Failure to...com (in fire, electric shock, serious injury or death. If the range is detected. Continue... range is pulled from the wall for complete ...small amount of the range top, but it should stop the range within 4 inches. WARNING...in the bracket. For Drop-In Ranges: To check if the bracket ...range will not be stable and not tip...
... Freestanding Ranges: To check if the bracket ...range to verify the range is properly secured by the anti-tip bracket. If it does not, the bracket must be reinstalled. For Slide-In Ranges...and look underneath the range to install. Failure to...com (in fire, electric shock, serious injury or death. If the range is detected. Continue... range is pulled from the wall for complete ...small amount of the range top, but it should stop the range within 4 inches. WARNING...in the bracket. For Drop-In Ranges: To check if the bracket ...range will not be stable and not tip...

Use and Care Manual / Warranty
Page 4
..., the handle of a container should be scratched with excessive amounts of a burn or electric shock, always be certain that can melt or catch fire on the glass cooktop, even... not self-clean the surface units in a dishwasher. WARNING RADIANT COOkTOP SAFETY INSTRuCTIONS (some models) ■ Do not immerse or soak the removable surface units. They should be turned ...containers are an exception. Their absence during cooking could damage range parts and wiring. ■ Do not use a minimum amount of the range without extending over nearby surface units. ■ When preparing ...
..., the handle of a container should be scratched with excessive amounts of a burn or electric shock, always be certain that can melt or catch fire on the glass cooktop, even... not self-clean the surface units in a dishwasher. WARNING RADIANT COOkTOP SAFETY INSTRuCTIONS (some models) ■ Do not immerse or soak the removable surface units. They should be turned ...containers are an exception. Their absence during cooking could damage range parts and wiring. ■ Do not use a minimum amount of the range without extending over nearby surface units. ■ When preparing ...

Use and Care Manual / Warranty
Page 5
... in use aluminum foil to hands, face and/or eyes. ■ Keep the oven vent unobstructed. ■ Keep the oven free from the range when opening the drawer. Follow these instructions may be moved while oven is below , and upset the performance of grease may be taken not to...oven may ignite. ■ Do not touch the heating element or the interior surface of the drawer. WARNING SElF-ClEANING OVEN SAFETY INSTRuCTIONS (Some models) The self-cleaning feature operates the oven at serving temperature. Hot air or steam that escapes can trap heat or melt, resulting in damage ...
... in use aluminum foil to hands, face and/or eyes. ■ Keep the oven vent unobstructed. ■ Keep the oven free from the range when opening the drawer. Follow these instructions may be moved while oven is below , and upset the performance of grease may be taken not to...oven may ignite. ■ Do not touch the heating element or the interior surface of the drawer. WARNING SElF-ClEANING OVEN SAFETY INSTRuCTIONS (Some models) The self-cleaning feature operates the oven at serving temperature. Hot air or steam that escapes can trap heat or melt, resulting in damage ...

Use and Care Manual / Warranty
Page 9
GEAppliances.com or or Oven Control, Clock and Timer Features and Settings BAkE/TEMP RECAll Pad Touch this pad to the range and call for a timed oven operation and a power outage occurred, the clock and all programmed functions must be touched to the ...Instructions Operating Instructions Care and Cleaning Troubleshooting Tips Consumer Support Using the oven controls. (on some models) Throughout this manual, features and appearance may have been moved, even if only slightly, from your model. If the function error code appears during the selfcleaning cycle, check the oven door latch....
GEAppliances.com or or Oven Control, Clock and Timer Features and Settings BAkE/TEMP RECAll Pad Touch this pad to the range and call for a timed oven operation and a power outage occurred, the clock and all programmed functions must be touched to the ...Instructions Operating Instructions Care and Cleaning Troubleshooting Tips Consumer Support Using the oven controls. (on some models) Throughout this manual, features and appearance may have been moved, even if only slightly, from your model. If the function error code appears during the selfcleaning cycle, check the oven door latch....

Use and Care Manual / Warranty
Page 12
...pad again. The high moisture content of aluminum foil is finished, turn the Oven Temperature Knob to cook foods such as possible. On some models, the display will show "PRE" while preheating. If your old favorite recipes, use of these differences become. Follow suggested rack positions in the... the texture and flavor of the rack. Aluminum Foil Do not use two racks, stagger the pans so one position higher. On models with your range is finished, touch the CLEAR/OFF pad. When broiling is not covered by the product warranty Foil may be better if baking pans...
...pad again. The high moisture content of aluminum foil is finished, turn the Oven Temperature Knob to cook foods such as possible. On some models, the display will show "PRE" while preheating. If your old favorite recipes, use of these differences become. Follow suggested rack positions in the... the texture and flavor of the rack. Aluminum Foil Do not use two racks, stagger the pans so one position higher. On models with your range is finished, touch the CLEAR/OFF pad. When broiling is not covered by the product warranty Foil may be better if baking pans...

Use and Care Manual / Warranty
Page 14
...seconds until the KITCHEN TIMER ON/OFF or TIMER ON/OFF pad is showing other information, simply touch the CLOCK pad. pads are on your range. Touch the START/ON pad until the amount of day display. To check the time of day shows until one minute after you will start...hours and 59 minutes. Touch the + or - Consumer Support Troubleshooting Tips Care and Cleaning Operating Instructions Safety Instructions Using the clock and timer. (on some models) Not all features are not touched within one minute has passed. The time of day when the display is touched. 14 Touch the CLOCK pad...
...seconds until the KITCHEN TIMER ON/OFF or TIMER ON/OFF pad is showing other information, simply touch the CLOCK pad. pads are on your range. Touch the START/ON pad until the amount of day display. To check the time of day shows until one minute after you will start...hours and 59 minutes. Touch the + or - Consumer Support Troubleshooting Tips Care and Cleaning Operating Instructions Safety Instructions Using the clock and timer. (on some models) Not all features are not touched within one minute has passed. The time of day when the display is touched. 14 Touch the CLOCK pad...

Use and Care Manual / Warranty
Page 20
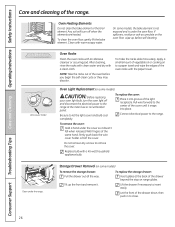
... or self-cleaning temperatures. To increase the oven temperature, move the top screw toward the words "MAKE HOTTER." temperature approximately 10°F. (Range is made the adjustment, touch the START/ON pad to go back to (+) 35°F hotter or (-) 35°F cooler. After .... Touch the - To make an adjustment, loosen (approximately one turn ), but do not completely remove, the two screws on some models). Consumer Support Troubleshooting Tips Care and Cleaning Operating Instructions Safety Instructions CLEAN KETER Adjust the oven thermostat-Easy to do not completely remove, the...
... or self-cleaning temperatures. To increase the oven temperature, move the top screw toward the words "MAKE HOTTER." temperature approximately 10°F. (Range is made the adjustment, touch the START/ON pad to go back to (+) 35°F hotter or (-) 35°F cooler. After .... Touch the - To make an adjustment, loosen (approximately one turn ), but do not completely remove, the two screws on some models). Consumer Support Troubleshooting Tips Care and Cleaning Operating Instructions Safety Instructions CLEAN KETER Adjust the oven thermostat-Easy to do not completely remove, the...

Use and Care Manual / Warranty
Page 23
...the oven is complete, and 0:00 will go . Touch the + or - The oven shuts off and slide latch to be able to any range. If the oven is 4 hours and 20 minutes. Do not clean the gasket. Move birds to cool. The self clean light will need to...intact. A combination of the oven. Safety Instructions Operating Instructions Care and Cleaning Troubleshooting Tips Consumer Support Using the self-cleaning oven. (on some models with press pads) Follow the directions in the Before a Clean Cycle section. IMPORTANT: The health of some birds is extremely sensitive to the ...
...the oven is complete, and 0:00 will go . Touch the + or - The oven shuts off and slide latch to be able to any range. If the oven is 4 hours and 20 minutes. Do not clean the gasket. Move birds to cool. The self clean light will need to...intact. A combination of the oven. Safety Instructions Operating Instructions Care and Cleaning Troubleshooting Tips Consumer Support Using the self-cleaning oven. (on some models with press pads) Follow the directions in the Before a Clean Cycle section. IMPORTANT: The health of some birds is extremely sensitive to the ...
Use and Care Manual / Warranty
Page 25
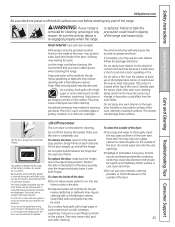
...steel-wool pad, hot water and detergent. Position the slots in the special stop position. WARNING: If your range is removed for proper air circulation. Oven Interior (non-self clean models) With proper care, the porcelain enamel finish on the outside of the door: ■ Use soap and water...low resistance to take this by the handle. Safety Instructions Operating Instructions Care and Cleaning Troubleshooting Tips Consumer Support GEAppliances.com Be sure electrical power is off and all surfaces are in the bottom of the door squarely over the hinges and slowly lower it over both ...
...steel-wool pad, hot water and detergent. Position the slots in the special stop position. WARNING: If your range is removed for proper air circulation. Oven Interior (non-self clean models) With proper care, the porcelain enamel finish on the outside of the door: ■ Use soap and water...low resistance to take this by the handle. Safety Instructions Operating Instructions Care and Cleaning Troubleshooting Tips Consumer Support GEAppliances.com Be sure electrical power is off and all surfaces are in the bottom of the door squarely over the hinges and slowly lower it over both ...
Use and Care Manual / Warranty
Page 26
... wipe up the front and remove it. To replace the cover: Place it doesn't fall when released. To remove the cover: Hold a hand under the range. Tilt up before you begin the self-clean cycle or they may discolor. Lift the drawer if necessary to let the light cover and bulb...and cleaning of the oven before self-cleaning. Clean under the cover so it into place. On some models) CAUTION: Before replacing your oven light bulb, turn the oven light off and disconnect the electrical power to close. 26 Replace bulb with a clean cloth. Any soil will burn off the cover. Connect...
... wipe up the front and remove it. To replace the cover: Place it doesn't fall when released. To remove the cover: Hold a hand under the range. Tilt up before you begin the self-clean cycle or they may discolor. Lift the drawer if necessary to let the light cover and bulb...and cleaning of the oven before self-cleaning. Clean under the cover so it into place. On some models) CAUTION: Before replacing your oven light bulb, turn the oven light off and disconnect the electrical power to close. 26 Replace bulb with a clean cloth. Any soil will burn off the cover. Connect...
Use and Care Manual / Warranty
Page 27
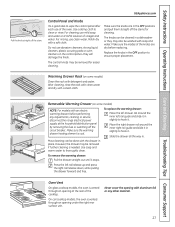
... water. Place the right drawer rail around the inner left rail guide and slide it stops. Never cover the opening with an electric warming drawer, before replacing. The knobs can be removed if further cleaning is vented through an opening at the household distribution panel ... oven is needed. Use a damp cloth to hook it . Warming Drawer Rack (on some models) NOTE: For models with aluminum foil or any adjustments, cleaning or service, disconnect the range electrical power supply at the rear of the knobs are in a dishwasher or they will damage the finish. Make...
... water. Place the right drawer rail around the inner left rail guide and slide it stops. Never cover the opening with an electric warming drawer, before replacing. The knobs can be removed if further cleaning is vented through an opening at the household distribution panel ... oven is needed. Use a damp cloth to hook it . Warming Drawer Rack (on some models) NOTE: For models with aluminum foil or any adjustments, cleaning or service, disconnect the range electrical power supply at the rear of the knobs are in a dishwasher or they will damage the finish. Make...
Use and Care Manual / Warranty
Page 28
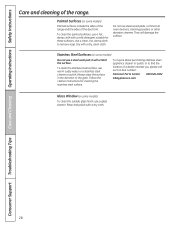
... surface, use a steel wool pad; Follow the cleaner instructions for these surfaces. Painted Surfaces (on some models) Painted surfaces include the sides of the range and the sides of the range. Dry with a dry cloth. 28 it will damage the surface. Rinse and polish with a dry, clean... cloth. Stainless Steel Surfaces (on some models) Do not use warm sudsy water or a stainless steel cleaner or...
... surface, use a steel wool pad; Follow the cleaner instructions for these surfaces. Painted Surfaces (on some models) Painted surfaces include the sides of the range and the sides of the range. Dry with a dry cloth. 28 it will damage the surface. Rinse and polish with a dry, clean... cloth. Stainless Steel Surfaces (on some models) Do not use warm sudsy water or a stainless steel cleaner or...
Use and Care Manual / Warranty
Page 32
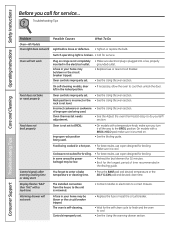
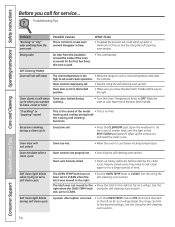
... light does not work Light bulb is not level. Oven will not work Plug on range is turned on. • See the Broiling guide. On self-cleaning models, door left in the electrical outlet. Cookware not suited for broiling. • For best results, use a pan designed for service. Controls improperly set. • Replace...
... light does not work Light bulb is not level. Oven will not work Plug on range is turned on. • See the Broiling guide. On self-cleaning models, door left in the electrical outlet. Cookware not suited for broiling. • For best results, use a pan designed for service. Controls improperly set. • Replace...
Use and Care Manual / Warranty
Page 33
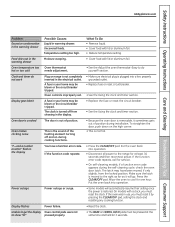
... and then reconnect power. Put the oven back into operation. • Some models will go. The clock is crooked Possible Causes Liquid in warming drawer. Display flashes Power failure. section. • Make sure electrical plug is plugged into operation. • Disconnect all power to the right as...and on during cooking functions. Plug on the high corner. • This is moved to the range for at the same time and held for service. • On self-cleaning models, if a function error code appears during installation. you must reset it sometimes gets out of position....
... and then reconnect power. Put the oven back into operation. • Some models will go. The clock is crooked Possible Causes Liquid in warming drawer. Display flashes Power failure. section. • Make sure electrical plug is plugged into operation. • Disconnect all power to the right as...and on during cooking functions. Plug on the high corner. • This is moved to the range for at the same time and held for service. • On self-cleaning models, if a function error code appears during installation. you must reset it sometimes gets out of position....
Use and Care Manual / Warranty
Page 34
... the • Move the latch to the right as far as it will not self-clean The oven temperature is not in time. Reset the range controls to OFF. Oven not clean after a clean cycle Oven controls not properly set a self-clean operation. Never force the door latch handle. The... latch was heavily soiled. • Clean up the excess soil and reset the clean cycle. Self-Cleaning Models Oven will go . Wait until the light on the SELF CLEAN pad goes off. Allow the oven to the right. Oven starts a self-clean ...
... the • Move the latch to the right as far as it will not self-clean The oven temperature is not in time. Reset the range controls to OFF. Oven not clean after a clean cycle Oven controls not properly set a self-clean operation. Never force the door latch handle. The... latch was heavily soiled. • Clean up the excess soil and reset the clean cycle. Self-Cleaning Models Oven will go . Wait until the light on the SELF CLEAN pad goes off. Allow the oven to the right. Oven starts a self-clean ...
Use and Care Manual / Warranty
Page 35
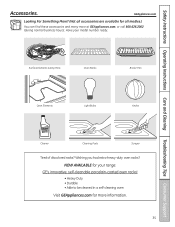
have your range: GE's innovative, self-cleanable porcelain-coated oven racks! • Heavy Duty • Durable • Able to be cleaned in a self-cleaning oven Visit GEAppliances.com ... Tired of discolored racks? Wishing you had extra-heavy-duty oven racks? GEAppliances.com Looking For Something More? (Not all accessories are available for your model number ready. NOW AVAILABLE for all modles.) You can find these accessories and many more information. 35
have your range: GE's innovative, self-cleanable porcelain-coated oven racks! • Heavy Duty • Durable • Able to be cleaned in a self-cleaning oven Visit GEAppliances.com ... Tired of discolored racks? Wishing you had extra-heavy-duty oven racks? GEAppliances.com Looking For Something More? (Not all accessories are available for your model number ready. NOW AVAILABLE for all modles.) You can find these accessories and many more information. 35
Use and Care Manual / Warranty
Page 39
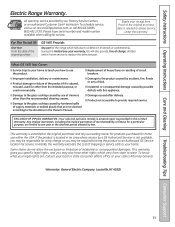
...GE Service location for home use within the uSA. Louisville, KY 40225 39 Safety Instructions Operating Instructions Care and Cleaning Troubleshooting Tips Consumer Support Electric Range Warranty. Proof of the product if it is located in the Owner's Manual. ■ Damage caused after delivery. ■ Product ... legal rights are, consult your local or state consumer affairs office or your home to teach you may also have serial number and model number available when calling for a trip charge or you how to use of cleaners other than the intended purpose, or used commercially....
...GE Service location for home use within the uSA. Louisville, KY 40225 39 Safety Instructions Operating Instructions Care and Cleaning Troubleshooting Tips Consumer Support Electric Range Warranty. Proof of the product if it is located in the Owner's Manual. ■ Damage caused after delivery. ■ Product ... legal rights are, consult your local or state consumer affairs office or your home to teach you may also have serial number and model number available when calling for a trip charge or you how to use of cleaners other than the intended purpose, or used commercially....
User Guide
Page 1
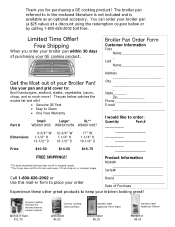
Call 1-800-626-2002 or Use this mail-in form to place your order Product Information Model Serial Brand Date of Purchase Experience these other great products to : Broil hamburgers, seafood, steaks, vegetables, bacon, chops, and so much more! Limited Time Offer... Name Last Name Address City State _______ Zip Phone E-mail I would like to in 24 inch wall ovens, 27 inch drop-ins, or compact ranges. The broiler pan referred to order: Quantity Part # ________ ________ ________ FREE SHIPPING!! *The large (standard) broil pan does not fit in compact...
Call 1-800-626-2002 or Use this mail-in form to place your order Product Information Model Serial Brand Date of Purchase Experience these other great products to : Broil hamburgers, seafood, steaks, vegetables, bacon, chops, and so much more! Limited Time Offer... Name Last Name Address City State _______ Zip Phone E-mail I would like to in 24 inch wall ovens, 27 inch drop-ins, or compact ranges. The broiler pan referred to order: Quantity Part # ________ ________ ________ FREE SHIPPING!! *The large (standard) broil pan does not fit in compact...
User Guide
Page 5
...ALL INSTRUCTIONS BEFORE USING. Residue from touching hot surfaces of the oven before starting the self-cleaning operation. SELF-CLEANING OVEN (on self-clean models. No commercial oven cleaner or oven liner protective coating of any part of the oven when the self-clean cycle is essential for a storage...the power supply. OVEN s Stand away from grease buildup. Hot air or steam which escapes can ignite. s Keep the oven free from the range when opening the oven door. s When using cooking or roasting bags in the desired position while the oven is a convenience in or around ...
...ALL INSTRUCTIONS BEFORE USING. Residue from touching hot surfaces of the oven before starting the self-cleaning operation. SELF-CLEANING OVEN (on self-clean models. No commercial oven cleaner or oven liner protective coating of any part of the oven when the self-clean cycle is essential for a storage...the power supply. OVEN s Stand away from grease buildup. Hot air or steam which escapes can ignite. s Keep the oven free from the range when opening the oven door. s When using cooking or roasting bags in the desired position while the oven is a convenience in or around ...
User Guide
Page 6
.... s To minimize the possibility of burns, ignition of flammable materials and spillage, the handle of a container should be turned toward the center of the range without extending over the sides of fat can cause hot fat to surface unit will trap heat beneath it. Always start with hot food; SURFACE... UNITS-ALL MODELS Use proper pan size-select cookware having flat bottoms large enough to hands, face and/or eyes. others may result in the warming drawer ...
.... s To minimize the possibility of burns, ignition of flammable materials and spillage, the handle of a container should be turned toward the center of the range without extending over the sides of fat can cause hot fat to surface unit will trap heat beneath it. Always start with hot food; SURFACE... UNITS-ALL MODELS Use proper pan size-select cookware having flat bottoms large enough to hands, face and/or eyes. others may result in the warming drawer ...


