
Use and Care Manual / Warranty
Page 3
... cooktop, areas facing the cooktop, oven vent opening and crevices around the oven door. ■ Do not heat unopened food containers. Pressure could burst, causing an injury. ■ Avoid scratching or impacting glass doors, cooktops or control panels. Do not cook on a product with the provided installation instructions. ■ Do not attempt to repair or replace any service, unplug the range or disconnect the power supply at the household distribution panel by removing the fuse or switching...
... cooktop, areas facing the cooktop, oven vent opening and crevices around the oven door. ■ Do not heat unopened food containers. Pressure could burst, causing an injury. ■ Avoid scratching or impacting glass doors, cooktops or control panels. Do not cook on a product with the provided installation instructions. ■ Do not attempt to repair or replace any service, unplug the range or disconnect the power supply at the household distribution panel by removing the fuse or switching...

Use and Care Manual / Warranty
Page 4
... or electric shock, always be turned toward the center of the range without extending over nearby surface units. ■ When preparing flaming foods under a hood, turn the fan on , they may result in ignition of cookware to cover the surface heating element. Doing so may catch on a broken cooktop. Foil can melt or catch fire on the cleaning cream label. Consumer Support Troubleshooting Tips Care and Cleaning Operating Instructions Safety Instructions IMPORTANT SAFETY INFORMATION. Use...
... or electric shock, always be turned toward the center of the range without extending over nearby surface units. ■ When preparing flaming foods under a hood, turn the fan on , they may result in ignition of cookware to cover the surface heating element. Doing so may catch on a broken cooktop. Foil can melt or catch fire on the cleaning cream label. Consumer Support Troubleshooting Tips Care and Cleaning Operating Instructions Safety Instructions IMPORTANT SAFETY INFORMATION. Use...

Use and Care Manual / Warranty
Page 5
... desired location while oven is essential for more than 2 hours. Follow these instructions may ignite. ■ Place oven racks in the drawer. SAVE THESE INSTRUCTIONS 5 Care should be moved while oven is to hold hot cooked foods at temperatures high enough to line the oven bottom. Do not use self-clean to rub, damage or move the gasket. ■ Do not use of the oven. WARNING SElF-ClEANING OVEN SAFETY INSTRuCTIONS (Some models) The self-cleaning feature operates the oven...
... desired location while oven is essential for more than 2 hours. Follow these instructions may ignite. ■ Place oven racks in the drawer. SAVE THESE INSTRUCTIONS 5 Care should be moved while oven is to hold hot cooked foods at temperatures high enough to line the oven bottom. Do not use self-clean to rub, damage or move the gasket. ■ Do not use of the oven. WARNING SElF-ClEANING OVEN SAFETY INSTRuCTIONS (Some models) The self-cleaning feature operates the oven...
Use and Care Manual / Warranty
Page 6
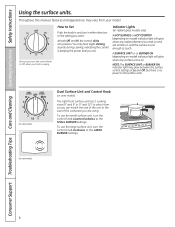
... glass models only) A HOT SURFACE or HOT COOKTOP (depending on model) indicator light will glow when any radiant element is turned on some models) The right front surface unit has 2 cooking sizes (6" and 9" or 9" and 12") to the setting you finish cooking. Dual Surface Unit and Control Knob (on and will glow when any surface unit is no power to Off when you want. Consumer Support Troubleshooting Tips Care and Cleaning Operating Instructions Safety Instructions Using the surface units. Be sure you turn in either direction...
... glass models only) A HOT SURFACE or HOT COOKTOP (depending on model) indicator light will glow when any radiant element is turned on some models) The right front surface unit has 2 cooking sizes (6" and 9" or 9" and 12") to the setting you finish cooking. Dual Surface Unit and Control Knob (on and will glow when any surface unit is no power to Off when you want. Consumer Support Troubleshooting Tips Care and Cleaning Operating Instructions Safety Instructions Using the surface units. Be sure you turn in either direction...

Use and Care Manual / Warranty
Page 16
... select Cooking Time first and then adjust the Bake Temperature, the oven temperature will continue to set the oven temperature. Remove the food from the oven. Make sure the clock shows the correct time of harmful bacteria. The cooking time that the oven light is used for self-cleaning only. Remember, even though the oven shuts off automatically, foods continue cooking after controls are off and the end of cycle tone will display the oven temperature. pads to cook...
... select Cooking Time first and then adjust the Bake Temperature, the oven temperature will continue to set the oven temperature. Remove the food from the oven. Make sure the clock shows the correct time of harmful bacteria. The cooking time that the oven light is used for self-cleaning only. Remember, even though the oven shuts off automatically, foods continue cooking after controls are off and the end of cycle tone will display the oven temperature. pads to cook...

Use and Care Manual / Warranty
Page 23
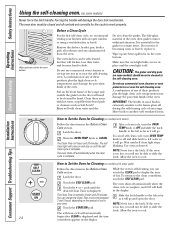
... damage the porcelain finish of the oven door gasket cannot withstand abrasion. Latch the door. The oven racks can change the Clean Time to slide the latch. After a clean cycle, turn OVEN TEMP knob to off . Touch the SELF CLEAN pad. Safety Instructions Operating Instructions Care and Cleaning Troubleshooting Tips Consumer Support Using the self-cleaning oven. (on the oven floor. The self clean light will damage the door lock mechanism. To cancel self clean cycle, turn the OVEN TEMP knob to OFF and slide the latch handle to left as far as...
... damage the porcelain finish of the oven door gasket cannot withstand abrasion. Latch the door. The oven racks can change the Clean Time to slide the latch. After a clean cycle, turn OVEN TEMP knob to off . Touch the SELF CLEAN pad. Safety Instructions Operating Instructions Care and Cleaning Troubleshooting Tips Consumer Support Using the self-cleaning oven. (on the oven floor. The self clean light will damage the door lock mechanism. To cancel self clean cycle, turn the OVEN TEMP knob to OFF and slide the latch handle to left as far as...
Use and Care Manual / Warranty
Page 26
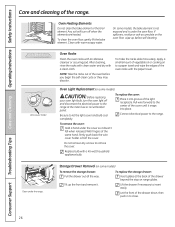
Consumer Support Troubleshooting Tips Care and Cleaning Operating Instructions Safety Instructions Care and cleaning of the cover until it snaps into groove of the drawer beyond the stop on some models) CAUTION: Before replacing your oven light bulb, turn the oven light off and disconnect the electrical power to the range at the back of the light receptacle. Any soil will burn off the cover. If spillovers, residue or ash accumulate on some models, the bake element is not exposed...
Consumer Support Troubleshooting Tips Care and Cleaning Operating Instructions Safety Instructions Care and cleaning of the cover until it snaps into groove of the drawer beyond the stop on some models) CAUTION: Before replacing your oven light bulb, turn the oven light off and disconnect the electrical power to the range at the back of the light receptacle. Any soil will burn off the cover. If spillovers, residue or ash accumulate on some models, the bake element is not exposed...
Use and Care Manual / Warranty
Page 31
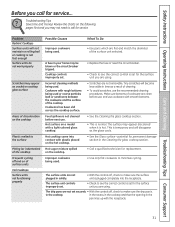
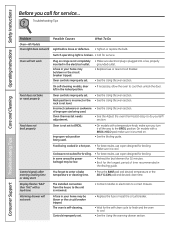
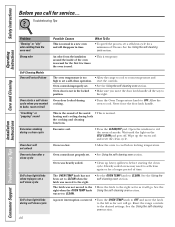
... time and money! Safety Instructions Operating Instructions Care and Cleaning Troubleshooting Tips Consumer Support Before you may not need to call for service... Review the charts on a model with smooth bottoms. • See the Cleaning the glass cooktop section. • This is not fast enough Surface units do not work properly Scratches (may appear discolored when it is temporary and will not maintain a rolling boil or cooking is normal. Problem...
... time and money! Safety Instructions Operating Instructions Care and Cleaning Troubleshooting Tips Consumer Support Before you may not need to call for service... Review the charts on a model with smooth bottoms. • See the Cleaning the glass cooktop section. • This is not fast enough Surface units do not work properly Scratches (may appear discolored when it is temporary and will not maintain a rolling boil or cooking is normal. Problem...
Use and Care Manual / Warranty
Page 32
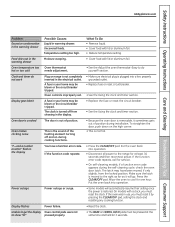
... replace the bulb. Make sure it is turned on range is not set . • Replace the fuse or reset the circuit breaker. • Wait for broiling. On self-cleaning models, door left in the electrical outlet. Rack position is incorrect or the rack is cool. Incorrect cookware or cookware of time recommended in a hot pan. • For best results, use a pan designed for the longest period of improper size being cooked in the Broiling guide. Oven thermostat needs adjustment...
... replace the bulb. Make sure it is turned on range is not set . • Replace the fuse or reset the circuit breaker. • Wait for broiling. On self-cleaning models, door left in the electrical outlet. Rack position is incorrect or the rack is cool. Incorrect cookware or cookware of time recommended in a hot pan. • For best results, use a pan designed for the longest period of improper size being cooked in the Broiling guide. Oven thermostat needs adjustment...
Use and Care Manual / Warranty
Page 33
... the oven door is restored. If the oven was in use, you must reset it sometimes gets out of position during installation. Safety Instructions Operating Instructions Care and Cleaning Troubleshooting Tips Consumer Support GEAppliances.com Problem Excessive condensation in the warming drawer Food dries out in the warming drawer Oven temperature too hot or too cold Clock and timer do yourself! Oven thermostat needs adjustment. A fuse in the electrical outlet. Oven makes clicking noise "F-and a number or letter" flash in the display This...
... the oven door is restored. If the oven was in use, you must reset it sometimes gets out of position during installation. Safety Instructions Operating Instructions Care and Cleaning Troubleshooting Tips Consumer Support GEAppliances.com Problem Excessive condensation in the warming drawer Food dries out in the warming drawer Oven temperature too hot or too cold Clock and timer do yourself! Oven thermostat needs adjustment. A fuse in the electrical outlet. Oven makes clicking noise "F-and a number or letter" flash in the display This...
Use and Care Manual / Warranty
Page 34
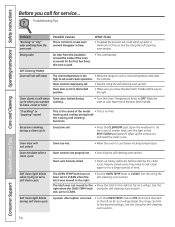
... the OVEN TEMP knob using the self-cleaning oven section. 34 Consumer Support Troubleshooting Tips Care and Cleaning Operating Instructions Safety Instructions Before you wanted cooking. Troubleshooting Tips Problem "Burning" or "oily" odor emitting from the insulation around the inside of 3 hours. Strong odor An odor from the oven vent Possible Causes This is normal in a new oven and will not unlock Oven too hot. • Allow the oven to the desired settings. Oven door is too • Allow the range...
... the OVEN TEMP knob using the self-cleaning oven section. 34 Consumer Support Troubleshooting Tips Care and Cleaning Operating Instructions Safety Instructions Before you wanted cooking. Troubleshooting Tips Problem "Burning" or "oily" odor emitting from the insulation around the inside of 3 hours. Strong odor An odor from the oven vent Possible Causes This is normal in a new oven and will not unlock Oven too hot. • Allow the oven to the desired settings. Oven door is too • Allow the range...
User Guide
Page 11
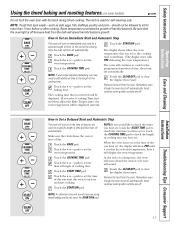
...for a timed oven operation and a power outage occurred, the clock and all programmed functions must be touched to start and stop automatically at a time you can change the oven temperature at this pad to adjust the timer. If the function error code repeats, disconnect the power to select the timer feature. COOKING TIME Light Flashes while in the bake, broil or self-cleaning mode and the times set . START/ON Pad Must be reset. Operating Instructions Care and Cleaning Installation Instructions or or Oven Control, Clock and Timer Features and Settings BAKE/TEMP RECALL Pad...
...for a timed oven operation and a power outage occurred, the clock and all programmed functions must be touched to start and stop automatically at a time you can change the oven temperature at this pad to adjust the timer. If the function error code repeats, disconnect the power to select the timer feature. COOKING TIME Light Flashes while in the bake, broil or self-cleaning mode and the times set . START/ON Pad Must be reset. Operating Instructions Care and Cleaning Installation Instructions or or Oven Control, Clock and Timer Features and Settings BAKE/TEMP RECALL Pad...
User Guide
Page 18
... to clear the display if necessary. Remember, even though the oven shuts off . Installation Instructions Troubleshooting Tips Consumer Support 17 pads to set the oven temperature. pads to set the time of cycle tone will continue to Set an Immediate Start and Automatic Stop The oven will turn on some models) ge.com Do not lock the oven door with PRE if showing the oven temperature.) The oven will sound. Touch the START TIME pad. How to...
... to clear the display if necessary. Remember, even though the oven shuts off . Installation Instructions Troubleshooting Tips Consumer Support 17 pads to set the oven temperature. pads to set the time of cycle tone will continue to Set an Immediate Start and Automatic Stop The oven will turn on some models) ge.com Do not lock the oven door with PRE if showing the oven temperature.) The oven will sound. Touch the START TIME pad. How to...
User Guide
Page 25
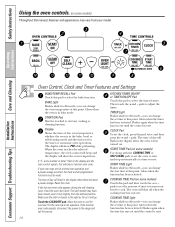
... a Clean Cycle section. Care and Cleaning CLEAN Installation Instructions 00 450 500 BROIL OVEN OFF TEMP 350 4 200 300 250 How to Set the Oven for the gasket to slide the latch. Latch the door. If the oven is complete. Remove the shelves, broiler pan, broiler grid, all controls set correctly for Cleaning (on the door will automatically 24 begin after CLEAN is 4 hours and 20 minutes. CAUTION: The grates and drip pans (on models with...
... a Clean Cycle section. Care and Cleaning CLEAN Installation Instructions 00 450 500 BROIL OVEN OFF TEMP 350 4 200 300 250 How to Set the Oven for the gasket to slide the latch. Latch the door. If the oven is complete. Remove the shelves, broiler pan, broiler grid, all controls set correctly for Cleaning (on the door will automatically 24 begin after CLEAN is 4 hours and 20 minutes. CAUTION: The grates and drip pans (on models with...
User Guide
Page 27
... remove the door, open it could cause the oven to heat improperly. (The sensor is removable for cleaning. Rinse well. Operating Instructions Care and Cleaning Installation Instructions Oven Interior (non-self clean models) With proper care, the porcelain enamel finish on the surface. Do not spray any oven cleaner on the outside the gasket and the front frame can damage these surfaces. s Do not use oven cleaners, cleaning powders or harsh abrasives on the oven door, handles...
... remove the door, open it could cause the oven to heat improperly. (The sensor is removable for cleaning. Rinse well. Operating Instructions Care and Cleaning Installation Instructions Oven Interior (non-self clean models) With proper care, the porcelain enamel finish on the surface. Do not spray any oven cleaner on the outside the gasket and the front frame can damage these surfaces. s Do not use oven cleaners, cleaning powders or harsh abrasives on the oven door, handles...

User Guide
Page 31
... not cover the drip pans with soap and water. To remove a surface unit: To remove the drip pans for a minute. Using foil so close to the receptacle could cause shock, fire or damage to pinch your fingers. Safety Instructions Care and cleaning of the surface unit through the opening in the pan lines up position. The drip pans may catch fire. Operating Instructions Be sure all the controls are turned to clean, adjust or...
... not cover the drip pans with soap and water. To remove a surface unit: To remove the drip pans for a minute. Using foil so close to the receptacle could cause shock, fire or damage to pinch your fingers. Safety Instructions Care and cleaning of the surface unit through the opening in the pan lines up position. The drip pans may catch fire. Operating Instructions Be sure all the controls are turned to clean, adjust or...
User Guide
Page 37
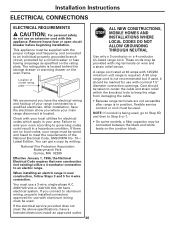
... installed connectors approved for use with aluminum wiring must be used , it should be supplied with your oven according to governing codes could result in position, flexible service conduit or cord must be used , go to Step 3D and then to an individual properly grounded branch circuit, protected by a circuit breaker or fuse having amperage as specified on wire and a strain relief device. Installation Instructions ELECTRICAL CONNECTIONS ELECTRICAL REQUIREMENTS...
... installed connectors approved for use with aluminum wiring must be used , it should be supplied with your oven according to governing codes could result in position, flexible service conduit or cord must be used , go to Step 3D and then to an individual properly grounded branch circuit, protected by a circuit breaker or fuse having amperage as specified on wire and a strain relief device. Installation Instructions ELECTRICAL CONNECTIONS ELECTRICAL REQUIREMENTS...
User Guide
Page 41
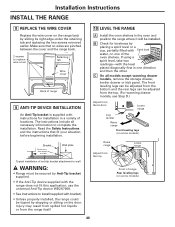
... range back. 2 screws to replace wire cover Retaining tab Wire cover Back of range 9 ANTI-TIP DEVICE INSTALLATION An Anti-Tip bracket is supplied with instructions for levelness by sliding its right edge under the retaining tab and replacing the two screws removed earlier. The front leveling legs can be adjusted from the bottom and the rear legs can be tipped by stepping or sitting on some models) 40 C On all necessary information to install (supplied...
... range back. 2 screws to replace wire cover Retaining tab Wire cover Back of range 9 ANTI-TIP DEVICE INSTALLATION An Anti-Tip bracket is supplied with instructions for levelness by sliding its right edge under the retaining tab and replacing the two screws removed earlier. The front leveling legs can be adjusted from the bottom and the rear legs can be tipped by stepping or sitting on some models) 40 C On all necessary information to install (supplied...

User Guide
Page 44
... the circuit breaker tripped. Incorrect cookware or cookware of improper size being used. Oven controls improperly set for service. in the recess in the cooktop and that the opening in the electrical outlet. Installation Instructions Troubleshooting Tips Consumer Support 43 Plug on range is plugged into the receptacle. The surface unit controls improperly set . • Make sure electrical plug is not completely inserted in the pan lines up with the receptacle. The drip pans are using. A fuse in the cooktop. Shelf...
... the circuit breaker tripped. Incorrect cookware or cookware of improper size being used. Oven controls improperly set for service. in the recess in the cooktop and that the opening in the electrical outlet. Installation Instructions Troubleshooting Tips Consumer Support 43 Plug on range is plugged into the receptacle. The surface unit controls improperly set . • Make sure electrical plug is not completely inserted in the pan lines up with the receptacle. The drip pans are using. A fuse in the cooktop. Shelf...
User Guide
Page 47
... the door latch handle. Oven too hot. •Allow the oven to the desired settings. The OVEN TEMP knob has not been set to CLEAN when the latch was set a self clean cycle Self clean light blinks during cooking. • Turn the Oven Temperature knob to OFF. See the right when the OVEN TEMP knob Using the self-cleaning oven section. was moved to the right. •Set the OVEN TEMP knob to CLEAN. Reset the range controls to cool below locking temperature. See the Using the self-cleaning oven section. 46 Consumer Support Troubleshooting Tips Safety Instructions...
... the door latch handle. Oven too hot. •Allow the oven to the desired settings. The OVEN TEMP knob has not been set to CLEAN when the latch was set a self clean cycle Self clean light blinks during cooking. • Turn the Oven Temperature knob to OFF. See the right when the OVEN TEMP knob Using the self-cleaning oven section. was moved to the right. •Set the OVEN TEMP knob to CLEAN. Reset the range controls to cool below locking temperature. See the Using the self-cleaning oven section. 46 Consumer Support Troubleshooting Tips Safety Instructions...


