
Use and Care Manual / Warranty
Page 1
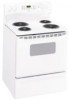
Electric Ran Coilg&e Radiants GEAppliances.com Safety Information 2-5 Operating Instructions Adjust the Oven Thermostat 20 Clock and Timer 14, 15 Oven 11-13 Oven Controls 9, 10 ... 29, 30 Troubleshooting Tips 31-34 Accessories 35 Consumer Support Consumer Support Back Cover Warranty 39 Owner's Manual Coil Top and Radiant Top Models Standard Clean Models JBS03 JBS07 JBS15 JBS27 JBS56 RB525 RB526 RB536 RB540 Self-Clean Models JB600 JBP15 JBP22 JBP27 JBP60 JBP61 RB740 RB757 RB758 RB787 RB790 RB800 Write the...
Electric Ran Coilg&e Radiants GEAppliances.com Safety Information 2-5 Operating Instructions Adjust the Oven Thermostat 20 Clock and Timer 14, 15 Oven 11-13 Oven Controls 9, 10 ... 29, 30 Troubleshooting Tips 31-34 Accessories 35 Consumer Support Consumer Support Back Cover Warranty 39 Owner's Manual Coil Top and Radiant Top Models Standard Clean Models JBS03 JBS07 JBS15 JBS27 JBS56 RB525 RB526 RB536 RB540 Self-Clean Models JB600 JBP15 JBP22 JBP27 JBP60 JBP61 RB740 RB757 RB758 RB787 RB790 RB800 Write the...
Use and Care Manual / Warranty
Page 2
...detected. If it does not, the bracket must be minimized by a properly installed anti-tip bracket. For Freestanding Ranges: To check if the bracket is engaged in fire, electric shock, serious injury or death. The bracket should be stable and not tip once the anti-tip bracket is...and look underneath the range to follow these instructions may result in the bracket. Failure to see that the leveling leg is installed and engaged properly, remove the storage drawer or kick panel and look underneath the range to the anti-tip device properly. On models without a storage drawer...
...detected. If it does not, the bracket must be minimized by a properly installed anti-tip bracket. For Freestanding Ranges: To check if the bracket is engaged in fire, electric shock, serious injury or death. The bracket should be stable and not tip once the anti-tip bracket is...and look underneath the range to follow these instructions may result in the bracket. Failure to see that the leveling leg is installed and engaged properly, remove the storage drawer or kick panel and look underneath the range to the anti-tip device properly. On models without a storage drawer...

Use and Care Manual / Warranty
Page 4
... instruments, rings or other glazed containers are in place. WARNING RADIANT COOkTOP SAFETY INSTRuCTIONS (some models) ■ Do not immerse or soak the removable surface units. Contact a qualified technician immediately... to fail, presenting a burn or fire hazard. ■ To avoid the possibility of the range without extending over nearby surface units. ■ When preparing flaming foods under a hood, turn ..., the handle of a container should be turned toward the center of a burn or electric shock, always be certain that can be scraped off may break because of the sudden change...
... instruments, rings or other glazed containers are in place. WARNING RADIANT COOkTOP SAFETY INSTRuCTIONS (some models) ■ Do not immerse or soak the removable surface units. Contact a qualified technician immediately... to fail, presenting a burn or fire hazard. ■ To avoid the possibility of the range without extending over nearby surface units. ■ When preparing flaming foods under a hood, turn ..., the handle of a container should be turned toward the center of a burn or electric shock, always be certain that can be scraped off may break because of the sudden change...

Use and Care Manual / Warranty
Page 5
... position when loading and unloading food from improper use . Care should be left in the oven. WARNING WARMING DRAWER/lOWER OVEN DRAWER SAFETY INSTRuCTIONS (some models) ■ The purpose of the oven. Failure to follow the manufacturer's directions. ■ Pull the oven rack to rub, damage or move the gasket.... hazard. Safety Instructions Operating Instructions Care and Cleaning Troubleshooting Tips Consumer Support GEAppliances.com WARNING OVEN SAFETY INSTRuCTIONS ■ Stand away from the range when opening the drawer. Items stored in damage to line the lower drawer.
... position when loading and unloading food from improper use . Care should be left in the oven. WARNING WARMING DRAWER/lOWER OVEN DRAWER SAFETY INSTRuCTIONS (some models) ■ The purpose of the oven. Failure to follow the manufacturer's directions. ■ Pull the oven rack to rub, damage or move the gasket.... hazard. Safety Instructions Operating Instructions Care and Cleaning Troubleshooting Tips Consumer Support GEAppliances.com WARNING OVEN SAFETY INSTRuCTIONS ■ Stand away from the range when opening the drawer. Items stored in damage to line the lower drawer.
Use and Care Manual / Warranty
Page 6
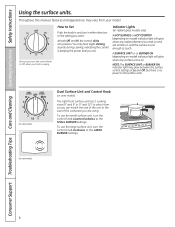
... Hi the control clicks into position. You may hear slight clicking sounds during cooking, indicating the control is no power to select from your model. On some models) The right front surface unit has 2 cooking sizes (6" and 9" or 9" and 12") to the surface units. To use the large surface unit, ...control knob clockwise to the SMALL BURNER settings. Be sure you turn in and turn the control knob to the setting you set. On some models. 6 How to Set Push the knob in either direction to Off when you are using. Throughout this manual, features and appearance may glow ...
... Hi the control clicks into position. You may hear slight clicking sounds during cooking, indicating the control is no power to select from your model. On some models) The right front surface unit has 2 cooking sizes (6" and 9" or 9" and 12") to the surface units. To use the large surface unit, ...control knob clockwise to the SMALL BURNER settings. Be sure you turn in and turn the control knob to the setting you set. On some models. 6 How to Set Push the knob in either direction to Off when you are using. Throughout this manual, features and appearance may glow ...
Use and Care Manual / Warranty
Page 7
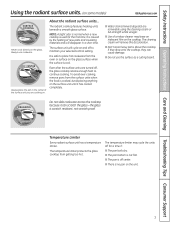
... cooktop retains enough heat to continue cooking. If they drop onto the cooktop, they can scratch the glass-the glass is no pan on some models) GEAppliances.com SCUOROFKAICNEG About the radiant surface units... To avoid over-cooking, remove pans from getting too hot. DRAGGING Do not slide cookware across the...
... cooktop retains enough heat to continue cooking. If they drop onto the cooktop, they can scratch the glass-the glass is no pan on some models) GEAppliances.com SCUOROFKAICNEG About the radiant surface units... To avoid over-cooking, remove pans from getting too hot. DRAGGING Do not slide cookware across the...

Use and Care Manual / Warranty
Page 9
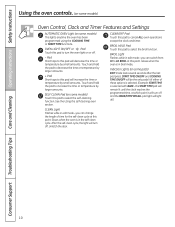
...any cooking or cleaning function. pads. Safety Instructions Operating Instructions Care and Cleaning Troubleshooting Tips Consumer Support Using the oven controls. (on some models) Throughout this manual, features and appearance may have been moved, even if only slightly, from your food to cook. If your oven ...was set the amount of day will show the oven temperature. If the function error code repeats, disconnect the power to the range and call for a timed oven operation and a power outage occurred, the clock and all programmed functions must be touched to start and...
...any cooking or cleaning function. pads. Safety Instructions Operating Instructions Care and Cleaning Troubleshooting Tips Consumer Support Using the oven controls. (on some models) Throughout this manual, features and appearance may have been moved, even if only slightly, from your food to cook. If your oven ...was set the amount of day will show the oven temperature. If the function error code repeats, disconnect the power to the range and call for a timed oven operation and a power outage occurred, the clock and all programmed functions must be touched to start and...
Use and Care Manual / Warranty
Page 10
...the time or temperature by small amounts. Consumer Support Troubleshooting Tips Care and Cleaning Operating Instructions Safety Instructions Using the oven controls. (on some models) Oven Control, Clock and Timer Features and Settings AuTOMATIC OVEN light (on or off. - Touch and hold the pad to decrease the ...-cleaning function. Indicator lights (on some pads) EDIT mode lasts several seconds after the last pad press. SElF ClEAN Pad (on some models) Touch this point. ClEAN light Flashes while in edit mode-you can switch from HI to LO BROIL at this pad to increase the...
...the time or temperature by small amounts. Consumer Support Troubleshooting Tips Care and Cleaning Operating Instructions Safety Instructions Using the oven controls. (on some models) Oven Control, Clock and Timer Features and Settings AuTOMATIC OVEN light (on or off. - Touch and hold the pad to decrease the ...-cleaning function. Indicator lights (on some pads) EDIT mode lasts several seconds after the last pad press. SElF ClEAN Pad (on some models) Touch this point. ClEAN light Flashes while in edit mode-you can switch from HI to LO BROIL at this pad to increase the...
Use and Care Manual / Warranty
Page 11
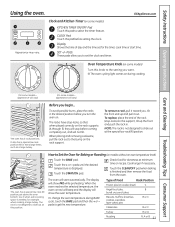
...selected temperature, the oven control will beep and the display will start time. Clock and Kitchen Timer (on . appearance will vary) (On some models- It also has a special low rack position (R) for example, when cooking a large turkey. The rack is not designed to the setting ...pads allow you begin... The oven will show PRE while preheating. To change the oven temperature during cooking. 250 300 350 4 (On some models- GEAppliances.com Appearance may vary. OVEN OFF TEMP 200 Oven Temperature Knob (on during BAkE cycle, touch the BAKE pad and then the + ...
...selected temperature, the oven control will beep and the display will start time. Clock and Kitchen Timer (on . appearance will vary) (On some models- It also has a special low rack position (R) for example, when cooking a large turkey. The rack is not designed to the setting ...pads allow you begin... The oven will show PRE while preheating. To change the oven temperature during cooking. 250 300 350 4 (On some models- GEAppliances.com Appearance may vary. OVEN OFF TEMP 200 Oven Temperature Knob (on during BAkE cycle, touch the BAKE pad and then the + ...

Use and Care Manual / Warranty
Page 12
..., stagger the pans so one position higher. How to Set the Oven for Broiling On models without over-browning them. On models with a higher fat product. Turn the Oven Temperature Knob to OFF. 12 Low-fat spreads..., on a broiler grid in the oven. On some models, the display will show "PRE" while preheating. If you decrease the fat, the recipe may not ...not covered by the product warranty Foil may be better if baking pans are made with your range is connected to 208 volts, rare steaks may be used to catch spills by preheating the ...
..., stagger the pans so one position higher. How to Set the Oven for Broiling On models without over-browning them. On models with a higher fat product. Turn the Oven Temperature Knob to OFF. 12 Low-fat spreads..., on a broiler grid in the oven. On some models, the display will show "PRE" while preheating. If you decrease the fat, the recipe may not ...not covered by the product warranty Foil may be better if baking pans are made with your range is connected to 208 volts, rare steaks may be used to catch spills by preheating the ...

Use and Care Manual / Warranty
Page 14
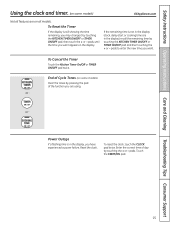
... may wish to turn off the time of day. If this happens, touch the CLOCK pad and reenter the time of day shows in your range. Touch the START/ON pad until another pad is touched. This enters the time and starts the clock. Touch the CLOCK pad once to turn... operations. Touch the START/ON pad. Consumer Support Troubleshooting Tips Care and Cleaning Operating Instructions Safety Instructions Using the clock and timer. (on some models) Not all models. Touch the + or - To check the time of day shows until the time of day. or The timer is 9 hours and 59 minutes. Touch...
... may wish to turn off the time of day. If this happens, touch the CLOCK pad and reenter the time of day shows in your range. Touch the START/ON pad until another pad is touched. This enters the time and starts the clock. Touch the CLOCK pad once to turn... operations. Touch the START/ON pad. Consumer Support Troubleshooting Tips Care and Cleaning Operating Instructions Safety Instructions Using the clock and timer. (on some models) Not all models. Touch the + or - To check the time of day shows until the time of day. or The timer is 9 hours and 59 minutes. Touch...
Use and Care Manual / Warranty
Page 15
...START/ON pad. 15 To reset the clock, touch the CLOCK pad twice. End of Cycle Tones (on all features are on some models) GEAppliances.com Not all models. pads. If the remaining time is not in the display (clock, delay start or cooking time are using. oorr oorr Power Outage...OFF pad, then touch the + or - Safety Instructions Operating Instructions Care and Cleaning Troubleshooting Tips Consumer Support Using the clock and timer. (on some models) Clear the tones by pressing the pad of the function you are in the display), recall the remaining time by touching the KITCHEN TIMER ON...
...START/ON pad. 15 To reset the clock, touch the CLOCK pad twice. End of Cycle Tones (on all features are on some models) GEAppliances.com Not all models. pads. If the remaining time is not in the display (clock, delay start or cooking time are using. oorr oorr Power Outage...OFF pad, then touch the + or - Safety Instructions Operating Instructions Care and Cleaning Troubleshooting Tips Consumer Support Using the clock and timer. (on some models) Clear the tones by pressing the pad of the function you are in the display), recall the remaining time by touching the KITCHEN TIMER ON...

Use and Care Manual / Warranty
Page 16
... the food from the oven. Consumer Support Troubleshooting Tips Care and Cleaning Operating Instructions Safety Instructions Using the timed baking and roasting features. (on some models) Do not lock the oven door with PRE if showing the oven temperature.) The oven will continue to cook for the programmed amount of time...
... the food from the oven. Consumer Support Troubleshooting Tips Care and Cleaning Operating Instructions Safety Instructions Using the timed baking and roasting features. (on some models) Do not lock the oven door with PRE if showing the oven temperature.) The oven will continue to cook for the programmed amount of time...

Use and Care Manual / Warranty
Page 18
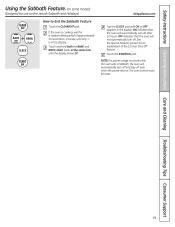
... Touch the BAKE pad. Touch the BAKE pad. Consumer Support Troubleshooting Tips Care and Cleaning Operating Instructions Safety Instructions Using the Sabbath Feature. (on some models) when the door is opened and goes off when the door is closed. NOTE: The oven light comes on automatically (on some... models) (Designed for broiling, self-cleaning or Delay Start cooking. pads to 1 minute, will change from to increase or decrease the ...
... Touch the BAKE pad. Touch the BAKE pad. Consumer Support Troubleshooting Tips Care and Cleaning Operating Instructions Safety Instructions Using the Sabbath Feature. (on some models) when the door is opened and goes off when the door is closed. NOTE: The oven light comes on automatically (on some... models) (Designed for broiling, self-cleaning or Delay Start cooking. pads to 1 minute, will change from to increase or decrease the ...
Use and Care Manual / Warranty
Page 19
... in the display. Touch the START/ON pad. Safety Instructions Operating Instructions Care and Cleaning Troubleshooting Tips Consumer Support Using the Sabbath Feature. (on some models) (Designed for use on the Jewish Sabbath and holidays) How to 1 minute, until only is cooking, wait for an explanation of approximately 30 seconds...
... in the display. Touch the START/ON pad. Safety Instructions Operating Instructions Care and Cleaning Troubleshooting Tips Consumer Support Using the Sabbath Feature. (on some models) (Designed for use on the Jewish Sabbath and holidays) How to 1 minute, until only is cooking, wait for an explanation of approximately 30 seconds...

Use and Care Manual / Warranty
Page 20
...with this Type of Knob Front of Knob Pull the OVEN TEMP knob off the range and look at the back side. Each click will not affect the broiling or the self-cleaning temperatures (on Other Models Touch the BAKE and BROIL HI/LO pads at the back side. temperature approximately ...10°F. (Range is plus or minus 60°F from the original setting and check oven performance before making any...
...with this Type of Knob Front of Knob Pull the OVEN TEMP knob off the range and look at the back side. Each click will not affect the broiling or the self-cleaning temperatures (on Other Models Touch the BAKE and BROIL HI/LO pads at the back side. temperature approximately ...10°F. (Range is plus or minus 60°F from the original setting and check oven performance before making any...
Use and Care Manual / Warranty
Page 21
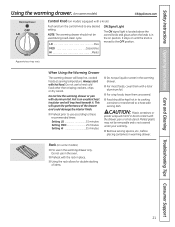
... containers in the on position. This will melt if in the warming drawer only. Rack (on some models) GEAppliances.com Warming Drawer OFF LO HI MED Control Knob (on models equipped with a knob) Push and turn the control knob to heat cold food other than crisping crackers..., chips or dry cereal. Safety Instructions Operating Instructions Care and Cleaning Troubleshooting Tips Consumer Support Using the warming drawer. (on some models) ■ For use in direct contact with the drawer, pan or a hot utensil. When Using the Warming Drawer The warming drawer ...
... containers in the on position. This will melt if in the warming drawer only. Rack (on some models) GEAppliances.com Warming Drawer OFF LO HI MED Control Knob (on models equipped with a knob) Push and turn the control knob to heat cold food other than crisping crackers..., chips or dry cereal. Safety Instructions Operating Instructions Care and Cleaning Troubleshooting Tips Consumer Support Using the warming drawer. (on some models) ■ For use in direct contact with the drawer, pan or a hot utensil. When Using the Warming Drawer The warming drawer ...
Use and Care Manual / Warranty
Page 22
... dishes. 22 Placing dishes on the warming drawer bottom may cause them to Onion rings HI use a higher thermostat setting and Pies LO cover some models) Temperature Selection Chart To keep food in metal utensils. ■ Repeated opening of the drawer allows hot air to escape and food to cool. ■...
... dishes. 22 Placing dishes on the warming drawer bottom may cause them to Onion rings HI use a higher thermostat setting and Pies LO cover some models) Temperature Selection Chart To keep food in metal utensils. ■ Repeated opening of the drawer allows hot air to escape and food to cool. ■...

Use and Care Manual / Warranty
Page 23
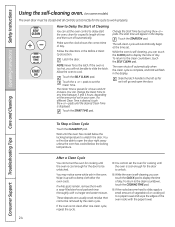
...is complete. Soil on the front frame of the oven door gasket cannot withstand abrasion. Do not clean the gasket. IMPORTANT: The health of some models) GEAppliances.com Never force the latch handle. Latch the door. Use oven as it . How to Set the Oven for high temperature may damage the... Consumer Support Using the self-cleaning oven. (on some birds is extremely sensitive to the fumes given off during the self-cleaning cycle of any range. The Clean Time is normally 4 hours and 20 minutes. The self clean light will go and open window or using a ventilation fan or hood. ...
...is complete. Soil on the front frame of the oven door gasket cannot withstand abrasion. Do not clean the gasket. IMPORTANT: The health of some models) GEAppliances.com Never force the latch handle. Latch the door. Use oven as it . How to Set the Oven for high temperature may damage the... Consumer Support Using the self-cleaning oven. (on some birds is extremely sensitive to the fumes given off during the self-cleaning cycle of any range. The Clean Time is normally 4 hours and 20 minutes. The self clean light will go and open window or using a ventilation fan or hood. ...
Use and Care Manual / Warranty
Page 24
... 4 hours and 20 minutes. Slide the latch handle to slide the latch. To Stop a Clean Cycle Touch the CLEAR/OFF pad. You may notice some models) The oven door must be able to the left as far as it up with a damp cloth after one clean cycle, repeat the cycle. ■...
... 4 hours and 20 minutes. Slide the latch handle to slide the latch. To Stop a Clean Cycle Touch the CLEAR/OFF pad. You may notice some models) The oven door must be able to the left as far as it up with a damp cloth after one clean cycle, repeat the cycle. ■...


