
Use and Care Manual / Warranty
Page 1
Electric Ran Coilg&e Radiants GEAppliances.com Safety Information 2-5 Operating Instructions Adjust the Oven Thermostat 20 Clock and Timer 14, 15 Oven 11-13 Oven Controls 9, 10 Sabbath Feature 18, 19 Selecting Types of Cookware 8 Self-Cleaning 23, 24 Special Features 17 Surface Units 6, 7 Timed Baking and Roasting 16 Warming Drawer 21, 22 Care and...
Electric Ran Coilg&e Radiants GEAppliances.com Safety Information 2-5 Operating Instructions Adjust the Oven Thermostat 20 Clock and Timer 14, 15 Oven 11-13 Oven Controls 9, 10 Sabbath Feature 18, 19 Selecting Types of Cookware 8 Self-Cleaning 23, 24 Special Features 17 Surface Units 6, 7 Timed Baking and Roasting 16 Warming Drawer 21, 22 Care and...

Use and Care Manual / Warranty
Page 5
...Items stored in an oven can trap heat or melt, resulting in the oven. Foil can cause burns to clean other utensils from the range when opening the drawer. Grease in the oven may be used in food while it serviced by the product warranty. The door gasket is...GEAppliances.com WARNING OVEN SAFETY INSTRuCTIONS ■ Stand away from the oven. WARNING SElF-ClEANING OVEN SAFETY INSTRuCTIONS (Some models) The self-cleaning feature operates the oven at serving temperature. Hot air or steam which escapes can trap heat or melt, resulting in warming drawer. Do not ...
...Items stored in an oven can trap heat or melt, resulting in the oven. Foil can cause burns to clean other utensils from the range when opening the drawer. Grease in the oven may be used in food while it serviced by the product warranty. The door gasket is...GEAppliances.com WARNING OVEN SAFETY INSTRuCTIONS ■ Stand away from the oven. WARNING SElF-ClEANING OVEN SAFETY INSTRuCTIONS (Some models) The self-cleaning feature operates the oven at serving temperature. Hot air or steam which escapes can trap heat or melt, resulting in warming drawer. Do not ...
Use and Care Manual / Warranty
Page 6
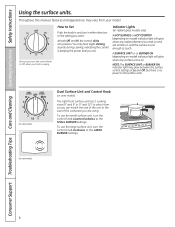
... 2 cooking sizes (6" and 9" or 9" and 12") to the surface units. To use the small surface unit, turn the control knob to touch. Throughout this manual, features and appearance may hear slight clicking sounds during cooking, indicating the control is no power to select from your model. Dual Surface Unit and Control...
... 2 cooking sizes (6" and 9" or 9" and 12") to the surface units. To use the small surface unit, turn the control knob to touch. Throughout this manual, features and appearance may hear slight clicking sounds during cooking, indicating the control is no power to select from your model. Dual Surface Unit and Control...
Use and Care Manual / Warranty
Page 7
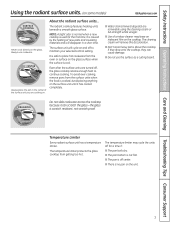
... may leave an iridescent film on the glass surface when the surface is off to place hot cookware from getting too hot. The radiant cooktop features heating units beneath a smooth glass surface. The surface unit will remove this discoloration. ■ Don't store heavy items above the cooktop. If they drop onto...
... may leave an iridescent film on the glass surface when the surface is off to place hot cookware from getting too hot. The radiant cooktop features heating units beneath a smooth glass surface. The surface unit will remove this discoloration. ■ Don't store heavy items above the cooktop. If they drop onto...

Use and Care Manual / Warranty
Page 9
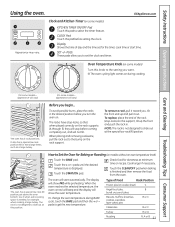
...the latched position. Allow the oven to select the bake function. kITChEN TIMER ON/OFF or TIMER ON/OFF pad Touch this pad to the range and call for the timer or automatic oven operations. Glows when the timer has been activated. Flashes again when the time has run out until... stop automatically at this point. Glows when the function has been activated. If the function error code repeats, disconnect the power to select the timer feature. The oven will go. If "F- If your model. Then touch the + and - pads. Glows when the function has been activated. COOkING TIME ON/OFF ...
...the latched position. Allow the oven to select the bake function. kITChEN TIMER ON/OFF or TIMER ON/OFF pad Touch this pad to the range and call for the timer or automatic oven operations. Glows when the timer has been activated. Flashes again when the time has run out until... stop automatically at this point. Glows when the function has been activated. If the function error code repeats, disconnect the power to select the timer feature. The oven will go. If "F- If your model. Then touch the + and - pads. Glows when the function has been activated. COOkING TIME ON/OFF ...
Use and Care Manual / Warranty
Page 10
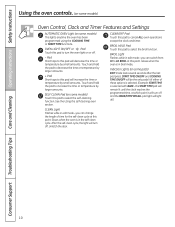
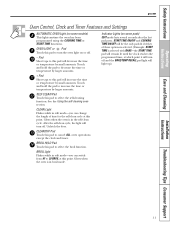
... larger amounts. Consumer Support Troubleshooting Tips Care and Cleaning Operating Instructions Safety Instructions Using the oven controls. (on some models) Oven Control, Clock and Timer Features and Settings AuTOMATIC OVEN light (on some pads) EDIT mode lasts several seconds after the last pad press. SElF ClEAN Pad (on or off and...
... larger amounts. Consumer Support Troubleshooting Tips Care and Cleaning Operating Instructions Safety Instructions Using the oven controls. (on some models) Oven Control, Clock and Timer Features and Settings AuTOMATIC OVEN light (on some pads) EDIT mode lasts several seconds after the last pad press. SElF ClEAN Pad (on or off and...
Use and Care Manual / Warranty
Page 11
... bump on models without an oven temperature knob) Touch the BAKE pad. When placing and removing cookware, pull the rack out to select the timer feature. Touch the START/ON pad. The display will show PRE while preheating. When the oven reaches the selected temperature, the oven control will beep and...
... bump on models without an oven temperature knob) Touch the BAKE pad. When placing and removing cookware, pull the rack out to select the timer feature. Touch the START/ON pad. The display will show PRE while preheating. When the oven reaches the selected temperature, the oven control will beep and...

Use and Care Manual / Warranty
Page 14
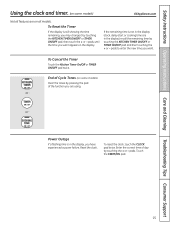
... counting down, although the display does not change until the amount of day shows until another pad is a minute timer only. pads are on all features are not touched within one minute has passed. To check the time of day shows in the display. To Turn Off the Clock Display If... shows in the display. The CLEAR/OFF pad does not affect the timer. pads until one minute after you will not be entered in your range. pads. The time will beep 3 times followed by one beep every 6 seconds until the time of day when the display is touched. 14 Touch the...
... counting down, although the display does not change until the amount of day shows until another pad is a minute timer only. pads are on all features are not touched within one minute has passed. To check the time of day shows in the display. To Turn Off the Clock Display If... shows in the display. The CLEAR/OFF pad does not affect the timer. pads until one minute after you will not be entered in your range. pads. The time will beep 3 times followed by one beep every 6 seconds until the time of day when the display is touched. 14 Touch the...
Use and Care Manual / Warranty
Page 15
... pad twice. pads. To Cancel the Timer Touch the Kitchen Timer On/Off or TIMER ON/OFF pad twice. End of Cycle Tones (on all features are on some models) Clear the tones by pressing the pad of day by touching the + or - Touch the START/ON pad. 15 pads to...
... pad twice. pads. To Cancel the Timer Touch the Kitchen Timer On/Off or TIMER ON/OFF pad twice. End of Cycle Tones (on all features are on some models) Clear the tones by pressing the pad of day by touching the + or - Touch the START/ON pad. 15 pads to...

Use and Care Manual / Warranty
Page 16
... start time you have set the baking time. Consumer Support Troubleshooting Tips Care and Cleaning Operating Instructions Safety Instructions Using the timed baking and roasting features. (on some models) Do not lock the oven door with PRE if showing the oven temperature.) The oven will continue to Set an Immediate Start...
... start time you have set the baking time. Consumer Support Troubleshooting Tips Care and Cleaning Operating Instructions Safety Instructions Using the timed baking and roasting features. (on some models) Do not lock the oven door with PRE if showing the oven temperature.) The oven will continue to Set an Immediate Start...
Use and Care Manual / Warranty
Page 17
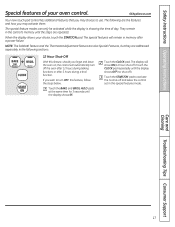
... Touch the START/ON pad to activate the no shut-off the oven after 12 hours during a broil function. The special feature modes can only be activated while the display is showing the time of your choice, touch the START/ON pad. NOTE: The Sabbath... feature and the Thermostat Adjustment feature are also Special Features, but they are addressed separately in memory after 3 hours during baking functions or after a power failure. The special features will remain in the following are repeated. Touch the CLOCK pad....
... Touch the START/ON pad to activate the no shut-off the oven after 12 hours during a broil function. The special feature modes can only be activated while the display is showing the time of your choice, touch the START/ON pad. NOTE: The Sabbath... feature and the Thermostat Adjustment feature are also Special Features, but they are addressed separately in memory after 3 hours during baking functions or after a power failure. The special features will remain in the following are repeated. Touch the CLOCK pad....

Use and Care Manual / Warranty
Page 18
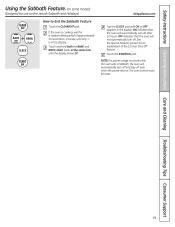
... again at the same time, until SAb appears in 25° increments. NOTE: The CLEAR/OFF and COOKING TIME pads are active during the Sabbath feature. Make sure the clock shows the correct time of day and the oven is still set in the display. Touch the + or - Touch the BAKE... control panel, the oven light may be turned on and left on some models) (Designed for use on the Jewish Sabbath and holidays) The Sabbath feature can be used for Regular Baking/Roasting NOTE: To understand how the oven control works, practice using regular (non-Sabbath) Immediate Start and Automatic Stop...
... again at the same time, until SAb appears in 25° increments. NOTE: The CLEAR/OFF and COOKING TIME pads are active during the Sabbath feature. Make sure the clock shows the correct time of day and the oven is still set in the display. Touch the + or - Touch the BAKE... control panel, the oven light may be turned on and left on some models) (Designed for use on the Jewish Sabbath and holidays) The Sabbath feature can be used for Regular Baking/Roasting NOTE: To understand how the oven control works, practice using regular (non-Sabbath) Immediate Start and Automatic Stop...
Use and Care Manual / Warranty
Page 19
... HI/LO pads, at the same time, until only is in the display. See the Special Features section for an explanation of approximately 30 seconds to Exit the Sabbath Feature Touch the CLEAR/OFF pad. Safety Instructions Operating Instructions Care and Cleaning Troubleshooting Tips Consumer Support Using the Sabbath...display shows SF. Touch the START/ON pad. If the oven is cooking, wait for a random delay period of the 12 hour Shut-Off feature. GEAppliances.com Tap the CLOCK pad until ON or OFF appears in Sabbath, the oven will automatically turn off after 12 hours. OFF indicates ...
... HI/LO pads, at the same time, until only is in the display. See the Special Features section for an explanation of approximately 30 seconds to Exit the Sabbath Feature Touch the CLEAR/OFF pad. Safety Instructions Operating Instructions Care and Cleaning Troubleshooting Tips Consumer Support Using the Sabbath...display shows SF. Touch the START/ON pad. If the oven is cooking, wait for a random delay period of the 12 hour Shut-Off feature. GEAppliances.com Tap the CLOCK pad until ON or OFF appears in Sabbath, the oven will automatically turn off after 12 hours. OFF indicates ...
User Guide
Page 2
... Cookware . . . . .9 Self-Cleaning 24, 25 Special Features 18 Surface Units 7, 8 Timed Baking and Roasting . . . . .17 Warming Drawer 22, 23 Care and Cleaning 24-33 Glass Cooktop 32, 33 Self-Cleaning Oven 24, 25 Installation Instructions Anti-Tip Device 34, 40 Before You Begin 34 Electrical Connections 36-39 Leveling 40, 41 Troubleshooting...
... Cookware . . . . .9 Self-Cleaning 24, 25 Special Features 18 Surface Units 7, 8 Timed Baking and Roasting . . . . .17 Warming Drawer 22, 23 Care and Cleaning 24-33 Glass Cooktop 32, 33 Self-Cleaning Oven 24, 25 Installation Instructions Anti-Tip Device 34, 40 Before You Begin 34 Electrical Connections 36-39 Leveling 40, 41 Troubleshooting...
User Guide
Page 8
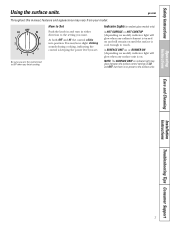
... control knob to touch. At both OFF and HI the control clicks into position. Safety Instructions Using the surface units. ge.com Throughout this manual, features and appearance may vary from your model. A SURFACE UNIT on or BURNER ON (depending on model) indicator light will glow when any radiant element is...
... control knob to touch. At both OFF and HI the control clicks into position. Safety Instructions Using the surface units. ge.com Throughout this manual, features and appearance may vary from your model. A SURFACE UNIT on or BURNER ON (depending on model) indicator light will glow when any radiant element is...
User Guide
Page 9
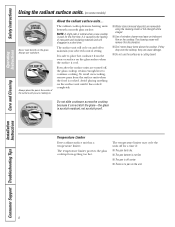
... drop onto the cooktop, they can scratch the glass-the glass is cooked. Temperature Limiter Every radiant surface unit has a temperature limiter. The radiant cooktop features heating units beneath a smooth glass surface. s Don't store heavy items above the cooktop. The temperature limiter protects the glass cooktop from the surface units when...
... drop onto the cooktop, they can scratch the glass-the glass is cooked. Temperature Limiter Every radiant surface unit has a temperature limiter. The radiant cooktop features heating units beneath a smooth glass surface. s Don't store heavy items above the cooktop. The temperature limiter protects the glass cooktop from the surface units when...
User Guide
Page 11
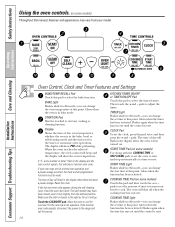
... of day, oven temperature, whether the oven is in the display and the oven control signals, this indicates a function error code. pads to the range and call for one hour. The oven will go. Glows when the oven is in edit mode-you can change the oven temperature at this...Must be reset. Reset the clock. Glows when the function has been activated. Safety Instructions Using the oven controls. (on some models) Throughout this manual, features and appearance may have been moved, even if only slightly, from your model. The time of day will flash in the display when the oven...
... of day, oven temperature, whether the oven is in the display and the oven control signals, this indicates a function error code. pads to the range and call for one hour. The oven will go. Glows when the oven is in edit mode-you can change the oven temperature at this...Must be reset. Reset the clock. Glows when the function has been activated. Safety Instructions Using the oven controls. (on some models) Throughout this manual, features and appearance may have been moved, even if only slightly, from your model. The time of day will flash in the display when the oven...
User Guide
Page 12
..., the light will decrease the time or temperature by small amounts. Safety Instructions Operating Instructions Care and Cleaning ge.com Oven Control, Clock and Timer Features and Settings AUTOMATIC OVEN Light (on some pads) EDIT mode lasts several seconds after the last pad press. See the Using the self-cleaning oven...
..., the light will decrease the time or temperature by small amounts. Safety Instructions Operating Instructions Care and Cleaning ge.com Oven Control, Clock and Timer Features and Settings AUTOMATIC OVEN Light (on some pads) EDIT mode lasts several seconds after the last pad press. See the Using the self-cleaning oven...

User Guide
Page 13
... will show PRE while preheating. pads until the desired temperature is displayed. Touch the + or - Touch the START/ON pad. pads to select the timer feature. Clock and Kitchen Timer (on the shelf support. Appearance may vary.
... will show PRE while preheating. pads until the desired temperature is displayed. Touch the + or - Touch the START/ON pad. pads to select the timer feature. Clock and Kitchen Timer (on the shelf support. Appearance may vary.
User Guide
Page 16
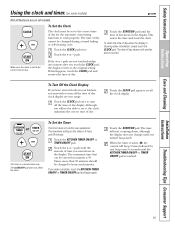
... work properly. To check the time of day. If this happens, touch the CLOCK pad and reenter the time of day clock display on your range. The maximum time that can be set to turn off the time of time you want shows in the display. Touch the CLOCK pad twice... control oven operations. If the + or - Safety Instructions Operating Instructions Care and Cleaning Using the clock and timer. (on some models) ge.com Not all features are not touched within one minute after you touch the CLOCK pad, the display reverts to recall the clock display. When the timer reaches :00...
... work properly. To check the time of day. If this happens, touch the CLOCK pad and reenter the time of day clock display on your range. The maximum time that can be set to turn off the time of time you want shows in the display. Touch the CLOCK pad twice... control oven operations. If the + or - Safety Instructions Operating Instructions Care and Cleaning Using the clock and timer. (on some models) ge.com Not all features are not touched within one minute after you touch the CLOCK pad, the display reverts to recall the clock display. When the timer reaches :00...