
Owner's Manual
Page 1
... Clock ...11 Step 8. Remove Old Thermostat ...5 Step 3. Customize Your Thermostat ...9 Step 7. Table of Contents Step 1. Programming ...12 Step 9. Wire Wallplate Terminals ...7 Step 5. Operating Your Thermostat ...15 Step 10. Set the Fan and System Switches ...17 If You Have a Problem ...18 Smart Response™ Technology ...20 Wiring Diagrams ...21 ® U.S. Registered Trademark Copyright © 2001 Honeywell • •All Rights Reserved 69- 1081- 3 Mount the Thermostat ...9 Step 6. Honeywell CT3611 PROGRAMMABLE THERMOSTAT Seven Day Programmable Heat Pump...
... Clock ...11 Step 8. Remove Old Thermostat ...5 Step 3. Customize Your Thermostat ...9 Step 7. Table of Contents Step 1. Programming ...12 Step 9. Wire Wallplate Terminals ...7 Step 5. Operating Your Thermostat ...15 Step 10. Set the Fan and System Switches ...17 If You Have a Problem ...18 Smart Response™ Technology ...20 Wiring Diagrams ...21 ® U.S. Registered Trademark Copyright © 2001 Honeywell • •All Rights Reserved 69- 1081- 3 Mount the Thermostat ...9 Step 6. Honeywell CT3611 PROGRAMMABLE THERMOSTAT Seven Day Programmable Heat Pump...
Owner's Manual
Page 2
... automatically remembering to have questions, call Honeywell Inc. the smart thermostat that; • Keeps you wake up or return home. • Saves the maximum amount of this thermostat is replacing a control that can use the preprogrammed schedule, or set your new Honeywell thermostat; Contact your local waste management authority for instructions regarding recycling and the proper disposal of energy and money by purchasing your own. TOTAL...
... automatically remembering to have questions, call Honeywell Inc. the smart thermostat that; • Keeps you wake up or return home. • Saves the maximum amount of this thermostat is replacing a control that can use the preprogrammed schedule, or set your new Honeywell thermostat; Contact your local waste management authority for instructions regarding recycling and the proper disposal of energy and money by purchasing your own. TOTAL...
Owner's Manual
Page 3
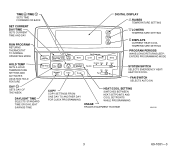
...DAY RUN PROGRAM RETURNS THERMOSTAT TO NORMAL OPERATING MODE Run Program Set Current Day/Time Time Wake Set Program Leave Return DIGITAL DISPLAY RAISES TEMPERATURE SETTING LOWERS TEMPERATURE SETTING DISPLAYS CURRENT HEAT/COOL TEMPERATURE SETTING PROGRAM PERIODS WAKE/LEAVE/RETURN/SLEEP: ENTERS PROGRAMMING MODE Sleep HOLD TEMP SETS A HOLD TEMPERATURE SETTING AND ACTIVATES VACATION HOLD FEATURE Hold Temp Day Daylight Time Copy Heat/Cool Settings Usage Em Heat Heat Off Cool System On Fan Auto SYSTEM SWITCH SELECTS EMERGENCY HEAT/ HEAT/OFF/COOL FAN SWITCH SELECTS AUTO/ON DAY SETS...
...DAY RUN PROGRAM RETURNS THERMOSTAT TO NORMAL OPERATING MODE Run Program Set Current Day/Time Time Wake Set Program Leave Return DIGITAL DISPLAY RAISES TEMPERATURE SETTING LOWERS TEMPERATURE SETTING DISPLAYS CURRENT HEAT/COOL TEMPERATURE SETTING PROGRAM PERIODS WAKE/LEAVE/RETURN/SLEEP: ENTERS PROGRAMMING MODE Sleep HOLD TEMP SETS A HOLD TEMPERATURE SETTING AND ACTIVATES VACATION HOLD FEATURE Hold Temp Day Daylight Time Copy Heat/Cool Settings Usage Em Heat Heat Off Cool System On Fan Auto SYSTEM SWITCH SELECTS EMERGENCY HEAT/ HEAT/OFF/COOL FAN SWITCH SELECTS AUTO/ON DAY SETS...

Owner's Manual
Page 4
...PROGRAM TIMES SHOWS THERMOSTAT IS IN THE SET DAY/TIME MODE SHOWS WHEN THERMOSTAT IS IN THE PROGRAMMING MODE SHOWS VACATION HOLD DURATION SHOWS TEMPERATURE SETTING CHANGED FOR THIS PROGRAM PERIOD SHOWS THERMOSTAT IS "CALLING" FOR EMERGENCY OR AUXILIARY HEAT SHOWS CURRENT DAY OR DAYS BEING PROGRAMMED SHOWS CURRENT PROGRAM PERIOD OR PERIOD BEING PROGRAMMED Set Program Set Day/Time Temporary Setting Hold for EEmmHHtt AM AAuuxx HHtt Room Humid MonTueWedThuFriSatSun Days WakeLeaveReturnSleep In Recovery Outdoor System DST EmEm Heat Off Cool Auto Wait SHOWS THE TEMPERATURE DISPLAYED...
...PROGRAM TIMES SHOWS THERMOSTAT IS IN THE SET DAY/TIME MODE SHOWS WHEN THERMOSTAT IS IN THE PROGRAMMING MODE SHOWS VACATION HOLD DURATION SHOWS TEMPERATURE SETTING CHANGED FOR THIS PROGRAM PERIOD SHOWS THERMOSTAT IS "CALLING" FOR EMERGENCY OR AUXILIARY HEAT SHOWS CURRENT DAY OR DAYS BEING PROGRAMMED SHOWS CURRENT PROGRAM PERIOD OR PERIOD BEING PROGRAMMED Set Program Set Day/Time Temporary Setting Hold for EEmmHHtt AM AAuuxx HHtt Room Humid MonTueWedThuFriSatSun Days WakeLeaveReturnSleep In Recovery Outdoor System DST EmEm Heat Off Cool Auto Wait SHOWS THE TEMPERATURE DISPLAYED...

Owner's Manual
Page 5
... the screw or screws holding the thermostat to make sure they work with multistage heat pumps (heat pumps with the old terminal designation. STEP 1. q Turn off when pulled firmly from the old thermostat. Wrap the wires around a WIRES THROUGH WALL OPENING pencil as shown to keep them from the old thermostat. If the cover does not snap off power to lock on the cover. M5136 5 69-1081-3 q Remove the cover from the bottom, check...
... the screw or screws holding the thermostat to make sure they work with multistage heat pumps (heat pumps with the old terminal designation. STEP 1. q Turn off when pulled firmly from the old thermostat. Wrap the wires around a WIRES THROUGH WALL OPENING pencil as shown to keep them from the old thermostat. If the cover does not snap off power to lock on the cover. M5136 5 69-1081-3 q Remove the cover from the bottom, check...

Owner's Manual
Page 7
... on the CT3611. q For wiring diagrams, if needed, see illustration). q Match the terminals from your existing thermostat wire terminals to Table 1. FOR STRAIGHT INSERTION STRIP 5/16 IN. (8 MM). STEP 4. q Loosen the terminal screws. Find the column from adversely affecting thermostat operation. q Match the letter of your local heating/air-conditioning contractor. Tighten the terminals. If unsure about household wiring procedures, call your old thermostat wire with local codes and...
... on the CT3611. q For wiring diagrams, if needed, see illustration). q Match the terminals from your existing thermostat wire terminals to Table 1. FOR STRAIGHT INSERTION STRIP 5/16 IN. (8 MM). STEP 4. q Loosen the terminal screws. Find the column from adversely affecting thermostat operation. q Match the letter of your local heating/air-conditioning contractor. Tighten the terminals. If unsure about household wiring procedures, call your old thermostat wire with local codes and...

Owner's Manual
Page 8
... matched to the C terminal, contact Honeywell. Call your local heating and cooling contractor for CT3611 a Never attach wires to the CT3611 C terminal. W1 or Y W or W2 W or W1 F or G G G R or Oa Oa Oa - W2 Function Description Common Power Compressor Stage 1 heating relay Auxiliary heat relay G Fan relay Oa Cooling changeover relay - d Use electrical tape to tape off , not needed for assistance. CT3611a C R Typical Terminal Designations from the Existing Thermostat C C or X C R R R Y Y or Y1...
... matched to the C terminal, contact Honeywell. Call your local heating and cooling contractor for CT3611 a Never attach wires to the CT3611 C terminal. W1 or Y W or W2 W or W1 F or G G G R or Oa Oa Oa - W2 Function Description Common Power Compressor Stage 1 heating relay Auxiliary heat relay G Fan relay Oa Cooling changeover relay - d Use electrical tape to tape off , not needed for assistance. CT3611a C R Typical Terminal Designations from the Existing Thermostat C C or X C R R R Y Y or Y1...

Owner's Manual
Page 9
Temperature °F. - 12-hour clock format. IMPORTANT Always press the keys with your fingertip or a similar blunt tool. CUSTOMIZE YOUR THERMOSTAT Your Honeywell CT3611 thermostat comes preset to the most commonly used settings. Sharp instruments like pens and pencil points can change any or all of these settings. The settings are: - You can damage the keyboard. 9 69-1081-3 Auxiliary and/or Emergency Heat type. - STEP 5. MOUNT THE THERMOSTAT STEP 6. Smart Response™ technology on. -
Temperature °F. - 12-hour clock format. IMPORTANT Always press the keys with your fingertip or a similar blunt tool. CUSTOMIZE YOUR THERMOSTAT Your Honeywell CT3611 thermostat comes preset to the most commonly used settings. Sharp instruments like pens and pencil points can change any or all of these settings. The settings are: - You can damage the keyboard. 9 69-1081-3 Auxiliary and/or Emergency Heat type. - STEP 5. MOUNT THE THERMOSTAT STEP 6. Smart Response™ technology on. -
Owner's Manual
Page 10
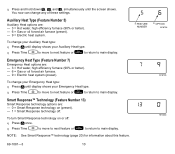
... forced air furnace (preset). - 9 = Electric heat system. q Press Time to move to next feature or Run Program to return to main display. q Press and hold down , , and , simultaneously until display shows your Emergency Heat type. q Press Time to move to next feature or Run Program to return to main display. To change your Auxiliary Heat type. To turn Smart Response technology on (preset). - 1 = Smart Response technology off : q Press once. Auxiliary Heat Type (Feature Number 5) Auxiliary Heat options...
... forced air furnace (preset). - 9 = Electric heat system. q Press Time to move to next feature or Run Program to return to main display. q Press and hold down , , and , simultaneously until display shows your Emergency Heat type. q Press Time to move to next feature or Run Program to return to main display. To change your Auxiliary Heat type. To turn Smart Response technology on (preset). - 1 = Smart Response technology off : q Press once. Auxiliary Heat Type (Feature Number 5) Auxiliary Heat options...
Owner's Manual
Page 11
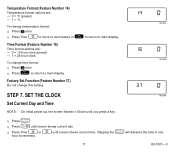
... or Run Program to return to main display. SET THE CLOCK M13346 Set Current Day and Time NOTE: On initial power-up, the screen flashes 1:00 pm until screen shows current time. (Tapping the Set Current Day/Time will advance the time in one 11 69-1081-3 Factory Set Function (Feature Number 37) Do not change time format: q Press once. q Press Time or hour increments). To change this setting. M13344 M13345 STEP 7. until you press a key. q Press Run Program to return...
... or Run Program to return to main display. SET THE CLOCK M13346 Set Current Day and Time NOTE: On initial power-up, the screen flashes 1:00 pm until screen shows current time. (Tapping the Set Current Day/Time will advance the time in one 11 69-1081-3 Factory Set Function (Feature Number 37) Do not change time format: q Press once. q Press Time or hour increments). To change this setting. M13344 M13345 STEP 7. until you press a key. q Press Run Program to return...
Owner's Manual
Page 12
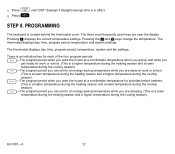
q Press Daylight Time until "DST" displays if daylight savings time is located behind the thermostat cover. The thermostat displays day, time, program period, temperature and system settings. Return -The program period when you get up and while you want the house at work or school. (This is a higher temperature during the heating season and a lower temperature during the cooling season). STEP 8. The thermostat displays day, time, program period, temperature, system and fan settings. The three most frequently used keys are...
q Press Daylight Time until "DST" displays if daylight savings time is located behind the thermostat cover. The thermostat displays day, time, program period, temperature and system settings. Return -The program period when you get up and while you want the house at work or school. (This is a higher temperature during the heating season and a lower temperature during the cooling season). STEP 8. The thermostat displays day, time, program period, temperature, system and fan settings. The three most frequently used keys are...

Owner's Manual
Page 13
... be helpful when planning your schedule of time and temperature settings. Table 2. Saturday Sunday (Sat) (Sun) Program the First Day Start by programming the wake time and temperature for one day. Table 2 can be higher than 90°F (32°C) or lower than 45°F (7°C). q Press and release Wake . The thermostat default settings are shown in the display. 13 69-1081-3 b Your cooling setpoints...
... be helpful when planning your schedule of time and temperature settings. Table 2. Saturday Sunday (Sat) (Sun) Program the First Day Start by programming the wake time and temperature for one day. Table 2 can be higher than 90°F (32°C) or lower than 45°F (7°C). q Press and release Wake . The thermostat default settings are shown in the display. 13 69-1081-3 b Your cooling setpoints...
Owner's Manual
Page 14
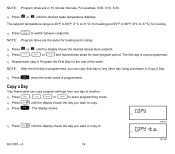
... Heat/Cool Settings to enter programming mode. q Press Wake , , Leave Return or Sleep to switch between setpoints. The setpoint temperature range is programmed, you can copy program settings from one day to 37°C) for the rest of the week. q Press or until the desired wake temperature displays. Copy a Day Your thermostat can copy that day to any other day using procedure in Program the First Day for cooling. Mon q Press Day until the display shows...
... Heat/Cool Settings to enter programming mode. q Press Wake , , Leave Return or Sleep to switch between setpoints. The setpoint temperature range is programmed, you can copy program settings from one day to 37°C) for the rest of the week. q Press or until the desired wake temperature displays. Copy a Day Your thermostat can copy that day to any other day using procedure in Program the First Day for cooling. Mon q Press Day until the display shows...
Owner's Manual
Page 15
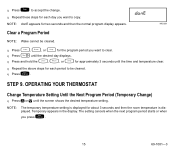
... normal program display appears. q Repeat these steps for each day you press Run Program . 15 69-1081-3 q Press Day until the time and temperature clear. q Repeat the above steps for each period to accept the change. M13329 Clear a Program Period NOTE: Wake cannot be cleared. The setting cancels when the next program period starts or when you want to copy. OPERATING YOUR THERMOSTAT Change Temperature Setting Until the Next Program Period (Temporary Change...
... normal program display appears. q Repeat these steps for each day you press Run Program . 15 69-1081-3 q Press Day until the time and temperature clear. q Repeat the above steps for each period to accept the change. M13329 Clear a Program Period NOTE: Wake cannot be cleared. The setting cancels when the next program period starts or when you want to copy. OPERATING YOUR THERMOSTAT Change Temperature Setting Until the Next Program Period (Temporary Change...
Owner's Manual
Page 16
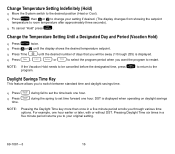
... (Heat or Cool). DST is displayed. Change Temperature Setting Indefinitely (Hold) q Move the System switch to switch between standard time and daylight savings time. Change the Temperature Setting Until a Designated Day and Period (Vacation Hold) q Press Hold Temp twice. NOTE: If the Vacation Hold needs to be away (1 through various time options. NOTE: Pressing the Daylight Time key more than once in a five minute period returns you want the program to the program. q Press Hold Temp then...
... (Heat or Cool). DST is displayed. Change Temperature Setting Indefinitely (Hold) q Move the System switch to switch between standard time and daylight savings time. Change the Temperature Setting Until a Designated Day and Period (Vacation Hold) q Press Hold Temp twice. NOTE: If the Vacation Hold needs to be away (1 through various time options. NOTE: Pressing the Daylight Time key more than once in a five minute period returns you want the program to the program. q Press Hold Temp then...

Owner's Manual
Page 17
Cool: The thermostat controls your heating system. Em Heat: Emergency heat or Auxiliary heat control to the G thermostat terminal). Use for improved air circulation or for more efficient central air cleaning. (In a heat-only system, fan runs continuously only if fan relay is off . Then set the fan switch. STEP 10. Fan Auto: Normal setting for the current day. The equipment controls the fan operation. On Auto Fan On Auto Fan Em Heat Heat Off Cool System Em Heat Heat Off Cool System Em Heat Heat Off Cool System Em Heat Heat Off Cool System 17...
Cool: The thermostat controls your heating system. Em Heat: Emergency heat or Auxiliary heat control to the G thermostat terminal). Use for improved air circulation or for more efficient central air cleaning. (In a heat-only system, fan runs continuously only if fan relay is off . Then set the fan switch. STEP 10. Fan Auto: Normal setting for the current day. The equipment controls the fan operation. On Auto Fan On Auto Fan Em Heat Heat Off Cool System Em Heat Heat Off Cool System Em Heat Heat Off Cool System Em Heat Heat Off Cool System 17...
Owner's Manual
Page 18
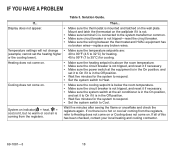
... the thermostat on the wall plate. or the cooling lower). 45 to 99°F (7 to Cool. IF YOU HAVE A PROBLEM Table 3. Solution Guide. Display does not appear. • Make sure the thermostat is mounted and latched on the wallplate if it is not. • Make sure terminal C is connected to 32°C) for cooling. If... Temperature settings will not change • Make sure the temperature setpoints...
... the thermostat on the wall plate. or the cooling lower). 45 to 99°F (7 to Cool. IF YOU HAVE A PROBLEM Table 3. Solution Guide. Display does not appear. • Make sure the thermostat is mounted and latched on the wallplate if it is not. • Make sure terminal C is connected to 32°C) for cooling. If... Temperature settings will not change • Make sure the temperature setpoints...

Owner's Manual
Page 19
...; technology, the start times occur before your local heating and cooling contractor. Before calling, please have the following information available: • Thermostat model number. (Located on indicates a problem with the heat pump. Make sure the AM and PM settings are correct. 4. The temperature setting limit has been reached. Display shows Wait. The Center hours are Monday through Friday, 7:00AM to a system monitor. If... Display flashes during programming. Solution Guide.
...; technology, the start times occur before your local heating and cooling contractor. Before calling, please have the following information available: • Thermostat model number. (Located on indicates a problem with the heat pump. Make sure the AM and PM settings are correct. 4. The temperature setting limit has been reached. Display shows Wait. The Center hours are Monday through Friday, 7:00AM to a system monitor. If... Display flashes during programming. Solution Guide.
Owner's Manual
Page 20
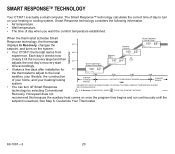
... thermostat displays In Recovery, changes the 68°F setpoint, and turns on once the program time begins and run continuously until the setpoint is actually a small computer. M18591 Recovery. Smart Response technology considers the following information. • Air temperature. • Wall temperature. • The time of your home, and your heating/cooling system. • You can turn on your heating or cooling system. Honeywell does not recommend this because the auxiliary heat comes on...
... thermostat displays In Recovery, changes the 68°F setpoint, and turns on once the program time begins and run continuously until the setpoint is actually a small computer. M18591 Recovery. Smart Response technology considers the following information. • Air temperature. • Wall temperature. • The time of your home, and your heating/cooling system. • You can turn on your heating or cooling system. Honeywell does not recommend this because the auxiliary heat comes on...

Owner's Manual
Page 21
... COOL CHANGEOVER VALVE 2 EM. SEE WIRE WALLPLATE TERMINALS SECTION FOR MORE DETAILS. WIRING DIAGRAMS See Table 1 on page 8 for additional wiring assistance. L1 (HOT) 2 NEVER ATTACH WIRES TO BOTH THE O AND B TERMINALS. HT. HEAT RELAY COMPRESSOR RELAY 1 L2 1 POWER SUPPLY. L1 (HOT) M15113A Typical hookup of CT3611 with isolated stage-one heating and cooling connections. PROVIDE DISCONNECT MEANS AND OVERLOAD PROTECTION AS REQUIRED. 2 LEAVE FACTORY INSTALLED JUMPER IN PLACE. HT. THERMOSTAT...
... COOL CHANGEOVER VALVE 2 EM. SEE WIRE WALLPLATE TERMINALS SECTION FOR MORE DETAILS. WIRING DIAGRAMS See Table 1 on page 8 for additional wiring assistance. L1 (HOT) 2 NEVER ATTACH WIRES TO BOTH THE O AND B TERMINALS. HT. HEAT RELAY COMPRESSOR RELAY 1 L2 1 POWER SUPPLY. L1 (HOT) M15113A Typical hookup of CT3611 with isolated stage-one heating and cooling connections. PROVIDE DISCONNECT MEANS AND OVERLOAD PROTECTION AS REQUIRED. 2 LEAVE FACTORY INSTALLED JUMPER IN PLACE. HT. THERMOSTAT...


