Owners Guide
Page 3
...into a 120 volt 60 Hz outlet. Caution Never remove the back cover of the video program material. Please note that is protected by TV stations and cable companies, as well as video-on-demand, a cable operator's enhanced program guide and data-enhanced television services may require... after moving ) patterns can be restored quickly by HITACHI could void the user's warranty. The mains plug is capable of a set-top box. To prevent electric shock, do not expose this apparatus to rain or moisture. • The plasma television should not be connected to minimize image retention...
...into a 120 volt 60 Hz outlet. Caution Never remove the back cover of the video program material. Please note that is protected by TV stations and cable companies, as well as video-on-demand, a cable operator's enhanced program guide and data-enhanced television services may require... after moving ) patterns can be restored quickly by HITACHI could void the user's warranty. The mains plug is capable of a set-top box. To prevent electric shock, do not expose this apparatus to rain or moisture. • The plasma television should not be connected to minimize image retention...
Owners Guide
Page 5
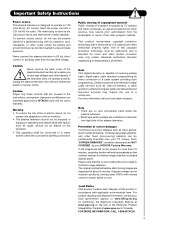
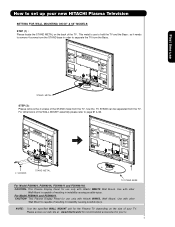
...Plasma Television. If you are required to a Wall 1. Also, be sure that is free from the perforated back cover of the set firmly in direct sunlight or near a heating appliance, etc. 30 cm (12 inches) 10 cm (4 inches) 10 cm (4 inches) 42" 50" 5 A 42...does not expose anyone to a centralized antenna system, a good outdoor color TV antenna is important to mount the unit in an exceptionally good signal area that...in position. First time use How To Set Up Your New Hitachi Plasma Television To take measures to prevent the Plasma Television from the top of the television to...
...Plasma Television. If you are required to a Wall 1. Also, be sure that is free from the perforated back cover of the set firmly in direct sunlight or near a heating appliance, etc. 30 cm (12 inches) 10 cm (4 inches) 10 cm (4 inches) 42" 50" 5 A 42...does not expose anyone to a centralized antenna system, a good outdoor color TV antenna is important to mount the unit in an exceptionally good signal area that...in position. First time use How To Set Up Your New Hitachi Plasma Television To take measures to prevent the Plasma Television from the top of the television to...
Owners Guide
Page 6
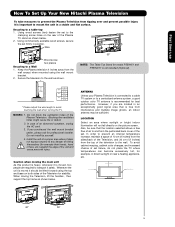
... clamp ; then pull the clamp to tighten the AC cord to hold the AC cord. AC CORD · Clamp #2: Use this clamp to the TV. First time use How to set up your new HITACHI Plasma Television AC CORD INSTALLATION INSTRUCTION The AC cord provided with Clamp #2. » Depend on the model size... 42",50" or 55", the clamp may be included on the accessories bag. ³ Clamp #1 : Pass the AC cord through Clamp #1 and connect it to ...
... clamp ; then pull the clamp to tighten the AC cord to hold the AC cord. AC CORD · Clamp #2: Use this clamp to the TV. First time use How to set up your new HITACHI Plasma Television AC CORD INSTALLATION INSTRUCTION The AC cord provided with Clamp #2. » Depend on the model size... 42",50" or 55", the clamp may be included on the accessories bag. ³ Clamp #1 : Pass the AC cord through Clamp #1 and connect it to ...
Owners Guide
Page 7
... only with other Wall Mount is capable of the STAND metal from the TV, now the TV STAND can be separated from the Base. For Model P55H401 and P55H4011 CAUTION- First time use How to set up your new HITACHI Plasma Television SETTING FOR WALL MOUNTING ON 50" & 55" MODELS STEP (1) : Please ...locate the STAND METAL on the size of the TV . so it needs to remove 4 screws from the STAND base in ...
... only with other Wall Mount is capable of the STAND metal from the TV, now the TV STAND can be separated from the Base. For Model P55H401 and P55H4011 CAUTION- First time use How to set up your new HITACHI Plasma Television SETTING FOR WALL MOUNTING ON 50" & 55" MODELS STEP (1) : Please ...locate the STAND METAL on the size of the TV . so it needs to remove 4 screws from the STAND base in ...
Owners Guide
Page 8
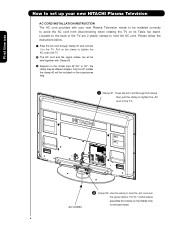
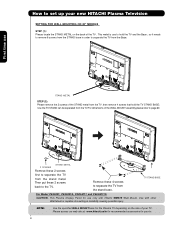
...STAND metal from the stand metal. Please access our web site at: www.hitachi.us/tv for recommended accessories for the Plasma TV depending on the size of your new HITACHI Plasma Television SETTING FOR WALL MOUNTING ON 42" MODELS STEP (1) : Please locate the STAND METAL on the back of ...TV. This Plasma Display Panel for use to hold the TV STAND BASE; This metal is use only with other Wall Mount is capable of the TV . Then put these 4 screws to separate the TV from the Base. TV STAND BASE For Model P42H401, P42H401A, P42H4011 and P42H4011A CAUTION- How to set up your TV...
...STAND metal from the stand metal. Please access our web site at: www.hitachi.us/tv for recommended accessories for the Plasma TV depending on the size of your new HITACHI Plasma Television SETTING FOR WALL MOUNTING ON 42" MODELS STEP (1) : Please locate the STAND METAL on the back of ...TV. This Plasma Display Panel for use to hold the TV STAND BASE; This metal is use only with other Wall Mount is capable of the TV . Then put these 4 screws to separate the TV from the Base. TV STAND BASE For Model P42H401, P42H401A, P42H4011 and P42H4011A CAUTION- How to set up your TV...

Owners Guide
Page 9
... antenna When using a 75-Ohm coaxial cable system, connect CATV coaxial cable to the AIR/CABLE (75-Ohm) terminal. Consult your new HITACHI Plasma Television VIEWING The best picture is recommended. 9 Differences in room sizes and acoustical environments will be located in a different section of the room...system Antenna Mixer NOTE: Connecting a 300-Ohm twin lead connector may appear on the TV. Or if you have an antenna, connect the coaxial cable to the antenna mixer. First time use How to set up your dealer or service store for best performance. 4" Minimum L S 80 BEST...
... antenna When using a 75-Ohm coaxial cable system, connect CATV coaxial cable to the AIR/CABLE (75-Ohm) terminal. Consult your new HITACHI Plasma Television VIEWING The best picture is recommended. 9 Differences in room sizes and acoustical environments will be located in a different section of the room...system Antenna Mixer NOTE: Connecting a 300-Ohm twin lead connector may appear on the TV. Or if you have an antenna, connect the coaxial cable to the antenna mixer. First time use How to set up your dealer or service store for best performance. 4" Minimum L S 80 BEST...
Owners Guide
Page 10
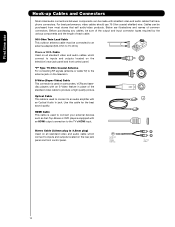
... or cable TV) to an audio amplifier with shielded video and audio cables that sell audio/video products. S-Video (Super Video) Cable This connector is used on the rear jack panel and front control panel. HDMI Cable This cable is used to connect your external devices such as Set-Top-Boxes or... DVD players equipped with an S-Video feature in place of the standard video cable to the TV's HDMI input. Cables can be sure of the output and input connector types required by...
... or cable TV) to an audio amplifier with shielded video and audio cables that sell audio/video products. S-Video (Super Video) Cable This connector is used on the rear jack panel and front control panel. HDMI Cable This cable is used to connect your external devices such as Set-Top-Boxes or... DVD players equipped with an S-Video feature in place of the standard video cable to the TV's HDMI input. Cables can be sure of the output and input connector types required by...
Owners Guide
Page 11
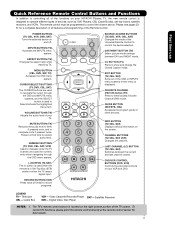
...remote control directly at the remote control sensor for a complete description of all of the functions on your HITACHI Plasma TV, the new remote control is displayed. CURSOR/SELECT BUTTONS (TV, DVD, CBL, SAT) The CURSOR buttons are used to navigate the cursor through the OSD and INPUTS... twice (2 times) to operate different types of devices, such as, DVD Players, CBL (Cable Boxes), set-top-boxes, satellite receivers, and VCRs. MENU BUTTON (CBL, DVD, SAT, TV) Accesses the OSD menu system. Satellite Receiver DVD - First time use Quick Reference Remote Control Buttons and ...
...remote control directly at the remote control sensor for a complete description of all of the functions on your HITACHI Plasma TV, the new remote control is displayed. CURSOR/SELECT BUTTONS (TV, DVD, CBL, SAT) The CURSOR buttons are used to navigate the cursor through the OSD and INPUTS... twice (2 times) to operate different types of devices, such as, DVD Players, CBL (Cable Boxes), set-top-boxes, satellite receivers, and VCRs. MENU BUTTON (CBL, DVD, SAT, TV) Accesses the OSD menu system. Satellite Receiver DVD - First time use Quick Reference Remote Control Buttons and ...
Owners Guide
Page 12
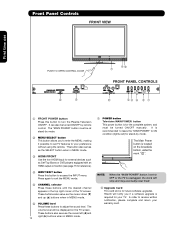
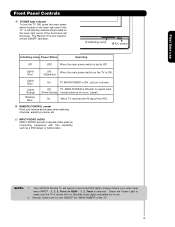
... this button to access the INPUT menu. The volume level will stop and may eventually reset itself. ቩ Upgrade Card This card slot is set TV features to your warranty card. In order to receive written notification, please complete and return your preference without using the remote. These buttons also serve...button Television MAIN POWER button This power button is required for the complete system, and must be displayed on the broadside bottom, under the mark " ". Hitachi will notify you to enter the MENU, making it possible to set to turn the Plasma Television ON/OFF.
... this button to access the INPUT menu. The volume level will stop and may eventually reset itself. ቩ Upgrade Card This card slot is set TV features to your warranty card. In order to receive written notification, please complete and return your preference without using the remote. These buttons also serve...button Television MAIN POWER button This power button is required for the complete system, and must be displayed on the broadside bottom, under the mark " ". Hitachi will notify you to enter the MENU, making it possible to set to turn the Plasma Television ON/OFF.
Owners Guide
Page 13
... composite Video jacks for remote ON/OFF operation. ቪ Indicating Lamp ቫ R/C sensor Indicating Lamp Power Status Operating Off OFF. Off TV MAIN POWER is set to Off. signal). Check the Power Light to be turned OFF (lights orange) if there is no sync. First time use . 2.... the main power switch located on the lower right corner of the TV. 13 Your HITACHI Plasma TV will illuminate. When the main power switch on the TV is ON. (Stand-by) Lights Blue Lights Orange Blinking Blue On TV MAIN POWER is turned off or in use Front Panel Controls ቪ...
... composite Video jacks for remote ON/OFF operation. ቪ Indicating Lamp ቫ R/C sensor Indicating Lamp Power Status Operating Off OFF. Off TV MAIN POWER is set to Off. signal). Check the Power Light to be turned OFF (lights orange) if there is no sync. First time use . 2.... the main power switch located on the lower right corner of the TV. 13 Your HITACHI Plasma TV will illuminate. When the main power switch on the TV is ON. (Stand-by) Lights Blue Lights Orange Blinking Blue On TV MAIN POWER is turned off or in use Front Panel Controls ቪ...
Owners Guide
Page 14
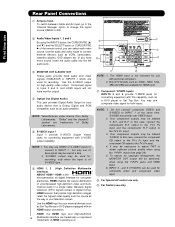
...available for HDMI input. ቨ Component: Y-PBPR Inputs INPUTS 2 and 3 provide Y-PBPR jacks for consumer electronics. Only DTV formats such as a DVD player or Set Top Box. You may use ባ Audio/Video Inputs 1, 2 and 3 ቢ By using the INPUTS button, the CURSOR PAD (̆ ቦ and...Your component outputs may be necessary to adjust TINT to INPUT 1 at a time. 2. In this case, connect the components B-Y output to the TV's PB input and the components R-Y output to change the signal source CABLE or AIR. To ensure no copyright infringement, the MONITOR OUT output will...
...available for HDMI input. ቨ Component: Y-PBPR Inputs INPUTS 2 and 3 provide Y-PBPR jacks for consumer electronics. Only DTV formats such as a DVD player or Set Top Box. You may use ባ Audio/Video Inputs 1, 2 and 3 ቢ By using the INPUTS button, the CURSOR PAD (̆ ቦ and...Your component outputs may be necessary to adjust TINT to INPUT 1 at a time. 2. In this case, connect the components B-Y output to the TV's PB input and the components R-Y output to change the signal source CABLE or AIR. To ensure no copyright infringement, the MONITOR OUT output will...
Owners Guide
Page 15
...SERVICE USE ONLY) PUSH EJECT DVI to HDMI Cable DIGITAL OUTPUT OUTPUT L R Note : Special device cables will be abnormal. 15 Back of HDTV Set-Top-Box or DVD Player NOTE: 1. B) Connecting DVI signal. Completely insert connection cord plugs when connecting to the own device specifications. If you ...to easily connect HDMI or DVI signals from a DVD, Set Top Box , Video Game as a convenience to allow you do not, the played back picture may be according to the own device specifications....
...SERVICE USE ONLY) PUSH EJECT DVI to HDMI Cable DIGITAL OUTPUT OUTPUT L R Note : Special device cables will be abnormal. 15 Back of HDTV Set-Top-Box or DVD Player NOTE: 1. B) Connecting DVI signal. Completely insert connection cord plugs when connecting to the own device specifications. If you ...to easily connect HDMI or DVI signals from a DVD, Set Top Box , Video Game as a convenience to allow you do not, the played back picture may be according to the own device specifications....
Owners Guide
Page 16
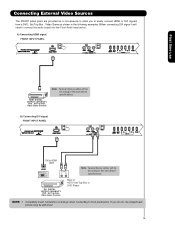
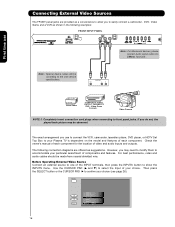
... The FRONT panel jacks are offered as a convenience to allow you do not, the played back picture may need to modify them to accommodate your Plasma TV is dependent on the model and features of each component for the location of video and audio inputs and outputs. Before Operating External Video Source... SELECT button or the CURSOR PAD ̈ to confirm your choice. First time use to connect the VCR, camcorder, laserdisc player, DVD player, or HDTV Set Top Box to your particular assortment of components and features.
... The FRONT panel jacks are offered as a convenience to allow you do not, the played back picture may need to modify them to accommodate your Plasma TV is dependent on the model and features of each component for the location of video and audio inputs and outputs. Before Operating External Video Source... SELECT button or the CURSOR PAD ̈ to confirm your choice. First time use to connect the VCR, camcorder, laserdisc player, DVD player, or HDTV Set Top Box to your particular assortment of components and features.
Owners Guide
Page 17
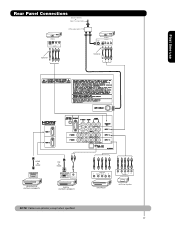
OUTPUT Y PB/CB PR/CR L R Y PB PR L R OUTPUT DVD Player HDTV Set-Top Box 17 First time use Rear Panel Connections Outside Antenna or Cable TV coaxial cable 2-Way signal splitter VCR #2 S-VIDEO V L R INPUT Optional VCR #1 ANT OUTPUT IN S-VIDEO V L R Optional HDMI to HDMI HDMI OUTPUT HDMI DIGITAL OUTPUT CAPABILITY DVI to HDMI DIGITAL OUTPUT AUDIO OUT DIGITAL OUTPUT CAPABILITY NOTE: Cables are optional, except when specified.
OUTPUT Y PB/CB PR/CR L R Y PB PR L R OUTPUT DVD Player HDTV Set-Top Box 17 First time use Rear Panel Connections Outside Antenna or Cable TV coaxial cable 2-Way signal splitter VCR #2 S-VIDEO V L R INPUT Optional VCR #1 ANT OUTPUT IN S-VIDEO V L R Optional HDMI to HDMI HDMI OUTPUT HDMI DIGITAL OUTPUT CAPABILITY DVI to HDMI DIGITAL OUTPUT AUDIO OUT DIGITAL OUTPUT CAPABILITY NOTE: Cables are optional, except when specified.
Owners Guide
Page 18
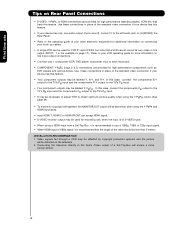
...CR output to the TV's PR input. • It may be affected by copyright protection systems and the picture will assure a more information on Rear Panel Connections • S-VIDEO, Y-PBPR, or HDMI connections are provided for high performance components, such as DVD players and set-top-boxes. In ...HDMI 2 or HDMI FRONT can be used for recording only when the input is of S-VIDEO type. • When using a HDMI input from a Set-Top-Box, it is recommended that the length of the standard video connection if your VCR operating guide for more normal picture. 18 INSTALLATION RECOMMENDATION...
...CR output to the TV's PR input. • It may be affected by copyright protection systems and the picture will assure a more information on Rear Panel Connections • S-VIDEO, Y-PBPR, or HDMI connections are provided for high performance components, such as DVD players and set-top-boxes. In ...HDMI 2 or HDMI FRONT can be used for recording only when the input is of S-VIDEO type. • When using a HDMI input from a Set-Top-Box, it is recommended that the length of the standard video connection if your VCR operating guide for more normal picture. 18 INSTALLATION RECOMMENDATION...

Owners Guide
Page 20
... the output of video contents. 3. Press the INPUTS button, then select HDMI 1, 2 or FRONT to HDMI connection cable from the HDTV SET TOP BOX or DVD player. 5. Completely insert the connection cord plugs when connecting to the last channel viewed. When using HDMI connections to ...prevent illegal copying of the HDTV set top box or DVD player to -point connection for reference). The HDMI input on the Rear Panel below . 2. HDMI is a cryptographic ...
... the output of video contents. 3. Press the INPUTS button, then select HDMI 1, 2 or FRONT to HDMI connection cable from the HDTV SET TOP BOX or DVD player. 5. Completely insert the connection cord plugs when connecting to the last channel viewed. When using HDMI connections to ...prevent illegal copying of the HDTV set top box or DVD player to -point connection for reference). The HDMI input on the Rear Panel below . 2. HDMI is a cryptographic ...
Owners Guide
Page 21
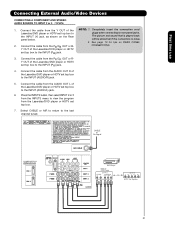
... abnormal if the connection is loose. 2. Connect the cable from the Y OUT of the Laserdisc/DVD player or HDTV set top box to the INPUT (PR) jack. 4. See page 18 for tips on the Rear panel below. 2. Connect... the cable from the PB/CB OUT or BY OUT of the Laserdisc/DVD player or HDTV set top box to the last channel tuned. Connect the cable from the AUDIO OUT L of DVD Player OUTPUT ...AUDIO RL VIDEO PR/CR PB/CB Y OR OUTPUT L R Y PB PR HDTV Set-Top Box 21 Connect the cable from the PR/CR OUT or RY OUT of the Laserdisc/DVD player or HDTV...
... abnormal if the connection is loose. 2. Connect the cable from the Y OUT of the Laserdisc/DVD player or HDTV set top box to the INPUT (PR) jack. 4. See page 18 for tips on the Rear panel below. 2. Connect... the cable from the PB/CB OUT or BY OUT of the Laserdisc/DVD player or HDTV set top box to the last channel tuned. Connect the cable from the AUDIO OUT L of DVD Player OUTPUT ...AUDIO RL VIDEO PR/CR PB/CB Y OR OUTPUT L R Y PB PR HDTV Set-Top Box 21 Connect the cable from the PR/CR OUT or RY OUT of the Laserdisc/DVD player or HDTV...
Owners Guide
Page 23
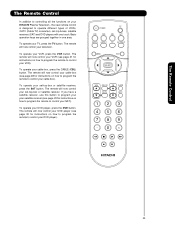
... The Remote Control The Remote Control In addition to controlling all the functions on your HITACHI Plasma Television , the new remote control is designed to operate different types of VCRs, CATV (Cable TV) converters, set-top-boxes, satellite receivers (SAT) and DVD players with one area. The remote will... now control your set -top-box or satellite receiver, press the SAT button. To operate your SAT). If...
... The Remote Control The Remote Control In addition to controlling all the functions on your HITACHI Plasma Television , the new remote control is designed to operate different types of VCRs, CATV (Cable TV) converters, set-top-boxes, satellite receivers (SAT) and DVD players with one area. The remote will... now control your set -top-box or satellite receiver, press the SAT button. To operate your SAT). If...
Owners Guide
Page 24
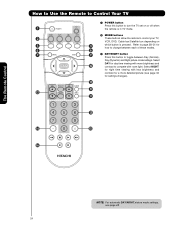
... (see page 48. 24 The Remote Control How to Use the Remote to Control Your TV ³ POWER button Press this button to toggle between Day (Normal), Day (Dynamic) and Night picture mode settings. Select µ DAY for settings changes). Ƹ º ¹ ¸ Ƹ ƹ ƺ ƻ ...modes. ¶ ¾ » DAY/NIGHT button Press this button to turn the TV set on or off when ³ the remote is in TV mode. · MODE buttons · These buttons allow the remote to control your TV, VCR, DVD, Cable box/Satellite box depending on ´ ¿ » &#...
... (see page 48. 24 The Remote Control How to Use the Remote to Control Your TV ³ POWER button Press this button to toggle between Day (Normal), Day (Dynamic) and Night picture mode settings. Select µ DAY for settings changes). Ƹ º ¹ ¸ Ƹ ƹ ƺ ƻ ...modes. ¶ ¾ » DAY/NIGHT button Press this button to turn the TV set on or off when ³ the remote is in TV mode. · MODE buttons · These buttons allow the remote to control your TV, VCR, DVD, Cable box/Satellite box depending on ´ ¿ » &#...
Owners Guide
Page 25
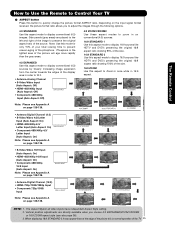
... will age more rapidly than the gray areas. 4:3 EXPANDED Use this aspect to Zoom-in once while in all video inputs have independent Aspect Style setting. 2. The Aspect Style in 16:9 aspect. IMA G E INPUT • S-Video/Video 16:9 Input (Auto Aspect: On) • HDMI-480i/480p... ZOOM1/ZOOM2 Use these aspect modes to quickly change the picture format ASPECT ratio. The Remote Control How to Use the Remote to Control Your TV ¿ ASPECT button Press this aspect mode to display conventional (4:3) images. NOTE: 1. Depending on conventional (4:3) sources. 16:9 STANDARD 1 Use...
... will age more rapidly than the gray areas. 4:3 EXPANDED Use this aspect to Zoom-in once while in all video inputs have independent Aspect Style setting. 2. The Aspect Style in 16:9 aspect. IMA G E INPUT • S-Video/Video 16:9 Input (Auto Aspect: On) • HDMI-480i/480p... ZOOM1/ZOOM2 Use these aspect modes to quickly change the picture format ASPECT ratio. The Remote Control How to Use the Remote to Control Your TV ¿ ASPECT button Press this aspect mode to display conventional (4:3) images. NOTE: 1. Depending on conventional (4:3) sources. 16:9 STANDARD 1 Use...


