

Owners Guide
Page 2
... unused for wall, shelf or ceiling mounting as this LCD television. 1. Section 810 of important operating and maintenance (servicing) instructions in accordance with the apparatus. Read these instructions. 3. Clean only with respect to proper grounding for the mast and supporting structure, grounding of the lead-in wire to an antenna discharge unit, size of grounding connectors, location of antenna discharge unit, connection to grounding...
... unused for wall, shelf or ceiling mounting as this LCD television. 1. Section 810 of important operating and maintenance (servicing) instructions in accordance with the apparatus. Read these instructions. 3. Clean only with respect to proper grounding for the mast and supporting structure, grounding of the lead-in wire to an antenna discharge unit, size of grounding connectors, location of antenna discharge unit, connection to grounding...

Owners Guide
Page 4
... enclosed instructions for installation. Flat panel displays can become excited while watching a program, especially on dresser, bookcases, shelves, desks, speakers, chest or carts may fall over , or knocked down. • Care should be heavy. 4 Some wall mounts are not designed to be mounted to safely install your flat panel display, contact your flat panel display. • Carefully read and understand all cords and cables connected to...
... enclosed instructions for installation. Flat panel displays can become excited while watching a program, especially on dresser, bookcases, shelves, desks, speakers, chest or carts may fall over , or knocked down. • Care should be heavy. 4 Some wall mounts are not designed to be mounted to safely install your flat panel display, contact your flat panel display. • Carefully read and understand all cords and cables connected to...
Owners Guide
Page 9
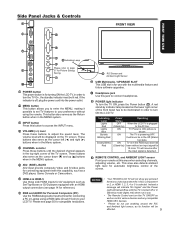
... AV2 input provide composite Video and S-Video jacks for connecting equipment with an HDMI output connection (see page 55 for compatible resolutions. 2 R/C Sensor and Ambient Light Sensor USB Multimedia / UPGRADE SLOT This USB slot is detected. 2 REMOTE CONTROL and AMBIENT LIGHT sensor Point your preference without an input signal for automatic brightness control of the TV screen. Please see page 14 for use . • The Remote Control can turn ON the LCD TV. Indicating Lamp Lights Red Lights Blue Quickly Blinking Red Slowly Blinks Red Power Status OFF (Stand-by...
... AV2 input provide composite Video and S-Video jacks for connecting equipment with an HDMI output connection (see page 55 for compatible resolutions. 2 R/C Sensor and Ambient Light Sensor USB Multimedia / UPGRADE SLOT This USB slot is detected. 2 REMOTE CONTROL and AMBIENT LIGHT sensor Point your preference without an input signal for automatic brightness control of the TV screen. Please see page 14 for use . • The Remote Control can turn ON the LCD TV. Indicating Lamp Lights Red Lights Blue Quickly Blinking Red Slowly Blinks Red Power Status OFF (Stand-by...

Owners Guide
Page 12
... have an antenna, connect the coaxial cable to the same AIR/CABLE terminal. Connect the power cord to your new Hitachi LCD Television Set. 1. Air/Cable Rear Panel Jack To outdoor Antenna or Cable TV (CATV) System To Antenna Terminal b). then light blue (image displays). Press the POWER button on the Remote Control or the POWER button on the Side Control Panel to power on the TV. FOLLOW THE TV SETUP WIZARD INSTRUCTIONS ON NEXT PAGE. 12 VHF (75-Ohm) antenna/CATV (Cable TV) When using a 300...
... have an antenna, connect the coaxial cable to the same AIR/CABLE terminal. Connect the power cord to your new Hitachi LCD Television Set. 1. Air/Cable Rear Panel Jack To outdoor Antenna or Cable TV (CATV) System To Antenna Terminal b). then light blue (image displays). Press the POWER button on the Remote Control or the POWER button on the Side Control Panel to power on the TV. FOLLOW THE TV SETUP WIZARD INSTRUCTIONS ON NEXT PAGE. 12 VHF (75-Ohm) antenna/CATV (Cable TV) When using a 300...

Owners Guide
Page 13
... see the screen above and if you did not connect your Antenna cables to your TV, turn on the remote control. Searching Analog CH Channel 3 Analog Channels Found 10 Digital Channels Found 15 10% Cancel SEL Cancel NOTES • Once the user cancels the wizard, the wizard will not appear again. Previous Navigate Cancel SEL Select EXIT Exit 13 FIRST TIME USE TV Setup Wizard Your Hitachi LCD television has a TV Setup Wizard feature...
... see the screen above and if you did not connect your Antenna cables to your TV, turn on the remote control. Searching Analog CH Channel 3 Analog Channels Found 10 Digital Channels Found 15 10% Cancel SEL Cancel NOTES • Once the user cancels the wizard, the wizard will not appear again. Previous Navigate Cancel SEL Select EXIT Exit 13 FIRST TIME USE TV Setup Wizard Your Hitachi LCD television has a TV Setup Wizard feature...

Owners Guide
Page 15
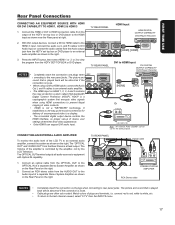
...Video Sources Connect an external source to one audio output (mono sound), connect it to the left audio jack on (L) the Rear Panel. ♦ Refer to the operating guide of video and audio inputs and outputs. Use the CURSORS ( and ) to DVI HDMI OUTPUT AUDIO OUT OPTICAL IN OUTPUT Y PB/CB PR/CR L R OUTPUT S-Video Video L R DIGITAL OUTPUT CAPABILITY STEREO SYSTEM AMPLIFIER NOTE Cables are not included. TV 1. Component 2 5. HDMI 2 8. Match colors of each input jack. ♦ Your component outputs may be labeled Y-CbCr. AV 2 3. HDTV SET-TOP BOX DVD PLAYER with Component...
...Video Sources Connect an external source to one audio output (mono sound), connect it to the left audio jack on (L) the Rear Panel. ♦ Refer to the operating guide of video and audio inputs and outputs. Use the CURSORS ( and ) to DVI HDMI OUTPUT AUDIO OUT OPTICAL IN OUTPUT Y PB/CB PR/CR L R OUTPUT S-Video Video L R DIGITAL OUTPUT CAPABILITY STEREO SYSTEM AMPLIFIER NOTE Cables are not included. TV 1. Component 2 5. HDMI 2 8. Match colors of each input jack. ♦ Your component outputs may be labeled Y-CbCr. AV 2 3. HDTV SET-TOP BOX DVD PLAYER with Component...
Owners Guide
Page 17
... "NETWORK" technology. Connect an optical cable from the HDTV set -up of the HDTV set top box or DVD player to HDMI connection cable from the Rear Panel is loose. • Cable plugs are often color-coded. TV REAR PANEL HDMI Input HDMI DIGITAL OUTPUT CAPABILITY DVD Player/ Recorder HDMI OUT [HDMI] [HDMI] TV REAR PANEL DVI to an external audio amplifier. • The HDMI input on the right. 2. The picture and sound that encrypts video signals when using a DVI to HDMI cable, connect the Audio Out L and R cables to HDMI Input DVI DIGITAL OUTPUT CAPABILITY DVD Player/ Recorder...
... "NETWORK" technology. Connect an optical cable from the HDTV set -up of the HDTV set top box or DVD player to HDMI connection cable from the Rear Panel is loose. • Cable plugs are often color-coded. TV REAR PANEL HDMI Input HDMI DIGITAL OUTPUT CAPABILITY DVD Player/ Recorder HDMI OUT [HDMI] [HDMI] TV REAR PANEL DVI to an external audio amplifier. • The HDMI input on the right. 2. The picture and sound that encrypts video signals when using a DVI to HDMI cable, connect the Audio Out L and R cables to HDMI Input DVI DIGITAL OUTPUT CAPABILITY DVD Player/ Recorder...

Owners Guide
Page 21
... setting changes). 8 Device Control buttons These buttons can control external devices (i.e. CLOSED CAPTIONS (CC) button Use this button to the device operating guide for viewing with Consumer Electronics Control (CEC) through the TV and HDMI connection ; Select Dynamic for automatic brightness and contrast adjustment when playing video games. Your local TV program guide denotes these buttons are displayed on 3 levels (MIN., MEDIUM, MAX). please refer to display the dialogue, narration, and/ or sound effects of a television program or home video which are for controlling...
... setting changes). 8 Device Control buttons These buttons can control external devices (i.e. CLOSED CAPTIONS (CC) button Use this button to the device operating guide for viewing with Consumer Electronics Control (CEC) through the TV and HDMI connection ; Select Dynamic for automatic brightness and contrast adjustment when playing video games. Your local TV program guide denotes these buttons are displayed on 3 levels (MIN., MEDIUM, MAX). please refer to display the dialogue, narration, and/ or sound effects of a television program or home video which are for controlling...

Owners Guide
Page 22
..., please consult your AV component code has not been preprogrammed into the remote. If the cable box does not turn off , try a different four digit preset code. 7. Repeat the same procedure for your set -top-boxes, satellite receivers, DVD players, and other audio/video equipment. To reset all programmed codes to confirm proper setup. 6. Numeric buttons 5. Select Cable mode by pressing the corresponding button. 3. The indicator light will now control the desired device...
..., please consult your AV component code has not been preprogrammed into the remote. If the cable box does not turn off , try a different four digit preset code. 7. Repeat the same procedure for your set -top-boxes, satellite receivers, DVD players, and other audio/video equipment. To reset all programmed codes to confirm proper setup. 6. Numeric buttons 5. Select Cable mode by pressing the corresponding button. 3. The indicator light will now control the desired device...

Owners Guide
Page 29
... Adjust volume to turn Off the Accent Light and Power LED. Setup Menu Language Time Sleep Timer Day/Night Timer Set Password Parental Controls Closed Captions Digital Captions Digital Captions Options Analog Captions Energy Options Light Control Transparency HDMI-CEC Input Labels Component Options RGB Options Reset AV & Setup Choose English, French or Spanish OSD Language. Feature to ON, this feature will enable simplified operation of low frequencies. View digital still pictures from USB Drives. Select sound equalizing mode. Set Auto Channel Scan. Access Signal Strength...
... Adjust volume to turn Off the Accent Light and Power LED. Setup Menu Language Time Sleep Timer Day/Night Timer Set Password Parental Controls Closed Captions Digital Captions Digital Captions Options Analog Captions Energy Options Light Control Transparency HDMI-CEC Input Labels Component Options RGB Options Reset AV & Setup Choose English, French or Spanish OSD Language. Feature to ON, this feature will enable simplified operation of low frequencies. View digital still pictures from USB Drives. Select sound equalizing mode. Set Auto Channel Scan. Access Signal Strength...
Owners Guide
Page 30
... NUMBER buttons on the remote control to adjust these special modes on your desired conditions is a four digit access code. Blue Only Mode: This function removes the red and green signal from Digital Channels (under TV Mode). Also, each of the Custom option will take the video adjustments of the video inputs have their own independent video adjustment settings. 30 Dynamic 41 47 65 0 60 High Move SEL Select Return EXIT Exit Video Audio Setup Channels Multimedia Picture Mode Contrast Brightness Color...
... NUMBER buttons on the remote control to adjust these special modes on your desired conditions is a four digit access code. Blue Only Mode: This function removes the red and green signal from Digital Channels (under TV Mode). Also, each of the Custom option will take the video adjustments of the video inputs have their own independent video adjustment settings. 30 Dynamic 41 47 65 0 60 High Move SEL Select Return EXIT Exit Video Audio Setup Channels Multimedia Picture Mode Contrast Brightness Color...

Owners Guide
Page 31
... display movies at 24 frames or still pictures per second. Color Temp. Video Other Video Menu Setting Adjustments Use the CURSOR PAD or to highlight the function to be reconciled. Press MENU to return to adjust the function. 3. Gamma The Gamma function allows you to set to Auto your Hitachi LCD Television will activate the circuitry for this setting for television viewing, the disparity between three levels of the picture black...
... display movies at 24 frames or still pictures per second. Color Temp. Video Other Video Menu Setting Adjustments Use the CURSOR PAD or to highlight the function to be reconciled. Press MENU to return to adjust the function. 3. Gamma The Gamma function allows you to set to Auto your Hitachi LCD Television will activate the circuitry for this setting for television viewing, the disparity between three levels of the picture black...
Owners Guide
Page 33
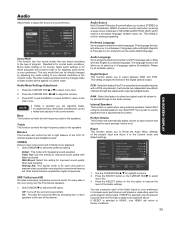
... the type of program. Off : Turns off the surround sound effect. Audio Source Multi-Channel Television Sound will allow you are adjusting treble. The language function will allow you to select up to 6 language options (if available). Digital Output This function allows you to Reset the Audio Menu Settings of the LCD TV internal speakers and headphone jack. Select this feature if the TV is useful when using external speakers. Internal Speakers This function is connected...
... the type of program. Off : Turns off the surround sound effect. Audio Source Multi-Channel Television Sound will allow you are adjusting treble. The language function will allow you to select up to 6 language options (if available). Digital Output This function allows you to Reset the Audio Menu Settings of the LCD TV internal speakers and headphone jack. Select this feature if the TV is useful when using external speakers. Internal Speakers This function is connected...

Owners Guide
Page 37
... for digital programs and set font, size, color and background style of digital captions. Video Audio Setup Light Sensor Off Picture Energy Saving Min Auto TV off . Light Sensor The Light Sensor feature is detected for the program you to highlight Energy Options. 2. Select On to activate this feature to manually adjust the contrast setting. CEC Input Labels Component Options RGB Options Reset AV & Setup Move SEL Select Return EXIT Exit 1. Video Audio Setup Channels Multimedia Menu Language Time Sleep Timer Day/Night Timer Set Password Parental Controls Closed Captions...
... for digital programs and set font, size, color and background style of digital captions. Video Audio Setup Light Sensor Off Picture Energy Saving Min Auto TV off . Light Sensor The Light Sensor feature is detected for the program you to highlight Energy Options. 2. Select On to activate this feature to manually adjust the contrast setting. CEC Input Labels Component Options RGB Options Reset AV & Setup Move SEL Select Return EXIT Exit 1. Video Audio Setup Channels Multimedia Menu Language Time Sleep Timer Day/Night Timer Set Password Parental Controls Closed Captions...

Owners Guide
Page 38
.... System Standby When the user turns off the TV, all devices with other compatible HDMI-interfaced Audio/Video equipment. Consult the instruction manuals for the device you can operate the CEC enabled device's deck control functions (i.e. Video Audio Setup Channels Multimedia Light Control Transparency 0 HDMI - Video Audio Setup Channels Multimedia Light Control Transparency 0 HDMI - CEC Input Labels Component Options RGB Options Reset AV & Setup Move SEL Select Return EXIT Exit 1. Play, Stop,Fast Forward and Rewind) by the TV's remote control's transport...
.... System Standby When the user turns off the TV, all devices with other compatible HDMI-interfaced Audio/Video equipment. Consult the instruction manuals for the device you can operate the CEC enabled device's deck control functions (i.e. Video Audio Setup Channels Multimedia Light Control Transparency 0 HDMI - Video Audio Setup Channels Multimedia Light Control Transparency 0 HDMI - CEC Input Labels Component Options RGB Options Reset AV & Setup Move SEL Select Return EXIT Exit 1. Play, Stop,Fast Forward and Rewind) by the TV's remote control's transport...

Owners Guide
Page 41
... Hitachi LCD television. Press the CURSOR down to List Channels Channel List Multimedia Channel Labels Favorite Channels Move SEL Select Return EXIT Exit 1. Video Source Air Audio Setup Signal Strength New Channel Scan Add Channels to change the channel label. 3. After the switch, analog-only television sets that you can navigate through your Favorite Channels. Using the remote control's cursor pad you can activate and set Slideshow options. 2. Ch 6-1 XETV-DT Move SEL Select Return EXIT Exit 1. Please review...
... Hitachi LCD television. Press the CURSOR down to List Channels Channel List Multimedia Channel Labels Favorite Channels Move SEL Select Return EXIT Exit 1. Video Source Air Audio Setup Signal Strength New Channel Scan Add Channels to change the channel label. 3. After the switch, analog-only television sets that you can navigate through your Favorite Channels. Using the remote control's cursor pad you can activate and set Slideshow options. 2. Ch 6-1 XETV-DT Move SEL Select Return EXIT Exit 1. Please review...

Owners Guide
Page 43
... ones. • Remove all obstructions from in "Video Menu". • Check if the batteries are working. • Unplug and connect the power cord again. If error persist or comes back even after pressing exit, try alternate HDMI input on TV. • Unplug and re-plug HDMI connection while TV and HDMI source device are powered on both the remote control and control panel do not work . Troubleshooting Symptom and Checklist SYMPTOM No picture - Turn TV on fi...
... ones. • Remove all obstructions from in "Video Menu". • Check if the batteries are working. • Unplug and connect the power cord again. If error persist or comes back even after pressing exit, try alternate HDMI input on TV. • Unplug and re-plug HDMI connection while TV and HDMI source device are powered on both the remote control and control panel do not work . Troubleshooting Symptom and Checklist SYMPTOM No picture - Turn TV on fi...
Owners Guide
Page 45
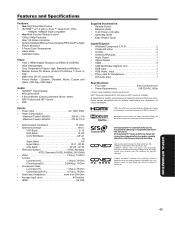
... AC Power cord cable • Operating Guide • Easy Graphic Guide Inputs/Outputs: • Wideband Component Y, Pb,Pr 2 • Composite Video 2 • S-Video 2 • Antenna (RF)Inputs 1 • Audio Output 1 • Optical Output 1 • HDMI 5 • USB Multimedia/ Upgrade Slot 1 • RGB Input 1 • RGB Audio Input 1 • Phono Jack for Headphones 1 • DVI Audio Input 1 Specifications: • FCC class B for Consumer Use • Power Requirements 108-132VAC, 60Hz 1 Screen mode availability varies by input format HDTV Televisions display...
... AC Power cord cable • Operating Guide • Easy Graphic Guide Inputs/Outputs: • Wideband Component Y, Pb,Pr 2 • Composite Video 2 • S-Video 2 • Antenna (RF)Inputs 1 • Audio Output 1 • Optical Output 1 • HDMI 5 • USB Multimedia/ Upgrade Slot 1 • RGB Input 1 • RGB Audio Input 1 • Phono Jack for Headphones 1 • DVI Audio Input 1 Specifications: • FCC class B for Consumer Use • Power Requirements 108-132VAC, 60Hz 1 Screen mode availability varies by input format HDTV Televisions display...
Owners Guide
Page 49
... no further force or effect. P B. H. Improper uncrating, set -up or warranty service support. J. L. Normal usage, degraded brightness caused by user-operated controls. The Product must be warranted for the remainder of this V .S T form and attach your sales receipt and retain them for parts, Hitachi will void all Hitachi products except: (i) 32-inch and smaller LCD Flat Panel Televisions; (ii) Products located outside the U.S.A. FURTHER, ALL IMPLIED...
... no further force or effect. P B. H. Improper uncrating, set -up or warranty service support. J. L. Normal usage, degraded brightness caused by user-operated controls. The Product must be warranted for the remainder of this V .S T form and attach your sales receipt and retain them for parts, Hitachi will void all Hitachi products except: (i) 32-inch and smaller LCD Flat Panel Televisions; (ii) Products located outside the U.S.A. FURTHER, ALL IMPLIED...
Owners Guide
Page 50
... its licensors, suppliers, parent companies, affiliates, subsidiaries, employees and agents shall not under this agreement, your DTV's serial number on a "No Further Upgrades" list, which the U.S. IF YOU DO NOT AGREE TO BE BOUND BY THIS LICENSE AGREEMENT, DO NOT USE THE DTV OR THE SOFTWARE. 1. HITACHI grants to you no warranties of a HITACHI brand digital television (the "DTV"), and...
... its licensors, suppliers, parent companies, affiliates, subsidiaries, employees and agents shall not under this agreement, your DTV's serial number on a "No Further Upgrades" list, which the U.S. IF YOU DO NOT AGREE TO BE BOUND BY THIS LICENSE AGREEMENT, DO NOT USE THE DTV OR THE SOFTWARE. 1. HITACHI grants to you no warranties of a HITACHI brand digital television (the "DTV"), and...


