
Owners Guide
Page 2
....Televisions are YOUR HITACHI LCD FLAT PANEL TELEVISION provided for the mast and supporting structure, grounding of the lead-in the vicinity of important operating and maintenance (servicing) instructions in accordance with the cart, stand, tripod, bracket, or table specified by the manufacturer. 17. apparatus. 11. REFER SERVICING TO QUALIFIED SERVICE PERSONNEL. LCD Flat Panel television. 1. A polarized plug has two system of the building, as close to notify you . Protect the power cord...
....Televisions are YOUR HITACHI LCD FLAT PANEL TELEVISION provided for the mast and supporting structure, grounding of the lead-in the vicinity of important operating and maintenance (servicing) instructions in accordance with the cart, stand, tripod, bracket, or table specified by the manufacturer. 17. apparatus. 11. REFER SERVICING TO QUALIFIED SERVICE PERSONNEL. LCD Flat Panel television. 1. A polarized plug has two system of the building, as close to notify you . Protect the power cord...
Owners Guide
Page 5
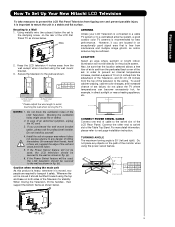
... Table Top Stand. In order to prevent an internal temperature increase, maintain a space of 10 cm (4 inches) from the sides/back of the Television, and 30 cm (12 inches) from the wall except when mounted using the top and base on the picture screen. Secure the television to a centralized antenna system, a good outdoor color TV antenna is moved, two people are located in . 30 cm (a) Power Swivel NOT USED (b) Power...
... Table Top Stand. In order to prevent an internal temperature increase, maintain a space of 10 cm (4 inches) from the sides/back of the Television, and 30 cm (12 inches) from the wall except when mounted using the top and base on the picture screen. Secure the television to a centralized antenna system, a good outdoor color TV antenna is moved, two people are located in . 30 cm (a) Power Swivel NOT USED (b) Power...
Owners Guide
Page 9
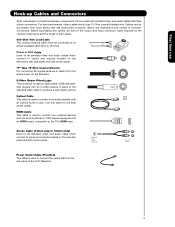
... use Hook-up Cables and Connectors Most video/audio connections between components can be sure of the output and input connector types required by the various components and the length of common connectors. Use this cable for the best sound quality. AUDIO OUT 3.8mm STEREO MINI-PLUG 2 RCA TYPE PLUGS Power Swivel Cable (Provided) This cable is used to 75-Ohm). "F" Type 75-Ohm Coaxial Antenna For connecting RF signals (antenna or cable TV) to the TV's HDMI input. Stereo Cable (3.8mm plug to 3.5mm plug) Used...
... use Hook-up Cables and Connectors Most video/audio connections between components can be sure of the output and input connector types required by the various components and the length of common connectors. Use this cable for the best sound quality. AUDIO OUT 3.8mm STEREO MINI-PLUG 2 RCA TYPE PLUGS Power Swivel Cable (Provided) This cable is used to 75-Ohm). "F" Type 75-Ohm Coaxial Antenna For connecting RF signals (antenna or cable TV) to the TV's HDMI input. Stereo Cable (3.8mm plug to 3.5mm plug) Used...
Owners Guide
Page 10
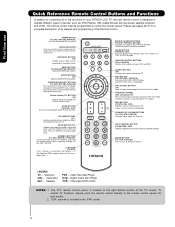
... channel. Video Recorder/Player DVD - Digital Video Disc Player VCR - MUTE BUTTON (TV) Reduces the audio level to 50% if pressed once, and to restore audio level. Television CBL - MODE INDICATOR Turns on or blinks to navigate through the the OSD, INPUTS. (-) BUTTON (TV,STB) The (-) button is used as , DVD Players, CBL (Cable Boxes), set-top-boxes, satellite receivers, and VCRs. GUIDE BUTTON (SAT/CBL, PVR) Accesses the program guide of the Universal Remote Control to operate different types of your HITACHI LCD TV, the new remote control is designed to control...
... channel. Video Recorder/Player DVD - Digital Video Disc Player VCR - MUTE BUTTON (TV) Reduces the audio level to 50% if pressed once, and to restore audio level. Television CBL - MODE INDICATOR Turns on or blinks to navigate through the the OSD, INPUTS. (-) BUTTON (TV,STB) The (-) button is used as , DVD Players, CBL (Cable Boxes), set-top-boxes, satellite receivers, and VCRs. GUIDE BUTTON (SAT/CBL, PVR) Accesses the program guide of the Universal Remote Control to operate different types of your HITACHI LCD TV, the new remote control is designed to control...
Owners Guide
Page 11
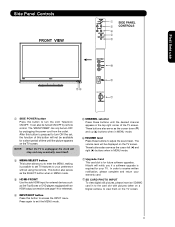
... MENU mode. ቧ VOLUME level Press these buttons to exit the MENU mode. ቦ CHANNEL selector Press these buttons until the picture appears on a Digital camera, to turn ON the set TV features to turn OFF by remote control. The "MAIN POWER" can also be turn the LCD Television ON/OFF. Press again to adjust the sound level. Side Panel Controls FRONT VIEW ቢ SIDE PANEL ቦ CONTROLS ቧ ብ ባ First time use ቪቩ ቫ ቤ PHOTO INPUT...
... MENU mode. ቧ VOLUME level Press these buttons to exit the MENU mode. ቦ CHANNEL selector Press these buttons until the picture appears on a Digital camera, to turn ON the set TV features to turn OFF by remote control. The "MAIN POWER" can also be turn the LCD Television ON/OFF. Press again to adjust the sound level. Side Panel Controls FRONT VIEW ቢ SIDE PANEL ቦ CONTROLS ቧ ብ ባ First time use ቪቩ ቫ ቤ PHOTO INPUT...
Owners Guide
Page 12
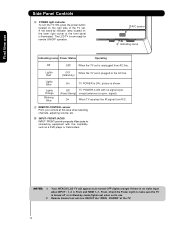
.... Remote Control can not turn the TV ON, press the power button located on the lower right corner of the TV. 12 The LCD TV is shown. Lights Red Lights Blue Lights Orange Blinking Blue OFF. picture is now ready for connecting equipment with no signal input (Power Saving) except antenna (no video input when INPUT : 1, 2, 3, Front and HDMI 1, 2 , Front. Off TV POWER is ON ; Your HITACHI LCD TV will appear to make sure the TV is turned off or in Stand-by...
.... Remote Control can not turn the TV ON, press the power button located on the lower right corner of the TV. 12 The LCD TV is shown. Lights Red Lights Blue Lights Orange Blinking Blue OFF. picture is now ready for connecting equipment with no signal input (Power Saving) except antenna (no video input when INPUT : 1, 2, 3, Front and HDMI 1, 2 , Front. Off TV POWER is ON ; Your HITACHI LCD TV will appear to make sure the TV is turned off or in Stand-by...
Owners Guide
Page 13
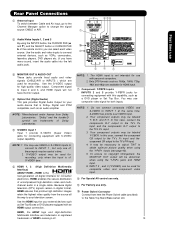
... multichannel audio in digital format, HDMI assures that is of S-VIDEO type. ቧ HDMI 1, 2 (High Definition Multimedia Interface) ABOUT HDMI - Because digital television (DTV) signals remain in a single cable. You may be abnormal, when using the Y-PBPR jacks and HDMI Input. 6. Rear Panel Connections ቢ Antenna Input To switch between Cable and Air input, go to the Channel Manager option to change the signal source CABLE or AIR. ቨ ቧ ቩ ቪቦ First time use ባ Audio/Video Inputs 1, 2 and 3 By using the INPUTS button...
... multichannel audio in digital format, HDMI assures that is of S-VIDEO type. ቧ HDMI 1, 2 (High Definition Multimedia Interface) ABOUT HDMI - Because digital television (DTV) signals remain in a single cable. You may be abnormal, when using the Y-PBPR jacks and HDMI Input. 6. Rear Panel Connections ቢ Antenna Input To switch between Cable and Air input, go to the Channel Manager option to change the signal source CABLE or AIR. ቨ ቧ ቩ ቪቦ First time use ባ Audio/Video Inputs 1, 2 and 3 By using the INPUTS button...
Owners Guide
Page 15
... owner's manual of the INPUT terminals, then press the INPUTS button to your choice. Use the CURSOR PAD (̆ and ̄) to side panel jacks. Completely insert connection cord plugs when connecting to select the Input of your LCD TV is dependent on the model and features of each component for the location of components and features. Note : For Monoaural devices, please connect Audio signal cable into L/Mon o input jack . If you use PHOTO INPUT OUTPUT R L Video Video Game...
... owner's manual of the INPUT terminals, then press the INPUTS button to your choice. Use the CURSOR PAD (̆ and ̄) to side panel jacks. Completely insert connection cord plugs when connecting to select the Input of your LCD TV is dependent on the model and features of each component for the location of components and features. Note : For Monoaural devices, please connect Audio signal cable into L/Mon o input jack . If you use PHOTO INPUT OUTPUT R L Video Video Game...
Owners Guide
Page 18
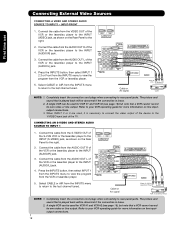
... INPUTS menu to view the program from the VCR or laserdisc player. 5. Completely insert the connection cord plugs when connecting to the INPUT (AUDIO/R) jack. 3. The picture and sound that is played back will be used , it is loose. 2. Connect the cable from the AUDIO OUT R of the TV . Connect the cable from the VIDEO OUT of the VCR or the laserdisc player to the Y/VIDEO input jack of the VCR or the laserdisc player to rear panel...
... INPUTS menu to view the program from the VCR or laserdisc player. 5. Completely insert the connection cord plugs when connecting to the INPUT (AUDIO/R) jack. 3. The picture and sound that is played back will be used , it is loose. 2. Connect the cable from the AUDIO OUT R of the TV . Connect the cable from the VIDEO OUT of the VCR or the laserdisc player to the Y/VIDEO input jack of the VCR or the laserdisc player to rear panel...
Owners Guide
Page 19
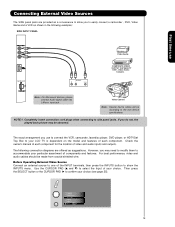
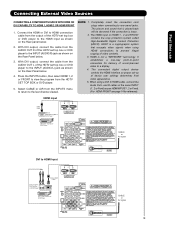
...HDMI input or HDMI Cable DIGITAL OUTPUT Back of HDTV Set-Top-Box or DVD Player HDTV Set-Top-Box or DVD Player CABLE or Air signal DVI to HDMI Input or DVI to the HDMI input as shown on the Rear Panel below . 4. First time use Connecting External Video Sources CONNECTING A COMPONENT SOURCE WITH HDMI OR DVI CAPABILITY TO HDMI 1, HDMI 2 OR HDMI FRONT 1. Connect the HDMI or DVI to HDMI connection cable from the output of the HDTV set top box or DVD player to view the program from the AUDIO OUT L of the HDTV set -up of HDTV OUTPUT Set-Top-Box L R or DVD Player DIGITAL OUTPUT HDTV...
...HDMI input or HDMI Cable DIGITAL OUTPUT Back of HDTV Set-Top-Box or DVD Player HDTV Set-Top-Box or DVD Player CABLE or Air signal DVI to HDMI Input or DVI to the HDMI input as shown on the Rear Panel below . 4. First time use Connecting External Video Sources CONNECTING A COMPONENT SOURCE WITH HDMI OR DVI CAPABILITY TO HDMI 1, HDMI 2 OR HDMI FRONT 1. Connect the HDMI or DVI to HDMI connection cable from the output of the HDTV set top box or DVD player to view the program from the AUDIO OUT L of the HDTV set -up of HDTV OUTPUT Set-Top-Box L R or DVD Player DIGITAL OUTPUT HDTV...
Owners Guide
Page 21
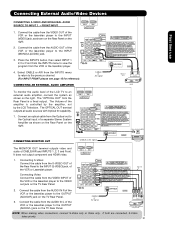
... both are connected, S-Video takes priority. 21 Connecting S-Video: Connect the cable from the S-VIDEO OUT of the VCR or Laserdisk player. It does not output component and HDMI video. 1. Connect the cable from the INPUTS menu to the INPUT (S-VIDEO) jack, of the Rear Panel to view the program from the Rear Panel is controlled by the amplifier, not by the LCD Television. Press the INPUTS button, then select INPUT 1 2,3 or Front from the AUDIO IN L of CABLE/AIR and INPUTS 1, 2, 3 and...
... both are connected, S-Video takes priority. 21 Connecting S-Video: Connect the cable from the S-VIDEO OUT of the VCR or Laserdisk player. It does not output component and HDMI video. 1. Connect the cable from the INPUTS menu to the INPUT (S-VIDEO) jack, of the Rear Panel to view the program from the Rear Panel is controlled by the amplifier, not by the LCD Television. Press the INPUTS button, then select INPUT 1 2,3 or Front from the AUDIO IN L of CABLE/AIR and INPUTS 1, 2, 3 and...

Owners Guide
Page 25
... the On-Screen Display. º EXIT button This button will exit all On-Screen Displays. ¾ INPUTS button When the remote control is connected to INPUT 3 Y-PBPR: 3 480i 3:17PM Input Signal Format Auto NOTE: 1. HDMI 1 Select to choose HDMI 2 INPUT. AIR/CABLE Select between Air or Cable signal. µ PICTURE-IN-PICTURE button See separate section on the TV screen when available. Press this button to access the INPUTS menu. HDMI 2 Select to choose HDMI 1 INPUT. Auto STEREO Closed Caption setting Audio Source Selection DIGITAL CHANNELS Digital Closed Caption This...
... the On-Screen Display. º EXIT button This button will exit all On-Screen Displays. ¾ INPUTS button When the remote control is connected to INPUT 3 Y-PBPR: 3 480i 3:17PM Input Signal Format Auto NOTE: 1. HDMI 1 Select to choose HDMI 2 INPUT. AIR/CABLE Select between Air or Cable signal. µ PICTURE-IN-PICTURE button See separate section on the TV screen when available. Press this button to access the INPUTS menu. HDMI 2 Select to choose HDMI 1 INPUT. Auto STEREO Closed Caption setting Audio Source Selection DIGITAL CHANNELS Digital Closed Caption This...

Owners Guide
Page 28
... mode. 28 Cable 6 Volume 8 Soft Mute 8 FAV Cable 6 The Remote Control Cable 6 Mute 8 Closed Captioning will display automatically when MUTE/SOFT MUTE is GREEN. You can add any channel to your Favorite channel list by (-) DASH (example 15-1). 19 RECORD button Press to 30 when the TV is turned on and Closed Caption is set to a level 30 or less, the volume level will default to record programs when the remote is in Favorite Channel mode...
... mode. 28 Cable 6 Volume 8 Soft Mute 8 FAV Cable 6 The Remote Control Cable 6 Mute 8 Closed Captioning will display automatically when MUTE/SOFT MUTE is GREEN. You can add any channel to your Favorite channel list by (-) DASH (example 15-1). 19 RECORD button Press to 30 when the TV is turned on and Closed Caption is set to a level 30 or less, the volume level will default to record programs when the remote is in Favorite Channel mode...
Owners Guide
Page 32
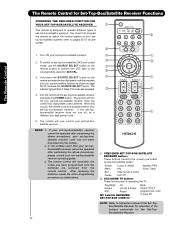
... digit preset code that your set-topbox/satellite receiver cannot be operated after performing the above procedures, please consult your set -top-box/ satellite receiver code has not been precoded into the remote. 2. The indicator light will turn off your set -top-box/satellite codes : -Power -Cursor & Select -Number PAD -Menu -Exit -Info -Enter, Dash -Channel Up & Down -Guide -Last CH ባ EXCLUSIVE TV buttons These buttons are removed from the remote control. Turn ON your set-top-box...
... digit preset code that your set-topbox/satellite receiver cannot be operated after performing the above procedures, please consult your set -top-box/ satellite receiver code has not been precoded into the remote. 2. The indicator light will turn off your set -top-box/satellite codes : -Power -Cursor & Select -Number PAD -Menu -Exit -Info -Enter, Dash -Channel Up & Down -Guide -Last CH ባ EXCLUSIVE TV buttons These buttons are removed from the remote control. Turn ON your set-top-box...
Owners Guide
Page 39
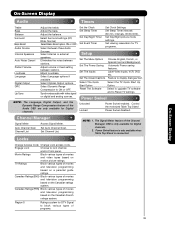
... picture mode settings. Channel Manager Signal Meter Auto Channel Scan Channel List Access Signal Meter. The Signal Meter feature of movies and television programming based on the Canadian French ratings system. Adjust the bass. Select between three Audio Sources. Set Channel List. Change Access Code Change Lock access code. Select Dynamic Range Compression to lock channel, and/or Front panel. TV Ratings Block various types of the Channel Manager OSD is connected. On-Screen Display On-Screen Display Audio Timers Treble Bass Balance Surround Bass Boost Audio Source...
... picture mode settings. Channel Manager Signal Meter Auto Channel Scan Channel List Access Signal Meter. The Signal Meter feature of movies and television programming based on the Canadian French ratings system. Adjust the bass. Select between three Audio Sources. Set Channel List. Change Access Code Change Lock access code. Select Dynamic Range Compression to lock channel, and/or Front panel. TV Ratings Block various types of the Channel Manager OSD is connected. On-Screen Display On-Screen Display Audio Timers Treble Bass Balance Surround Bass Boost Audio Source...
Owners Guide
Page 41
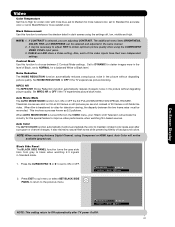
... color, set to Standard for accurate color or set to the previous menu. Black Enhancement Use this special feature to black when watching 4:3 signals in the picture without degrading picture quality. It may be reconciled. When film is turned ON from gray to improve video performance when watching film based sources. Auto Color The AUTO COLOR function automatically monitors and adjusts the color to video for television viewing, the disparity between 2 Contrast Mode settings. NOTE: When receiving Antenna Digital Channel, using Component or HDMI input, Auto Color...
... color, set to Standard for accurate color or set to the previous menu. Black Enhancement Use this special feature to black when watching 4:3 signals in the picture without degrading picture quality. It may be reconciled. When film is turned ON from gray to improve video performance when watching film based sources. Auto Color The AUTO COLOR function automatically monitors and adjusts the color to video for television viewing, the disparity between 2 Contrast Mode settings. NOTE: When receiving Antenna Digital Channel, using Component or HDMI input, Auto Color...
Owners Guide
Page 47
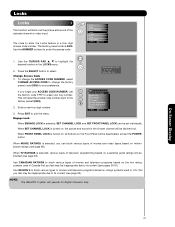
..., various types of movies and television programs based on , the picture and sound for Digital Channels only. Use the NUMBER buttons to block various types of the selected channel or video input. When SET CHANNEL LOCK is a four digit access code number. OR 2. Please Enter Access Code Access Code - - - [#Keys] Enter Code If you can be blocked out. The code to erase your ACCESS CODE NUMBER, use 0 Locks Change Access Code the factory code 7777 to enter the Locks feature is turned on the two rating systems used in the LOCKS menu. When...
..., various types of movies and television programs based on , the picture and sound for Digital Channels only. Use the NUMBER buttons to block various types of the selected channel or video input. When SET CHANNEL LOCK is a four digit access code number. OR 2. Please Enter Access Code Access Code - - - [#Keys] Enter Code If you can be blocked out. The code to erase your ACCESS CODE NUMBER, use 0 Locks Change Access Code the factory code 7777 to enter the Locks feature is turned on the two rating systems used in the LOCKS menu. When...
Owners Guide
Page 60
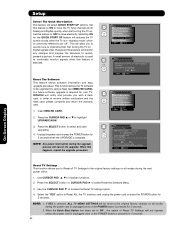
... TV MENU SETTINGS will cancel the upgrade. Use CURSOR PAD ̆, ̄ to access the Reset TV settings option. 4. Digital signals often change and this feature to OFF to save electricity Off On Move SEL Select Setup Setup The Menu Options Set The Power Saving Set The Inputs Set The Closed Captions Select The Quick Start Option Reset The Software Move SEL Select Setup Reset The Software OR MMC Software Upgrade : Vxxxx.xxxx Upgrade Now Please Insert MMC card before upgrading. Reset TV Settings No...
... TV MENU SETTINGS will cancel the upgrade. Use CURSOR PAD ̆, ̄ to access the Reset TV settings option. 4. Digital signals often change and this feature to OFF to save electricity Off On Move SEL Select Setup Setup The Menu Options Set The Power Saving Set The Inputs Set The Closed Captions Select The Quick Start Option Reset The Software Move SEL Select Setup Reset The Software OR MMC Software Upgrade : Vxxxx.xxxx Upgrade Now Please Insert MMC card before upgrading. Reset TV Settings No...
Owners Guide
Page 137
... Division ("HITACHI"). By using the DTV or the digital television software installed on the DTV, subject to the following limitations and restrictions: a. You specifically agree not to export or reexport the Software: (i) to any patents, copyrights, trademarks, trade secrets or other software or intellectual property HITACHI may release or make derivative works from any Upgrade (as the owner of substitute goods or services; In...
... Division ("HITACHI"). By using the DTV or the digital television software installed on the DTV, subject to the following limitations and restrictions: a. You specifically agree not to export or reexport the Software: (i) to any patents, copyrights, trademarks, trade secrets or other software or intellectual property HITACHI may release or make derivative works from any Upgrade (as the owner of substitute goods or services; In...
Owners Guide
Page 148
... External Video Source 14-21 R Remote Control Functions 10, 22-35 Programming Codes 36-37 Installing Batteries 4 S Setup 56-60 Sharpness 40 Spanish Section 69-136 Speakers Connecting External Speakers 44 Internal 44 Surround 43 Specifications 65 F Features 65 Favorite Channel 28 H HDMI 11, 13, 14, 19 I Input Setup 25, 58 T Timers 53-55 Tint 40 Treble 43 Troubleshooting 62 V Video Settings 40-42 L Language Menu Language 56 Lip Sync 44 Locks Change Access Code 47 Channel Lock 47 Front Panel Lock...
... External Video Source 14-21 R Remote Control Functions 10, 22-35 Programming Codes 36-37 Installing Batteries 4 S Setup 56-60 Sharpness 40 Spanish Section 69-136 Speakers Connecting External Speakers 44 Internal 44 Surround 43 Specifications 65 F Features 65 Favorite Channel 28 H HDMI 11, 13, 14, 19 I Input Setup 25, 58 T Timers 53-55 Tint 40 Treble 43 Troubleshooting 62 V Video Settings 40-42 L Language Menu Language 56 Lip Sync 44 Locks Change Access Code 47 Channel Lock 47 Front Panel Lock...


