Owners Guide
Page 3
...the FCC rules. NOTE INDUSTRY CANADA AGENCY REGULATORY INFORMATION Cable Compatible Television Apparatus- This LCD Television receiver will not occur in a residential installation. This product incorporates copyright protection...blocompatible, Canada. Public viewing of copyrighted material Public viewing of programs broadcast by Hitachi Home Electronics (America), Inc, may require prior authorization from that are supplied with...15 of the FCC Rules. Any cables that are not expressly approved by TV stations and cable companies, as well as replacement cables. Lead/Mercury Notice...
...the FCC rules. NOTE INDUSTRY CANADA AGENCY REGULATORY INFORMATION Cable Compatible Television Apparatus- This LCD Television receiver will not occur in a residential installation. This product incorporates copyright protection...blocompatible, Canada. Public viewing of copyrighted material Public viewing of programs broadcast by Hitachi Home Electronics (America), Inc, may require prior authorization from that are supplied with...15 of the FCC Rules. Any cables that are not expressly approved by TV stations and cable companies, as well as replacement cables. Lead/Mercury Notice...
Owners Guide
Page 6
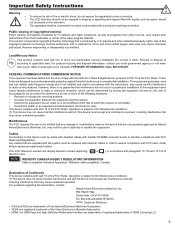
...resulting in leakage. • Never mix used for L42A403 & L32A403 IMPORTANT SAFETY INSTRUCTIONS 2-5 FIRST TIME U SE ...6-17 THE REMOTE CONTROL 18-21 ON-SCREEN D ISPLAY 22-34 USEFUL I NFORMATION 3 5-41 LIMITED WARRANTY ...42 END USER L ICENSE A GREEMENT FOR HITACHI DTV SOFTWARE 4 3-48 APPENDIXES ...49 INDEX ...... RBG Side Controls www.hitachi.us /tv CAUTION • Ceiling mounting is not going to be used and new batteries in the device. • Replace all the batteries in this Operating Guide and please visit www.dtvtransition.org Alpha Series LCD Flat Panel HDTV Operating ...
...resulting in leakage. • Never mix used for L42A403 & L32A403 IMPORTANT SAFETY INSTRUCTIONS 2-5 FIRST TIME U SE ...6-17 THE REMOTE CONTROL 18-21 ON-SCREEN D ISPLAY 22-34 USEFUL I NFORMATION 3 5-41 LIMITED WARRANTY ...42 END USER L ICENSE A GREEMENT FOR HITACHI DTV SOFTWARE 4 3-48 APPENDIXES ...49 INDEX ...... RBG Side Controls www.hitachi.us /tv CAUTION • Ceiling mounting is not going to be used and new batteries in the device. • Replace all the batteries in this Operating Guide and please visit www.dtvtransition.org Alpha Series LCD Flat Panel HDTV Operating ...
Owners Guide
Page 7
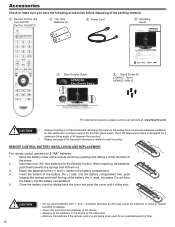
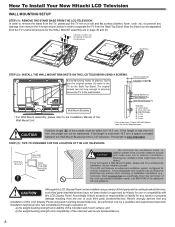
...corners, then support the top frame as shown below . Keep the LCD television 4 inches away from the wall, except when mounted using the top and base on both sides of the Television for example, in . 42" 10 cm. 7 Place the TV unit face down on a soft and flat surface covered by yourself...AC cord and contact 800-HITACHI. • If you purchased a wall mount bracket, please ask for example their hands, head or face, etc.) against the edge of the unit that the location selected allows a free flow of air to the LCD TV. 2. Located on the back of the TV there is moved, at...
...corners, then support the top frame as shown below . Keep the LCD television 4 inches away from the wall, except when mounted using the top and base on both sides of the Television for example, in . 42" 10 cm. 7 Place the TV unit face down on a soft and flat surface covered by yourself...AC cord and contact 800-HITACHI. • If you purchased a wall mount bracket, please ask for example their hands, head or face, etc.) against the edge of the unit that the location selected allows a free flow of air to the LCD TV. 2. Located on the back of the TV there is moved, at...
Owners Guide
Page 8
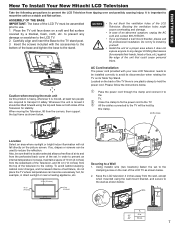
...and guidance. This length is very important. Call 800-HITACHI for any injuries or property damage resulting from the TV, please put the TV set on a soft and flat surface (blanket, foam, cloth, etc.) to prevent any installation of this LCD Display Panel using a variety of third party wall ... of the screws must be installed using wall mounting brackets/devices be separated from the TV. How To Install Your New Hitachi LCD Television WALL MOUNTING SETUP STEP (1) : REMOVE THE STAND BASE FROM THE LCD TELEVISION In order to remove the stand from the use of such third party brackets/...
...and guidance. This length is very important. Call 800-HITACHI for any injuries or property damage resulting from the TV, please put the TV set on a soft and flat surface (blanket, foam, cloth, etc.) to prevent any installation of this LCD Display Panel using a variety of third party wall ... of the screws must be installed using wall mounting brackets/devices be separated from the TV. How To Install Your New Hitachi LCD Television WALL MOUNTING SETUP STEP (1) : REMOVE THE STAND BASE FROM THE LCD TELEVISION In order to remove the stand from the use of such third party brackets/...
Owners Guide
Page 9
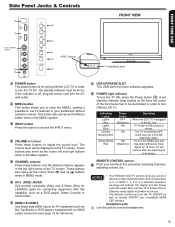
...(SIDE) JACKS AV2 provide composite Video and S-Video (Only for L42A403) jacks for connecting equipment with an HDMI output connection (see page 14 for turning ON the LCD TV, in the MENU system. A red stand-by ) state. The TV is ON; The volume level will resume after the input signal ...adjusting volume, etc. It will soon be displayed on the lower left and right buttons when in the Menu system. NOTES • Your HITACHI LCD TV will remain Blue until the desired channel appears in order to connect headphones. 9 Instead a message will indicate "No Signal" and the Power ...
...(SIDE) JACKS AV2 provide composite Video and S-Video (Only for L42A403) jacks for connecting equipment with an HDMI output connection (see page 14 for turning ON the LCD TV, in the MENU system. A red stand-by ) state. The TV is ON; The volume level will resume after the input signal ...adjusting volume, etc. It will soon be displayed on the lower left and right buttons when in the Menu system. NOTES • Your HITACHI LCD TV will remain Blue until the desired channel appears in order to connect headphones. 9 Instead a message will indicate "No Signal" and the Power ...
Owners Guide
Page 10
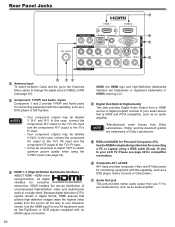
...to change the signal source CABLE or AIR (see page 24). In this case, connect the component Cb output to the TV's Pb input and the component CR output to the TV's Pr input. • It may be necessary to adjust TINT to obtain optimum picture quality when using a RGB cable ... is RAW and PCM compatible, such as an audio amplifier. Digital Out (Optical Digital Audio) This jack provides Digital Audio Output from your TV to your LCD TV. Composite AV1 JACKS AV1 input provides composite Video and S-Video jacks for connecting equipment with this capability, such as Set-Top-Boxes or DVD...
...to change the signal source CABLE or AIR (see page 24). In this case, connect the component Cb output to the TV's Pb input and the component CR output to the TV's Pr input. • It may be necessary to adjust TINT to obtain optimum picture quality when using a RGB cable ... is RAW and PCM compatible, such as an audio amplifier. Digital Out (Optical Digital Audio) This jack provides Digital Audio Output from your TV to your LCD TV. Composite AV1 JACKS AV1 input provides composite Video and S-Video jacks for connecting equipment with this capability, such as Set-Top-Boxes or DVD...
Owners Guide
Page 11
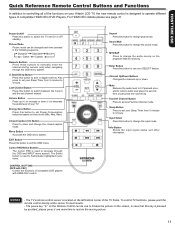
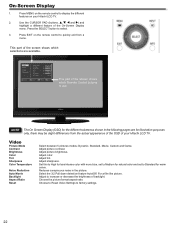
... Channel Button Press to change the input mode. Sleep Button Press to set Power Consumption reduction based on the left bottom corner of the TV frame. The TV's remote control sensor is located on three levels (Min, Med, Max). Energy Save Button Press this button to use to Freeze the...SELECT feature. Info Button Shows the input signal status and other information. Volume Button Press up or down (-) to decrease the audio level of your Hitachi LCD TV, the new remote control is pressed by accident, please press it a second time or just press the volume key. MTS/SAP Press to change ...
... Channel Button Press to change the input mode. Sleep Button Press to set Power Consumption reduction based on the left bottom corner of the TV frame. The TV's remote control sensor is located on three levels (Min, Med, Max). Energy Save Button Press this button to use to Freeze the...SELECT feature. Info Button Shows the input signal status and other information. Volume Button Press up or down (-) to decrease the audio level of your Hitachi LCD TV, the new remote control is pressed by accident, please press it a second time or just press the volume key. MTS/SAP Press to change ...
Owners Guide
Page 12
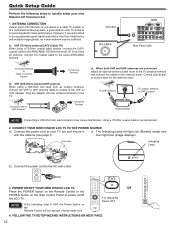
... When both VHF and UHF antennas are located in an exceptionally good signal area that is recommended for the antenna mixer. CONNECT YOUR NEW HITACHI LCD TV TO THE POWER SOURCE a). AC Wire Clamp Indicating Lamp POWER b). NOTE If the Indicating lamp is recommended. 2. The Indicating Lamp will...Button on the Remote Control will light red (Standby mode) and with the cable tie (see page 7) . POWER ON/OFF YOUR NEW HITACHI LCD TV. Please make sure or For Stand-By Power OFF 4. then light blue (image displays). Or if you are connected Attach an optional antenna...
... When both VHF and UHF antennas are located in an exceptionally good signal area that is recommended for the antenna mixer. CONNECT YOUR NEW HITACHI LCD TV TO THE POWER SOURCE a). AC Wire Clamp Indicating Lamp POWER b). NOTE If the Indicating lamp is recommended. 2. The Indicating Lamp will...Button on the Remote Control will light red (Standby mode) and with the cable tie (see page 7) . POWER ON/OFF YOUR NEW HITACHI LCD TV. Please make sure or For Stand-By Power OFF 4. then light blue (image displays). Or if you are connected Attach an optional antenna...
Owners Guide
Page 13
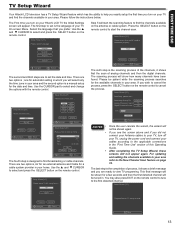
... and time ... Press the SELECT button on the remote control to help you easily setup the first time you turn on your TV and find the channels available on your Hitachi LCD TV the Initial Settings screen will show how many channels have been found. There are two options ; The First time you turn...
... and time ... Press the SELECT button on the remote control to help you easily setup the first time you turn on your TV and find the channels available on your Hitachi LCD TV the Initial Settings screen will show how many channels have been found. There are two options ; The First time you turn...
Owners Guide
Page 14
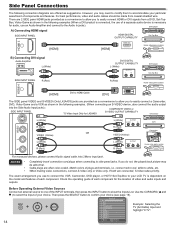
... connecting an S-VIDEO device, also connect the audio output into the Side Audio Input jacks).: COMPOSITE VIDEO or SIDE INPUT PANEL *S-Video Input Only for L42A403 S-VIDEO OUTPUT CAPABILITY DVD player L (White) R (Red) VIDEO (Yellow) L (White) OUTPUT S-VIDEO L R VCR R (Red) Camcorder OR VIDEO (Yellow) L (White) R (Red)...DVI product is connected, the use to connect the VCR, Camcorder, DVD player, or HDTV Set-Top-Box to accommodate your LCD TV is necessary for the location of each component for audio, use an Audio Amplifier and connect to HDMI Cable DVI DIGITAL OUTPUT ...
... connecting an S-VIDEO device, also connect the audio output into the Side Audio Input jacks).: COMPOSITE VIDEO or SIDE INPUT PANEL *S-Video Input Only for L42A403 S-VIDEO OUTPUT CAPABILITY DVD player L (White) R (Red) VIDEO (Yellow) L (White) OUTPUT S-VIDEO L R VCR R (Red) Camcorder OR VIDEO (Yellow) L (White) R (Red)...DVI product is connected, the use to connect the VCR, Camcorder, DVD player, or HDTV Set-Top-Box to accommodate your LCD TV is necessary for the location of each component for audio, use an Audio Amplifier and connect to HDMI Cable DVI DIGITAL OUTPUT ...
Owners Guide
Page 17
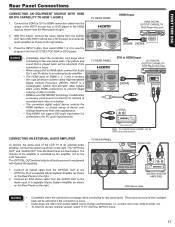
... audio amplifier, connect the system as shown on the right. Connect an RCA stereo cable from the AUDIO OUT to the Audio input of the LCD TV to from the AUDIO OUT jack of the HDTV set top box or DVD player to the HDMI input as shown to the PC audio... the connection is loose. • When using HDMI connections to view the program from the Rear Panel is controlled by the amplifier, not by the LCD Television. The "OPTICAL OUT" and "AUDIO OUT" from the HDTV SET-TOP symbol are trademarks of plugs and terminals, i.e.
... audio amplifier, connect the system as shown on the right. Connect an RCA stereo cable from the AUDIO OUT to the Audio input of the LCD TV to from the AUDIO OUT jack of the HDTV set top box or DVD player to the HDMI input as shown to the PC audio... the connection is loose. • When using HDMI connections to view the program from the Rear Panel is controlled by the amplifier, not by the LCD Television. The "OPTICAL OUT" and "AUDIO OUT" from the HDTV SET-TOP symbol are trademarks of plugs and terminals, i.e.
Owners Guide
Page 22
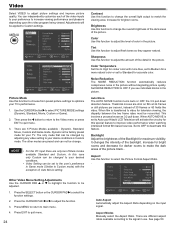
... remote control to display the different features on the remote control to use. Press the SELECT button to factory settings. 22 Press EXIT on your Hitachi LCD TV. NOTE The On Screen Display (OSD) for the different submenus shown in the picture. Adjust tint. For a film like picture. Video Audio Setup Channels ... or decrease the brightness of the screen shows which Remote Control buttons to quickly exit from the actual appearance of the OSD of your Hitachi LCD TV. 2. Adjust to Standard for illustration purposes only, there may be slight differences from a menu.
... remote control to display the different features on the remote control to use. Press the SELECT button to factory settings. 22 Press EXIT on your Hitachi LCD TV. NOTE The On Screen Display (OSD) for the different submenus shown in the picture. Adjust tint. For a film like picture. Video Audio Setup Channels ... or decrease the brightness of the screen shows which Remote Control buttons to quickly exit from the actual appearance of the OSD of your Hitachi LCD TV. 2. Adjust to Standard for illustration purposes only, there may be slight differences from a menu.
Owners Guide
Page 24
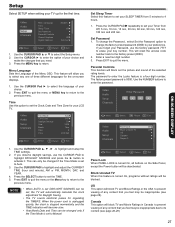
... OFF the 3:2 pull down . When AUTO MOVIE is set to match the viewing area. Increase for bright rooms and decrease for your Hitachi LCD Television will be change. There are preset and can be reconciled. Increase for cooler color with the exception of fine detail in the picture...Move SEL Select Return EXIT Exit Video Audio Setup Channels Picture Mode Contrast Brightness Color Tint Sharpness Color temp. In this function to your TV's performance. 1. Set NOISE REDUCTION to OFF if you see individual blocks in Game mode (Similar to Custom mode) with more natural color...
... OFF the 3:2 pull down . When AUTO MOVIE is set to match the viewing area. Increase for bright rooms and decrease for your Hitachi LCD Television will be change. There are preset and can be reconciled. Increase for cooler color with the exception of fine detail in the picture...Move SEL Select Return EXIT Exit Video Audio Setup Channels Picture Mode Contrast Brightness Color Tint Sharpness Color temp. In this function to your TV's performance. 1. Set NOISE REDUCTION to OFF if you see individual blocks in Game mode (Similar to Custom mode) with more natural color...

Owners Guide
Page 26
...two speaker, eliminating the need for every seat in the same manner. Audio Menu Settings Adjustment 1. Select this feature if the TV is useful when using the internal speakers only. Internal Speakers This function is connected to select STEREO (a stereo broadcast), MONO (monaural... for analog programing. Balance This function will return to select Yes or No. 3. This setting changes the format of the LCD TV internal speakers and headphone jack. This is adjusting audio levels at your preference to the type of the listener. Press the CURSOR...
...two speaker, eliminating the need for every seat in the same manner. Audio Menu Settings Adjustment 1. Select this feature if the TV is useful when using the internal speakers only. Internal Speakers This function is connected to select STEREO (a stereo broadcast), MONO (monaural... for analog programing. Balance This function will return to select Yes or No. 3. This setting changes the format of the LCD TV internal speakers and headphone jack. This is adjusting audio levels at your preference to the type of the listener. Press the CURSOR...
Owners Guide
Page 27
... any content that you forget your Password, use the CURSOR PAD to highlight DAYLIGHT SAVINGS and press the ► button to your LCD TV. This can be set, the TV will be changed if the Time Mode is turned On, all buttons on -screen displays. 1. Enter a new four digit number.... Channels Region 5 Move SEL Select Return EXIT Exit Panel Lock When PANEL LOCK is set your Timer from 5 minutes to Auto. 3. Block Unrated TV When this feature to set to 4 hours. 1. Setup Select SETUP when setting your choice. 2. Video Audio Setup Channels Menu Language Time Sleep Timer...
... any content that you forget your Password, use the CURSOR PAD to highlight DAYLIGHT SAVINGS and press the ► button to your LCD TV. This can be set, the TV will be changed if the Time Mode is turned On, all buttons on -screen displays. 1. Enter a new four digit number.... Channels Region 5 Move SEL Select Return EXIT Exit Panel Lock When PANEL LOCK is set your Timer from 5 minutes to Auto. 3. Block Unrated TV When this feature to set to 4 hours. 1. Setup Select SETUP when setting your choice. 2. Video Audio Setup Channels Menu Language Time Sleep Timer...
Owners Guide
Page 30
... highlight and select the function to highlight Energy Options. 2. Closed Caption are for 3 hours, please choose On or Off to select your Hitachi LCD TV. Press the CURSOR PAD ▲ or ▼ to change the transparency of this feature. TEXT1, etc. : These are available when ... Audio Setup Channels Energy Options Transparency 0 HDMI - on when Mute is not possible. This information covers the entire screen and viewing the TV program is on screen. • Digital Captions language will help choose and set font, size, color and background style of a television...
... highlight and select the function to highlight Energy Options. 2. Closed Caption are for 3 hours, please choose On or Off to select your Hitachi LCD TV. Press the CURSOR PAD ▲ or ▼ to change the transparency of this feature. TEXT1, etc. : These are available when ... Audio Setup Channels Energy Options Transparency 0 HDMI - on when Mute is not possible. This information covers the entire screen and viewing the TV program is on screen. • Digital Captions language will help choose and set font, size, color and background style of a television...
Owners Guide
Page 31
...-CEC signal bus to allow your Hitachi LCD TV to , will become the active System Standby input source for the TV. Video Audio Setup Channels Energy Options Transparency 0 HDMI - ON-SCREEN DISPLAY Video CEC Enable On Audio Device Auto Off On TV Auto On On Setup Channels Video ... the phase between your AV system. Video Audio Setup Channels Energy Options Transparency 0 HDMI - Play, Stop,Fast Forward and Rewind) by the TV's remote control's transport keys (ie. Æ,Ê,7 and 8). Component Options This function allows you are two common functions when HDMI CEC is...
...-CEC signal bus to allow your Hitachi LCD TV to , will become the active System Standby input source for the TV. Video Audio Setup Channels Energy Options Transparency 0 HDMI - ON-SCREEN DISPLAY Video CEC Enable On Audio Device Auto Off On TV Auto On On Setup Channels Video ... the phase between your AV system. Video Audio Setup Channels Energy Options Transparency 0 HDMI - Play, Stop,Fast Forward and Rewind) by the TV's remote control's transport keys (ie. Æ,Ê,7 and 8). Component Options This function allows you are two common functions when HDMI CEC is...

Owners Guide
Page 32
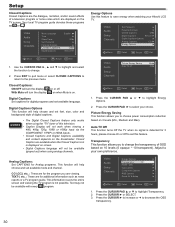
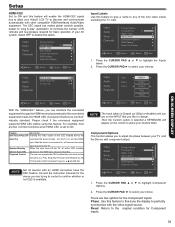
Setup RGB Options This function is to adjust the RGB input to select your LCD Television. Press the CURSOR PAD ► to match your PC or laptop output with your choices. CEC Input Labels Component Options RGB Options Reset ... Setup Channels Energy Options Transparency 0 HDMI - Reset AV & Setup This feature restores all Audio, Video and Setup configuration that you have made on the TV and it will be restored to the factory settings. V-Position Adjusts the display position vertically. Clock Minimizes vertical stripes on horizontal row. H-position, V-Position,...
Setup RGB Options This function is to adjust the RGB input to select your LCD Television. Press the CURSOR PAD ► to match your PC or laptop output with your choices. CEC Input Labels Component Options RGB Options Reset ... Setup Channels Energy Options Transparency 0 HDMI - Reset AV & Setup This feature restores all Audio, Video and Setup configuration that you have made on the TV and it will be restored to the factory settings. V-Position Adjusts the display position vertically. Clock Minimizes vertical stripes on horizontal row. H-position, V-Position,...
Owners Guide
Page 35
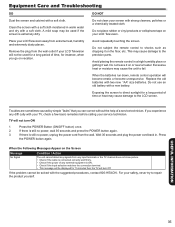
...not subject the remote control to the precision parts. USEFUL INFORMATION 35 Do not use an old battery with the suggested procedures, contact 800-HITACHI. Troubles are sometimes caused by simple "faults" that you can correct without the help of time or heat may cause damage to shocks... such as dropping it on vacation. Clean the screen with your TV, check a few basic remedies before calling your LCD Television. This may cause damage to direct sunlight for a long period of a service technician. Replace the old batteries with...
...not subject the remote control to the precision parts. USEFUL INFORMATION 35 Do not use an old battery with the suggested procedures, contact 800-HITACHI. Troubles are sometimes caused by simple "faults" that you can correct without the help of time or heat may cause damage to shocks... such as dropping it on vacation. Clean the screen with your TV, check a few basic remedies before calling your LCD Television. This may cause damage to direct sunlight for a long period of a service technician. Replace the old batteries with...


