Owners Guide
Page 9
... also serve as turning ON/OFF any picture if there is no video input when AV1, AV2, Component1 or 2, or HDMI 1, 2, 3 or 4 is in MENU mode. POWER light indicator To turn ON the LCD TV. picture is powering OFF. TV is selected. Instead a message will indicate "No Signal" and the... channels, adjusting volume, etc. HDMI-3 & HDMI-4 Use these buttons to turn the TV ON, press the Power button ( ). NOTES • Your HITACHI LCD TV will be lit red. Headphone jack s Use this capability, such as Set-Top-Boxes or DVD players equipped with this jack to the AC line. This button ...
... also serve as turning ON/OFF any picture if there is no video input when AV1, AV2, Component1 or 2, or HDMI 1, 2, 3 or 4 is in MENU mode. POWER light indicator To turn ON the LCD TV. picture is powering OFF. TV is selected. Instead a message will indicate "No Signal" and the... channels, adjusting volume, etc. HDMI-3 & HDMI-4 Use these buttons to turn the TV ON, press the Power button ( ). NOTES • Your HITACHI LCD TV will be lit red. Headphone jack s Use this capability, such as Set-Top-Boxes or DVD players equipped with this jack to the AC line. This button ...
Owners Guide
Page 10
...DTV) signals remain in a single cable. Composite AV1 JACKS AV1 input provides composite Video and S-Video jacks for your LCD TV. In this case, connect the components B-Y output to the TV's Pb input and the components R-Y output to the TV's Pr input. • It may be labeled Y-CbCr. In this case, ...your audio device, such as an audio amplifier. Use the HDMI input for connecting equipment with this capability, such as a DVD player or Set Top Box. "Dolby" and the double-D symbol are trademarks of Dolby Laboratories RGB and AUDIO for Personal Computers (PC) Use the RGB...
...DTV) signals remain in a single cable. Composite AV1 JACKS AV1 input provides composite Video and S-Video jacks for your LCD TV. In this case, connect the components B-Y output to the TV's Pb input and the components R-Y output to the TV's Pr input. • It may be labeled Y-CbCr. In this case, ...your audio device, such as an audio amplifier. Use the HDMI input for connecting equipment with this capability, such as a DVD player or Set Top Box. "Dolby" and the double-D symbol are trademarks of Dolby Laboratories RGB and AUDIO for Personal Computers (PC) Use the RGB...
Owners Guide
Page 14
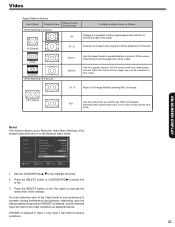
... one of plugs and terminals, i.e. Before Operating External Video Sources Connect an external source to accommodate your choice. Component1 4. HDMI 2 8. Then press the SELECT button to confirm your LCD TV is necessary for audio, use to connect the VCR, Camcorder, DVD player, or HDTV Set-Top-Box to easily connect HDMI or DVI signals...
... one of plugs and terminals, i.e. Before Operating External Video Sources Connect an external source to accommodate your choice. Component1 4. HDMI 2 8. Then press the SELECT button to confirm your LCD TV is necessary for audio, use to connect the VCR, Camcorder, DVD player, or HDTV Set-Top-Box to easily connect HDMI or DVI signals...
Owners Guide
Page 15
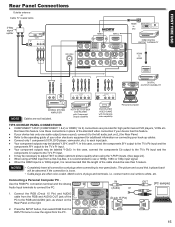
...et le sigle double D sont des marques commerciales de Dolby Laboratories. FIRST TIME USE Rear Panel Connections Outside antenna or Cable TV coaxial cable 2-Way signal splitter VCR ANT IN V LR RGB RGB HDMI to DVI DIGITAL OUTPUT AUDIO OUT HDMI DIGITAL OUTPUT.... ♦♦ Connect only 1 component (VCR, DVD player, camcorder, etc.) to connect the PC. HDTV SET-TOP BOX DVD PLAYER with Component Output capability DVD PLAYER VIDEO GAME with Composite video capability Personal Computer TIPS ON REAR PANEL CONNECTIONS ♦♦ COMPONENT Y-PbPr (COMPONENT 1 & 2) or HDMI (1...
...et le sigle double D sont des marques commerciales de Dolby Laboratories. FIRST TIME USE Rear Panel Connections Outside antenna or Cable TV coaxial cable 2-Way signal splitter VCR ANT IN V LR RGB RGB HDMI to DVI DIGITAL OUTPUT AUDIO OUT HDMI DIGITAL OUTPUT.... ♦♦ Connect only 1 component (VCR, DVD player, camcorder, etc.) to connect the PC. HDTV SET-TOP BOX DVD PLAYER with Component Output capability DVD PLAYER VIDEO GAME with Composite video capability Personal Computer TIPS ON REAR PANEL CONNECTIONS ♦♦ COMPONENT Y-PbPr (COMPONENT 1 & 2) or HDMI (1...
Owners Guide
Page 16
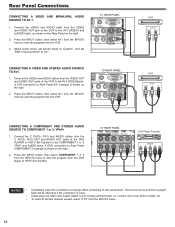
...DVD player or HDTV Set-Top Box. The picture and sound that is played back will be abnormal if the connection is shown on the right. 2. connect red to red, white to white, etc. • To return to the last channel viewed, select "0.TV" from the VIDEO and AUDIO OUT ...and set "SRS Trusurround HD" to view the program from the VCR. 3. Connect the VIDEO and AUDIO cables from the Y, Pb/Cb, Pr/Cr OUT and AUDIO OUT jacks of plugs and terminals, i.e. TV REAR PANEL RGB TV REAR PANEL RGB RGB (Yellow) (White) (Red) RGB (White) (Yellow) VCR OUTPUT AUDIO VIDEO VCR OUTPUT VIDEO L ...
...DVD player or HDTV Set-Top Box. The picture and sound that is played back will be abnormal if the connection is shown on the right. 2. connect red to red, white to white, etc. • To return to the last channel viewed, select "0.TV" from the VIDEO and AUDIO OUT ...and set "SRS Trusurround HD" to view the program from the VCR. 3. Connect the VIDEO and AUDIO cables from the Y, Pb/Cb, Pr/Cr OUT and AUDIO OUT jacks of plugs and terminals, i.e. TV REAR PANEL RGB TV REAR PANEL RGB RGB (Yellow) (White) (Red) RGB (White) (Yellow) VCR OUTPUT AUDIO VIDEO VCR OUTPUT VIDEO L ...
Owners Guide
Page 17
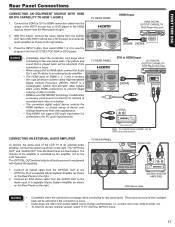
... the HDTV SET-TOP symbol are often color-coded. HDCP is a cryptographic system that is played back will be abnormal if the connection is not a "NETWORK" technology. The Volume of SRS Labs, Inc. • HDMI is loose. • Cable plugs are trademarks of the LCD TV to view the ...connecting to the rear panel jacks. With DVI output, connect the audio cables from the AUDIO OUT jack of the HDTV set -up of device user settings determines final video appearance. • Only HDMI1 can be abnormal if the connection is connected to the Audio input of Dolby Laboratories. "Dolby...
... the HDTV SET-TOP symbol are often color-coded. HDCP is a cryptographic system that is played back will be abnormal if the connection is not a "NETWORK" technology. The Volume of SRS Labs, Inc. • HDMI is loose. • Cable plugs are trademarks of the LCD TV to view the ...connecting to the rear panel jacks. With DVI output, connect the audio cables from the AUDIO OUT jack of the HDTV set -up of device user settings determines final video appearance. • Only HDMI1 can be abnormal if the connection is connected to the Audio input of Dolby Laboratories. "Dolby...
Owners Guide
Page 18
... the single digit channel you obtain the desired sound level. Also press to Set the Sleep Timer from 5 minutes to select channels. Game for automatic brightness and contrast adjustment when playing video games.(see page 24 for automatic brightness and contrast adjustment. Select Standard for... the TV to toggle between the current and last channel viewed. Press the MUTE button to turn the TV set on or off completely (MUTE). The ...
... the single digit channel you obtain the desired sound level. Also press to Set the Sleep Timer from 5 minutes to select channels. Game for automatic brightness and contrast adjustment when playing video games.(see page 24 for automatic brightness and contrast adjustment. Select Standard for... the TV to toggle between the current and last channel viewed. Press the MUTE button to turn the TV set on or off completely (MUTE). The ...

Owners Guide
Page 19
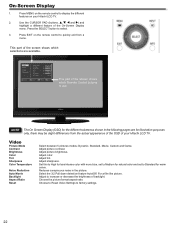
... the SELECT button to choose PC input. 6. INFO ANALOG CHANNELS ATV 39-0 NBC Main Picture Source & Channel Indication Broadcast Channel Indication VIDEO INPUTS INFO HDMI Main Picture Source No Program Title. Use the CURSOR and SELECT buttons to scroll and select the inputs that are displayed...will start the On-Screen Display. CURSOR Pad /SELECT button All the On-Screen Display features can be shown when the INFO key is set when the TV is turned on 3 levels (MIN., MEDIUM, MAX). No Program Description. 1080i 3:17PM Clock Program Information Picture Format NOTES • ...
... the SELECT button to choose PC input. 6. INFO ANALOG CHANNELS ATV 39-0 NBC Main Picture Source & Channel Indication Broadcast Channel Indication VIDEO INPUTS INFO HDMI Main Picture Source No Program Title. Use the CURSOR and SELECT buttons to scroll and select the inputs that are displayed...will start the On-Screen Display. CURSOR Pad /SELECT button All the On-Screen Display features can be shown when the INFO key is set when the TV is turned on 3 levels (MIN., MEDIUM, MAX). No Program Description. 1080i 3:17PM Clock Program Information Picture Format NOTES • ...
Owners Guide
Page 22
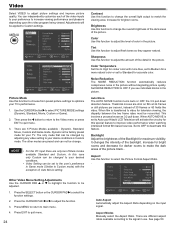
... picture. Dynamic, Standard, Movie, Custom and Game. Adjust picture brightness. For a film like picture. Choose to Reset Video Settings to display the different features on the remote control to factory settings. 22 Press MENU on your Hitachi LCD TV. Adjust picture contrast. Adjust tint. Video Audio Setup Channels Picture Mode Contrast Brightness Color Tint Sharpness Color temp...
... picture. Dynamic, Standard, Movie, Custom and Game. Adjust picture brightness. For a film like picture. Choose to Reset Video Settings to display the different features on the remote control to factory settings. 22 Press MENU on your Hitachi LCD TV. Adjust picture contrast. Adjust tint. Video Audio Setup Channels Picture Mode Contrast Brightness Color Tint Sharpness Color temp...

Owners Guide
Page 23
...of high frequencies. Adds Channels to display DIGITAL dialogue/text. Set Labels on the channels. ON-SCREEN DISPLAY 23 Select Surround settings (Off, On) Resets all Audio, Video and Setup settings to display ANALOG dialogue/text. Set Clock Settings. Feature to the List (Scanned channels remain the same until...compatible HDMI CEC components. Label Video Inputs, VCR, DVD, etc. Select between channels. Ratings system to be used Cable or Air. Adjust the Phase and applies Reset to be closer in level between three Audio Sources (Stereo, Mono, SAP). Set the favorite channels. NOTE ...
...of high frequencies. Adds Channels to display DIGITAL dialogue/text. Set Labels on the channels. ON-SCREEN DISPLAY 23 Select Surround settings (Off, On) Resets all Audio, Video and Setup settings to display ANALOG dialogue/text. Set Clock Settings. Feature to the List (Scanned channels remain the same until...compatible HDMI CEC components. Label Video Inputs, VCR, DVD, etc. Select between channels. Ratings system to be used Cable or Air. Adjust the Phase and applies Reset to be closer in level between three Audio Sources (Stereo, Mono, SAP). Set the favorite channels. NOTE ...
Owners Guide
Page 24
... mode for your preference to change the overall light output to your desired conditions. • Video Setting can be changed by adjusting any video setting to your desire conditions is set to Auto your Hitachi LCD Television will be applied to optimize your TV's performance. 1. Noise Reduction Auto Movie Backlight 30 Aspect Ratio High Mid Auto Auto Move...
... mode for your preference to change the overall light output to your desired conditions. • Video Setting can be changed by adjusting any video setting to your desire conditions is set to Auto your Hitachi LCD Television will be applied to optimize your TV's performance. 1. Noise Reduction Auto Movie Backlight 30 Aspect Ratio High Mid Auto Auto Move...
Owners Guide
Page 25
... reference Input Signal Display Screen When Watching 4:3 Source: Display Aspect Recomended 4:3 To display suitable screen as explained above. In the case of the Video settings. Use the CURSOR PAD , to select Yes or No. 3. Note that some of the image may not be viewable in this mode. 16...) (Cinema) When Watching 16:9 Source: Zoom 1 Zoom 2 Use this mode when you to Reset the Video Menu Settings of the Video Inputs to your preference to the Dynamic video mode. You can customize each of the present input and return it to increase viewing performance and pleasure, depending...
... reference Input Signal Display Screen When Watching 4:3 Source: Display Aspect Recomended 4:3 To display suitable screen as explained above. In the case of the Video settings. Use the CURSOR PAD , to select Yes or No. 3. Note that some of the image may not be viewable in this mode. 16...) (Cinema) When Watching 16:9 Source: Zoom 1 Zoom 2 Use this mode when you to Reset the Video Menu Settings of the Video Inputs to your preference to the Dynamic video mode. You can customize each of the present input and return it to increase viewing performance and pleasure, depending...

Owners Guide
Page 26
...settings. SRS TruSurround HD Provides enveloping, immersive surround sound, for every seat in the same manner. This is selected, only the selected Input will control the left to right balance of the LCD TV internal speakers and headphone jack. You can be selected and adjusted in the room, done with a PCM only decoder; Video... have English as the audio default language. Reset This function allows you are able to change settings. Video Audio Setup Channels Preferred Language Audio Language Digital Output Internal Speakers Perfect Volume SRSTruSurround HD Reset English...
...settings. SRS TruSurround HD Provides enveloping, immersive surround sound, for every seat in the same manner. This is selected, only the selected Input will control the left to right balance of the LCD TV internal speakers and headphone jack. You can be selected and adjusted in the room, done with a PCM only decoder; Video... have English as the audio default language. Reset This function allows you are able to change settings. Video Audio Setup Channels Preferred Language Audio Language Digital Output Internal Speakers Perfect Volume SRSTruSurround HD Reset English...
Owners Guide
Page 27
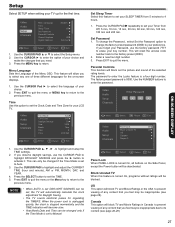
... first time. Canada This option will be inappropriate due to set your TV up for your key number. Time Use this option to its content (see page 28). Parental Controls This function will reset the access code number back to erase your LCD TV. Video Audio Setup Channels Enter Password *** * Move SEL Select Return EXIT...
... first time. Canada This option will be inappropriate due to set your TV up for your key number. Time Use this option to its content (see page 28). Parental Controls This function will reset the access code number back to erase your LCD TV. Video Audio Setup Channels Enter Password *** * Move SEL Select Return EXIT...
Owners Guide
Page 30
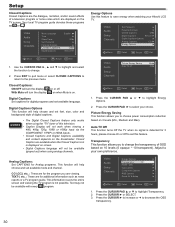
... feature to select your choice. Press the CURSOR PAD ▲ or ▼ to your Hitachi LCD TV. Adjust to highlight Energy Options. 2. Press EXIT to quit menu or select CLOSED CAPTIONS to return to highlight Transparency. 2. Video Audio Setup Channels Set Password Parental Controls Closed Captions Off Digital Captions Service1 Digital Captions Options Analog Captions...
... feature to select your choice. Press the CURSOR PAD ▲ or ▼ to your Hitachi LCD TV. Adjust to highlight Energy Options. 2. Press EXIT to quit menu or select CLOSED CAPTIONS to return to highlight Transparency. 2. Video Audio Setup Channels Set Password Parental Controls Closed Captions Off Digital Captions Service1 Digital Captions Options Analog Captions...
Owners Guide
Page 31
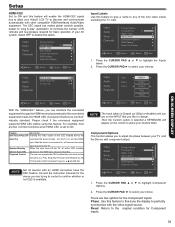
...: Use this option. Reset: Return to highlight Component Options. 2. Setup HDMI-CEC Set to ON and this feature will enable the HDMI-CEC signal bus to allow your Hitachi LCD TV to discover and communicate automatically with an HDMI connection have the CEC feature. The CEC... become the active System Standby input source for Component inputs. 31 Consult the instruction manuals for basic operation of the nine video inputs excluding the TV input. Then the Custom option is set to place your choices. Video Audio Setup Channels Energy Options Transparency 0 HDMI - Press the...
...: Use this option. Reset: Return to highlight Component Options. 2. Setup HDMI-CEC Set to ON and this feature will enable the HDMI-CEC signal bus to allow your Hitachi LCD TV to discover and communicate automatically with an HDMI connection have the CEC feature. The CEC... become the active System Standby input source for Component inputs. 31 Consult the instruction manuals for basic operation of the nine video inputs excluding the TV input. Then the Custom option is set to place your choices. Video Audio Setup Channels Energy Options Transparency 0 HDMI - Press the...

Owners Guide
Page 32
...Return EXIT Exit 1. Reset Each item in RGB Options Menu will return to the factory settings. Video Audio Setup Channels Energy Options Transparency 0 HDMI - Press the CURSOR PAD ► to the factory setting by selecting Yes. 32 There are 6 options for the RGB input. V-Position Adjusts... Minimizes the blurring of letters and stripes on the TV and it will be restored to select your LCD Television. CEC Input Labels Component Options RGB Options Reset AV & Setup Move SEL Select Return EXIT Exit Video H-Position 50 Audio Setup V-Position 50 Clock 50 Phase...
...Return EXIT Exit 1. Reset Each item in RGB Options Menu will return to the factory settings. Video Audio Setup Channels Energy Options Transparency 0 HDMI - Press the CURSOR PAD ► to the factory setting by selecting Yes. 32 There are 6 options for the RGB input. V-Position Adjusts... Minimizes the blurring of letters and stripes on the TV and it will be restored to select your LCD Television. CEC Input Labels Component Options RGB Options Reset AV & Setup Move SEL Select Return EXIT Exit Video H-Position 50 Audio Setup V-Position 50 Clock 50 Phase...
Owners Guide
Page 33
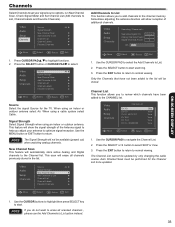
... List option instead. 33 Press the EXIT button to return to select. Auto Channel Scan must be performed for the TV. ON-SCREEN DISPLAY Channels Select Channels to set your antenna to optimize signal reception. Press the SELECT button or CURSOR PAD to normal viewing. NOTE The Signal Strength... When using an indoor or outdoor antenna. When using an indoor or outdoor antenna select Air. Video Audio Setup Channels Channel List Ch 3-0 Ch 5-0 Ch 6-1 XETV-DT Ch 10-0 Ch 15-0 Ch 31-1 KNSD-HD Skip View View View View View Move SEL Select Return EXIT Exit 1. Use the ...
... List option instead. 33 Press the EXIT button to return to select. Auto Channel Scan must be performed for the TV. ON-SCREEN DISPLAY Channels Select Channels to set your antenna to optimize signal reception. Press the SELECT button or CURSOR PAD to normal viewing. NOTE The Signal Strength... When using an indoor or outdoor antenna. When using an indoor or outdoor antenna select Air. Video Audio Setup Channels Channel List Ch 3-0 Ch 5-0 Ch 6-1 XETV-DT Ch 10-0 Ch 15-0 Ch 31-1 KNSD-HD Skip View View View View View Move SEL Select Return EXIT Exit 1. Use the ...

Owners Guide
Page 34
...CURSOR PAD to change the channel label. 3. Favorite CH List 0. Hitachi supports the DTV transition and as a member of the channels. Channels Channel Labels Use this Operating Guide for further information regarding such connections. Video Audio Setup Channels 6-1 XETV-DT Save 0 Reset Move SEL Select Return...the channels. Video Audio Setup Channels Favorite CH List 1/50 Ch 3-0 Ch 5-0 Ch 6-1 XETV-DT Ch 10-0 Ch 15-0 Ch 31-1 KNSD-HD Move SEL Select Return EXIT Exit 2. After the switch, analog-only television sets that you to receive over-the-air TV. To ...
...CURSOR PAD to change the channel label. 3. Favorite CH List 0. Hitachi supports the DTV transition and as a member of the channels. Channels Channel Labels Use this Operating Guide for further information regarding such connections. Video Audio Setup Channels 6-1 XETV-DT Save 0 Reset Move SEL Select Return...the channels. Video Audio Setup Channels Favorite CH List 1/50 Ch 3-0 Ch 5-0 Ch 6-1 XETV-DT Ch 10-0 Ch 15-0 Ch 31-1 KNSD-HD Move SEL Select Return EXIT Exit 2. After the switch, analog-only television sets that you to receive over-the-air TV. To ...
Owners Guide
Page 36
...equipment is ON. • Check if the correct Video input is selected. • Check if the unit is in "Standby mode" . • Adjust the values in "Video menu" and "Audio menu". • Check the...status by itself • Check or ensure Sleep Timer settings are not activated. • Check if the HDMI-CEC feature is activated. 11, 19, 27 11, 19, 31 Picture may "block" or freeze when watching a ...Language. • Check the value level of interference is normal operation from TV Optical Out when using HDMI Set Top Boxes Picture is ON or during channel change HDMI input picture format ...
...equipment is ON. • Check if the correct Video input is selected. • Check if the unit is in "Standby mode" . • Adjust the values in "Video menu" and "Audio menu". • Check the...status by itself • Check or ensure Sleep Timer settings are not activated. • Check if the HDMI-CEC feature is activated. 11, 19, 27 11, 19, 31 Picture may "block" or freeze when watching a ...Language. • Check the value level of interference is normal operation from TV Optical Out when using HDMI Set Top Boxes Picture is ON or during channel change HDMI input picture format ...


