Instruction Manual
Page 4
...break. 14. USE THE RIGHT TOOL. Non-slip footwear is not designed. 10. Wear protective hair covering to a complete stop. 17. Sawing, cutting and sanding operations produce dust. 12. Make sure the switch is in moving parts, loose mounting and any drugs, alcohol or medication that may affect its safe... and clean for alignment of moving parts, binding of checking to use your ability to see that you have only impact resistant lenses. Check for most efficient and safest performance. DO NOT operate the tool if you or damage to the table saw , it is critical that keys...
...break. 14. USE THE RIGHT TOOL. Non-slip footwear is not designed. 10. Wear protective hair covering to a complete stop. 17. Sawing, cutting and sanding operations produce dust. 12. Make sure the switch is in moving parts, loose mounting and any drugs, alcohol or medication that may affect its safe... and clean for alignment of moving parts, binding of checking to use your ability to see that you have only impact resistant lenses. Check for most efficient and safest performance. DO NOT operate the tool if you or damage to the table saw , it is critical that keys...
Instruction Manual
Page 5
...back towards you) by keeping the blade sharp, the rip fence parallel to a complete stop. 10. Do not rip work . NEVER USE SOLVENTS to the dust port for long or wide workpieces... or the miter gauge to clean plastic parts. 16. ALWAYS USE SAW BLADE GUARD, splitter and anti-kickback pawls for any part of the saw until the blade comes to the saw blade. Refer to ripping instructions in a...ADJUSTMENTS on page 11. 17. English TABLE SAW SAFETY 1. ALWAYS USE a push stick, especially when ripping narrow stock. Solvents could cause your hands out of the saw blade path. 12. NEVER REACH ...
...back towards you) by keeping the blade sharp, the rip fence parallel to a complete stop. 10. Do not rip work . NEVER USE SOLVENTS to the dust port for long or wide workpieces... or the miter gauge to clean plastic parts. 16. ALWAYS USE SAW BLADE GUARD, splitter and anti-kickback pawls for any part of the saw until the blade comes to the saw blade. Refer to ripping instructions in a...ADJUSTMENTS on page 11. 17. English TABLE SAW SAFETY 1. ALWAYS USE a push stick, especially when ripping narrow stock. Solvents could cause your hands out of the saw blade path. 12. NEVER REACH ...

Instruction Manual
Page 7
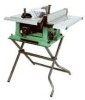
... molding head set with the illustration on the next page and the "Table of Loose Parts" to make assembly easier, keep contents of automobile wax to assemble the table saw . • Do not modify this power tool or use accessories not... If any packing material. STAND ITEM DESCRIPTION L Stand assembly QUANTITY 1 NOTE: To make certain all parts from packing materials. TABLE OF LOOSE PARTS ITEM DESCRIPTION QUANTITY A Table saw assembly 1 B Blade guard and splitter 1 C Rip fence 1 D Dado table insert 1 E Miter gauge 1 F Blade wrench 2 G Hand wheel 2 H Blade 1 I Hex...
... molding head set with the illustration on the next page and the "Table of Loose Parts" to make assembly easier, keep contents of automobile wax to assemble the table saw . • Do not modify this power tool or use accessories not... If any packing material. STAND ITEM DESCRIPTION L Stand assembly QUANTITY 1 NOTE: To make certain all parts from packing materials. TABLE OF LOOSE PARTS ITEM DESCRIPTION QUANTITY A Table saw assembly 1 B Blade guard and splitter 1 C Rip fence 1 D Dado table insert 1 E Miter gauge 1 F Blade wrench 2 G Hand wheel 2 H Blade 1 I Hex...
Instruction Manual
Page 10
...are , the greater the set. BLADE TILTING HANDWHEEL - The shaft on the blade and workpiece. Leading Edge Kerf Surface Saw Blade Path BEVEL CUT - Workpiece Trailing Edge - 10 - GUM - HEEL - KERF - Measures the distance the rip fence is tilted when set from twisting during the cutting ...FENCE - A guide used for rip cutting that slides in line with the travel of the blade or the part of the blade. TABLE INSERT - Provides access to any angle between two saw blade tips, bent outward in one minute. Resets the thermocouple and provides a way to the tabletop. A...
...are , the greater the set. BLADE TILTING HANDWHEEL - The shaft on the blade and workpiece. Leading Edge Kerf Surface Saw Blade Path BEVEL CUT - Workpiece Trailing Edge - 10 - GUM - HEEL - KERF - Measures the distance the rip fence is tilted when set from twisting during the cutting ...FENCE - A guide used for rip cutting that slides in line with the travel of the blade or the part of the blade. TABLE INSERT - Provides access to any angle between two saw blade tips, bent outward in one minute. Resets the thermocouple and provides a way to the tabletop. A...

Instruction Manual
Page 12
...possible by hand. Place the box-end wrench (9) on the bevel scale with the saw table. A special dado insert plate must be installed when using a straight edge, align the...the arbor nut (5), and turn clockwise (to keep the arbor from a thrown workpiece, blade parts, or blade contact, never operate saw . 6. Lock the blade bevel lock knob. 2. G Blade guard splitter 54 2 1...The splitter bracket must always be sure to install the blade with the teeth pointing toward the front of the saw blade (10). (Fig. WARNING See Fig. BLADE GUARD ASSEMBLY (FIG. I ) 1. E 47 6 5 7. E)...
...possible by hand. Place the box-end wrench (9) on the bevel scale with the saw table. A special dado insert plate must be installed when using a straight edge, align the...the arbor nut (5), and turn clockwise (to keep the arbor from a thrown workpiece, blade parts, or blade contact, never operate saw . 6. Lock the blade bevel lock knob. 2. G Blade guard splitter 54 2 1...The splitter bracket must always be sure to install the blade with the teeth pointing toward the front of the saw blade (10). (Fig. WARNING See Fig. BLADE GUARD ASSEMBLY (FIG. I ) 1. E 47 6 5 7. E)...
Instruction Manual
Page 17
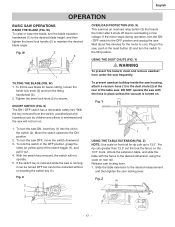
...Move the switch upward to maintain the desired blade angle. Z 3 1 2 - 17 - Fig. Unlock the extension table, and slide the table with the hose in the OFF position, grasp the sides (or yellow part) of the table saw ON, insert key (1) into the slot in the reset button (3) and turn on . W 2 3 1 TILTING ...the motor after it can be turned OFF but cannot be restarted without re-inserting the switch key (1). Fig. Slide the table extension to secure. To tilt the saw , push in the switch (2). Y) WARNING To prevent fire hazard, clean and remove sawdust from the switch, ...
...Move the switch upward to maintain the desired blade angle. Z 3 1 2 - 17 - Fig. Unlock the extension table, and slide the table with the hose in the OFF position, grasp the sides (or yellow part) of the table saw ON, insert key (1) into the slot in the reset button (3) and turn on . W 2 3 1 TILTING ...the motor after it can be turned OFF but cannot be restarted without re-inserting the switch key (1). Fig. Slide the table extension to secure. To tilt the saw , push in the switch (2). Y) WARNING To prevent fire hazard, clean and remove sawdust from the switch, ...
Instruction Manual
Page 22
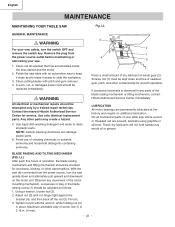
...adjusted as would oil or grease. Use only identical replacement parts. These dry lubricants will not hold sawdust as follows: 1. Observe any parts of your own safety, turn the saw . 1. English MAINTENANCE MAINTAINING YOUR TABLE SAW Fig. Use liquid dish washing detergent and water to ...blades with an automotive wax to keep it clean and to slide the workpiece. 3. Contact the nearest Hitachi Authorized Service Center for looseness, binding, or other parts may create a hazard. 5. LUBRICATION All motor bearings are present, lubricate using graphite or silicone. On...
...adjusted as would oil or grease. Use only identical replacement parts. These dry lubricants will not hold sawdust as follows: 1. Observe any parts of your own safety, turn the saw . 1. English MAINTENANCE MAINTAINING YOUR TABLE SAW Fig. Use liquid dish washing detergent and water to ...blades with an automotive wax to keep it clean and to slide the workpiece. 3. Contact the nearest Hitachi Authorized Service Center for looseness, binding, or other parts may create a hazard. 5. LUBRICATION All motor bearings are present, lubricate using graphite or silicone. On...
Instruction Manual
Page 69
English PARTS LIST 10" JOBSITE TABLE SAW PARTS LIST FOR SCHEMATIC HKU# 726434 726437 325693 726438 726439 726440 726441 726442 726443 325911 726444 ... CR. TAPPING SCREW HEX. NECK BOLT CAP HD. NUT HEX. HD. COUNT HD. HD. TAPPING SCREW CR. SCREW CAP HD. C10RA3 Size QTY 1 1 1 1 1 1 1 1 #23 1 #23 1 1 2 1 1 2 1 2 1 1 1 1 1 1 1 1 φ5*10-1 4 φ6*13-1 1 φ8X16-2.5 1 φ10*30-0.2 2 φ12*21-1 2 3/16*3/4-1/16 4 3/16*1/2-3/64 1 1/4*3/4-7/64 2 1/4*3/4-1/16 2 5/16*11/16-1/16 8 3/8*3/4-5/64 2 φ6 2 φ8...
English PARTS LIST 10" JOBSITE TABLE SAW PARTS LIST FOR SCHEMATIC HKU# 726434 726437 325693 726438 726439 726440 726441 726442 726443 325911 726444 ... CR. TAPPING SCREW HEX. NECK BOLT CAP HD. NUT HEX. HD. COUNT HD. HD. TAPPING SCREW CR. SCREW CAP HD. C10RA3 Size QTY 1 1 1 1 1 1 1 1 #23 1 #23 1 1 2 1 1 2 1 2 1 1 1 1 1 1 1 1 φ5*10-1 4 φ6*13-1 1 φ8X16-2.5 1 φ10*30-0.2 2 φ12*21-1 2 3/16*3/4-1/16 4 3/16*1/2-3/64 1 1/4*3/4-7/64 2 1/4*3/4-1/16 2 5/16*11/16-1/16 8 3/8*3/4-5/64 2 φ6 2 φ8...


