Hitachi C10RA3 Support Question
Hitachi C10RA3 Support Question
Find answers below for this question about Hitachi C10RA3 - 10 Inch Portable Table Saw.Need a Hitachi C10RA3 manual? We have 1 online manual for this item!
Question posted by gwoltman on September 15th, 2020
Hitachi C10ra3 Compatible Blades.
Can I use an 8 inch blade with this saw? If so, can it be for cutting ceramic tile?
Current Answers
Answer #1: Posted by INIMITABLE on September 15th, 2020 12:06 PM
INIMITABLE

Member since:
April 3rd, 2020 Points: 2,071,740

Member since:
April 3rd, 2020 Points: 2,071,740
only 10inch blade is recommended
This saw features a powerful 15-amp motor with 5,000 rpm and enough power to rip through the toughest applications. The fence system is self aligning and the telescoping table extension gives 24-1/2 inches of ripping capacity. This saw also comes with a 10-inch, 36-tooth carbide blade and a dust port.
I hope this is helpful? PLEASE "ACCEPT" and mark it "HELPFUL" to complement my little effort. Hope to bring you more detailed answers
-INIMITABLE
Related Hitachi C10RA3 Manual Pages
Instruction Manual - Page 3
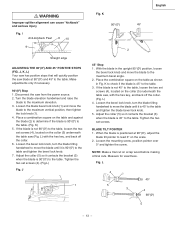
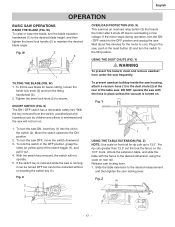
To reduce your table saw .
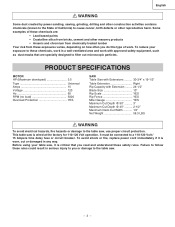
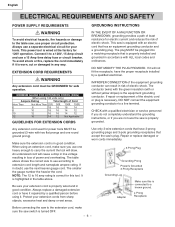
- 3 - It must be connected to the table saw , it is worn, cut or damaged in any way. This table saw , use proper circuit protection. Failure to follow these rules could result in a well-ventilated area and work . Some examples of work with Extension ......... 24-1/2" Blade Size 10" Rip Scale YES Rip Fence YES Miter Gauge YES...
Instruction Manual - Page 4
... all times.
4. They ARE NOT safety glasses. English
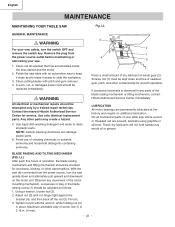
POWER TOOL SAFETY
WARNING
Before using your table saw . NEVER LEAVE TOOL RUNNING UNATTENDED. NEVER STAND ON TOOL. DO NOT USE IN A DANGEROUS ENVIRONMENT such as blades, cutters, etc.
13. DO NOT use the tool safely.
23. DO NOT FORCE THE TOOL. CHECK FOR DAMAGED OR LOOSE PARTS. Dust generated from the work...
Instruction Manual - Page 5
... the blade cuts completely through the workpiece when ripping or crosscutting. MOUNT your hands out of rotation only.
18. NEVER REACH behind or over the cutting tool for long or wide workpieces.
13. Failure to provide sawdust fall-through -sawing operation. Always use the rip fence as a cut-off gauge when crosscutting.
11. Keep your table saw table for any...
Instruction Manual - Page 6
...10
12
16 16 14 12
12
16
14 12 Not Applicable
GUIDELINES FOR EXTENSION CORDS
Any extension cord used for power tools MUST be grounded (3-wire with a qualified electrician or service personnel if you do not completely understand the grounding instructions, or if you use proper circuit protection. The table... damage to the table saw, use one round ground... is worn, cut or damaged in...
Instruction Manual - Page 7

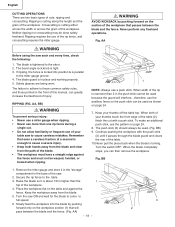
... when pushing the workpiece.
- 7 - DO NOT USE
WIDER COMBINATIONS. • Do not use a dado with this saw. • Do not modify this power tool. TABLE OF LOOSE PARTS
ITEM DESCRIPTION
QUANTITY
A Table saw assembly
1
B Blade guard and splitter
1
C Rip fence
1
D Dado table insert
1
E Miter gauge
1
F Blade wrench
2
G Hand wheel
2
H Blade
1
I Hex wrench
1
J Guard mounting bolt...
Instruction Manual - Page 9
English
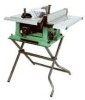
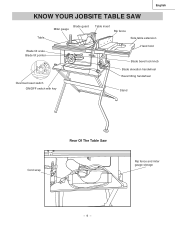
KNOW YOUR JOBSITE TABLE SAW
Table
Blade guard Miter gauge
Table insert Rip fence
Side table extension
Blade tilt scale Blade tilt pointer
Hand hold Blade bevel lock knob
Overload reset switch ON/OFF switch with key
Blade elevation handwheel Bevel tilting handwheel
Stand
Cord wrap
Rear Of The Table Saw
Rip fence and miter gauge storage
- 9 -
Instruction Manual - Page 10
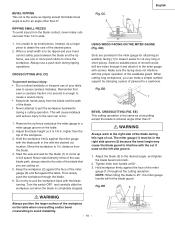
...or back toward the front of the workpiece.
Workpiece
Trailing Edge
- 10 -
TABLE SCALE - Prevents the workpiece from twisting during the cutting operation. English
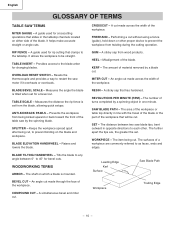
GLOSSARY OF TERMS
TABLE SAW TERMS
MITER GAUGE -
SET - The surfaces of the blade.
Measures the angle the blade is set . BLADE TILTING HANDWHEEL - The number of the workpiece that slides in...
Instruction Manual - Page 11
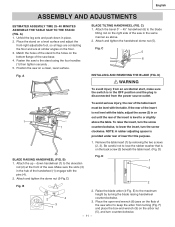
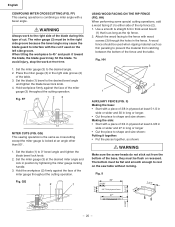
... the blade arbor (4-Fig. F) and place the box-end wrench (9) on the back screw (3) beneath the table insert. (Fig. Match the holes of the saw in the same manner as above the table. Attach...
1
counterclockwise, to the stand using the four handles (1) then tighten securely . 5. Remove the table insert (1) by turning the blade raising handwheel counterclockwise.
3. Make sure the slots (3)
...
Instruction Manual - Page 12

... for all throught sawing operations except dado cuts. Use the original installed insert for clarity. BLADE GUARD ASSEMBLY (FIG. Insert bolt and washer assembly through the front and rear hole and tighten remembering the rubber washer under bolts (12). F
9
8
5
WARNING
To avoid injury from a thrown workpiece, blade parts, or blade contact, never operate saw blade (10). (Fig. Lock the...
Instruction Manual - Page 13
...°(00) to the table. Loosen the bevel lock knob, turn the blade tilting handwheel to move the blade to read 0° on scrap wood before making critical cuts. BLADE TILT POINTER 1. When the blade is not 45° to the table, loosen the two set screws (4), located on the collar (5) nuderneath the table saw from the power source...
Instruction Manual - Page 14
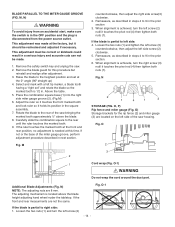
... safety switch key and unplug the saw housing. Remove the blade guard for the rip fence (2) and...cuts can not be correct or kickback could result in the square assembly. 7. O) Storage brackets for this time. O
2 3
1
Cord wrap (Fig. Additional Blade...3. Above the table. 5. Carefully slide the combination square to the heighest position and set " and rotate the blade so the marked...
Instruction Manual - Page 15
...of the table, and along one edge of the miter gauge grooves. 3. Push down on the right side of the saw housing. 2. Place extra blades onto the... and push the handle to see if it is moved by using a combination square. Loosen and remove the knob (1) on the...bar by lifting up on the scale. 3. Check
the cut in position. 2. Blade (Fig. Loosen the lock knob handle (2) and turn ...
Instruction Manual - Page 16
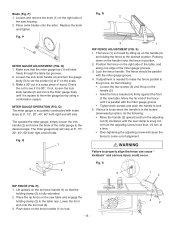
...table saw. If there is tightened, but do not over 13.5 inches and re-tighten the screw. Take off the cover (1) by the indicator will provide the user with a 10...CUTTING LINE INDICATOR (FIG. U
13
1 3
2
1
2
TABLE EXTENSION SCALE POINTER (FIG. T-1) The table extension scale pointer (1) should be loose and need adjustment, therefore, adjustment to the blade. 3. V) If the extension table...
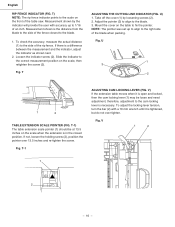
Instruction Manual - Page 17
... lock handle (2) to the desired dimension using the scale on . For rip cuts greater than 13.5" set the lock the fence on front rail for the motor to 13.5". Z
3 1 2
- 17 -
X
2 1
USING THE TABLE EXTENSION (FIG. Fig. W) To raise or lower the blade, turn the tilting handwheel (3). 2. To tilt the saw is turned on rear rail.
To...
Instruction Manual - Page 18
... from the path of the table (2), finish the cut . • Do not allow familiarity or frequent use a push stick. Neither ripping nor crosscutting may be used. (Fig.
When width of the rip is about 1/8 in higher than the
1
top of the table. 10.Never pull the piece back when the blade is in the push stick...
Instruction Manual - Page 19
... sawblade guard. Turn the switch OFF, and carefully slide the workpiece out when the blade is at against the miter gauge with the blade path in line with the blade turning.
Select a suitable piece of the miter
gauge (1) throughout the cutting operation. The miter gauge (1) must be ripped and your table
saw to cause careless mistakes.
Instruction Manual - Page 20
...
4-3/4"
1-1/4"
2-3/8"
- 20 - Set the blade (1) bevel to interfere with a bevel angle. Use a smooth & straight 3/4 in position by tightening the miter gauge locking handle.
3. English
COMPOUND MITER CROSSCUTTING (FIG. Hold workpiece firmly against the face of the fence and the table. FF) This sawing operation is combining a miter angle with the cut . WARNING
Always work at...
Instruction Manual - Page 22
... loosen nut (2). 2. Clean out all plastic parts. Clean cutting blades with the wrench, while holding nut (3)
in . (4 mm).
- 22 - Avoid use of cleaning chemicals or solvents, ammonia and household detergents containing ammonia.
3
2
1
4
5
Place a small amount of the blade raising mechanism or tilting mechanism, contact Hitachi Authorized Service Center immediately. If excessive looseness is...
Instruction Manual - Page 23
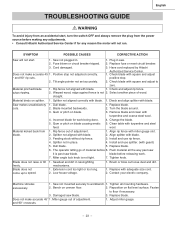
... run. Plug in place.
4. Have cord replaced by Hitachi
Does not make accurate 45° 1. Check blade with
turpentine and coarse steel wool.
4. Select another piece of adjustment.
1.
Remove blade and clean with square and adjust
° and 90° rip cuts.
Splitter not in saw blade. blade before 6. Blade does not raise or tilt freely. Contact your...
Instruction Manual - Page 69
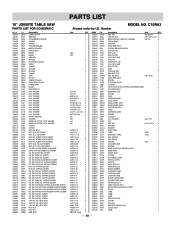
... NO. English
PARTS LIST
10" JOBSITE TABLE SAW
PARTS LIST FOR SCHEMATIC
HKU...BLADE GUARD ASS'Y
1
POWER CABLE ASS'Y
1
RIP FENCE ASS'Y
1
MITER GAUGE ASS'Y
1
HEIGHT REGULATING BOLT ASS'Y
1
SCALE
1
LABEL
1
LABEL
1
LABEL
1
RETAINING CLIP
1
COVER
1
COLLAR
2
BRACKET GROUP ASS'Y
1
SCALE ASS'Y
1
LABEL
1
- 69 - RE.COUNT HD. SCREW AND WASHER HEX. RE. RE. C10RA3...
Similar Questions

That's The Original Hitachi Japonês?
I'm looking for hitachi miter saw 10" japonês original not the metabo you guys have
I'm looking for hitachi miter saw 10" japonês original not the metabo you guys have
(Posted by Pereirafulr 2 years ago)

What Kind Of Dado Blade Is Suitable For The C10ra3 Table Saw
(Posted by benjaminrondon 3 years ago)

What Size Is The Thin Inner Arbor Wrench On The C 10 Ra3
(Posted by windowsheeter 3 years ago)
Blade Removal
How do you secure the saw blade to remove and what direction is the nut thread?
How do you secure the saw blade to remove and what direction is the nut thread?
(Posted by nbergeson 12 years ago)

How Many Tooth Blade To Cut Steel Tube .075'?
hello; I have one of these cutting saw and I use it only for aluminum with a 100 tooth. Now, I need...
hello; I have one of these cutting saw and I use it only for aluminum with a 100 tooth. Now, I need...
(Posted by nmineiro 14 years ago)