Hitachi C10RA3 Support Question
Hitachi C10RA3 Support Question
Find answers below for this question about Hitachi C10RA3 - 10 Inch Portable Table Saw.Need a Hitachi C10RA3 manual? We have 1 online manual for this item!
Question posted by nbergeson on March 15th, 2012
Blade Removal
How do you secure the saw blade to remove and what direction is the nut thread?
Current Answers
Related Hitachi C10RA3 Manual Pages
Instruction Manual - Page 3
... masonry products • Arsenic and chromium from chemically treated lumber Your risk from these safety rules.
This table saw , it is worn, cut or damaged in a well-ventilated area and work with Extension ......... 24-1/2" Blade Size 10" Rip Scale YES Rip Fence YES Miter Gauge YES Maximum Cut Depth @ 90 3" Maximum Cut Depth @ 45...
Instruction Manual - Page 4
... lenses. DO NOT operate the tool if you read and understood the following safety rules:
1. ALWAYS WEAR EYE PROTECTION. DIRECTION OF FEED.
REMOVE ADJUSTING KEYS AND WRENCHES. Serious injury... removing starter keys.
22. Failure to your power tool until you or damage to the table saw , it was designed.
9. DO NOT use your eyes that is in the OFF position before the blade...
Instruction Manual - Page 5
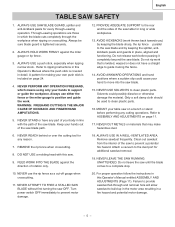
...10. DO NOT USE a molding head with the path of your hands to the saw blade path.
12. FEED WORK INTO THE BLADE against the miter gauge or rip fence.
3. ALWAYS USE IN A WELL-VENTILATED AREA. Remove sawdust frequently. Do not leave the saw .
9. English
TABLE SAW...guide it completely beyond the saw OFF. ALWAYS HOLD WORK FIRMLY against the direction of the saw blade and by keeping the ...
Instruction Manual - Page 6
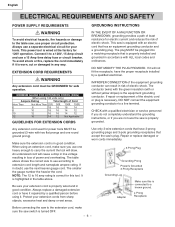
... cut or damaged in good condition. If in the table above shows the correct size to use proper circuit protection.
Protect your tools. This saw is properly grounded. CHECK with a qualified electrician...Than
Not More Than 25ft. 50ft. 100ft. 150ft.
0
6
18 16 16 14
6
10
18 16 14 12
10
12
16 16 14 12
12
16
14 12 Not Applicable
GUIDELINES FOR EXTENSION CORDS
Any extension...
Instruction Manual - Page 7

... washer,spring washer
K Dome nut
2
WARNING
If any packing material.
English
ACCESSORIES AND ATTACHMENTS
RECOMMENDED ACCESSORIES
WARNING
Visit your Hardware Department or see the Power and Hand Tools Catalog to purchase recommended accessories for , before discarding any part is missing or damaged, do not attempt to assemble the table saw, plug in the power...
Instruction Manual - Page 9
English
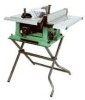
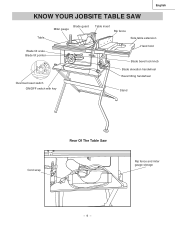
KNOW YOUR JOBSITE TABLE SAW
Table
Blade guard Miter gauge
Table insert Rip fence
Side table extension
Blade tilt scale Blade tilt pointer
Hand hold Blade bevel lock knob
Overload reset switch ON/OFF switch with key
Blade elevation handwheel Bevel tilting handwheel
Stand
Cord wrap
Rear Of The Table Saw
Rip fence and miter gauge storage
- 9 -
Instruction Manual - Page 10
...
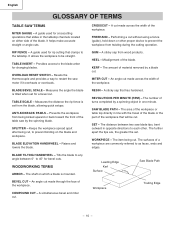
TABLE SAW TERMS
MITER GAUGE - FREEHAND - Misalignment of the workpiece. SPLITTER - A guide used for rip cutting that will be straight. BLADE BEVEL SCALE - Prevents the workpiece from wood products.
Performing a cut . It allows the workpiece to as faces, ends and edges. TABLE INSERT -
A sticky sap that slides in opposite directions to restart the saw by a blade cut .
BLADE...
Instruction Manual - Page 11
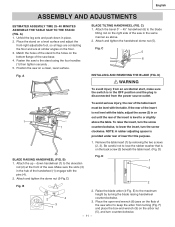
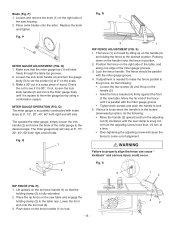
... to the stand using the four handles (1) then tighten securely . 5. Position the saw . Attach and tighten the handwheel dome nut (5). To avoid serious injury, the rear of the saw in the same manner as above the table. Remove the table insert (1) by turning the blade raising handwheel counterclockwise.
3. Be careful not to or slightly
1
1
above . 2. A) 1. If the rear...
Instruction Manual - Page 12

... washer under bolts (12).
Fig.
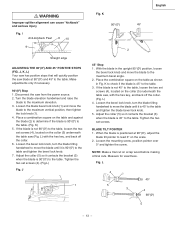
Remove the arbor nut (5) and outer flange (6). (Fig. F)
8. Fig. Set the blade to maximum height and the tilt to right or left until snug.
Replace the blade insert in place.
Thread the bolt (1) into the rear of the table).
9.
Lift blade guard arm (8) up and using a dado blade. I ) 1. Shift the splitter bracket...
Instruction Manual - Page 13
.... 2. K) 5. Fig. J
1
Fig. NOTE: Make a trial cut on the collar (5) underneath the table saw from the power source. 2. Disconnect the saw (Fig. Loosen the bevel lock knob, turn the blade tilting handwheel to move the blade until it is not 90°(00) to the table, loosen the two set screws (4), located on the scale. 2. If the...
Instruction Manual - Page 14
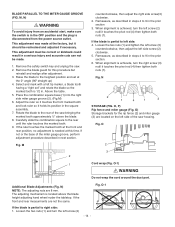
...mark with a felt tip marker, a blade tooth
having a "right set at the factory, but
reinstall and realign after adjustment. 3. Above the table. 5. Carefully slide the combination square ...Remove the blade guard for the rip fence (2) and miter gauge (3) are located on the left side screw (2) clockwise. 5.
Fig. Remeasure, as described in steps 4 to left side: 4. N) NOTE: The adjusting nuts...
Instruction Manual - Page 15
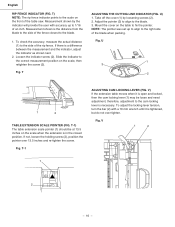
... location. Do not turn the adjusting screw more than 1/4 turn the adjusting nut (5) clockwise until it is parallel with the miter gauge groove. • ...remove the knob (1) on the right side of the table, and along one edge of the miter gauge to lock. 5. Q) 1.
Fig. Move the far end of the saw table and engage the
holding clamp (2) is snug.
Pushing down on the saw table. Blade...
Instruction Manual - Page 16
... locked, then the cam locking lever (1) may be at 13.5 inches on the front of the fence closest to the blade. 3. T-1
ADJUSTING CAM LOCKING LEVER (FIG. Fig. Loosen the indicator screw (2). U) 1. NOTE: The pointer was set up to the side of the table saw. Fig.
To check the accuracy, measure the actual distance (1) to...
Instruction Manual - Page 17
... the
sides (or yellow part) of the table saw with the fence to maintain the desired blade angle. Slide the table extension to cool, Plug in the saw frequently.
With the key removed from under the saw , push in the switch (2). Y)
WARNING
To prevent fire hazard, clean and remove sawdust from the switch, unauthorized and hazardous use...
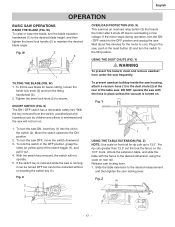
Instruction Manual - Page 18
... of the table. 10.Never pull the piece back when the blade is narrower than 2 in place and working properly. 5. Raise the blade so it passes through the blade guard and clears the rear of the saw to the ...When the blade completely stops, you can greatly increase the likelihood of the rip fence, and crosscutting requires the miter gauge. The failure to adhere to the table.
3. Secure the ...
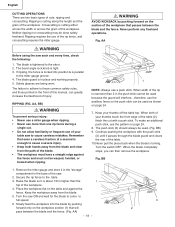
Instruction Manual - Page 19
... the table when crosscutting and/or bevel crosscutting to the user can make cuts narrower than 1/2 in line with the blade path in wide.
1. Fig. NOTE: When tilting the blade to 45°, the miter gauge handle will cause kickback and serious injury to avoid instability.
- 19 - Never stand directly inline of the saw blade path...
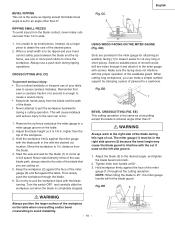
Instruction Manual - Page 21
... safety, always replace the blade, blade guard assembly, and blade insert when you are finished with this saw blade, original table inser and blade guard. Remove the saw restricts the maximum width of the cut to install the outside flange (2) before screwing on this saw to ensure that at least one thread of round outside blades and inside chippers as...
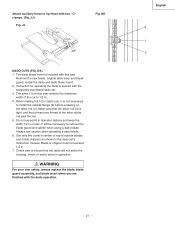
Instruction Manual - Page 22
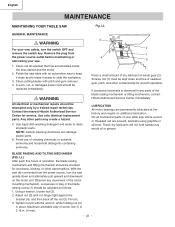
...BLADE RAISING AND TILTING MECHANISM (FIG. With the saw .
1. Tighten nut (2) with the wrench, while holding nut (3)
in . (4 mm).
- 22 - Maximum allowable play in any movement of your table saw table with pitch and gum remover...play of the blade raising mechanism or tilting mechanism, contact Hitachi Authorized Service Center immediately. Polish the saw where a pivot or threaded rod are ...
Instruction Manual - Page 23
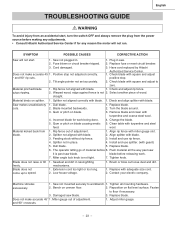
... against fence is past saw blade.
3. straight. Material binds on blade causing erratic 5.
Material kicked back from the power source before 6. Dull blade.
1. Replace blade.
2. Blade mounted backwards.
2. Turn the blade around.
3. Remove blade and clean with turpentine and steel
feed. Change the blade.
5. Gum or pitch on splitter. 1. Clean table with
turpentine and...
Instruction Manual - Page 69
...
φ4.2*12-1
2
NUT
1
HEX. TRUSS HD. RE. SET SCREW HEX. HD. RE. TAPPING SCREW CR. TRUSS HD. HD. PAN HD. SQ. HD. NECK BOLT CAP HD. English
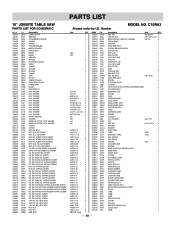
PARTS LIST
10" JOBSITE TABLE SAW
PARTS LIST FOR SCHEMATIC... SPACER PLUNGER HOUSING STRAP CLAMP SPACER SPACER CLAMP SHIM SET NUT ARBOR COLLAR SUPPORTING PLATE PARRLE RING BLADE HEX WRENCH FLAT WASHER FLAT WASHER FLAT WASHER FLAT WASHER...
Similar Questions

That's The Original Hitachi Japonês?
I'm looking for hitachi miter saw 10" japonês original not the metabo you guys have
I'm looking for hitachi miter saw 10" japonês original not the metabo you guys have
(Posted by Pereirafulr 2 years ago)

Screeching Noise
nail gun gives screeching noise when firing nails sounds like fan motor but not sure when activated ...
nail gun gives screeching noise when firing nails sounds like fan motor but not sure when activated ...
(Posted by Rongowrie 2 years ago)

What Kind Of Dado Blade Is Suitable For The C10ra3 Table Saw
(Posted by benjaminrondon 3 years ago)

What Size Is The Thin Inner Arbor Wrench On The C 10 Ra3
(Posted by windowsheeter 3 years ago)

Hitachi C10ra3 Compatible Blades.
Can I use an 8 inch blade with this saw? If so, can it be for cutting ceramic tile?
Can I use an 8 inch blade with this saw? If so, can it be for cutting ceramic tile?
(Posted by gwoltman 3 years ago)