
Owners Guide
Page 1
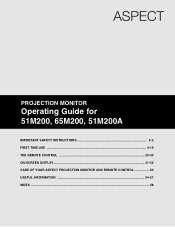
PROJECTION MONITOR Operating Guide for 51M200, 65M200, 51M200A IMPORTANT SAFETY INSTRUCTIONS 2-3 FIRST TIME USE ...4-19 THE REMOTE CONTROL 20-30 ON-SCREEN DISPLAY...31-52 CARE OF YOUR ASPECT PROJECTION MONITOR AND REMOTE CONTROL 53 USEFUL INFORMATION ...54-57 INDEX ...58
PROJECTION MONITOR Operating Guide for 51M200, 65M200, 51M200A IMPORTANT SAFETY INSTRUCTIONS 2-3 FIRST TIME USE ...4-19 THE REMOTE CONTROL 20-30 ON-SCREEN DISPLAY...31-52 CARE OF YOUR ASPECT PROJECTION MONITOR AND REMOTE CONTROL 53 USEFUL INFORMATION ...54-57 INDEX ...58
Owners Guide
Page 4
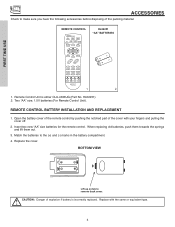
... SELECT MUTE EXIT LAST CH VOL CH 1 2 3 4 5 6 7 8 9 ANT 0 INFO VID1 REC VID2 VID5 VID3 SIZE VID4 SLEEP CLU-433OUG 1. 2. 1. HL02251). 2. REMOTE CONTROL BATTERY INSTALLATION AND REPLACEMENT 1. BOTTOM VIEW Lift up on tab to the (+) and (-) marks in the battery compartment...lift them out. 3. CAUTION: Danger of the packing material. Insert two new "AA" size batteries for the remote control. Replace with your fingers and pulling the cover off. 2. REMOTE CONTROL POWER TV CBL/SAT DVD/VCR SWAP PIP MODE PIP FREEZE C.C. Open the battery cover of the...
... SELECT MUTE EXIT LAST CH VOL CH 1 2 3 4 5 6 7 8 9 ANT 0 INFO VID1 REC VID2 VID5 VID3 SIZE VID4 SLEEP CLU-433OUG 1. 2. 1. HL02251). 2. REMOTE CONTROL BATTERY INSTALLATION AND REPLACEMENT 1. BOTTOM VIEW Lift up on tab to the (+) and (-) marks in the battery compartment...lift them out. 3. CAUTION: Danger of the packing material. Insert two new "AA" size batteries for the remote control. Replace with your fingers and pulling the cover off. 2. REMOTE CONTROL POWER TV CBL/SAT DVD/VCR SWAP PIP MODE PIP FREEZE C.C. Open the battery cover of the...

Owners Guide
Page 7
... VOL- These buttons also serve as the cursor down (̄) and up from a camcorder or VCR to instantly view your preference without using the remote control, point it possible to set to manual (see page 47). ቨ FRONT INPUT JACKS (INPUT 5) Use these buttons for best response. 7 NOTES:... Your remote control does not have mono sound, insert the audio cable into the left (̇) and right (̈) buttons when in MENU mode. ባ INPUT/...
... VOL- These buttons also serve as the cursor down (̄) and up from a camcorder or VCR to instantly view your preference without using the remote control, point it possible to set to manual (see page 47). ቨ FRONT INPUT JACKS (INPUT 5) Use these buttons for best response. 7 NOTES:... Your remote control does not have mono sound, insert the audio cable into the left (̇) and right (̈) buttons when in MENU mode. ባ INPUT/...

Owners Guide
Page 13
... to the speaker and distorted sound, set the volume control of the audio amplifier lower and adjust the sound using the remote control of an external audio amplifier with the remote control, connect the system as shown below. FIRST TIME USE CONNECTING EXTERNAL AUDIO DEVICES To control the audio level of the...
... to the speaker and distorted sound, set the volume control of the audio amplifier lower and adjust the sound using the remote control of an external audio amplifier with the remote control, connect the system as shown below. FIRST TIME USE CONNECTING EXTERNAL AUDIO DEVICES To control the audio level of the...
Owners Guide
Page 20
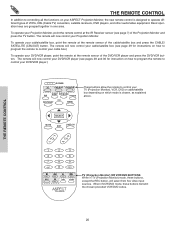
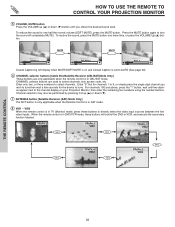
... control your cable box.) To operate your Projection Monitor. DAY/NIGHT MENU These buttons allow the remote to control your Projection Monitor, point the remote control at the remote sensor of the Projection Monitor and press the TV button. To operate your DVD/VCR player.) POWER TV CBL/SAT DVD/VCR... SWAP PIP MODE PIP FREEZE C.C. The remote will now control your DVD/VCR player (see page 7) of the DVD/VCR player and press the DVD/VCR button. SELECT MUTE EXIT LAST ...
... control your cable box.) To operate your Projection Monitor. DAY/NIGHT MENU These buttons allow the remote to control your Projection Monitor, point the remote control at the remote sensor of the Projection Monitor and press the TV button. To operate your DVD/VCR player.) POWER TV CBL/SAT DVD/VCR... SWAP PIP MODE PIP FREEZE C.C. The remote will now control your DVD/VCR player (see page 7) of the DVD/VCR player and press the DVD/VCR button. SELECT MUTE EXIT LAST ...
Owners Guide
Page 21
...CLU-433OUG ቫ SLEEP button ቪ SIZE button ᕃ POWER button Press this button to turn the Projection Monitor on or off when the remote is in TV (Monitor) mode. ባ PICTURE-IN-PICTURE buttons See separate section on pages 25, 26 and 27 for settings changes). &#...4709; SELECT, MENU, CURSOR buttons All the On-Screen Display features can be set different features. THE REMOTE CONTROL HOW TO USE THE REMOTE TO CONTROL YOUR PROJECTION MONITOR ቢ PROJECTION MONITOR POWER button ባ PICTURE-IN-PICTURE ቤ DAY/NIGHT button ብ SELECT,...
...CLU-433OUG ቫ SLEEP button ቪ SIZE button ᕃ POWER button Press this button to turn the Projection Monitor on or off when the remote is in TV (Monitor) mode. ባ PICTURE-IN-PICTURE buttons See separate section on pages 25, 26 and 27 for settings changes). &#...4709; SELECT, MENU, CURSOR buttons All the On-Screen Display features can be set different features. THE REMOTE CONTROL HOW TO USE THE REMOTE TO CONTROL YOUR PROJECTION MONITOR ቢ PROJECTION MONITOR POWER button ባ PICTURE-IN-PICTURE ቤ DAY/NIGHT button ብ SELECT,...
Owners Guide
Page 22
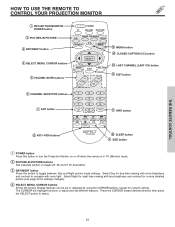
...numbers using the number buttons. To restore the sound, press the MUTE button one , two, or three numbers to select channels. When the remote control is in CBL/SAT mode. To reduce the sound to turn the sound off completely (MUTE). Channel selection may also be performed by pressing... is in DVD/VCR mode, these buttons to directly select the video input sources between the five video inputs. THE REMOTE CONTROL ▲ ▲ ▲ HOW TO USE THE REMOTE TO CONTROL YOUR PROJECTION MONITOR ቦ VOLUME, MUTE button Press the VOLUME up (̆) or down (̄) button until...
...numbers using the number buttons. To restore the sound, press the MUTE button one , two, or three numbers to select channels. When the remote control is in CBL/SAT mode. To reduce the sound to turn the sound off completely (MUTE). Channel selection may also be performed by pressing... is in DVD/VCR mode, these buttons to directly select the video input sources between the five video inputs. THE REMOTE CONTROL ▲ ▲ ▲ HOW TO USE THE REMOTE TO CONTROL YOUR PROJECTION MONITOR ቦ VOLUME, MUTE button Press the VOLUME up (̆) or down (̄) button until...
Owners Guide
Page 23
... INPUT 4:3 STANDARD 4:3 EXPANDED 4:3 ZOOM1 16:9 ZOOM (2) 480p INPUT with Video ID: Letter 4:3 INPUT 4:3 STANDARD 16:9 STANDARD 4:3 EXPANDED 4:3 ZOOM2 THE REMOTE CONTROL (3) 720p/1080i INPUT 4:3 ZOOM2 4:3 ZOOM1 16:9 INPUT 16:9 STANDARD 16:9 ZOOM NOTE: All five video inputs have independent Picture Format ratio settings. 23...preserving the original 16:9 aspect ratio. 16:9 Zoom Use this size mode to display conventional (4:3) images. HOW TO USE THE REMOTE TO CONTROL YOUR PROJECTION MONITOR ቪ SIZE button Press this mode for only 15% of your total viewing time to prevent ...
... INPUT 4:3 STANDARD 4:3 EXPANDED 4:3 ZOOM1 16:9 ZOOM (2) 480p INPUT with Video ID: Letter 4:3 INPUT 4:3 STANDARD 16:9 STANDARD 4:3 EXPANDED 4:3 ZOOM2 THE REMOTE CONTROL (3) 720p/1080i INPUT 4:3 ZOOM2 4:3 ZOOM1 16:9 INPUT 16:9 STANDARD 16:9 ZOOM NOTE: All five video inputs have independent Picture Format ratio settings. 23...preserving the original 16:9 aspect ratio. 16:9 Zoom Use this size mode to display conventional (4:3) images. HOW TO USE THE REMOTE TO CONTROL YOUR PROJECTION MONITOR ቪ SIZE button Press this mode for only 15% of your total viewing time to prevent ...
Owners Guide
Page 24
... On-Screen Display. Closed Captioning Sleep Timer S - IN: 3 When an S-VIDEO Input is connected to VIDEO: 3. ቮ EXIT button When in 15 minute intervals. THE REMOTE CONTROL 24 LAST CH ተ C.C. Day/Night Mode Aspect Mode Vitual HD Day CC On 4:3 Expanded HD1080i Zzzz -:-- HOW TO USE THE... REMOTE TO CONTROL YOUR PROJECTION MONITOR ቫ SLEEP button Show and set the Closed Caption options to ON, OFF, and AUTO. ቱ MENU button The MENU ...
... On-Screen Display. Closed Captioning Sleep Timer S - IN: 3 When an S-VIDEO Input is connected to VIDEO: 3. ቮ EXIT button When in 15 minute intervals. THE REMOTE CONTROL 24 LAST CH ተ C.C. Day/Night Mode Aspect Mode Vitual HD Day CC On 4:3 Expanded HD1080i Zzzz -:-- HOW TO USE THE... REMOTE TO CONTROL YOUR PROJECTION MONITOR ቫ SLEEP button Show and set the Closed Caption options to ON, OFF, and AUTO. ቱ MENU button The MENU ...
Owners Guide
Page 25
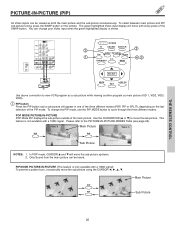
...modes. In POP mode, CURSOR ̆ and ̄ will appear in one of the three different modes (POP, PIP or SPLIT), depending on the remote. You can change the PIP mode, use the PIP MODE button to move the sub-picture using the CURSOR PIP PIP Main Picture Sub Picture... shown. Please refer to view VCR program as a sub-picture while viewing another program as both the main picture and the sub-picture simultaneously. THE REMOTE CONTROL PICTURE-IN-PICTURE (PIP) All Video inputs can be heard. The green highlighted Video input display will move the sub-picture up/down. 2....
...modes. In POP mode, CURSOR ̆ and ̄ will appear in one of the three different modes (POP, PIP or SPLIT), depending on the remote. You can change the PIP mode, use the PIP MODE button to move the sub-picture using the CURSOR PIP PIP Main Picture Sub Picture... shown. Please refer to view VCR program as a sub-picture while viewing another program as both the main picture and the sub-picture simultaneously. THE REMOTE CONTROL PICTURE-IN-PICTURE (PIP) All Video inputs can be heard. The green highlighted Video input display will move the sub-picture up/down. 2....

Owners Guide
Page 26
... the Main Picture to a different mode. PICTURE-IN-PICTURE (PIP) MODES POP PIP SPLIT 480i YES x YES 480p 720p 1080i x x YES x x YES x YES YES THE REMOTE CONTROL 26 Video: 3 PIP MODE Video: 3 Video: 4 PIP MODE Video: 4 PIP MODES will depend on the screen. SPLIT Video: 3 Video: 4 SWAP Green Highlight NOTE: The...
... the Main Picture to a different mode. PICTURE-IN-PICTURE (PIP) MODES POP PIP SPLIT 480i YES x YES 480p 720p 1080i x x YES x x YES x YES YES THE REMOTE CONTROL 26 Video: 3 PIP MODE Video: 3 Video: 4 PIP MODE Video: 4 PIP MODES will depend on the screen. SPLIT Video: 3 Video: 4 SWAP Green Highlight NOTE: The...

Owners Guide
Page 27
... viewing. Press the FREEZE button again to return to normal viewing. Press this button again to return to motion, press the FREEZE button again. THE REMOTE CONTROL 27 To return the picture to normal viewing. To change FREEZE modes, use the PIP MODE button to freeze. Hot Springs Clay Mask C/O John...
... viewing. Press the FREEZE button again to return to normal viewing. Press this button again to return to motion, press the FREEZE button again. THE REMOTE CONTROL 27 To return the picture to normal viewing. To change FREEZE modes, use the PIP MODE button to freeze. Hot Springs Clay Mask C/O John...

Owners Guide
Page 28
...4. MUTE EXIT LAST CH ባ PRECODED VCR Buttons These buttons transmit the chosen precoded VCR codes. NOTES: 1. Hold down the DVD/VCR button on the remote and enter the two digit preset code that your VCR cannot be operated after performing the above procedures, your VCR by set- When this occurs... 1 2 3 4 5 6 7 8 9 VCR BRAND CODE Aiwa 48 Daewoo 45 Emerson 20,21,22,23,24 Fisher 34,37,38,39 Funai 52 General Electric 33 Goldstar 36 Hitachi 00,01,02,03,04,05,06 JVC 18,49,50,51 Magnavox 12,13, 14 Mitsubishi 27,28,29,30 NEC 40,41 Panasonic...
...4. MUTE EXIT LAST CH ባ PRECODED VCR Buttons These buttons transmit the chosen precoded VCR codes. NOTES: 1. Hold down the DVD/VCR button on the remote and enter the two digit preset code that your VCR cannot be operated after performing the above procedures, your VCR by set- When this occurs... 1 2 3 4 5 6 7 8 9 VCR BRAND CODE Aiwa 48 Daewoo 45 Emerson 20,21,22,23,24 Fisher 34,37,38,39 Funai 52 General Electric 33 Goldstar 36 Hitachi 00,01,02,03,04,05,06 JVC 18,49,50,51 Magnavox 12,13, 14 Mitsubishi 27,28,29,30 NEC 40,41 Panasonic...
Owners Guide
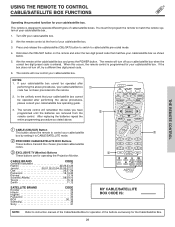
Page 29
...,27,28 Panasonic 18,19,20 Pioneer 13,14 Scientific Atlanta 08,09,10 Tocom 15,16 Zenith 11,12 SATELLITE BRAND CODE Ecostar 32 Hitachi 29 Hughes 33 Panasonic 34 RCA 30, 35 Samsung 36 Sony 31 VOL CH ባ 1 2 3 4 5 6 7 8 9 ባ ANT 0 INFO ...Buttons These buttons transmit the chosen precoded cable/satellite codes. ቤ EXCLUSIVE TV (Monitor) Buttons These buttons are removed from the remote control. The remote will turn off your cable/satellite box. NOTES: 1. Press and release the cable/satellite (CBL/SAT) button to switch to operate...
...,27,28 Panasonic 18,19,20 Pioneer 13,14 Scientific Atlanta 08,09,10 Tocom 15,16 Zenith 11,12 SATELLITE BRAND CODE Ecostar 32 Hitachi 29 Hughes 33 Panasonic 34 RCA 30, 35 Samsung 36 Sony 31 VOL CH ባ 1 2 3 4 5 6 7 8 9 ባ ANT 0 INFO ...Buttons These buttons transmit the chosen precoded cable/satellite codes. ቤ EXCLUSIVE TV (Monitor) Buttons These buttons are removed from the remote control. The remote will turn off your cable/satellite box. NOTES: 1. Press and release the cable/satellite (CBL/SAT) button to switch to operate...
Owners Guide
Page 30
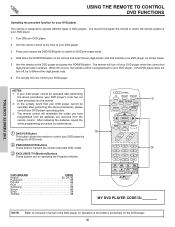
... the DVD/VCR button to switch to instruction manual of the DVD player for operation of the buttons exclusively for the DVD player. 30 The remote will turn off your DVD player. NOTES: 1. If your DVD player cannot be operated after performing the above procedures, your DVD player. 2. DVD ...BRAND CODE Hitachi 53, 59, 60 Panasonic 55 Pioneer 56 RCA 57 Samsung 59 Sanyo 60 Sony 54 Toshiba 58 POWER TV CBL/SAT DVD/VCR ቢ SWAP ...
... the DVD/VCR button to switch to instruction manual of the DVD player for operation of the buttons exclusively for the DVD player. 30 The remote will turn off your DVD player. NOTES: 1. If your DVD player cannot be operated after performing the above procedures, your DVD player. 2. DVD ...BRAND CODE Hitachi 53, 59, 60 Panasonic 55 Pioneer 56 RCA 57 Samsung 59 Sanyo 60 Sony 54 Toshiba 58 POWER TV CBL/SAT DVD/VCR ቢ SWAP ...

Owners Guide
Page 31
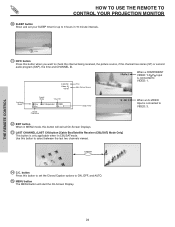
.... Press CURSOR ̇ or ̈ to quickly exit from a menu. 4. Video Audio Aspect Locks Setup Move SEL Sel This part of the screen shows which Remote Control buttons to choose. 3. Press the CURSOR ̇, ̈, ̆ and ̄ to highlight a different feature, then press SELECT to use. ON-SCREEN DISPLAY (OSD...
.... Press CURSOR ̇ or ̈ to quickly exit from a menu. 4. Video Audio Aspect Locks Setup Move SEL Sel This part of the screen shows which Remote Control buttons to choose. 3. Press the CURSOR ̇, ̈, ̆ and ̄ to highlight a different feature, then press SELECT to use. ON-SCREEN DISPLAY (OSD...
Owners Guide
Page 45
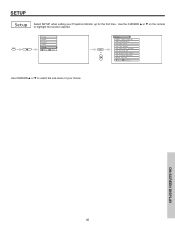
ON-SCREEN DISPLAY 45 Use the CURSOR ̆ or ̄ on the remote to select the sub-menu of your Projection Monitor up for the first time. SETUP Setup Select SETUP when setting your choice. MENU Video Audio Aspect Locks Setup Move SEL Sel SELECT or Setup Magic Focus Tune Up Menu Preference Set The Clock Set The Inputs Set The Color System Set Virtual HD Set Black Side Panel Set Closed Captions About Your TV Move SEL Return Use CURSOR ̆ or ̄ to highlight the function desired.
ON-SCREEN DISPLAY 45 Use the CURSOR ̆ or ̄ on the remote to select the sub-menu of your Projection Monitor up for the first time. SETUP Setup Select SETUP when setting your choice. MENU Video Audio Aspect Locks Setup Move SEL Sel SELECT or Setup Magic Focus Tune Up Menu Preference Set The Clock Set The Inputs Set The Color System Set Virtual HD Set Black Side Panel Set Closed Captions About Your TV Move SEL Return Use CURSOR ̆ or ̄ to highlight the function desired.
Owners Guide
Page 47
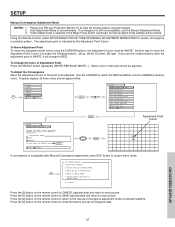
...now Start Move SEL Return SELECT SELECT Adjustment Point Cursor If convergence is to main picture. Press the [1] button on the remote control to CANCEL adjusted data and return to Normal Mode. ON-SCREEN DISPLAY 47 Auto Adjustment Mode is indicated by the Adjustment ...Cursor to the point to the manual convergence adjustment mode (crosshatch pattern). The adjustment point is recommended. Press the [2] button on the remote control to move the adjustment point cursor using this feature. 2. SETUP Manual Convergence Adjustment Mode NOTES: 1. Another way to recall the ...
...now Start Move SEL Return SELECT SELECT Adjustment Point Cursor If convergence is to main picture. Press the [1] button on the remote control to CANCEL adjusted data and return to Normal Mode. ON-SCREEN DISPLAY 47 Auto Adjustment Mode is indicated by the Adjustment ...Cursor to the point to the manual convergence adjustment mode (crosshatch pattern). The adjustment point is recommended. Press the [2] button on the remote control to move the adjustment point cursor using this feature. 2. SETUP Manual Convergence Adjustment Mode NOTES: 1. Another way to recall the ...

Owners Guide
Page 50
... Set The Inputs Video1 Rename List Video2 AVR DVD PVR2 Video3 CAM DVD2 SAT Video4 CBL LD STB Video5 CBL2 PVR STB2 Auto Link Auto Remote Off Move SEL Return DVD VCR VCR2 Reset Use CURSOR ̇, ̈, ̆ and ̄ then press the SELECT button to input 2. ...Monitor as described above. 2. When using the AUTO LINK feature, it later. However, intended operation is now reset and will turn on your remote control is pressed after three hours. This feature is for your video input device play button. When AUTO is selected, the Projection Monitor will...
... Set The Inputs Video1 Rename List Video2 AVR DVD PVR2 Video3 CAM DVD2 SAT Video4 CBL LD STB Video5 CBL2 PVR STB2 Auto Link Auto Remote Off Move SEL Return DVD VCR VCR2 Reset Use CURSOR ̇, ̈, ̆ and ̄ then press the SELECT button to input 2. ...Monitor as described above. 2. When using the AUTO LINK feature, it later. However, intended operation is now reset and will turn on your remote control is pressed after three hours. This feature is for your video input device play button. When AUTO is selected, the Projection Monitor will...

Owners Guide
Page 53
... precision parts may cause the unit to shocks such as dropping it wet. Excessive heat or moisture may result. When the batteries run down, remote control operation will not be used for a long period of the viewing screen to permanently warp, resulting in a distorted picture. 53 Do not... use an old battery with a soft cloth. CARE OF YOUR ASPECT PROJECTION MONITOR AND YOUR REMOTE CONTROL DO Dust the screen and cabinet with a new battery. Clean the screen with a soft cloth moistened in a high humidity place or getting it...
... precision parts may cause the unit to shocks such as dropping it wet. Excessive heat or moisture may result. When the batteries run down, remote control operation will not be used for a long period of the viewing screen to permanently warp, resulting in a distorted picture. 53 Do not... use an old battery with a soft cloth. CARE OF YOUR ASPECT PROJECTION MONITOR AND YOUR REMOTE CONTROL DO Dust the screen and cabinet with a new battery. Clean the screen with a soft cloth moistened in a high humidity place or getting it...


