
Owners Guide
Page 1
PROJECTION MONITOR Operating Guide for 51M200, 65M200, 51M200A IMPORTANT SAFETY INSTRUCTIONS 2-3 FIRST TIME USE ...4-19 THE REMOTE CONTROL 20-30 ON-SCREEN DISPLAY...31-52 CARE OF YOUR ASPECT PROJECTION MONITOR AND REMOTE CONTROL 53 USEFUL INFORMATION ...54-57 INDEX ...58
PROJECTION MONITOR Operating Guide for 51M200, 65M200, 51M200A IMPORTANT SAFETY INSTRUCTIONS 2-3 FIRST TIME USE ...4-19 THE REMOTE CONTROL 20-30 ON-SCREEN DISPLAY...31-52 CARE OF YOUR ASPECT PROJECTION MONITOR AND REMOTE CONTROL 53 USEFUL INFORMATION ...54-57 INDEX ...58
Owners Guide
Page 2
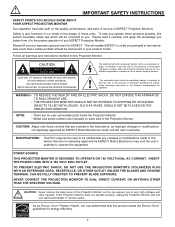
...THE POWER CORD INTO A 120 VOLT 60Hz OUTLET. NEVER CONNECT THE PROJECTION MONITOR TO 50Hz, DIRECT CURRENT, OR ANYTHING OTHER THAN THE SPECIFIED VOLTAGE. As an ENERGY STAR® Partner, Hitachi, Ltd. To help you ASPECT Projection Monitor. WARNING: • TO REDUCE THE RISK OF FIRE OR ELECTRIC SHOCK..., DO NOT EXPOSE THIS APPARATUS TO RAIN OR MOISTURE. • THE PROJECTION MONITOR SHOULD NOT BE EXPOSED TO DRIPPING OR SPLASHING....
...THE POWER CORD INTO A 120 VOLT 60Hz OUTLET. NEVER CONNECT THE PROJECTION MONITOR TO 50Hz, DIRECT CURRENT, OR ANYTHING OTHER THAN THE SPECIFIED VOLTAGE. As an ENERGY STAR® Partner, Hitachi, Ltd. To help you ASPECT Projection Monitor. WARNING: • TO REDUCE THE RISK OF FIRE OR ELECTRIC SHOCK..., DO NOT EXPOSE THIS APPARATUS TO RAIN OR MOISTURE. • THE PROJECTION MONITOR SHOULD NOT BE EXPOSED TO DRIPPING OR SPLASHING....
Owners Guide
Page 3
...an electrician for long periods of time. 14. Use only with the cart, stand, tripod, bracket, or table specified by your ASPECT Factory Warranty. Unplug this apparatus during lightning storms or when unused for replacement of the obsolete outlet. 10. Refer all instructions. 5....operate normal- Follow instructions for proper grounding and, in product damage and/or personal injury. 16. Do not slide or force Projection Monitor into apparatus, the apparatus has been exposed to overturn resulting in particular, specifies that produce heat. 9. For product recycling and disposal...
...an electrician for long periods of time. 14. Use only with the cart, stand, tripod, bracket, or table specified by your ASPECT Factory Warranty. Unplug this apparatus during lightning storms or when unused for replacement of the obsolete outlet. 10. Refer all instructions. 5....operate normal- Follow instructions for proper grounding and, in product damage and/or personal injury. 16. Do not slide or force Projection Monitor into apparatus, the apparatus has been exposed to overturn resulting in particular, specifies that produce heat. 9. For product recycling and disposal...

Owners Guide
Page 5
... ANGLE S CAUTION: Magnetic fields, such as those of the Projection Monitor, place the surround speakers to the side or behind the viewing area. FIRST TIME USE HOW TO SET UP YOUR NEW HITACHI PROJECTION MONITOR LOCATION Select an area where sunlight or bright indoor illumination will require ... screen center. Move the magnetic field source away from each side of the ASPECT Projection Monitor is its best, test various locations in the room to reduce the reflection or the Projection Monitor can become excessively hot, for example, in room sizes and acoustical environments will...
... ANGLE S CAUTION: Magnetic fields, such as those of the Projection Monitor, place the surround speakers to the side or behind the viewing area. FIRST TIME USE HOW TO SET UP YOUR NEW HITACHI PROJECTION MONITOR LOCATION Select an area where sunlight or bright indoor illumination will require ... screen center. Move the magnetic field source away from each side of the ASPECT Projection Monitor is its best, test various locations in the room to reduce the reflection or the Projection Monitor can become excessively hot, for example, in room sizes and acoustical environments will...

Owners Guide
Page 7
...; VOLUME level Press these audio/video jacks for a quick hook-up (̆) buttons when in the top right corner of the Projection Monitor screen. Your selection is ON during normal operation. ቧ MAGIC FOCUS Use this button to video inputs, press VID1~VID5 buttons depending...; PULL POWER ASPECT ̆ PULL POWER ቩ ቦ INPUT 5 S-VIDEO AUDIO VIDEO L/MONO R MAGIC FOCUS VOL- The volume level will not work when adjustment mode is set Projection Monitor features to your preference without using the remote control, point it possible to set to manual (see page...
...; VOLUME level Press these audio/video jacks for a quick hook-up (̆) buttons when in the top right corner of the Projection Monitor screen. Your selection is ON during normal operation. ቧ MAGIC FOCUS Use this button to video inputs, press VID1~VID5 buttons depending...; PULL POWER ASPECT ̆ PULL POWER ቩ ቦ INPUT 5 S-VIDEO AUDIO VIDEO L/MONO R MAGIC FOCUS VOL- The volume level will not work when adjustment mode is set Projection Monitor features to your preference without using the remote control, point it possible to set to manual (see page...
Owners Guide
Page 20
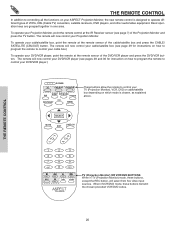
... (see page 7) of the cable/satellite box and press the CABLE/ SATELLITE (CBL/SAT) button. The remote will now control your ASPECT Projection Monitor, the new remote control is chosen, as explained above. The remote will select from five video input sources. SELECT MUTE EXIT LAST CH... VOL CH 1 2 3 4 5 6 7 8 9 ANT 0 INFO VID1 REC VID2 VID5 VID3 SIZE VID4 SLEEP CLU-433OUG TV (Projection Monitor) OR VCR/DVD BUTTONS When in one area. THE REMOTE CONTROL THE REMOTE CONTROL In addition to controlling all the functions on which mode is...
... (see page 7) of the cable/satellite box and press the CABLE/ SATELLITE (CBL/SAT) button. The remote will now control your ASPECT Projection Monitor, the new remote control is chosen, as explained above. The remote will select from five video input sources. SELECT MUTE EXIT LAST CH... VOL CH 1 2 3 4 5 6 7 8 9 ANT 0 INFO VID1 REC VID2 VID5 VID3 SIZE VID4 SLEEP CLU-433OUG TV (Projection Monitor) OR VCR/DVD BUTTONS When in one area. THE REMOTE CONTROL THE REMOTE CONTROL In addition to controlling all the functions on which mode is...
Owners Guide
Page 23
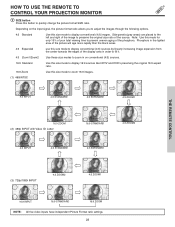
...ratio settings. 23 Depending on conventional (4:3) sources. 16:9 Standard Use this size mode to display 16:9 sources like HDTV and DVD's preserving the original 16:9 aspect ratio. 16:9 Zoom Use this size mode to display conventional (4:3) images. Side panels (gray areas) are placed to the left and right of the image... of the source. Note: Use this button to quickly change the picture format SIZE ratio. HOW TO USE THE REMOTE TO CONTROL YOUR PROJECTION MONITOR ቪ SIZE button Press this mode for only 15% of your total viewing time to prevent uneven aging of the phosphors.
...ratio settings. 23 Depending on conventional (4:3) sources. 16:9 Standard Use this size mode to display 16:9 sources like HDTV and DVD's preserving the original 16:9 aspect ratio. 16:9 Zoom Use this size mode to display conventional (4:3) images. Side panels (gray areas) are placed to the left and right of the image... of the source. Note: Use this button to quickly change the picture format SIZE ratio. HOW TO USE THE REMOTE TO CONTROL YOUR PROJECTION MONITOR ቪ SIZE button Press this mode for only 15% of your total viewing time to prevent uneven aging of the phosphors.
Owners Guide
Page 24
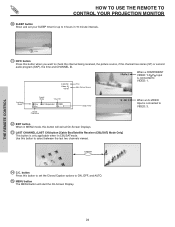
... S-VIDEO Input is only applicable when iin CBL/SATmode. THE REMOTE CONTROL 24 LAST CH ተ C.C. HOW TO USE THE REMOTE TO CONTROL YOUR PROJECTION MONITOR ቫ SLEEP button Show and set the Closed Caption options to ON, OFF, and AUTO. ቱ MENU button The MENU button will exit all On... in MENU mode, this button to set your SLEEP timer for up to 3 hours in 15 minute intervals. Closed Captioning Sleep Timer S - Day/Night Mode Aspect Mode Vitual HD Day CC On 4:3 Expanded HD1080i Zzzz -:--
... S-VIDEO Input is only applicable when iin CBL/SATmode. THE REMOTE CONTROL 24 LAST CH ተ C.C. HOW TO USE THE REMOTE TO CONTROL YOUR PROJECTION MONITOR ቫ SLEEP button Show and set the Closed Caption options to ON, OFF, and AUTO. ቱ MENU button The MENU button will exit all On... in MENU mode, this button to set your SLEEP timer for up to 3 hours in 15 minute intervals. Closed Captioning Sleep Timer S - Day/Night Mode Aspect Mode Vitual HD Day CC On 4:3 Expanded HD1080i Zzzz -:--

Owners Guide
Page 31
Press EXIT on your ASPECT Projection Monitor. 2. MENU SELECT EXIT This part of the screen shows which selections are available. ASPECT ̆ PULL POWER ON-SCREEN DISPLAY 31 Press CURSOR ̇ or ̈ to choose. 3. Press the CURSOR ̇, ̈, ̆ and ̄ to highlight ...to access Favorite Channels menu. Press MENU on the remote control to display the different features on the remote control to use. Video Audio Aspect Locks Setup Move SEL Sel This part of the screen shows which Remote Control buttons to quickly exit from a menu. 4. ON-SCREEN DISPLAY ...
Press EXIT on your ASPECT Projection Monitor. 2. MENU SELECT EXIT This part of the screen shows which selections are available. ASPECT ̆ PULL POWER ON-SCREEN DISPLAY 31 Press CURSOR ̇ or ̈ to choose. 3. Press the CURSOR ̇, ̈, ̆ and ̄ to highlight ...to access Favorite Channels menu. Press MENU on the remote control to display the different features on the remote control to use. Video Audio Aspect Locks Setup Move SEL Sel This part of the screen shows which Remote Control buttons to quickly exit from a menu. 4. ON-SCREEN DISPLAY ...
Owners Guide
Page 32
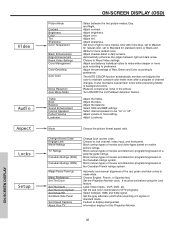
...the edges between 1080i and 540p signal. Choose to display dialogue/text. Adjust the bass. Adjust Loudness. Set the Projection Monitor clock. Adjust tint. Adjust the balance. Adjust and balance individual colors to Medium for natural color, set before using the.... Day and Night. Adjust contrast. Set tint and color coordinates for more reddish color. ON-SCREEN DISPLAY Video Audio Aspect Locks Setup Picture Mode Contrast Brightness Color Tint Sharpness Color Temperature Black Enhancement Edge Enhancement Reset Video Settings Color Management Color Decoding...
...the edges between 1080i and 540p signal. Choose to display dialogue/text. Adjust the bass. Adjust Loudness. Set the Projection Monitor clock. Adjust tint. Adjust the balance. Adjust and balance individual colors to Medium for natural color, set before using the.... Day and Night. Adjust contrast. Set tint and color coordinates for more reddish color. ON-SCREEN DISPLAY Video Audio Aspect Locks Setup Picture Mode Contrast Brightness Color Tint Sharpness Color Temperature Black Enhancement Edge Enhancement Reset Video Settings Color Management Color Decoding...

Owners Guide
Page 33
MENU Video Audio Aspect Locks Setup Move SEL Sel Video Picture Mode Contrast Brightness Color Tint Sharpness Color Temperature Black Enhancement Edge Enhancement Reset Video Settings Move SEL Return ... If RESET is selected, only the selected input will reset to Day Mode. You can independently customize each of the Video Inputs to your Projection Monitor's performance. Picture Mode Use this function to choose from automatic picture settings to optimize your preference to previous menu. Function Contrast Brightness Color Tint Sharpness...
MENU Video Audio Aspect Locks Setup Move SEL Sel Video Picture Mode Contrast Brightness Color Tint Sharpness Color Temperature Black Enhancement Edge Enhancement Reset Video Settings Move SEL Return ... If RESET is selected, only the selected input will reset to Day Mode. You can independently customize each of the Video Inputs to your Projection Monitor's performance. Picture Mode Use this function to choose from automatic picture settings to optimize your preference to previous menu. Function Contrast Brightness Color Tint Sharpness...
Owners Guide
Page 36
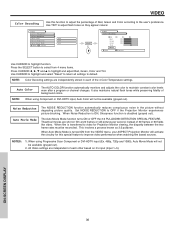
Press the SELECT button to select from the VIDEO menu, your ASPECT Projection Monitor will not be available (grayed out). 2. Auto Color The AUTO COLOR function automatically monitors and adjusts the color to highlight and adjust Red, Green, Color and Tint. NOTE: When using Progressive Scan ...RGB R G B Red 50% Green 50% Color 50% Tint Reset Move SEL Return Use CURSOR to OFF if the Projection Monitor experiences picture blocking. ON-SCREEN DISPLAY 36 All Video settings are independently stored in the picture without degrading picture quality. Set NOISE ...
Press the SELECT button to select from the VIDEO menu, your ASPECT Projection Monitor will not be available (grayed out). 2. Auto Color The AUTO COLOR function automatically monitors and adjusts the color to highlight and adjust Red, Green, Color and Tint. NOTE: When using Progressive Scan ...RGB R G B Red 50% Green 50% Color 50% Tint Reset Move SEL Return Use CURSOR to OFF if the Projection Monitor experiences picture blocking. ON-SCREEN DISPLAY 36 All Video settings are independently stored in the picture without degrading picture quality. Set NOISE ...
Owners Guide
Page 37
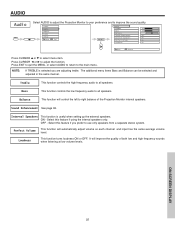
Video Audio Audio Treble 45% MENU Aspect Locks Setup Move SEL Sel Bass 50% Balance L R Sound Enhancement Off ... same manner. Sound Enhancement See page 38. Perfect Volume This function will improve the quality of the Projection Monitor internal speakers. This function will control the left to adjust the function. Select this feature if you are adjusting...so each channel and input has the same average volume level. AUDIO Audio Select AUDIO to adjust the Projection Monitor to your preference and to the main menu. Press EXIT to quit the MENU, or select AUDIO to ...
Video Audio Audio Treble 45% MENU Aspect Locks Setup Move SEL Sel Bass 50% Balance L R Sound Enhancement Off ... same manner. Sound Enhancement See page 38. Perfect Volume This function will improve the quality of the Projection Monitor internal speakers. This function will control the left to adjust the function. Select this feature if you are adjusting...so each channel and input has the same average volume level. AUDIO Audio Select AUDIO to adjust the Projection Monitor to your preference and to the main menu. Press EXIT to quit the MENU, or select AUDIO to ...
Owners Guide
Page 38
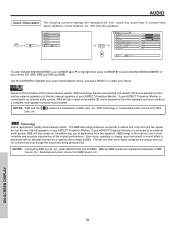
...of the original performance. ON-SCREEN DISPLAY 38 with its attendant harmonics or partials more complete and accurate reproduction of your ASPECT Projection Monitor. Manufactured under license from two speakers and even enhance a complete multi-speaker surround sound system. NOTES: *SRS and ...technology delivers and exciting and realistic 3D Sound experience from just two speakers (or) the two internal speakers of your ASPECT Projection Monitor is incorporated under license from two speakers. BBE brings to an external audio system, BBE will reproduce the "live ...
...of the original performance. ON-SCREEN DISPLAY 38 with its attendant harmonics or partials more complete and accurate reproduction of your ASPECT Projection Monitor. Manufactured under license from two speakers and even enhance a complete multi-speaker surround sound system. NOTES: *SRS and ...technology delivers and exciting and realistic 3D Sound experience from just two speakers (or) the two internal speakers of your ASPECT Projection Monitor is incorporated under license from two speakers. BBE brings to an external audio system, BBE will reproduce the "live ...
Owners Guide
Page 40
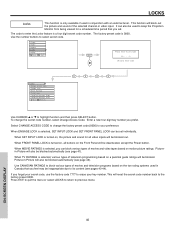
... key number you can also be used to change the secret code number, select Change Access Code. Select CHANGE ACCESS CODE to keep the Projection Monitor from being viewed for all buttons on , all video inputs will reset the secret code number back to enter the Locks feature is a four... buttons to previous menu. If you set individually. Press EXIT to quit the menu or select LOCKS to return to select secret code. Video Audio Aspect Locks Setup Move SEL Sel SELECT or Please Enter Access Code [ - - - - ] [# Keys] Enter Code Locks Change Access Code Engage Lock Movie Ratings TV ...
... key number you can also be used to change the secret code number, select Change Access Code. Select CHANGE ACCESS CODE to keep the Projection Monitor from being viewed for all buttons on , all video inputs will reset the secret code number back to enter the Locks feature is a four... buttons to previous menu. If you set individually. Press EXIT to quit the menu or select LOCKS to return to select secret code. Video Audio Aspect Locks Setup Move SEL Sel SELECT or Please Enter Access Code [ - - - - ] [# Keys] Enter Code Locks Change Access Code Engage Lock Movie Ratings TV ...
Owners Guide
Page 45
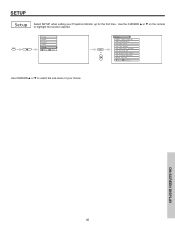
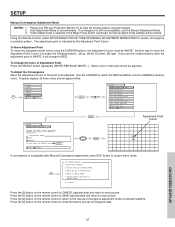
ON-SCREEN DISPLAY 45 SETUP Setup Select SETUP when setting your choice. Use the CURSOR ̆ or ̄ on the remote to select the sub-menu of your Projection Monitor up for the first time. MENU Video Audio Aspect Locks Setup Move SEL Sel SELECT or Setup Magic Focus Tune Up Menu Preference Set The Clock Set The Inputs Set The Color System Set Virtual HD Set Black Side Panel Set Closed Captions About Your TV Move SEL Return Use CURSOR ̆ or ̄ to highlight the function desired.
ON-SCREEN DISPLAY 45 SETUP Setup Select SETUP when setting your choice. Use the CURSOR ̆ or ̄ on the remote to select the sub-menu of your Projection Monitor up for the first time. MENU Video Audio Aspect Locks Setup Move SEL Sel SELECT or Setup Magic Focus Tune Up Menu Preference Set The Clock Set The Inputs Set The Color System Set Virtual HD Set Black Side Panel Set Closed Captions About Your TV Move SEL Return Use CURSOR ̆ or ̄ to highlight the function desired.

Owners Guide
Page 46
... Manual If you want to converge (align) the colors. Properly converged, the lines appear white, which allows the Projection Monitor to self-adjust. To simplify convergence, ASPECT Projection Monitor incorporates a function called "convergence". Your ASPECT Projection Monitor has three color projection tubes: one for red, one for green, one for Magnetic Influences. Over a period of...
... Manual If you want to converge (align) the colors. Properly converged, the lines appear white, which allows the Projection Monitor to self-adjust. To simplify convergence, ASPECT Projection Monitor incorporates a function called "convergence". Your ASPECT Projection Monitor has three color projection tubes: one for red, one for green, one for Magnetic Influences. Over a period of...
Owners Guide
Page 47
...SETUP-MAGIC FOCUS TUNE UP-MANUAL ADJUSTMENT MODE-START to GREEN (reference color). Green color is to main picture. MENU Video Audio Aspect Locks Setup Move SEL Sel SELECT Setup Magic Focus Tune Up Menu Preference Set The Clock Set The Inputs Set The Color System ...is pressed, all three colors should appear white. Press the [1] button on the remote control to Normal Mode. Please turn ON your Projection Monitor for Magnetic Influences. The adjustment point is recommended. Properly aligned, all manual adjust mode settings will change to main picture. Press the [3] ...
...SETUP-MAGIC FOCUS TUNE UP-MANUAL ADJUSTMENT MODE-START to GREEN (reference color). Green color is to main picture. MENU Video Audio Aspect Locks Setup Move SEL Sel SELECT Setup Magic Focus Tune Up Menu Preference Set The Clock Set The Inputs Set The Color System ...is pressed, all three colors should appear white. Press the [1] button on the remote control to Normal Mode. Please turn ON your Projection Monitor for Magnetic Influences. The adjustment point is recommended. Properly aligned, all manual adjust mode settings will change to main picture. Press the [3] ...

Owners Guide
Page 53
CARE OF YOUR ASPECT PROJECTION MONITOR AND YOUR REMOTE CONTROL DO Dust the screen and cabinet with a new battery...cause the screen to shocks such as dropping it on vacation. Place your Projection Monitor away from the wall outlet if your Projection Monitor will become erratic or possibly stop altogether. When the batteries run down, remote control... period of the viewing screen to prolonged direct sunlight or heat may result. DO NOT Do not clean your Projection Monitor. Do not place rubber or vinyl products or cellophane tape on or near a heater. Avoid placing the remote control...
CARE OF YOUR ASPECT PROJECTION MONITOR AND YOUR REMOTE CONTROL DO Dust the screen and cabinet with a new battery...cause the screen to shocks such as dropping it on vacation. Place your Projection Monitor away from the wall outlet if your Projection Monitor will become erratic or possibly stop altogether. When the batteries run down, remote control... period of the viewing screen to prolonged direct sunlight or heat may result. DO NOT Do not clean your Projection Monitor. Do not place rubber or vinyl products or cellophane tape on or near a heater. Avoid placing the remote control...
Owners Guide
Page 55
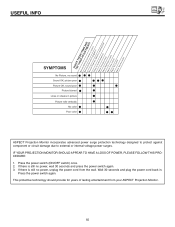
...cord back in picture © Picture rolls vertically © No color © © Poor color © ©© ASPECT Projection Monitor incorporates advanced power surge protection technology designed to protect against component or circuit damage due to external or internal voltage power surges. This ... © Picture blurred © © Lines or streaks in . If there is still no power, unplug the power cord from your ASPECT Projection Monitor. 55 Press the power switch again. Press the power switch (ON/OFF switch) once. 2. If there is still no power, wait 30...
...cord back in picture © Picture rolls vertically © No color © © Poor color © ©© ASPECT Projection Monitor incorporates advanced power surge protection technology designed to protect against component or circuit damage due to external or internal voltage power surges. This ... © Picture blurred © © Lines or streaks in . If there is still no power, unplug the power cord from your ASPECT Projection Monitor. 55 Press the power switch again. Press the power switch (ON/OFF switch) once. 2. If there is still no power, wait 30...


