Owners Guide
Page 1
LCD REAR PROJECTION TELEVISION Operating Guide for energy efficiency. has determined that this product meets the ENERGY STAR® guidelines for 50VS810, 60VS810, 70VS810, 50VS810A, 60VS810A, IMPORTANT SAFETY INSTRUCTIONS 2-3 FIRST TIME USE ...4-20 THE REMOTE CONTROL 21-40 ON-SCREEN DISPLAY...41-68 LAMP REPLACEMENT ...69-72 CARE OF YOUR HITACHI TV & REMOTE CONTROL 73 RECEPTION PROBLEMS ...74 USEFUL INFORMATION / INDEX 75-83 As an ENERGY STAR® Partner, Hitachi, Ltd.
LCD REAR PROJECTION TELEVISION Operating Guide for energy efficiency. has determined that this product meets the ENERGY STAR® guidelines for 50VS810, 60VS810, 70VS810, 50VS810A, 60VS810A, IMPORTANT SAFETY INSTRUCTIONS 2-3 FIRST TIME USE ...4-20 THE REMOTE CONTROL 21-40 ON-SCREEN DISPLAY...41-68 LAMP REPLACEMENT ...69-72 CARE OF YOUR HITACHI TV & REMOTE CONTROL 73 RECEPTION PROBLEMS ...74 USEFUL INFORMATION / INDEX 75-83 As an ENERGY STAR® Partner, Hitachi, Ltd.

Owners Guide
Page 3
.... Do not place any way, such as to qualified service personnel. PUBLIC VIEWING OF COPYRIGHTED MATERIAL Public viewing of programs broadcast by TV stations and cable companies, as well as recommended by your safety. A CableCARD provided by the manufacturer. 17. Heed all servicing to... is required when the apparatus has been damaged in accordance with the cart, stand, tripod, brack- For more information call "1-800-HITACHI." Use of this apparatus near any ventilation openings. ing-type plug. If the provided plug does not fit into apparatus, the apparatus...
.... Do not place any way, such as to qualified service personnel. PUBLIC VIEWING OF COPYRIGHTED MATERIAL Public viewing of programs broadcast by TV stations and cable companies, as well as recommended by your safety. A CableCARD provided by the manufacturer. 17. Heed all servicing to... is required when the apparatus has been damaged in accordance with the cart, stand, tripod, brack- For more information call "1-800-HITACHI." Use of this apparatus near any ventilation openings. ing-type plug. If the provided plug does not fit into apparatus, the apparatus...
Owners Guide
Page 4
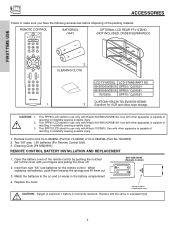
...make sure you have the following accessories before disposing of resulting in instability causing possible injury. 1. REMOTE CONTROL BATTERIES ("AA") OPTIONAL LCD REAR PTV STAND (NOT INCLUDED, ORDER SEPARATELY) GUIDE C.C. 2. CAUTION: 1. 2. 3. HL02062) or CLU-3844WL (Part No. REMOTE CONTROL...Match the batteries to remove back cover. Replace with Hitachi 50VS810/50VS810A. CLEANING CLOTH LCD TV MODEL LCD STAND/PART NO. 50VS810/50VS810A SPF50 / QJ01521 60VS810/60VS810A SPF60 / QJ01581 70VS810 SPF70 / QJ01591 CUSTOM HITACHI TELEVISION STAND 1. 3. This SPF50 LCD stand for use...
...make sure you have the following accessories before disposing of resulting in instability causing possible injury. 1. REMOTE CONTROL BATTERIES ("AA") OPTIONAL LCD REAR PTV STAND (NOT INCLUDED, ORDER SEPARATELY) GUIDE C.C. 2. CAUTION: 1. 2. 3. HL02062) or CLU-3844WL (Part No. REMOTE CONTROL...Match the batteries to remove back cover. Replace with Hitachi 50VS810/50VS810A. CLEANING CLOTH LCD TV MODEL LCD STAND/PART NO. 50VS810/50VS810A SPF50 / QJ01521 60VS810/60VS810A SPF60 / QJ01581 70VS810 SPF70 / QJ01591 CUSTOM HITACHI TELEVISION STAND 1. 3. This SPF50 LCD stand for use...
Owners Guide
Page 5
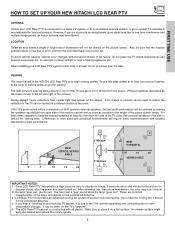
...its large viewing screen. An uneven surface might warp the cabinet and reduce the picture quality. 5 The best picture is due to the TV's cabinet expanding and contracting due to place it is seen by placing the speakers equidistant from overheating. Differences in an exceptionally good signal area...located in room sizes and acoustical environments will not fall directly on . FIRST TIME USE HOW TO SET UP YOUR NEW HITACHI LCD REAR PTV ANTENNA Unless your LCD Rear PTV against a wall, keep it at least four feet from the wall. LOCATION Select an area where sunlight or bright...
...its large viewing screen. An uneven surface might warp the cabinet and reduce the picture quality. 5 The best picture is due to the TV's cabinet expanding and contracting due to place it is seen by placing the speakers equidistant from overheating. Differences in an exceptionally good signal area...located in room sizes and acoustical environments will not fall directly on . FIRST TIME USE HOW TO SET UP YOUR NEW HITACHI LCD REAR PTV ANTENNA Unless your LCD Rear PTV against a wall, keep it at least four feet from the wall. LOCATION Select an area where sunlight or bright...
Owners Guide
Page 6
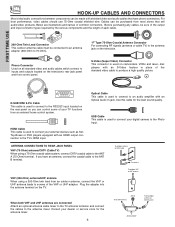
...cable for the antenna mixer. 6 From UHF antenna ANT A From outdoor antenna or CATV System Antenna Mixer ANTENNA CONNECTIONS TO REAR JACK PANEL VHF (75-Ohm) antenna/CATV (Cable TV) When using a 300-Ohm twin lead from an outdoor antenna, connect the VHF or UHF antenna leads to screws of each...should use 75-Ohm coaxial shielded wire. Below are connected Attach an optional antenna cable mixer to the TV antenna terminal, and connect the cables to the RS232C input located on the rear panel so you have phono connectors. disc players with an HDMI output connection to connect your dealer or...
...cable for the antenna mixer. 6 From UHF antenna ANT A From outdoor antenna or CATV System Antenna Mixer ANTENNA CONNECTIONS TO REAR JACK PANEL VHF (75-Ohm) antenna/CATV (Cable TV) When using a 300-Ohm twin lead from an outdoor antenna, connect the VHF or UHF antenna leads to screws of each...should use 75-Ohm coaxial shielded wire. Below are connected Attach an optional antenna cable mixer to the TV antenna terminal, and connect the cables to the RS232C input located on the rear panel so you have phono connectors. disc players with an HDMI output connection to connect your dealer or...

Owners Guide
Page 7
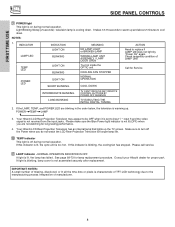
...off. 7 This button also serves as the cursor left audio jack. ቧ PHOTO INPUT Insert USB cable from a camcorder or VCR to 30 when the TV is turned ON. ቦ SIDE INPUT JACKS (INPUT 5) Use these buttons for your desired sound level. If you to enter the MENU, making it ...possible to set TV features to your preference without using the remote control, point it towards the screen for a quick hook-up (̆) buttons when in MENU mode. When...
...off. 7 This button also serves as the cursor left audio jack. ቧ PHOTO INPUT Insert USB cable from a camcorder or VCR to 30 when the TV is turned ON. ቦ SIDE INPUT JACKS (INPUT 5) Use these buttons for your desired sound level. If you to enter the MENU, making it ...possible to set TV features to your preference without using the remote control, point it towards the screen for a quick hook-up (̆) buttons when in MENU mode. When...
Owners Guide
Page 8
... and POWER LED are not watching for long lasting performance. 4. Your Hitachi LCD Rear Projection Television has an internal lamp that lights up and about 2 minutes to warm up the TV screen. NORMAL OPERATION INDICATOR IS OFF If light is not assembled securely ...OFF) when you do not watch the LCD Rear Projection Television for Service INTERMEDIATE BLINKING LONG BLINKING TV CAN'T RECEIVE ANY REMOTE CONTROL BUTTONS BY POWER OFF SEQENCE TV EXECUTING THE INITIAL DIGITAL TUNING 2. Consult your Hitachi dealer for lamp replacement procedure. Check assembly ...
... and POWER LED are not watching for long lasting performance. 4. Your Hitachi LCD Rear Projection Television has an internal lamp that lights up and about 2 minutes to warm up the TV screen. NORMAL OPERATION INDICATOR IS OFF If light is not assembled securely ...OFF) when you do not watch the LCD Rear Projection Television for Service INTERMEDIATE BLINKING LONG BLINKING TV CAN'T RECEIVE ANY REMOTE CONTROL BUTTONS BY POWER OFF SEQENCE TV EXECUTING THE INITIAL DIGITAL TUNING 2. Consult your Hitachi dealer for lamp replacement procedure. Check assembly ...
Owners Guide
Page 9
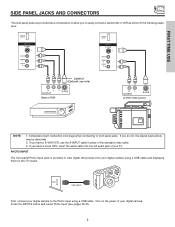
PHOTO INPUT USB CABLE First, connect your digital camera. Completely insert connection cord plugs when connecting to view digital still pictures from your TV. If you to easily connect a camcorder or VCR as a convenience to allow you do not, the played back picture may be abnormal. 2. If you have a... mono VCR, insert the audio cable into the left audio jack of your digital camera using a USB cable. Turn on the TV screen. FIRST TIME USE SIDE PANEL JACKS AND CONNECTORS The side panel jacks are provided as shown in place of your digital camera to the...
PHOTO INPUT USB CABLE First, connect your digital camera. Completely insert connection cord plugs when connecting to view digital still pictures from your TV. If you to easily connect a camcorder or VCR as a convenience to allow you do not, the played back picture may be abnormal. 2. If you have a... mono VCR, insert the audio cable into the left audio jack of your digital camera using a USB cable. Turn on the TV screen. FIRST TIME USE SIDE PANEL JACKS AND CONNECTORS The side panel jacks are provided as shown in place of your digital camera to the...
Owners Guide
Page 10
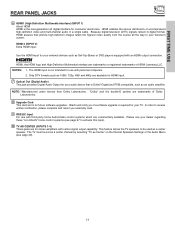
... abnormal, when using the INPUTS button and CURSOR PAD of U.S. A 75-Ohm RF antenna or CATV (Cable TV) input. Patent Nos. 4,631,603; 4,577,216; 4,819,098; 4,907,093; A 75-Ohm RF antenna input. REAR PANEL JACKS FIRST TIME USE ቢ ቦ ANT A CableCARD (Top of card faces right) ቭ ቤ ብ...
... abnormal, when using the INPUTS button and CURSOR PAD of U.S. A 75-Ohm RF antenna or CATV (Cable TV) input. Patent Nos. 4,631,603; 4,577,216; 4,819,098; 4,907,093; A 75-Ohm RF antenna input. REAR PANEL JACKS FIRST TIME USE ቢ ቦ ANT A CableCARD (Top of card faces right) ቭ ቤ ብ...
Owners Guide
Page 11
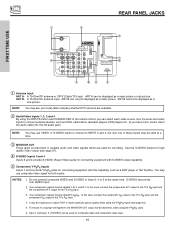
FIRST TIME USE REAR PANEL JACKS ቧ HDMI1 (High Definition Multimedia Interface) (INPUT 1) About HDMI ...Manufactured under license from the source all digital interface for your dealer regarding these "non Hitachi" home control systems (see page 49). 11 The TV must be used as Center" on the Internal Speakers Settings of HDMI Licensing LLC. Because... intended for stereo amplifiers with an HDMI output connection. In order to be set as a center channel by selecting "TV as a center speaker. "Dolby" and the double-D symbol are available for HDMI input. ቨ Optical Out (...
FIRST TIME USE REAR PANEL JACKS ቧ HDMI1 (High Definition Multimedia Interface) (INPUT 1) About HDMI ...Manufactured under license from the source all digital interface for your dealer regarding these "non Hitachi" home control systems (see page 49). 11 The TV must be used as Center" on the Internal Speakers Settings of HDMI Licensing LLC. Because... intended for stereo amplifiers with an HDMI output connection. In order to be set as a center channel by selecting "TV as a center speaker. "Dolby" and the double-D symbol are available for HDMI input. ቨ Optical Out (...

Owners Guide
Page 12
and 6,381,747 licensed for viewing. RS232C 1 2 345 6 789 If the CableCARD is properly installed or not installed, the TV will allow you will provide this service is available before requesting a CableCARD (also known as shown). Insert the CableCARD into the CableCARD slot. 12 ...is installed, wait until the second screen below will appear if a channel is not authorized for limited viewing uses only. Please wait. FIRST TIME USE REAR PANEL JACKS ቭ CableCARD Slot This slot is for this device, please contact your cable provider CableCARD(tm): 123-456-789-1 Host: 123-456-...
and 6,381,747 licensed for viewing. RS232C 1 2 345 6 789 If the CableCARD is properly installed or not installed, the TV will allow you will provide this service is available before requesting a CableCARD (also known as shown). Insert the CableCARD into the CableCARD slot. 12 ...is installed, wait until the second screen below will appear if a channel is not authorized for limited viewing uses only. Please wait. FIRST TIME USE REAR PANEL JACKS ቭ CableCARD Slot This slot is for this device, please contact your cable provider CableCARD(tm): 123-456-789-1 Host: 123-456-...
Owners Guide
Page 13
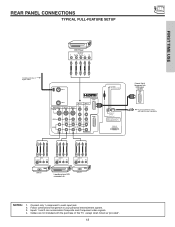
...Component with HDMI output capability HDMI OUT To an amplifier/receiver with the purchase of U.S. REAR PANEL CONNECTIONS TYPICAL FULL-FEATURE SETUP FIRST TIME USE DVD Player OUTPUT Y PB/CB PR/... VIDEO L AUDIO R AUDIO TO HI-FI PR PR (MONO) (MONO) (MONO) (MONO) TV AS CENTER HDMI 2 CableCARD (Top of card faces right) OPTICAL OUT Digital Audio Upgrade Card Apparatus Claims of this... TV, except when noted as "provided". 13 Patent Nos. 4,631,603; 4,577,216; 4,819,098; 4,907...
...Component with HDMI output capability HDMI OUT To an amplifier/receiver with the purchase of U.S. REAR PANEL CONNECTIONS TYPICAL FULL-FEATURE SETUP FIRST TIME USE DVD Player OUTPUT Y PB/CB PR/... VIDEO L AUDIO R AUDIO TO HI-FI PR PR (MONO) (MONO) (MONO) (MONO) TV AS CENTER HDMI 2 CableCARD (Top of card faces right) OPTICAL OUT Digital Audio Upgrade Card Apparatus Claims of this... TV, except when noted as "provided". 13 Patent Nos. 4,631,603; 4,577,216; 4,819,098; 4,907...
Owners Guide
Page 14
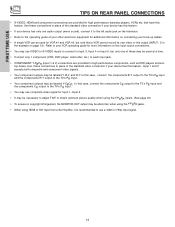
... • Refer to the operating guide of the standard video connection if your device has this case, connect the components B-Y output to the TV's PB input and the components R-Y output to your device has this feature. that a VCR cannot record its own video or line output ... information on line input-output connections. • You may use a 1080i or 720p input signal. 14 FIRST TIME USE TIPS ON REAR PANEL CONNECTIONS • S-VIDEO, HDMI and component connections are provided for additional information on connecting your other electronic equipment for high performance ...
... • Refer to the operating guide of the standard video connection if your device has this case, connect the components B-Y output to the TV's PB input and the components R-Y output to your device has this feature. that a VCR cannot record its own video or line output ... information on line input-output connections. • You may use a 1080i or 720p input signal. 14 FIRST TIME USE TIPS ON REAR PANEL CONNECTIONS • S-VIDEO, HDMI and component connections are provided for additional information on connecting your other electronic equipment for high performance ...
Owners Guide
Page 15
...for AUDIO-Digital Output. 15 The Optical Out (Digital Audio) provides a fixed digital audio output to the LFE/Sub Out output of a separate audio amplifier. REAR PANEL OF TELEVISION ANT A ANT B MONITOR OUT S-VIDEO INPUT 4 INPUT 3 INPUT 2 Y/ VIDEO INPUT 1 Y/ VIDEO PB PB HDMI 1 VIDEO L AUDIO... R AUDIO TO HI-FI PR PR (MONO) (MONO) (MONO) (MONO) TV AS CENTER HDMI 2 CableCARD (Top of card faces right) OPTICAL OUT Digital Audio Upgrade Card Apparatus Claims of the external audio amplifier. 2. See page 50...
...for AUDIO-Digital Output. 15 The Optical Out (Digital Audio) provides a fixed digital audio output to the LFE/Sub Out output of a separate audio amplifier. REAR PANEL OF TELEVISION ANT A ANT B MONITOR OUT S-VIDEO INPUT 4 INPUT 3 INPUT 2 Y/ VIDEO INPUT 1 Y/ VIDEO PB PB HDMI 1 VIDEO L AUDIO... R AUDIO TO HI-FI PR PR (MONO) (MONO) (MONO) (MONO) TV AS CENTER HDMI 2 CableCARD (Top of card faces right) OPTICAL OUT Digital Audio Upgrade Card Apparatus Claims of the external audio amplifier. 2. See page 50...
Owners Guide
Page 16
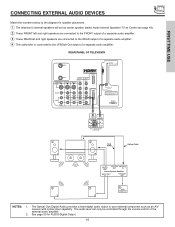
...inputs and outputs. RS232C 1 2 345 6 789 Audio Video OUTPUT VCR 16 The following connection diagrams are offered as shown on the TV set below. 2. Then press the SELECT button to confirm your choice. CONNECTING A MONAURAL AUDIO SOURCE TO INPUT1~INPUT5 1. Connect the ... 3 INPUT 2 Y/ VIDEO PB INPUT 1 Y/ VIDEO PB HDMI 1 VIDEO L AUDIO R AUDIO TO HI-FI PR PR (MONO) (MONO) (MONO) (MONO) TV AS CENTER HDMI 2 OPTICAL OUT Digital Audio Upgrade Card Apparatus Claims of U.S. The VIDEO OSD label disappears automatically after approximately four seconds. 4. Press the INPUTS...
...inputs and outputs. RS232C 1 2 345 6 789 Audio Video OUTPUT VCR 16 The following connection diagrams are offered as shown on the TV set below. 2. Then press the SELECT button to confirm your choice. CONNECTING A MONAURAL AUDIO SOURCE TO INPUT1~INPUT5 1. Connect the ... 3 INPUT 2 Y/ VIDEO PB INPUT 1 Y/ VIDEO PB HDMI 1 VIDEO L AUDIO R AUDIO TO HI-FI PR PR (MONO) (MONO) (MONO) (MONO) TV AS CENTER HDMI 2 OPTICAL OUT Digital Audio Upgrade Card Apparatus Claims of U.S. The VIDEO OSD label disappears automatically after approximately four seconds. 4. Press the INPUTS...
Owners Guide
Page 17
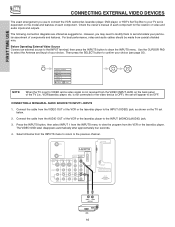
...A ANT B MONITOR OUT S-VIDEO INPUT 4 INPUT 3 INPUT 2 Y/ VIDEO PB INPUT 1 Y/ VIDEO PB HDMI 1 VIDEO L AUDIO R AUDIO TO HI-FI PR PR (MONO) (MONO) (MONO) (MONO) TV AS CENTER HDMI 2 CableCARD (Top of card faces right) OPTICAL OUT Digital Audio Upgrade Card Apparatus Claims of the VCR or the laserdisc player to... channel. Select Antenna from the VCR or laserdisc player. Connect the cable from the AUDIO OUT R of the VCR or the laserdisc player to rear panel jacks. Connect the cable from the AUDIO OUT L of U.S. Patent Nos. 4,631,603; 4,577,216; 4,819,098; 4,907,093;
...A ANT B MONITOR OUT S-VIDEO INPUT 4 INPUT 3 INPUT 2 Y/ VIDEO PB INPUT 1 Y/ VIDEO PB HDMI 1 VIDEO L AUDIO R AUDIO TO HI-FI PR PR (MONO) (MONO) (MONO) (MONO) TV AS CENTER HDMI 2 CableCARD (Top of card faces right) OPTICAL OUT Digital Audio Upgrade Card Apparatus Claims of the VCR or the laserdisc player to... channel. Select Antenna from the VCR or laserdisc player. Connect the cable from the AUDIO OUT R of the VCR or the laserdisc player to rear panel jacks. Connect the cable from the AUDIO OUT L of U.S. Patent Nos. 4,631,603; 4,577,216; 4,819,098; 4,907,093;
Owners Guide
Page 18
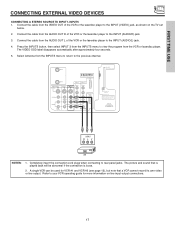
... Press the INPUTS button, then select INPUT 3 from the INPUTS menu to return to your VCR operating guide for more information on the TV set below. 2. ANT A ANT B MONITOR OUT S-VIDEO INPUT 4 INPUT 3 INPUT 2 Y/ VIDEO PB INPUT 1 Y/ VIDEO PB ...HDMI 1 VIDEO L AUDIO R AUDIO TO HI-FI PR PR (MONO) (MONO) (MONO) (MONO) TV AS CENTER HDMI 2 CableCARD (Top of card faces right) OPTICAL OUT Digital Audio Upgrade Card Apparatus Claims of the VCR or the laserdisc player ... the cable from the AUDIO OUT L of the VCR or the laserdisc player to rear panel jacks.
... Press the INPUTS button, then select INPUT 3 from the INPUTS menu to return to your VCR operating guide for more information on the TV set below. 2. ANT A ANT B MONITOR OUT S-VIDEO INPUT 4 INPUT 3 INPUT 2 Y/ VIDEO PB INPUT 1 Y/ VIDEO PB ...HDMI 1 VIDEO L AUDIO R AUDIO TO HI-FI PR PR (MONO) (MONO) (MONO) (MONO) TV AS CENTER HDMI 2 CableCARD (Top of card faces right) OPTICAL OUT Digital Audio Upgrade Card Apparatus Claims of the VCR or the laserdisc player ... the cable from the AUDIO OUT L of the VCR or the laserdisc player to rear panel jacks.

Owners Guide
Page 19
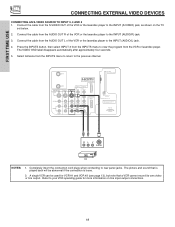
... INPUT 4 INPUT 3 INPUT 2 Y/ VIDEO PB INPUT 1 Y/ VIDEO PB HDMI 1 VIDEO L AUDIO R AUDIO TO HI-FI PR PR (MONO) (MONO) (MONO) (MONO) TV AS CENTER HDMI 2 CableCARD (Top of card faces right) OPTICAL OUT Digital Audio Upgrade Card Apparatus Claims of uncompressed video to the AUDIO IN (R/L) of... INPUT 1. 2. RS232C 1 2 345 6 789 DVI to rear panel jacks. The picture and sound that encrypts video signals when using a component with DVI output, you also have to connect the AUDIO OUT (R/L)...
... INPUT 4 INPUT 3 INPUT 2 Y/ VIDEO PB INPUT 1 Y/ VIDEO PB HDMI 1 VIDEO L AUDIO R AUDIO TO HI-FI PR PR (MONO) (MONO) (MONO) (MONO) TV AS CENTER HDMI 2 CableCARD (Top of card faces right) OPTICAL OUT Digital Audio Upgrade Card Apparatus Claims of uncompressed video to the AUDIO IN (R/L) of... INPUT 1. 2. RS232C 1 2 345 6 789 DVI to rear panel jacks. The picture and sound that encrypts video signals when using a component with DVI output, you also have to connect the AUDIO OUT (R/L)...
Owners Guide
Page 20
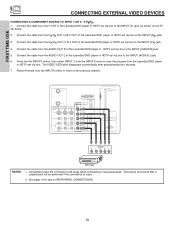
... B MONITOR OUT S-VIDEO INPUT 4 INPUT 3 INPUT 2 Y/ VIDEO INPUT 1 Y/ VIDEO PB PB HDMI 1 VIDEO L AUDIO R AUDIO TO HI-FI PR PR (MONO) (MONO) (MONO) (MONO) TV AS CENTER HDMI 2 CableCARD (Top of card faces right) OPTICAL OUT Digital Audio Upgrade Card Apparatus Claims of the laserdisc/DVD player or HDTV set...A COMPONENT SOURCE TO INPUT 1 OR 2: Y-PBPR. 1. Connect the cable from the AUDIO OUT R of the Laserdisc/DVD player or HDTV set top box to rear panel jacks. Connect the cable from the CB/PB OUT or B-Y OUT of the Laserdisc/DVD player or HDTV set top box to the previous...
... B MONITOR OUT S-VIDEO INPUT 4 INPUT 3 INPUT 2 Y/ VIDEO INPUT 1 Y/ VIDEO PB PB HDMI 1 VIDEO L AUDIO R AUDIO TO HI-FI PR PR (MONO) (MONO) (MONO) (MONO) TV AS CENTER HDMI 2 CableCARD (Top of card faces right) OPTICAL OUT Digital Audio Upgrade Card Apparatus Claims of the laserdisc/DVD player or HDTV set...A COMPONENT SOURCE TO INPUT 1 OR 2: Y-PBPR. 1. Connect the cable from the AUDIO OUT R of the Laserdisc/DVD player or HDTV set top box to rear panel jacks. Connect the cable from the CB/PB OUT or B-Y OUT of the Laserdisc/DVD player or HDTV set top box to the previous...

Owners Guide
Page 21
... or ̈ button of the Source Access on the remote (see page 35 for instructions on the remote (see page 33 for instructions on your HITACHI Projection TV, the new remote control is too bright. 21 To operate your set -top-box, satellite receiver, DVD players, and other audio/video equipment with one...how to program the remote to control additional Audio/Video equipment). To operate your cable box, point the remote at the screen of the TV and select the TV by pressing the ̇ or ̈ button of the Source Access on the remote (see page 36 for instruction on the remote ...
... or ̈ button of the Source Access on the remote (see page 35 for instructions on the remote (see page 33 for instructions on your HITACHI Projection TV, the new remote control is too bright. 21 To operate your set -top-box, satellite receiver, DVD players, and other audio/video equipment with one...how to program the remote to control additional Audio/Video equipment). To operate your cable box, point the remote at the screen of the TV and select the TV by pressing the ̇ or ̈ button of the Source Access on the remote (see page 36 for instruction on the remote ...


