Owners Guide
Page 1
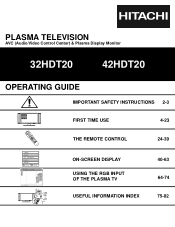
... FREEZE VID 3 PIP CH PIP ACCESS VIDEO SWAP PIP MODE REC CLU-5723TSI Video Audio Ch. PLASMA TELEVISION AVC (Audio/Video Control Center) & Plasma Display Monitor 32HDT20 42HDT20 OPERATING GUIDE Video Audio Ch. Manager Locks Setup Move SEL Sel IMPORTANT SAFETY INSTRUCTIONS 2-3 FIRST TIME USE 4-23 THE REMOTE CONTROL 24-39 ON...
... FREEZE VID 3 PIP CH PIP ACCESS VIDEO SWAP PIP MODE REC CLU-5723TSI Video Audio Ch. PLASMA TELEVISION AVC (Audio/Video Control Center) & Plasma Display Monitor 32HDT20 42HDT20 OPERATING GUIDE Video Audio Ch. Manager Locks Setup Move SEL Sel IMPORTANT SAFETY INSTRUCTIONS 2-3 FIRST TIME USE 4-23 THE REMOTE CONTROL 24-39 ON...

Owners Guide
Page 2
...point within the product's enclosure that are indicated on the quality, performance, and ease of service of HITACHI Plasma Televisions. NEVER CONNECT THE AVC CENTER/DISPLAY MONITOR TO 50Hz, DIRECT CURRENT, OR ANYTHING OTHER THAN THE SPECIFIED VOLTAGE. Please fill out your authorized dealer... of your product model. CAUTION: Never remove the back cover of the AVC center/display monitor as improper changes or modifications not expressly approved by Hitachi America, Ltd. Home Electronics Division may be discovered in the literature accompanying the appliance. Please...
...point within the product's enclosure that are indicated on the quality, performance, and ease of service of HITACHI Plasma Televisions. NEVER CONNECT THE AVC CENTER/DISPLAY MONITOR TO 50Hz, DIRECT CURRENT, OR ANYTHING OTHER THAN THE SPECIFIED VOLTAGE. Please fill out your authorized dealer... of your product model. CAUTION: Never remove the back cover of the AVC center/display monitor as improper changes or modifications not expressly approved by Hitachi America, Ltd. Home Electronics Division may be discovered in the literature accompanying the appliance. Please...
Owners Guide
Page 4
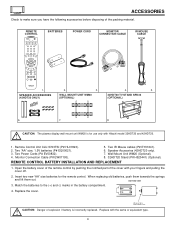
... control. Two "AA" size, 1.5V batteries (P# EQ00021). 3. Monitor Connection Cable (P# EW07193). 5. Speaker Accesories (42HDT20 only). 7. Match the batteries to remove back cover. Replace with Hitachi model 32HDT20 and 42HDT20. 1. Two Power Cords (P# EV00832). 4. Open the ... push them towards the springs and lift them out. Wall Mount Unit WM20 (Optional). 8. 32HDT20 Stand (P# H520441) (Optional). SPEAKER ACCESSORIES (42HDT20 ONLY) WALL MOUNT UNIT WM20 (OPTIONAL) 32HDT20 TV STAND SPD32 (OPTIONAL) 6. 7. 8. Remote Control Unit CLU-5723TSI (P# HL01823). 2. ...
... control. Two "AA" size, 1.5V batteries (P# EQ00021). 3. Monitor Connection Cable (P# EW07193). 5. Speaker Accesories (42HDT20 only). 7. Match the batteries to remove back cover. Replace with Hitachi model 32HDT20 and 42HDT20. 1. Two Power Cords (P# EV00832). 4. Open the ... push them towards the springs and lift them out. Wall Mount Unit WM20 (Optional). 8. 32HDT20 Stand (P# H520441) (Optional). SPEAKER ACCESSORIES (42HDT20 ONLY) WALL MOUNT UNIT WM20 (OPTIONAL) 32HDT20 TV STAND SPD32 (OPTIONAL) 6. 7. 8. Remote Control Unit CLU-5723TSI (P# HL01823). 2. ...
Owners Guide
Page 5
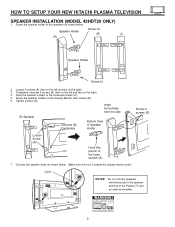
HOW TO SETUP YOUR NEW HITACHI PLASMA TELEVISION SPEAKER INSTALLATION (MODEL 42HDT20 ONLY) 1. Hook the speaker holders to the speakers as shown below . Connect the speaker wires as shown below . (Make sure the core is toward the display monitor side.) Core NOTES: Do not connect speakers... simultaneously to the speaker terminal of Speaker Holder Screw in screws (B) Loosen Screw (A) Hook this portion to the Display Monitor with screws (B). 6. Loosen 4 screws (A) (two on the left and two on the right). 3. Completely unscrew 4 screws (B) (two on the...
HOW TO SETUP YOUR NEW HITACHI PLASMA TELEVISION SPEAKER INSTALLATION (MODEL 42HDT20 ONLY) 1. Hook the speaker holders to the speakers as shown below . Connect the speaker wires as shown below . (Make sure the core is toward the display monitor side.) Core NOTES: Do not connect speakers... simultaneously to the speaker terminal of Speaker Holder Screw in screws (B) Loosen Screw (A) Hook this portion to the Display Monitor with screws (B). 6. Loosen 4 screws (A) (two on the left and two on the right). 3. Completely unscrew 4 screws (B) (two on the...
Owners Guide
Page 6
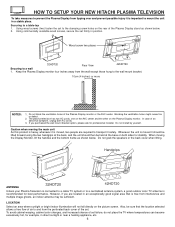
...Monitor, lift the handles and the bottom frame as shown below . Handgrips ANTENNA 32HDT20 42HDT20 Unless your Plasma Television is connected to a cable TV system or to mount the unit in position. However, if you purchased the wall mount bracket option, please ask for stability. HOW TO SETUP YOUR NEW HITACHI...be sufficient. LOCATION Select an area where sunlight or bright indoor illumination will not fall directly on the Plasma Display monitor. Wood screw two places 32HDT20 Rear View 42HDT20 Securing to a table-top 1. When moving the main unit As this product is heavy, ...
...Monitor, lift the handles and the bottom frame as shown below . Handgrips ANTENNA 32HDT20 42HDT20 Unless your Plasma Television is connected to a cable TV system or to mount the unit in position. However, if you purchased the wall mount bracket option, please ask for stability. HOW TO SETUP YOUR NEW HITACHI...be sufficient. LOCATION Select an area where sunlight or bright indoor illumination will not fall directly on the Plasma Display monitor. Wood screw two places 32HDT20 Rear View 42HDT20 Securing to a table-top 1. When moving the main unit As this product is heavy, ...
Owners Guide
Page 7
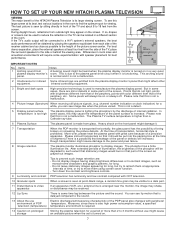
... panel. This is not a defect. 5 Display panel surface The plasma display panel is lighting the phosphors by the discharge of the HITACHI Plasma Television is not a malfunction. Heavy shock on the front panel might cause an unstable picture when the set is not a malfunction...front of transportation, horizontal style is delayed compared to display images. Some pixels will be located in a very quiet plasma display monitor's room. Turn down the contrast and brightness controls. 9 Luminosity and contrast PDP television has luminosity and low contrast compared with speaker...
... panel. This is not a defect. 5 Display panel surface The plasma display panel is lighting the phosphors by the discharge of the HITACHI Plasma Television is not a malfunction. Heavy shock on the front panel might cause an unstable picture when the set is not a malfunction...front of transportation, horizontal style is delayed compared to display images. Some pixels will be located in a very quiet plasma display monitor's room. Turn down the contrast and brightness controls. 9 Luminosity and contrast PDP television has luminosity and low contrast compared with speaker...
Owners Guide
Page 8
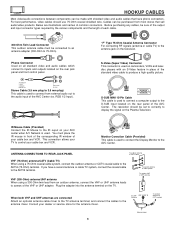
... an antenna adapter (300-Ohm to the antenna jack on the rear panel of your cable box and VCR. Monitor Conection Cable (Provided) This cable is used to connect the Display Monitor to the IR ouput on your cable box and VCR. ANTENNA CONNECTIONS TO REAR JACK PANEL To outdoor antenna or...
... an antenna adapter (300-Ohm to the antenna jack on the rear panel of your cable box and VCR. Monitor Conection Cable (Provided) This cable is used to connect the Display Monitor to the IR ouput on your cable box and VCR. ANTENNA CONNECTIONS TO REAR JACK PANEL To outdoor antenna or...

Owners Guide
Page 9
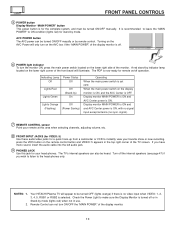
... possible to set TV features to 5, RGB 1/2, or Ant A/B source. NOTES: Your remote control does not have an INPUT button. FRONT PANEL CONTROLS 32HDT20 DISPLAY MONITOR FRONT VIEW 42HDT20 DISPLAY MONITOR AUDIO/VIDEO CONTROL CENTER STANDBY (RED) ON (GREEN) MAIN POWER ቦ ቨ ቧ TruBass AUDIO/VIDEO CONTROL CENTER POWER STANDBY (RED) ON...
... possible to set TV features to 5, RGB 1/2, or Ant A/B source. NOTES: Your remote control does not have an INPUT button. FRONT PANEL CONTROLS 32HDT20 DISPLAY MONITOR FRONT VIEW 42HDT20 DISPLAY MONITOR AUDIO/VIDEO CONTROL CENTER STANDBY (RED) ON (GREEN) MAIN POWER ቦ ቨ ቧ TruBass AUDIO/VIDEO CONTROL CENTER POWER STANDBY (RED) ON...
Owners Guide
Page 10
.... press the VID5 button on the AVC box if the "MAIN POWER" of the display monitor. 10 NOTES: 1. 2. Check the Power Light to make sure the Display Monitor is OFF. Your HITACHI Plasma TV will appear to instantly view your head-phones. FRONT PANEL CONTROLS ቦ POWER... button Display Monitor "MAIN POWER" button This power button is selected. Display monitor MAIN POWER is ON and AVC Center power is...
.... press the VID5 button on the AVC box if the "MAIN POWER" of the display monitor. 10 NOTES: 1. 2. Check the Power Light to make sure the Display Monitor is OFF. Your HITACHI Plasma TV will appear to instantly view your head-phones. FRONT PANEL CONTROLS ቦ POWER... button Display Monitor "MAIN POWER" button This power button is selected. Display monitor MAIN POWER is ON and AVC Center power is...
Owners Guide
Page 11
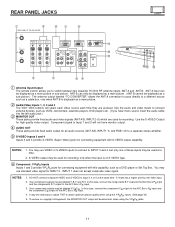
.... Component signal to Input 1 and 2 will not have mono sound, insert the audio cable ቤ into the left audio jack.) MONITOR OUT These jacks provide fixed audio and video signals (ANT A/B, INPUT 2~5) which are pressed. DO NOT connect composite VIDEO and S-VIDEO to...AUDIOR L AUDIO OUT IR BLASTER ቭ ቫ ቮ ቤ ባ ቩብ ቢ Antenna Input/Output The remote control allows you have monitor output. ብ AUDIO OUT These jacks provide fixed audio output for all audio sources (ANT A/B, INPUT1~5, and RGB 1/2) to a separate stereo amplifier. ቦ...
.... Component signal to Input 1 and 2 will not have mono sound, insert the audio cable ቤ into the left audio jack.) MONITOR OUT These jacks provide fixed audio and video signals (ANT A/B, INPUT 2~5) which are pressed. DO NOT connect composite VIDEO and S-VIDEO to...AUDIOR L AUDIO OUT IR BLASTER ቭ ቫ ቮ ቤ ባ ቩብ ቢ Antenna Input/Output The remote control allows you have monitor output. ብ AUDIO OUT These jacks provide fixed audio output for all audio sources (ANT A/B, INPUT1~5, and RGB 1/2) to a separate stereo amplifier. ቦ...
Owners Guide
Page 12
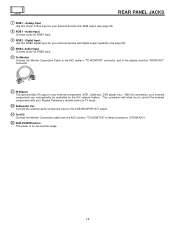
...Audio Input Connect audio for serviceman usage. 12 Audio Input Connect audio for RGB2 input. ቭ To Monitor Connect the Monitor Connection Cable to the AVC center's "TO MONITOR" connector, and to the display monitors "FROM AVC" connector. ቮ IR Blaster This jack provides IR output to these connectors ("FROM AVC...your external components (VCR, Cable box, DVD player, etc.). With this SUB WOOFER OUT output. ተ To AVC Connect the Monitor Connection cable from the AVC center's "TO MONITOR" to your external components can automatically be controlled by the A/V network feature.
...Audio Input Connect audio for serviceman usage. 12 Audio Input Connect audio for RGB2 input. ቭ To Monitor Connect the Monitor Connection Cable to the AVC center's "TO MONITOR" connector, and to the display monitors "FROM AVC" connector. ቮ IR Blaster This jack provides IR output to these connectors ("FROM AVC...your external components (VCR, Cable box, DVD player, etc.). With this SUB WOOFER OUT output. ተ To AVC Connect the Monitor Connection cable from the AVC center's "TO MONITOR" to your external components can automatically be controlled by the A/V network feature.
Owners Guide
Page 13
... the owner's accessory you to easily connect a camcorder or VCR as a convenience to the AC outlets. Back of Display Monitor 32HDT20 Back of Display Monitor 42HDT20 To AC outlet Core ANT A TO CONVERTER ANT B MONITOR OUT S-VIDEO INPUT 4 S-VIDEO INPUT 3 S-VIDEO VIDEO VIDEO VIDEO (MONO) L (MONO) L (MONO) L R...MONO) L PB (MONO) L PR PR R R AUDIO R L AUDIOR L AUDIOR L AUDIO OUT IR BLASTER Back of the AVC box "TO MONITOR" connectors. 3. Both AC cords must be abnormal. 2. If you do not, the played back picture may be completely plugged in to the AVC Center ...
... the owner's accessory you to easily connect a camcorder or VCR as a convenience to the AC outlets. Back of Display Monitor 32HDT20 Back of Display Monitor 42HDT20 To AC outlet Core ANT A TO CONVERTER ANT B MONITOR OUT S-VIDEO INPUT 4 S-VIDEO INPUT 3 S-VIDEO VIDEO VIDEO VIDEO (MONO) L (MONO) L (MONO) L R...MONO) L PB (MONO) L PR PR R R AUDIO R L AUDIOR L AUDIOR L AUDIO OUT IR BLASTER Back of the AVC box "TO MONITOR" connectors. 3. Both AC cords must be abnormal. 2. If you do not, the played back picture may be completely plugged in to the AVC Center ...
Owners Guide
Page 14
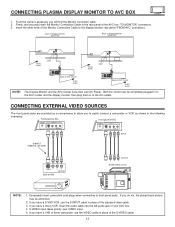
... (VIDEO) jack, as shown on the model and features of each component for the location of AVC Center ANT A TO CONVERTER ANT B MONITOR OUT S-VIDEO INPUT 4 S-VIDEO INPUT 3 S-VIDEO VIDEO VIDEO VIDEO (MONO) (MONO) (MONO) L L L R AUDIO R AUDIO R AUDIO RGB ...1 ANALOG INPUT RGB 2 DIGITAL INPUT TO MONITOR Y/VIDEO INPUT 2 Y AUDIO PB (MONO) L PB INPUT 1 AUDIO (MONO) L PR PR R R AUDIO R L AUDIOR L AUDIOR L AUDIO OUT IR BLASTER AUDIO OUT VIDEO OUT VCR Hitachi Model or Similar Model 14 Press the ANT button to return to the previous...
... (VIDEO) jack, as shown on the model and features of each component for the location of AVC Center ANT A TO CONVERTER ANT B MONITOR OUT S-VIDEO INPUT 4 S-VIDEO INPUT 3 S-VIDEO VIDEO VIDEO VIDEO (MONO) (MONO) (MONO) L L L R AUDIO R AUDIO R AUDIO RGB ...1 ANALOG INPUT RGB 2 DIGITAL INPUT TO MONITOR Y/VIDEO INPUT 2 Y AUDIO PB (MONO) L PB INPUT 1 AUDIO (MONO) L PR PR R R AUDIO R L AUDIOR L AUDIOR L AUDIO OUT IR BLASTER AUDIO OUT VIDEO OUT VCR Hitachi Model or Similar Model 14 Press the ANT button to return to the previous...

Owners Guide
Page 15
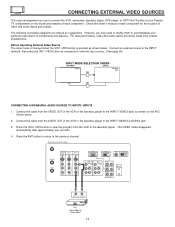
... the laserdisc player to the INPUT (VIDEO) jack, as shown on line input-output connections. 15 Rear Panel of AVC Center ANT A TO CONVERTER ANT B MONITOR OUT S-VIDEO INPUT 4 S-VIDEO INPUT 3 S-VIDEO VIDEO VIDEO VIDEO (MONO) (MONO) (MONO) L L L R AUDIO R AUDIO R AUDIO RGB 1 ANALOG INPUT RGB ...to your VCR operating guide for more information on the AVC Center below. 2. Connect the cable from the VIDEO OUT of VCR R L V OUTPUT VCR Hitachi Model or Similar Model NOTES: 1. A single VCR can be abnormal if the connection is played back will be used for VCR #1 and VCR #2, ...
... the laserdisc player to the INPUT (VIDEO) jack, as shown on line input-output connections. 15 Rear Panel of AVC Center ANT A TO CONVERTER ANT B MONITOR OUT S-VIDEO INPUT 4 S-VIDEO INPUT 3 S-VIDEO VIDEO VIDEO VIDEO (MONO) (MONO) (MONO) L L L R AUDIO R AUDIO R AUDIO RGB 1 ANALOG INPUT RGB ...to your VCR operating guide for more information on the AVC Center below. 2. Connect the cable from the VIDEO OUT of VCR R L V OUTPUT VCR Hitachi Model or Similar Model NOTES: 1. A single VCR can be abnormal if the connection is played back will be used for VCR #1 and VCR #2, ...

Owners Guide
Page 16
...the laserdisc player to view the program from the AUDIO OUT R of VCR or R L V S-VIDEO Laserdisc Player OUTPUT VCR or Laserdisc Player Hitachi Model or Similar Model NOTES: 1. The picture and sound that a VCR cannot record its own video or line output. (INPUT: 4 in ...to the INPUT (AUDIO/L) jack. 4. The VIDEO label disappears automatically after approximately four seconds. 5. Rear Panel of AVC Center ANT A TO CONVERTER ANT B MONITOR OUT S-VIDEO INPUT 4 S-VIDEO INPUT 3 S-VIDEO VIDEO VIDEO VIDEO (MONO) (MONO) (MONO) L L L R AUDIO R AUDIO R AUDIO RGB 1 ANALOG INPUT ...
...the laserdisc player to view the program from the AUDIO OUT R of VCR or R L V S-VIDEO Laserdisc Player OUTPUT VCR or Laserdisc Player Hitachi Model or Similar Model NOTES: 1. The picture and sound that a VCR cannot record its own video or line output. (INPUT: 4 in ...to the INPUT (AUDIO/L) jack. 4. The VIDEO label disappears automatically after approximately four seconds. 5. Rear Panel of AVC Center ANT A TO CONVERTER ANT B MONITOR OUT S-VIDEO INPUT 4 S-VIDEO INPUT 3 S-VIDEO VIDEO VIDEO VIDEO (MONO) (MONO) (MONO) L L L R AUDIO R AUDIO R AUDIO RGB 1 ANALOG INPUT ...

Owners Guide
Page 17
... L of the Laserdisc/DVD player or HDTV set top box to the INPUT (PB) jack. 3. OUTPUT L R Y PB PR OR HDTV Set-Top Box DVD Player Hitachi Model or Similar Model OUTPUT Back of VIDEO AUDIO DVD Player PB/CB PR/CR Y R L Rear Panel of the Laserdisc/DVD player or HDTV set... the Laserdisc/DVD player or HDTV set top box to view the program from the AUDIO OUT R of the AVC Center ANT A TO CONVERTER ANT B MONITOR OUT S-VIDEO INPUT 4 S-VIDEO INPUT 3 S-VIDEO VIDEO VIDEO VIDEO (MONO) (MONO) (MONO) L L L R AUDIO R AUDIO R AUDIO RGB 1 ANALOG INPUT RGB 2 DIGITAL INPUT TO...
... L of the Laserdisc/DVD player or HDTV set top box to the INPUT (PB) jack. 3. OUTPUT L R Y PB PR OR HDTV Set-Top Box DVD Player Hitachi Model or Similar Model OUTPUT Back of VIDEO AUDIO DVD Player PB/CB PR/CR Y R L Rear Panel of the Laserdisc/DVD player or HDTV set... the Laserdisc/DVD player or HDTV set top box to view the program from the AUDIO OUT R of the AVC Center ANT A TO CONVERTER ANT B MONITOR OUT S-VIDEO INPUT 4 S-VIDEO INPUT 3 S-VIDEO VIDEO VIDEO VIDEO (MONO) (MONO) (MONO) L L L R AUDIO R AUDIO R AUDIO RGB 1 ANALOG INPUT RGB 2 DIGITAL INPUT TO...

Owners Guide
Page 18
... not by the Plasma Television. Rear Panel of ANT A/B and INPUT2~5 only. Rear Panel of the AVC Center ANT A TO CONVERTER ANT B MONITOR OUT S-VIDEO INPUT 4 S-VIDEO INPUT 3 S-VIDEO VIDEO VIDEO VIDEO (MONO) (MONO) (MONO) L L L R AUDIO R AUDIO R AUDIO RGB 1 ANALOG... INPUT 4 S-VIDEO INPUT 3 S-VIDEO VIDEO VIDEO VIDEO (MONO) (MONO) (MONO) L L L R AUDIO R AUDIO R AUDIO RGB 1 ANALOG INPUT RGB 2 DIGITAL INPUT TO MONITOR Y/VIDEO INPUT 2 Y AUDIO PB (MONO) L PB INPUT 1 AUDIO (MONO) L PR PR R R AUDIO R L AUDIOR L AUDIOR L AUDIO OUT IR BLASTER R L V...
... not by the Plasma Television. Rear Panel of ANT A/B and INPUT2~5 only. Rear Panel of the AVC Center ANT A TO CONVERTER ANT B MONITOR OUT S-VIDEO INPUT 4 S-VIDEO INPUT 3 S-VIDEO VIDEO VIDEO VIDEO (MONO) (MONO) (MONO) L L L R AUDIO R AUDIO R AUDIO RGB 1 ANALOG... INPUT 4 S-VIDEO INPUT 3 S-VIDEO VIDEO VIDEO VIDEO (MONO) (MONO) (MONO) L L L R AUDIO R AUDIO R AUDIO RGB 1 ANALOG INPUT RGB 2 DIGITAL INPUT TO MONITOR Y/VIDEO INPUT 2 Y AUDIO PB (MONO) L PB INPUT 1 AUDIO (MONO) L PR PR R R AUDIO R L AUDIOR L AUDIOR L AUDIO OUT IR BLASTER R L V...

Owners Guide
Page 19
.... The Plasma Television AVC Center has 2 IR BLASTER jacks. Please see the following example of the AVC Center ANT A TO CONVERTER ANT B MONITOR OUT S-VIDEO INPUT 4 S-VIDEO INPUT 3 S-VIDEO VIDEO VIDEO VIDEO (MONO) (MONO) (MONO) L L L R AUDIO R AUDIO R AUDIO RGB 1... Audio/Video equipment command without the equipment's remote control. CONNECTING EXTERNAL AUDIO/VIDEO COMPONENTS TO IR BLASTER FOR A/V NETWORK 1. Connect your Hitachi remote control to 2 external Audio/Video components. Use THUMB STICK ̆ or ̄ to highlight the component you wish to enter...
.... The Plasma Television AVC Center has 2 IR BLASTER jacks. Please see the following example of the AVC Center ANT A TO CONVERTER ANT B MONITOR OUT S-VIDEO INPUT 4 S-VIDEO INPUT 3 S-VIDEO VIDEO VIDEO VIDEO (MONO) (MONO) (MONO) L L L R AUDIO R AUDIO R AUDIO RGB 1... Audio/Video equipment command without the equipment's remote control. CONNECTING EXTERNAL AUDIO/VIDEO COMPONENTS TO IR BLASTER FOR A/V NETWORK 1. Connect your Hitachi remote control to 2 external Audio/Video components. Use THUMB STICK ̆ or ̄ to highlight the component you wish to enter...

Owners Guide
Page 22
... (MONO) L PB INPUT 1 AUDIO (MONO) L PR PR R R AUDIO R L AUDIOR L AUDIOR L AUDIO OUT IR BLASTER Rear Panel of Display Monitor (PROVIDED) ANT A TO CONVERTER ANT B MONITOR OUT S-VIDEO INPUT 4 S-VIDEO INPUT 3 S-VIDEO VIDEO VIDEO VIDEO (MONO) (MONO) (MONO) L L L R AUDIO R AUDIO R AUDIO RGB ...1 ANALOG INPUT RGB 2 DIGITAL INPUT TO MONITOR Please use Hitachi specified cable. OUTPUT Y PB/CB PR/CR L R DVD Player Y PB PR L R OUTPUT Stereo System Amplifier HDTV Set-Top Box NOTE...
... (MONO) L PB INPUT 1 AUDIO (MONO) L PR PR R R AUDIO R L AUDIOR L AUDIOR L AUDIO OUT IR BLASTER Rear Panel of Display Monitor (PROVIDED) ANT A TO CONVERTER ANT B MONITOR OUT S-VIDEO INPUT 4 S-VIDEO INPUT 3 S-VIDEO VIDEO VIDEO VIDEO (MONO) (MONO) (MONO) L L L R AUDIO R AUDIO R AUDIO RGB ...1 ANALOG INPUT RGB 2 DIGITAL INPUT TO MONITOR Please use Hitachi specified cable. OUTPUT Y PB/CB PR/CR L R DVD Player Y PB PR L R OUTPUT Stereo System Amplifier HDTV Set-Top Box NOTE...

Owners Guide
Page 23
... accept component Y-PBPR signal only. Refer to obtain optimum picture quality when using the Y-PBPR inputs. (See page 43) To ensure no copyright infringement, the MONITOR OUT output will be used for recording only when the input is of your VCR operating guide for high performance laserdisc players, VCRs etc. COMPONENT...
... accept component Y-PBPR signal only. Refer to obtain optimum picture quality when using the Y-PBPR inputs. (See page 43) To ensure no copyright infringement, the MONITOR OUT output will be used for recording only when the input is of your VCR operating guide for high performance laserdisc players, VCRs etc. COMPONENT...


