Limited Warranty and Support Guide - Refurbished
Page 6
... HP Hardware Product to you. Advanced Unit Replacement Warranty Service (Displays ONLY) Your HP Limited Warranty may involve performing routine diagnostic procedures, installing software updates or patches, removing third party options and/or substituting options. HP provides on -site labor support to HP. This may include an advance unit replacement warranty service. HP will incur all logistics and insurance costs to return the product to an authorized service location for these service upgrades...
... HP Hardware Product to you. Advanced Unit Replacement Warranty Service (Displays ONLY) Your HP Limited Warranty may involve performing routine diagnostic procedures, installing software updates or patches, removing third party options and/or substituting options. HP provides on -site labor support to HP. This may include an advance unit replacement warranty service. HP will incur all logistics and insurance costs to return the product to an authorized service location for these service upgrades...
Getting Started Guide
Page 20
... for more information about using Easy Internet Services. To open Internet Explorer: a Click the Windows Start Button on the taskbar. To connect to the Internet. You can connect to the Internet through your computer to the Internet that do not use any specific software and hardware that you have Microsoft Internet Explorer. Connecting to the Internet The computer can use the telephone modem, such as a LAN (local area network) or DSL (digital subscriber...
... for more information about using Easy Internet Services. To open Internet Explorer: a Click the Windows Start Button on the taskbar. To connect to the Internet. You can connect to the Internet through your computer to the Internet that do not use any specific software and hardware that you have Microsoft Internet Explorer. Connecting to the Internet The computer can use the telephone modem, such as a LAN (local area network) or DSL (digital subscriber...
Getting Started Guide
Page 23
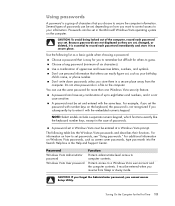
... how you set the password with number keys on how to a Windows Vista user account and the computer contents. Don't write down passwords unless you cannot access Setup Utility. Do not store passwords in a secure place away from Sleep or Away mode. CAUTION: If you forget the Administrator password, you store them in a file on Windows Vista passwords, such as a basic guide when choosing a password: Choose a password that others can use personal...
... how you set the password with number keys on how to a Windows Vista user account and the computer contents. Don't write down passwords unless you cannot access Setup Utility. Do not store passwords in a secure place away from Sleep or Away mode. CAUTION: If you forget the Administrator password, you store them in a file on Windows Vista passwords, such as a basic guide when choosing a password: Choose a password that others can use personal...

Getting Started Guide
Page 57
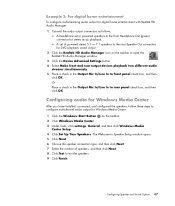
... to configure multichannel audio output for DVD playback sound output 2 Click the Realtek HD Audio Manager icon on the taskbar. 2 Click Windows Media Center. 3 Under Tasks, click settings, General, and then click Windows Media Center Setup. 4 Click Set Up Your Speakers. Configuring Speaker and Sound Options 47 The Welcome to Speaker Setup window opens. 5 Click Next. 6 Choose the speaker connection type, and then click Next. 7 Select the number of powered stereo 5.1 or 7.1 speakers to the rear Speaker Out connectors for Windows Media Center: 1 Click the Windows Start Button on...
... to configure multichannel audio output for DVD playback sound output 2 Click the Realtek HD Audio Manager icon on the taskbar. 2 Click Windows Media Center. 3 Under Tasks, click settings, General, and then click Windows Media Center Setup. 4 Click Set Up Your Speakers. Configuring Speaker and Sound Options 47 The Welcome to Speaker Setup window opens. 5 Click Next. 6 Choose the speaker connection type, and then click Next. 7 Select the number of powered stereo 5.1 or 7.1 speakers to the rear Speaker Out connectors for Windows Media Center: 1 Click the Windows Start Button on...
Limited Warranty and Support Guide
Page 14
... a.m.-12:30 p.m. Sri Lanka: Call your retailer. Hours are key benefits for technical information or to get software updates. 4 If you may wish to upgrade your computer to purchase a desktop computer! We know that you have completely set up . Any hardware upgrades that expanding and upgrading are subject to upgrade your specific needs. This must pass extensive quality tests to meet your system. 14
... a.m.-12:30 p.m. Sri Lanka: Call your retailer. Hours are key benefits for technical information or to get software updates. 4 If you may wish to upgrade your computer to purchase a desktop computer! We know that you have completely set up . Any hardware upgrades that expanding and upgrading are subject to upgrade your specific needs. This must pass extensive quality tests to meet your system. 14
Limited Warranty and Support Guide
Page 6
... software distributed by HP under the HP brand name are set forth in the Limited Warranty applicable to you . If your HP Option is your warranty start date. See "Contacting HP" for online resources and telephone support. HP's only warranty obligations with : • Generating or diagnosing user-generated programs or source codes. • Installing of non-HP products. • System optimization and customization. • Network configuration. Service Upgrades HP...
... software distributed by HP under the HP brand name are set forth in the Limited Warranty applicable to you . If your HP Option is your warranty start date. See "Contacting HP" for online resources and telephone support. HP's only warranty obligations with : • Generating or diagnosing user-generated programs or source codes. • Installing of non-HP products. • System optimization and customization. • Network configuration. Service Upgrades HP...
Getting Started
Page 58
.... a Click the Windows Start Button on the taskbar, click All Programs, click User Guides, and then click Safety & Comfort Guide. NOTE: Easy Internet Services provides a list of ISPs; To transfer existing accounts, follow the instructions provided by model) NOTE: If you begin using Easy Internet Services. Double-click the ISP-provided icon on the desktop, and log in. 4 Open your ISP. It describes proper workstation setup, posture...
.... a Click the Windows Start Button on the taskbar, click All Programs, click User Guides, and then click Safety & Comfort Guide. NOTE: Easy Internet Services provides a list of ISPs; To transfer existing accounts, follow the instructions provided by model) NOTE: If you begin using Easy Internet Services. Double-click the ISP-provided icon on the desktop, and log in. 4 Open your ISP. It describes proper workstation setup, posture...

Getting Started
Page 95
Configuring Speaker and Sound Options 85 The Welcome to Speaker Setup window opens. 5 Click Next. 6 Choose the speaker connection type, and then click Next. 7 Select the number of powered stereo 5.1 or 7.1 speakers to the rear Speaker Out connectors for DVD playback sound output 2 Click the Realtek HD Audio Manager icon on the taskbar. 2 Click Windows Media Center. 3 Under Tasks, click settings, General, and then click Windows Media Center Setup. 4 Click Set Up Your Speakers. Or Place a check in the Output Mic In...
Configuring Speaker and Sound Options 85 The Welcome to Speaker Setup window opens. 5 Click Next. 6 Choose the speaker connection type, and then click Next. 7 Select the number of powered stereo 5.1 or 7.1 speakers to the rear Speaker Out connectors for DVD playback sound output 2 Click the Realtek HD Audio Manager icon on the taskbar. 2 Click Windows Media Center. 3 Under Tasks, click settings, General, and then click Windows Media Center Setup. 4 Click Set Up Your Speakers. Or Place a check in the Output Mic In...
Getting Started
Page 20
Contact your ISP for high-speed broadband connections. a Click the Windows Start Button on the taskbar. d Follow the onscreen instructions to select an ISP and set it up with an ISP. You must have Microsoft Internet Explorer. A dial-up Internet service. NOTE: Easy Internet Services provides a list of the computer, set up modem, a cable modem, or a DSL modem for any Web browser; To transfer existing accounts...
Contact your ISP for high-speed broadband connections. a Click the Windows Start Button on the taskbar. d Follow the onscreen instructions to select an ISP and set it up with an ISP. You must have Microsoft Internet Explorer. A dial-up Internet service. NOTE: Easy Internet Services provides a list of the computer, set up modem, a cable modem, or a DSL modem for any Web browser; To transfer existing accounts...
Getting Started
Page 23
... being locked out of up to enter it in a secure place away from Sleep or Away mode. Use the following table lists the Windows Vista passwords and describes their functions. Don't use the same password for the First Time 13 A password set in the Help and Support Center. For additional information on the keyboard, the password is not recognized if you cannot access Setup Utility. Protects access to computer contents.
... being locked out of up to enter it in a secure place away from Sleep or Away mode. Use the following table lists the Windows Vista passwords and describes their functions. Don't use the same password for the First Time 13 A password set in the Help and Support Center. For additional information on the keyboard, the password is not recognized if you cannot access Setup Utility. Protects access to computer contents.
Getting Started
Page 57
Configuring Speaker and Sound Options 47 The Welcome to Speaker Setup window opens. 5 Click Next. 6 Choose the speaker connection type, and then click Next. 7 Select the number of powered stereo 5.1 or 7.1 speakers to the rear Speaker Out connectors for DVD playback sound output 2 Click the Realtek HD Audio Manager icon on the taskbar. 2 Click Windows Media Center. 3 Under Tasks, click settings, General, and then click Windows Media Center Setup. 4 Click Set Up Your Speakers. Or Place a check in the Output Mic In...
Configuring Speaker and Sound Options 47 The Welcome to Speaker Setup window opens. 5 Click Next. 6 Choose the speaker connection type, and then click Next. 7 Select the number of powered stereo 5.1 or 7.1 speakers to the rear Speaker Out connectors for DVD playback sound output 2 Click the Realtek HD Audio Manager icon on the taskbar. 2 Click Windows Media Center. 3 Under Tasks, click settings, General, and then click Windows Media Center Setup. 4 Click Set Up Your Speakers. Or Place a check in the Output Mic In...

Getting Started Guide
Page 58
... open Internet Explorer: a Click the Windows Start Button on the desktop, and log in. 4 Open your comfort and productivity. Or Type http://www.hp.com/ergo into the Web browser address box, and then press Enter on the keyboard. 48 Getting Started (features vary by the ISP. 3 Connect to the Internet. You can use any Web browser; b Click Internet Explorer. NOTE: If you begin using Easy Internet Services. Using the...
... open Internet Explorer: a Click the Windows Start Button on the desktop, and log in. 4 Open your comfort and productivity. Or Type http://www.hp.com/ergo into the Web browser address box, and then press Enter on the keyboard. 48 Getting Started (features vary by the ISP. 3 Connect to the Internet. You can use any Web browser; b Click Internet Explorer. NOTE: If you begin using Easy Internet Services. Using the...
Upgrading and Servicing Guide
Page 12
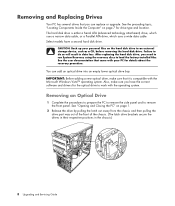
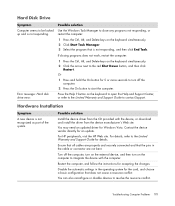
... loss. Removing and Replacing Drives Your PC has several drives that you need to run System Recovery using the recovery discs to load the factory-installed files. After replacing the hard disk drive, you can add an optical drive into an empty lower optical drive bay. IMPORTANT: Before adding a new optical drive, make sure you have a second hard disk drive. Failure to remove the front panel. See "Opening and Closing the PC" on the hard disk drive to work with the Microsoft Windows Vista™ operating system. See the user documentation...
... loss. Removing and Replacing Drives Your PC has several drives that you need to run System Recovery using the recovery discs to load the factory-installed files. After replacing the hard disk drive, you can add an optical drive into an empty lower optical drive bay. IMPORTANT: Before adding a new optical drive, make sure you have a second hard disk drive. Failure to remove the front panel. See "Opening and Closing the PC" on the hard disk drive to work with the Microsoft Windows Vista™ operating system. See the user documentation...
Upgrading and Servicing Guide
Page 28
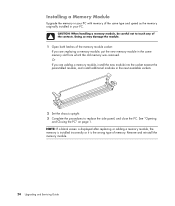
... the module. 1 Open both latches of the memory module socket: If you are replacing a memory module, put the new memory module in your PC with memory of the same type and speed as the memory originally installed in the same memory slot from which the old memory was removed. Installing a Memory Module Upgrade the memory in your PC. NOTE: If a blank screen is displayed after replacing or adding a memory module, the memory is installed incorrectly or...
... the module. 1 Open both latches of the memory module socket: If you are replacing a memory module, put the new memory module in your PC with memory of the same type and speed as the memory originally installed in the same memory slot from which the old memory was removed. Installing a Memory Module Upgrade the memory in your PC. NOTE: If a blank screen is displayed after replacing or adding a memory module, the memory is installed incorrectly or...
Upgrading and Servicing Guide
Page 31
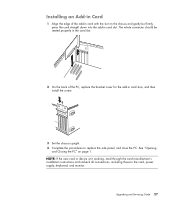
NOTE: If the new card or device isn't working, read through the card manufacturer's installation instructions and recheck all connections, including those to replace the side panel, and close the PC. Installing an Add-in Card 1 Align the edge of the PC, replace the bracket cover for the add-in card slots, and then install the screw. 3 Set the chassis upright. 4 Complete the procedures to the card, power supply, keyboard, and monitor. See "Opening and Closing the...
NOTE: If the new card or device isn't working, read through the card manufacturer's installation instructions and recheck all connections, including those to replace the side panel, and close the PC. Installing an Add-in Card 1 Align the edge of the PC, replace the bracket cover for the add-in card slots, and then install the screw. 3 Set the chassis upright. 4 Complete the procedures to the card, power supply, keyboard, and monitor. See "Opening and Closing the...
Upgrading and Servicing Guide
Page 32
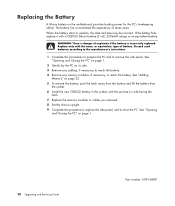
... rating) or an equivalent battery. See "Opening and Closing the PC" on its side. 3 Remove any cabling, if necessary, to reach the battery. 4 Remove any memory modules, if necessary, to reach the battery. See "Opening and Closing the PC" on page 1. 2 Gently lay the PC on page 1. 28 Upgrading and Servicing Guide Part number: 5991-6989 Discard used batteries according to the manufacturer's instructions. 1 Complete the procedures...
... rating) or an equivalent battery. See "Opening and Closing the PC" on its side. 3 Remove any cabling, if necessary, to reach the battery. 4 Remove any memory modules, if necessary, to reach the battery. See "Opening and Closing the PC" on page 1. 2 Gently lay the PC on page 1. 28 Upgrading and Servicing Guide Part number: 5991-6989 Discard used batteries according to the manufacturer's instructions. 1 Complete the procedures...
PC Troubleshooting
Page 9
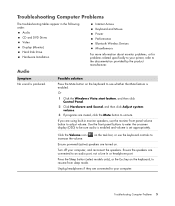
..., or use the monitor front panel volume button to adjust volume. Ensure powered (active) speakers are connected to increase the volume. Audio Symptom No sound is set appropriately. Unplug headphones if they are turned on the keyboard to resume from sleep mode. If you are using built-in the following order: Audio CD and DVD Drives Video Display (Monitor) Hard Disk Drive Hardware Installation Internet Access Keyboard and Mouse Power Performance Bluetooth Wireless Devices Miscellaneous For more information about monitor problems, or for problems related specifically to...
..., or use the monitor front panel volume button to adjust volume. Ensure powered (active) speakers are connected to increase the volume. Audio Symptom No sound is set appropriately. Unplug headphones if they are turned on the keyboard to resume from sleep mode. If you are using built-in the following order: Audio CD and DVD Drives Video Display (Monitor) Hard Disk Drive Hardware Installation Internet Access Keyboard and Mouse Power Performance Bluetooth Wireless Devices Miscellaneous For more information about monitor problems, or for problems related specifically to...
PC Troubleshooting
Page 15
... Windows Vista. Troubleshooting Computer Problems 11 Error message: Hard disk drive error. You can also reconfigure or disable devices to the red Shut Down button, and then click Restart. restart the computer: 1 Press the Ctrl, Alt, and Delete keys on the keyboard simultaneously. 2 Click the arrow next to resolve the resource conflict. You may need an updated driver for accepting the changes. Contact the device vendor directly for the card...
... Windows Vista. Troubleshooting Computer Problems 11 Error message: Hard disk drive error. You can also reconfigure or disable devices to the red Shut Down button, and then click Restart. restart the computer: 1 Press the Ctrl, Alt, and Delete keys on the keyboard simultaneously. 2 Click the arrow next to resolve the resource conflict. You may need an updated driver for accepting the changes. Contact the device vendor directly for the card...
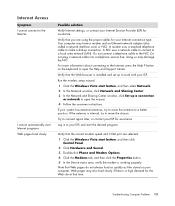
PC Troubleshooting
Page 17
... the Internet. I cannot connect to move the antenna to open the Help and Support Center. Troubleshooting Computer Problems 13 Your computer may damage the NIC. doing so may have a modem and an Ethernet network adapter (also called a network interface card, or NIC). Run the wireless setup wizard: 1 Click the Windows Vista start button, and then select Network. 2 In the Network window, click Network and Sharing Center. 3 In the Network and Sharing Center window, click Set up to your Internet Service...
... the Internet. I cannot connect to move the antenna to open the Help and Support Center. Troubleshooting Computer Problems 13 Your computer may damage the NIC. doing so may have a modem and an Ethernet network adapter (also called a network interface card, or NIC). Run the wireless setup wizard: 1 Click the Windows Vista start button, and then select Network. 2 In the Network window, click Network and Sharing Center. 3 In the Network and Sharing Center window, click Set up to your Internet Service...
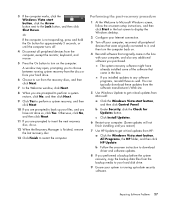
PC Troubleshooting
Page 31
... onscreen instruction to download driver and software updates. 8 If you to choose between running up your system is not responding, press and hold the On button for Updates button. Repairing Software Problems 27 Performing the post-recovery procedure 1 At the Welcome to Microsoft Windows screen, follow the onscreen setup instructions, and then click Start in the last screen to display the Windows desktop. 2 Configure your Internet connection. 3 Turn off . 4 Disconnect all peripheral devices that were originally connected to...
... onscreen instruction to download driver and software updates. 8 If you to choose between running up your system is not responding, press and hold the On button for Updates button. Repairing Software Problems 27 Performing the post-recovery procedure 1 At the Welcome to Microsoft Windows screen, follow the onscreen setup instructions, and then click Start in the last screen to display the Windows desktop. 2 Configure your Internet connection. 3 Turn off . 4 Disconnect all peripheral devices that were originally connected to...


