

User Manual
Page 3
2.8 Connecting to PC (Micro USB Cable 18 3 Capturing Videos and Photos 19 3.1 Recording Videos 19 3.2 Taking Photos 19 3.2.1 WiFi 20 3.2.2 Burst Shooting 20 3.2.3 Time Lapse Shooting 21 3.2.4 Self-Timer 21 4 Adjusting the Settings 22 4.1 Video Resolution 24 4.2 Field of View (FOV 25 4.3 Time Lapse Interval 26 4.4 Up/Down 27 4.5 Delete 28 4.6 OSD Up/Down 30 4.7 LED 31 4.8 Brightness 32 4.9 Beep 33 4.10 Auto-Off 34 4.11 Date and Time 35 4.12 RF 36 4.13 Factory Default 38 5 Using the Accessories 40 5.1 Waterproof Case 40 5.1.1 Using the Waterproof Case 40 ii
2.8 Connecting to PC (Micro USB Cable 18 3 Capturing Videos and Photos 19 3.1 Recording Videos 19 3.2 Taking Photos 19 3.2.1 WiFi 20 3.2.2 Burst Shooting 20 3.2.3 Time Lapse Shooting 21 3.2.4 Self-Timer 21 4 Adjusting the Settings 22 4.1 Video Resolution 24 4.2 Field of View (FOV 25 4.3 Time Lapse Interval 26 4.4 Up/Down 27 4.5 Delete 28 4.6 OSD Up/Down 30 4.7 LED 31 4.8 Brightness 32 4.9 Beep 33 4.10 Auto-Off 34 4.11 Date and Time 35 4.12 RF 36 4.13 Factory Default 38 5 Using the Accessories 40 5.1 Waterproof Case 40 5.1.1 Using the Waterproof Case 40 ii

User Manual
Page 14
...; At least 1 GB of RAM or higher At least DirectX 9 video card, DirectX 10 is recommended Standard USB 1.1 port or higher At least 2GB or greater available hard disk space Note: A USB 1.1 port will enable you to transfer files to 5 Megapixel Photos Sports Camera functionality Li-ion Rechargeable Battery External Waterproof Case/Standard Mounts/Wrist...
...; At least 1 GB of RAM or higher At least DirectX 9 video card, DirectX 10 is recommended Standard USB 1.1 port or higher At least 2GB or greater available hard disk space Note: A USB 1.1 port will enable you to transfer files to 5 Megapixel Photos Sports Camera functionality Li-ion Rechargeable Battery External Waterproof Case/Standard Mounts/Wrist...

User Manual
Page 28
... settings. The displayed icon varies depending on the mode. Press the Shutter button to capture photos. Indicates the operation that the camcorder will do when the Shutter button is pressed. Burst Mode 1 Time Lapse Mode Self-timer Mode Set Mode Button Function 2 Record Capture 3 Field of View (FOV) Use this mode to adjust the settings of your camcorder. To stop capturing, press the Shutter button again. Use this mode to capture 10 continuous photos with a specific interval time when the Shutter button is pressed. Press the Shutter button to record videos...
... settings. The displayed icon varies depending on the mode. Press the Shutter button to capture photos. Indicates the operation that the camcorder will do when the Shutter button is pressed. Burst Mode 1 Time Lapse Mode Self-timer Mode Set Mode Button Function 2 Record Capture 3 Field of View (FOV) Use this mode to adjust the settings of your camcorder. To stop capturing, press the Shutter button again. Use this mode to capture 10 continuous photos with a specific interval time when the Shutter button is pressed. Press the Shutter button to record videos...

User Manual
Page 34
... the Shutter button. Those continuous shots are combined and saved into one press of a construction project, weather changes, or flower blossom. 1. Press the Mode button repeatedly to switch to stop capturing photos. Press the Shutter button again to Time Lapse mode. 2. Note: Review "Adjusting the Settings" section 4.3 on how to change the Time Lapse interval. 3.2.4 Self-Timer This feature allows you to continuously capture photos with one video automatically. Shooting only stops when the Shutter button is played...
... the Shutter button. Those continuous shots are combined and saved into one press of a construction project, weather changes, or flower blossom. 1. Press the Mode button repeatedly to switch to stop capturing photos. Press the Shutter button again to Time Lapse mode. 2. Note: Review "Adjusting the Settings" section 4.3 on how to change the Time Lapse interval. 3.2.4 Self-Timer This feature allows you to continuously capture photos with one video automatically. Shooting only stops when the Shutter button is played...

User Manual
Page 35
... card. Select to adjust the interval time between capturing photos in Time Lapse mode. Select to close the SETUP menu and return to adjust capture settings. The screen below is useful when using the camcorder as a vehicle recorder. Select MORE to confirm. 4 Adjusting the Settings To adjust the camcorder settings, press the Mode button repeatedly to switch to Set mode and then press the Shutter button to adjust basic camera settings. This feature is displayed: 1 2 3 4 SETUP Menu Video FOV Time Lapse 1 Up/Down Delete...
... card. Select to adjust the interval time between capturing photos in Time Lapse mode. Select to close the SETUP menu and return to adjust capture settings. The screen below is useful when using the camcorder as a vehicle recorder. Select MORE to confirm. 4 Adjusting the Settings To adjust the camcorder settings, press the Mode button repeatedly to switch to Set mode and then press the Shutter button to adjust basic camera settings. This feature is displayed: 1 2 3 4 SETUP Menu Video FOV Time Lapse 1 Up/Down Delete...
User Manual
Page 37
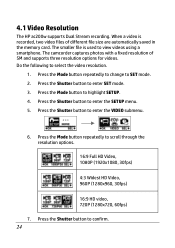
Press the Shutter button to SET mode. 2. The camcorder captures photos with a fixed resolution of different file size are automatically saved in the memory card. Press the Mode button repeatedly to change to enter SET mode. 3. Press the Shutter button to view videos using a smartphone. The smaller file is recorded, two video files of 5M and supports three resolution options for videos. Press the Mode button to select the video resolution. 1. Do the following to highlight SETUP. 4. Press the Shutter button to confirm. 24...
Press the Shutter button to SET mode. 2. The camcorder captures photos with a fixed resolution of different file size are automatically saved in the memory card. Press the Mode button repeatedly to change to enter SET mode. 3. Press the Shutter button to view videos using a smartphone. The smaller file is recorded, two video files of 5M and supports three resolution options for videos. Press the Mode button to select the video resolution. 1. Do the following to highlight SETUP. 4. Press the Shutter button to confirm. 24...

User Manual
Page 38
Press the Shutter button to exit SET mode. 4.2 Field of View (FOV) This menu allows you to highlight SETUP. 4. Press the Mode button to select the view angle of the camcorder lens. Do the following to SET mode. 2. Press the Mode button repeatedly to change to select the FOV. 1. Press the Mode button to enter the SETUP menu. 5. Press the Shutter button to highlight FOV. 6. Press the Shutter button to enter SET mode. 3. 8. Press the Shutter button to enter the FOV submenu. 25 To exit the menu, press the Mode button repeatedly until the EXIT screen appears. 9.
Press the Shutter button to exit SET mode. 4.2 Field of View (FOV) This menu allows you to highlight SETUP. 4. Press the Mode button to select the view angle of the camcorder lens. Do the following to SET mode. 2. Press the Mode button repeatedly to change to select the FOV. 1. Press the Mode button to enter the SETUP menu. 5. Press the Shutter button to highlight FOV. 6. Press the Shutter button to enter SET mode. 3. 8. Press the Shutter button to enter the FOV submenu. 25 To exit the menu, press the Mode button repeatedly until the EXIT screen appears. 9.

User Manual
Page 39
... Video mode is always Ultra. 4.3 Time Lapse Interval This menu allows you to SET mode. 2. Press the Mode button repeatedly to change to select the interval options when capturing photos using Lapse mode. Press the Shutter button to enter the SETUP menu. 26 Press the Shutter button to enter SET mode. 3. To exit the menu, press the Mode button repeatedly until the EXIT screen appears. 10. Press the Shutter button to 120 degrees] 8. Ultra wide angle lens...
... Video mode is always Ultra. 4.3 Time Lapse Interval This menu allows you to SET mode. 2. Press the Mode button repeatedly to change to select the interval options when capturing photos using Lapse mode. Press the Shutter button to enter the SETUP menu. 26 Press the Shutter button to enter SET mode. 3. To exit the menu, press the Mode button repeatedly until the EXIT screen appears. 10. Press the Shutter button to 120 degrees] 8. Ultra wide angle lens...

User Manual
Page 40
.... 8. Press the Shutter button to capture videos and photos upside down. Press the Shutter button to highlight SETUP. 4. Press the Mode button to enter SET mode. 3. Press the Shutter button to highlight LAPSE. 6. 5. Press the Mode button to enter the SETUP menu. 27 Press the Mode button repeatedly to change to enter the LAPSE submenu. 7. Press the Shutter button to SET mode. 2. To exit the menu, press the Mode button repeatedly until the EXIT screen appears. 10. You...
.... 8. Press the Shutter button to capture videos and photos upside down. Press the Shutter button to highlight SETUP. 4. Press the Mode button to enter SET mode. 3. Press the Shutter button to highlight LAPSE. 6. 5. Press the Mode button to enter the SETUP menu. 27 Press the Mode button repeatedly to change to enter the LAPSE submenu. 7. Press the Shutter button to SET mode. 2. To exit the menu, press the Mode button repeatedly until the EXIT screen appears. 10. You...

User Manual
Page 41
... the Shutter button to exit SET mode. 4.5 Delete This menu allows you to highlight UP/DOWN. 6. Press the Shutter button to select ON or OFF. 8. Press the Mode button to confirm. 9. To exit the menu, press the Mode button repeatedly until the EXIT screen appears. 10. Do the following to enter SET mode. 3. Press the Shutter button to delete all files in the Micro SD card. Press the Mode button repeatedly to change to SET mode. 2.
... the Shutter button to exit SET mode. 4.5 Delete This menu allows you to highlight UP/DOWN. 6. Press the Shutter button to select ON or OFF. 8. Press the Mode button to confirm. 9. To exit the menu, press the Mode button repeatedly until the EXIT screen appears. 10. Do the following to enter SET mode. 3. Press the Shutter button to delete all files in the Micro SD card. Press the Mode button repeatedly to change to SET mode. 2.

User Manual
Page 43
4.6 OSD Up/Down This menu allows you to enable this feature. 1. Do the following to display the OLED screen upside down. Press the Shutter button to enter the MORE menu. 4. Press the Shutter button to enter the UP/DOWN submenu. 5. To exit the menu, press the Mode button repeatedly until the EXIT screen appears. 8. Press the Mode button to confirm. 7. Press the Shutter button to select OSD UP or OSD DOWN. 6. Press the Mode button repeatedly to change to enter SET mode. 3. Press the Shutter button to SET mode. 2. Press the Shutter button to exit SET mode. 30
4.6 OSD Up/Down This menu allows you to enable this feature. 1. Do the following to display the OLED screen upside down. Press the Shutter button to enter the MORE menu. 4. Press the Shutter button to enter the UP/DOWN submenu. 5. To exit the menu, press the Mode button repeatedly until the EXIT screen appears. 8. Press the Mode button to confirm. 7. Press the Shutter button to select OSD UP or OSD DOWN. 6. Press the Mode button repeatedly to change to enter SET mode. 3. Press the Shutter button to SET mode. 2. Press the Shutter button to exit SET mode. 30

User Manual
Page 44
... enter the LED submenu. 6. Press the Shutter button to enter SET mode. 3. To exit the menu, press the Mode button repeatedly until the EXIT screen appears. 9. Press the Mode button to exit SET mode. 31 Press the Shutter button to select ON or OFF. 7. 4.7 LED This menu allows you to turn the LED on or off . 1. Press the Mode button repeatedly to change to highlight LED. 5. Do the following...
... enter the LED submenu. 6. Press the Shutter button to enter SET mode. 3. To exit the menu, press the Mode button repeatedly until the EXIT screen appears. 9. Press the Mode button to exit SET mode. 31 Press the Shutter button to select ON or OFF. 7. 4.7 LED This menu allows you to turn the LED on or off . 1. Press the Mode button repeatedly to change to highlight LED. 5. Do the following...

User Manual
Page 45
... Shutter button to SET mode. 2. Press the Mode button repeatedly to change to enter SET mode. 3. Press the Shutter button to exit SET mode. 32 Press the Shutter button to enter the BRIGHT submenu. 6. Press the Shutter button to adjust the screen brightness. 1. Do the following to confirm. 8. To exit the menu, press the Mode button repeatedly until the EXIT screen appears. 9. 4.8 Brightness This menu allows you to highlight BRIGHT. 5. Press the Mode button repeatedly to adjust...
... Shutter button to SET mode. 2. Press the Mode button repeatedly to change to enter SET mode. 3. Press the Shutter button to exit SET mode. 32 Press the Shutter button to enter the BRIGHT submenu. 6. Press the Shutter button to adjust the screen brightness. 1. Do the following to confirm. 8. To exit the menu, press the Mode button repeatedly until the EXIT screen appears. 9. 4.8 Brightness This menu allows you to highlight BRIGHT. 5. Press the Mode button repeatedly to adjust...
Quick Start Guide
Page 3
... and Mac OS are trademarks or registered trademarks of Apple Inc. RESTART THE CAMCORDER IN THIS CASE. 3 DISASSEMBLING THE CAMCORDER MAY VOID THE WARRANTY · THERE ARE NO PARTS OR COMPONENTS INSIDE THAT NEED TO BE MAINTAINED · REPAIRS WILL BE MADE BY AUTHORIZED SERVICE CENTERS ONLY · Do not touch the camcorder lens · Do not use...
... and Mac OS are trademarks or registered trademarks of Apple Inc. RESTART THE CAMCORDER IN THIS CASE. 3 DISASSEMBLING THE CAMCORDER MAY VOID THE WARRANTY · THERE ARE NO PARTS OR COMPONENTS INSIDE THAT NEED TO BE MAINTAINED · REPAIRS WILL BE MADE BY AUTHORIZED SERVICE CENTERS ONLY · Do not touch the camcorder lens · Do not use...
Data Sheet
Page 1
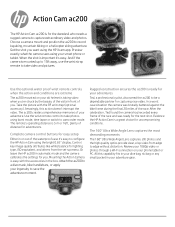
.... Use the wrist remote control to take photos using your ski helmet is ready for adventurers. Complete camera control buttons for easy setup Either in automatic mode and the camera calibrates the settings for the next shot. Get the shot you . And if the camera is important it 's easy to your phone tablet or PC. In a worst case situation the camera was ready for you can download video and pictures to configure the HP...
.... Use the wrist remote control to take photos using your ski helmet is ready for adventurers. Complete camera control buttons for easy setup Either in automatic mode and the camera calibrates the settings for the next shot. Get the shot you . And if the camera is important it 's easy to your phone tablet or PC. In a worst case situation the camera was ready for you can download video and pictures to configure the HP...
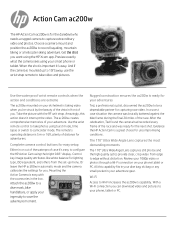
Product Information
Page 1
... needs a rugged camera to a dive mask, bike handlebars, or apply your adventure. Control key image quality attributes like white balance for you want using the bright 0.83" display. Rugged construction ensures the ac200 is ready for your dive bag, ski bag or any small pocket in automatic mode and the camera calibrates the settings for lighting type, ISO equivalent, and others from edge to take photos using...
... needs a rugged camera to a dive mask, bike handlebars, or apply your adventure. Control key image quality attributes like white balance for you want using the bright 0.83" display. Rugged construction ensures the ac200 is ready for your dive bag, ski bag or any small pocket in automatic mode and the camera calibrates the settings for lighting type, ISO equivalent, and others from edge to take photos using...

Quick Start Guide 1
Page 3
... Precautions WARNING: Follow these instructions to prevent damage to clean the product. DISASSEMBLING THE CAMCORDER MAY VOID THE WARRANTY · THERE ARE NO PARTS OR COMPONENTS INSIDE THAT NEED TO BE MAINTAINED · REPAIRS WILL BE MADE BY AUTHORIZED SERVICE CENTERS ONLY · Do not touch the camcorder lens · Do not use abrasive chemicals, cleaning solvents...
... Precautions WARNING: Follow these instructions to prevent damage to clean the product. DISASSEMBLING THE CAMCORDER MAY VOID THE WARRANTY · THERE ARE NO PARTS OR COMPONENTS INSIDE THAT NEED TO BE MAINTAINED · REPAIRS WILL BE MADE BY AUTHORIZED SERVICE CENTERS ONLY · Do not touch the camcorder lens · Do not use abrasive chemicals, cleaning solvents...

User Manual 1
Page 27
... record videos. Indicates the battery capacity. 26 Time Lapse Mode 1 Self-timer Mode Set Mode Button Function 2 Record Capture 3 Field of View (FOV) 4 Number of Files 5 Battery In this mode, photos are taken 10 seconds after pressing the Shutter button. Use this mode, photos are continuously captured with a specific interval time when the Shutter button is pressed. Indicates the field of view of your camcorder. In this mode to adjust the settings of the camera lens: Wide or Ultra. Indicates the total number of videos and photos saved in the micro SD card...
... record videos. Indicates the battery capacity. 26 Time Lapse Mode 1 Self-timer Mode Set Mode Button Function 2 Record Capture 3 Field of View (FOV) 4 Number of Files 5 Battery In this mode, photos are taken 10 seconds after pressing the Shutter button. Use this mode, photos are continuously captured with a specific interval time when the Shutter button is pressed. Indicates the field of view of your camcorder. In this mode to adjust the settings of the camera lens: Wide or Ultra. Indicates the total number of videos and photos saved in the micro SD card...

User Manual 1
Page 46
... change to highlight BINDING. 5. Press the Shutter button to exit SET mode. 4.12 RF This menu allows you can record videos or capture photos by pressing the corresponding buttons on the RF wrist strap remote control. Press the Shutter button to pair your RF wrist strap remote control. 1. 10. Press the Shutter button repeatedly to adjust the hour value, and then press the Mode button to go to complete the date and time setting...
... change to highlight BINDING. 5. Press the Shutter button to exit SET mode. 4.12 RF This menu allows you can record videos or capture photos by pressing the corresponding buttons on the RF wrist strap remote control. Press the Shutter button to pair your RF wrist strap remote control. 1. 10. Press the Shutter button repeatedly to adjust the hour value, and then press the Mode button to go to complete the date and time setting...

User Manual 1
Page 55
... Specifications General Imaging sensor Active pixels 1/2.5" CMOS 5.0 Megapixel Sensor 5.0 Megapixel Storage media Sensor sensitivity Camera Optics Focus range Internal: Built-in 128MB Flash Memory SD Card, SDHC compatible (up to SDHC 32GB Class6) Auto Fixed lens Wide: F2.8, f=2.5mm 110°/1080p, 150°/720p, 162° in 960p, 165 in 5M Photo 30cm ~ infinity Still image Movie clips Zoom Exposure Setting Format: JPEG (EXIF 2.2), DCF Resolution: 5M Mode: Signal shot 10 Photo Burst, Time...
... Specifications General Imaging sensor Active pixels 1/2.5" CMOS 5.0 Megapixel Sensor 5.0 Megapixel Storage media Sensor sensitivity Camera Optics Focus range Internal: Built-in 128MB Flash Memory SD Card, SDHC compatible (up to SDHC 32GB Class6) Auto Fixed lens Wide: F2.8, f=2.5mm 110°/1080p, 150°/720p, 162° in 960p, 165 in 5M Photo 30cm ~ infinity Still image Movie clips Zoom Exposure Setting Format: JPEG (EXIF 2.2), DCF Resolution: 5M Mode: Signal shot 10 Photo Burst, Time...


