User Guide
Page 5
... 2 Using the monitor ...14 Software and utilities ...14 The Information file ...14 The Image Color Matching file ...14 Installing the INF and ICM files ...14 Installing from the optical disc (available in select regions 14 Downloading from the web ...15 Using the on-screen display (OSD) menu ...15 Assigning the Function buttons ...16 Adjusting Low Blue Light Mode ...17 Using Auto-Sleep Mode ...17 3 Support and troubleshooting ...18 Solving common problems ...18 Button lockouts ...18 Product support...
... 2 Using the monitor ...14 Software and utilities ...14 The Information file ...14 The Image Color Matching file ...14 Installing the INF and ICM files ...14 Installing from the optical disc (available in select regions 14 Downloading from the web ...15 Using the on-screen display (OSD) menu ...15 Assigning the Function buttons ...16 Adjusting Low Blue Light Mode ...17 Using Auto-Sleep Mode ...17 3 Support and troubleshooting ...18 Solving common problems ...18 Button lockouts ...18 Product support...

User Guide
Page 6
4 Maintaining the monitor ...20 Maintenance guidelines ...20 Cleaning the monitor ...20 Shipping the monitor ...20 Appendix A Technical specifications ...21 Preset display resolutions ...22 Entering user modes ...23 Energy saver feature ...23 Appendix B Accessibility ...24 Supported assistive technologies ...24 Contacting support ...24 vi
4 Maintaining the monitor ...20 Maintenance guidelines ...20 Cleaning the monitor ...20 Shipping the monitor ...20 Appendix A Technical specifications ...21 Preset display resolutions ...22 Entering user modes ...23 Energy saver feature ...23 Appendix B Accessibility ...24 Supported assistive technologies ...24 Contacting support ...24 vi

User Guide
Page 7
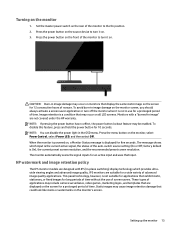
... all cords and cables connected to the LCD monitor so that may fall over . 1 Getting Started Important safety information A power cord is an important safety feature. The grounding pin is included with a 3-pin attachment plug on the correct power cord set to some form of serious injury, read the Safety & Comfort Guide. When unplugging from surrounding light and bright surfaces that they cannot be specifically labeled...
... all cords and cables connected to the LCD monitor so that may fall over . 1 Getting Started Important safety information A power cord is an important safety feature. The grounding pin is included with a 3-pin attachment plug on the correct power cord set to some form of serious injury, read the Safety & Comfort Guide. When unplugging from surrounding light and bright surfaces that they cannot be specifically labeled...

User Guide
Page 8
... and height adjustment capabilities ● HDMI (High-Definition Multimedia Interface) video input ● DisplayPort video input ● USB Type-C port with power delivery up to 65 W and DisplayPort Alternate Mode ● USB 3.0 hub with three ports ● Audio-out (headphone) jack ● Premium integrated speakers ● Plug and Play capability if supported by your operating system ● On-screen display (OSD) adjustments in several languages for easy setup and screen optimization ● HP Display Assistant software for adjusting monitor settings and...
... and height adjustment capabilities ● HDMI (High-Definition Multimedia Interface) video input ● DisplayPort video input ● USB Type-C port with power delivery up to 65 W and DisplayPort Alternate Mode ● USB 3.0 hub with three ports ● Audio-out (headphone) jack ● Premium integrated speakers ● Plug and Play capability if supported by your operating system ● On-screen display (OSD) adjustments in several languages for easy setup and screen optimization ● HP Display Assistant software for adjusting monitor settings and...

User Guide
Page 10
...-A port with Connects a USB Type-A cable to achieve 15 W output. 4 Chapter 1 Getting Started WARNING! To reduce the risk of power to 65 watts of personal injury, reduce the volume before using headphones, earbuds, or a headset. Power outputs are 5 V/12 V/20 V to the source device. battery charging 1.2 (downstream) 9 USB Type-C port (upstream) Connects a USB Type-C cable to the monitor. The USB Type-C port can function as a DisplayPort audio/video input, as a USB 3.0 upstream connection...
...-A port with Connects a USB Type-A cable to achieve 15 W output. 4 Chapter 1 Getting Started WARNING! To reduce the risk of power to 65 watts of personal injury, reduce the volume before using headphones, earbuds, or a headset. Power outputs are 5 V/12 V/20 V to the source device. battery charging 1.2 (downstream) 9 USB Type-C port (upstream) Connects a USB Type-C cable to the monitor. The USB Type-C port can function as a DisplayPort audio/video input, as a USB 3.0 upstream connection...

User Guide
Page 11
... monitor. 3. Use caution when setting up the monitor 5 doing so can cause damage. The master power switch turns off to the monitor, do not touch the surface of the monitor, is fragile. Attaching the monitor stand CAUTION: The screen is in the Off position. Remove the stand from surrounding light and bright surfaces. 1. Setting up the monitor To prevent damage to the monitor, computer system, and other attached devices, then follow the instructions...
... monitor. 3. Use caution when setting up the monitor 5 doing so can cause damage. The master power switch turns off to the monitor, do not touch the surface of the monitor, is fragile. Attaching the monitor stand CAUTION: The screen is in the Off position. Remove the stand from surrounding light and bright surfaces. 1. Setting up the monitor To prevent damage to the monitor, computer system, and other attached devices, then follow the instructions...

User Guide
Page 12
... the display panel may damage the monitor. CAUTION: This monitor supports the VESA industry-standard 100 mm mounting holes. It is important to be used because they may damage the panel if the monitor is turned off and all cables from the monitor (3). 6 Chapter 1 Getting Started or CSA-Listed wall mount bracket. Disconnect and remove all cables are required. Place the monitor on the release latch (1) and tilt the stand base away...
... the display panel may damage the monitor. CAUTION: This monitor supports the VESA industry-standard 100 mm mounting holes. It is important to be used because they may damage the panel if the monitor is turned off and all cables from the monitor (3). 6 Chapter 1 Getting Started or CSA-Listed wall mount bracket. Disconnect and remove all cables are required. Place the monitor on the release latch (1) and tilt the stand base away...

User Guide
Page 13
... the connector slot on page 6. 2. IMPORTANT: Follow the mounting device manufacturer's instructions when mounting the monitor to portrait orientation. Attaching the VESA mounting bracket A VESA mounting bracket is aligned with the monitor for use when attaching the monitor to a wall, swing arm, or other mounting device, insert four mounting screws through the holes on the VESA bracket. Remove the monitor stand. To attach the monitor to Removing the monitor stand on the monitor. 3. Setting up the monitor...
... the connector slot on page 6. 2. IMPORTANT: Follow the mounting device manufacturer's instructions when mounting the monitor to portrait orientation. Attaching the VESA mounting bracket A VESA mounting bracket is aligned with the monitor for use when attaching the monitor to a wall, swing arm, or other mounting device, insert four mounting screws through the holes on the VESA bracket. Remove the monitor stand. To attach the monitor to Removing the monitor stand on the monitor. 3. Setting up the monitor...

User Guide
Page 14
... valid video signals. The inputs can be selected through the OSD by pressing the Menu button and selecting Input Control. ● Connect one end of a DisplayPort cable to the DisplayPort port on the rear of the monitor and the other end to a DisplayPort port on the source device. ● Connect one end of the monitor and the other end to a USB Type-A port on the rear of an HDMI cable...
... valid video signals. The inputs can be selected through the OSD by pressing the Menu button and selecting Input Control. ● Connect one end of a DisplayPort cable to the DisplayPort port on the rear of the monitor and the other end to a DisplayPort port on the source device. ● Connect one end of the monitor and the other end to a USB Type-A port on the rear of an HDMI cable...
User Guide
Page 19
... OSD menu. This panel technology, however, is not in use of time. Static images may occur on the screen for a prolonged period of advanced image quality applications. factory default is a condition that may cause image retention damage that are not covered under the HP warranty. Turning on the monitor, select Power Control, select Power LED, and then select Off. Press the power button on . 3. Image retention is On), the current preset screen resolution...
... OSD menu. This panel technology, however, is not in use of time. Static images may occur on the screen for a prolonged period of advanced image quality applications. factory default is a condition that may cause image retention damage that are not covered under the HP warranty. Turning on the monitor, select Power Control, select Power LED, and then select Off. Press the power button on . 3. Image retention is On), the current preset screen resolution...
User Guide
Page 20
...'s graphic card is VESA DDC2- View the HP Monitor Software Information file. 3. Follow the on the computer from the optical disc: 1. The optical disc menu is Windows Plug and Play-compatible and the monitor will work through separate BNC-type connectors or through distribution buffers/boxes. Ensure that are data files that the proper resolution and refresh rates appear in the Windows Display control panel. 14 Chapter 2 Using the monitor The Image Color Matching...
...'s graphic card is VESA DDC2- View the HP Monitor Software Information file. 3. Follow the on the computer from the optical disc: 1. The optical disc menu is Windows Plug and Play-compatible and the monitor will work through separate BNC-type connectors or through distribution buffers/boxes. Ensure that are data files that the proper resolution and refresh rates appear in the Windows Display control panel. 14 Chapter 2 Using the monitor The Image Color Matching...

User Guide
Page 21
... Get software and drivers. 3. Using the on-screen display (OSD) menu Use the OSD menu to turn on your monitor and download the software. To access the OSD menu and make adjustments in the OSD main menu. If the monitor is not already on, press the power button to adjust the monitor screen image based on the monitor. 2. To access the OSD menu, press one of INF and ICM files from the HP monitors support website. 1. Then press the menu button to activate the buttons. Main Menu Brightness Contrast Color Control Input Control Image Control Power Control Menu Control Management Language...
... Get software and drivers. 3. Using the on-screen display (OSD) menu Use the OSD menu to turn on your monitor and download the software. To access the OSD menu and make adjustments in the OSD main menu. If the monitor is not already on, press the power button to adjust the monitor screen image based on the monitor. 2. To access the OSD menu, press one of INF and ICM files from the HP monitors support website. 1. Then press the menu button to activate the buttons. Main Menu Brightness Contrast Color Control Input Control Image Control Power Control Menu Control Management Language...
User Guide
Page 23
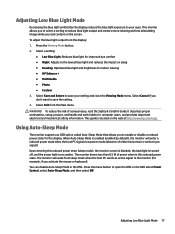
... Guide. Adjusting Low Blue Light Mode 17 Select Cancel if you to save your eyes. When Auto-Sleep Mode is enabled (enabled by the display reduces the blue light exposure to open the OSD. Press the menu button to your setting and close the Viewing Mode menu. The monitor draws less than 0.5 W of either horizontal or vertical sync signal). Select Exit from the display: 1. Press the Viewing Mode button. 2. Adjusting Low Blue Light Mode Decreasing the blue light emitted by default), the monitor will wake from sleep mode when...
... Guide. Adjusting Low Blue Light Mode 17 Select Cancel if you to save your eyes. When Auto-Sleep Mode is enabled (enabled by the display reduces the blue light exposure to open the OSD. Press the menu button to your setting and close the Viewing Mode menu. The monitor draws less than 0.5 W of either horizontal or vertical sync signal). Select Exit from the display: 1. Press the Viewing Mode button. 2. Adjusting Low Blue Light Mode Decreasing the blue light emitted by default), the monitor will wake from sleep mode when...
User Guide
Page 24
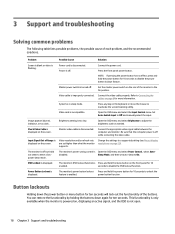
... to a supported setting (see Preset display resolutions on the screen. Open the OSD menu and select Brightness to disable the OSD lockout function. Video resolution and/or refresh rate are set auto-sleep to Off and manually select the input. disabled. The monitor's OSD lockout function is displayed on page 22). Problem Possible Cause Solution Screen is blank or video is turned off . Master power switch is flashing. Refer to enter a lowpower sleep mode. Open the OSD menu and select the Input Control menu. Connect the power cord. Press the front panel power button...
... to a supported setting (see Preset display resolutions on the screen. Open the OSD menu and select Brightness to disable the OSD lockout function. Video resolution and/or refresh rate are set auto-sleep to Off and manually select the input. disabled. The monitor's OSD lockout function is displayed on page 22). Problem Possible Cause Solution Screen is blank or video is turned off . Master power switch is flashing. Refer to enter a lowpower sleep mode. Open the OSD menu and select the Input Control menu. Connect the power cord. Press the front panel power button...
User Guide
Page 25
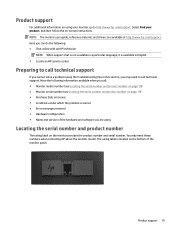
... -screen instructions. The rating label is available in English. ● Locate an HP service center Preparing to call technical support. You may need these numbers when contacting HP about the monitor model. Product support 19 Select Find your monitor, go to call technical support If you cannot solve a problem using the troubleshooting tips in this section, you are available at http://www.hp.com/support. NOTE: The monitor user guide, reference material, and drivers...
... -screen instructions. The rating label is available in English. ● Locate an HP service center Preparing to call technical support. You may need these numbers when contacting HP about the monitor model. Product support 19 Select Find your monitor, go to call technical support If you cannot solve a problem using the troubleshooting tips in this section, you are available at http://www.hp.com/support. NOTE: The monitor user guide, reference material, and drivers...

User Guide
Page 26
... cleaner directly on the power cord. Cleaning the monitor 1. CAUTION: Do not use a 50/50 mix of water and Isopropyl alcohol. Disconnect the monitor by wiping the screen and the cabinet with a "burned-in image" are not covered under the HP warranty. ● Slots and openings in a well-ventilated area, away from the back of the display panel may need it from the outlet...
... cleaner directly on the power cord. Cleaning the monitor 1. CAUTION: Do not use a 50/50 mix of water and Isopropyl alcohol. Disconnect the monitor by wiping the screen and the cabinet with a "burned-in image" are not covered under the HP warranty. ● Slots and openings in a well-ventilated area, away from the back of the display panel may need it from the outlet...
User Guide
Page 27
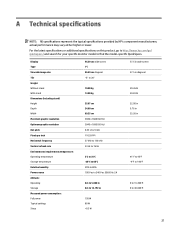
... http://www.hp.com/go/ quickspecs/ and search for your specific monitor model to 12,192 m 195 W 80 W Display Type Viewable image size Tilt Weight Without stand With stand Dimensions (including stand) Height Depth Width Maximum graphic resolution Optimum graphic resolution Dot pitch Pixels per inch Horizontal frequency Vertical refresh rate Environmental requirements temperature: Operating temperature Storage temperature Relative humidity Power source Altitude: Operating Storage Measured power consumption: Full power Typical settings Sleep 95.29 cm wide screen IPS...
... http://www.hp.com/go/ quickspecs/ and search for your specific monitor model to 12,192 m 195 W 80 W Display Type Viewable image size Tilt Weight Without stand With stand Dimensions (including stand) Height Depth Width Maximum graphic resolution Optimum graphic resolution Dot pitch Pixels per inch Horizontal frequency Vertical refresh rate Environmental requirements temperature: Operating temperature Storage temperature Relative humidity Power source Altitude: Operating Storage Measured power consumption: Full power Typical settings Sleep 95.29 cm wide screen IPS...

User Guide
Page 28
Off Input terminal
Off Input terminal

User Guide
Page 29
... the absence of these signals, the monitor screen is blanked, the backlight is turned off, and the power light turns amber. When the monitor is in memory. If this occurs, you may occasionally call for a mode that can be made to any or all of either the horizontal sync signal or the vertical sync signal. Energy saver feature The monitor supports a reduced power state. Your changes can be entered and...
... the absence of these signals, the monitor screen is blanked, the backlight is turned off, and the power light turns amber. When the monitor is in memory. If this occurs, you may occasionally call for a mode that can be made to any or all of either the horizontal sync signal or the vertical sync signal. Energy saver feature The monitor supports a reduced power state. Your changes can be entered and...
User Guide
Page 30
... people with disabilities, either on your source device that is connected to the monitor to work with appropriate assistive devices. to 9 p.m. If you , please contact us if you require technical support or have helped you are constantly refining the accessibility of our products and services and welcome feedback from users. Supported assistive technologies HP products support a wide variety of -hearing and use TRS/VRS...
... people with disabilities, either on your source device that is connected to the monitor to work with appropriate assistive devices. to 9 p.m. If you , please contact us if you require technical support or have helped you are constantly refining the accessibility of our products and services and welcome feedback from users. Supported assistive technologies HP products support a wide variety of -hearing and use TRS/VRS...


