User Guide
Page 5
... started ...1 Important safety information ...1 Product features and components ...2 Features ...2 Rear and side components ...3 Setting up the monitor ...4 Installing the monitor stand ...4 Connecting the cables ...5 Connecting USB devices ...8 Adjusting the monitor ...9 Turning on the monitor ...11 HP watermark and image retention policy 11 Removing the monitor stand ...12 Mounting the display head ...12 Installing a security cable ...13 2 Using the...
... started ...1 Important safety information ...1 Product features and components ...2 Features ...2 Rear and side components ...3 Setting up the monitor ...4 Installing the monitor stand ...4 Connecting the cables ...5 Connecting USB devices ...8 Adjusting the monitor ...9 Turning on the monitor ...11 HP watermark and image retention policy 11 Removing the monitor stand ...12 Mounting the display head ...12 Installing a security cable ...13 2 Using the...
User Guide
Page 8
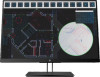
...; 1200 resolution, plus full-screen support for lower resolutions The monitor features include the following: ● Nonglare panel with an LED backlight ● Wide viewing angle to allow viewing from a sitting or standing position, or when moving from side to side ● Tilt... for easy setup and screen optimization ● HP Display Assistant software for adjusting monitor settings and enabling the theft deterrence features ● Software and documentation disc provided with the monitor in select regions that includes monitor drivers and product documentation ● Energy saver ...
...; 1200 resolution, plus full-screen support for lower resolutions The monitor features include the following: ● Nonglare panel with an LED backlight ● Wide viewing angle to allow viewing from a sitting or standing position, or when moving from side to side ● Tilt... for easy setup and screen optimization ● HP Display Assistant software for adjusting monitor settings and enabling the theft deterrence features ● Software and documentation disc provided with the monitor in select regions that includes monitor drivers and product documentation ● Energy saver ...
User Guide
Page 9
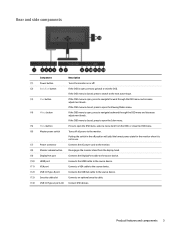
...Master power switch Turns off position will yield the lowest power state for the monitor when it is not in use. (7) Power connector Connects the AC power cord to the monitor. (8) Monitor release button Disengages the monitor stand from the display head. (9) DisplayPort port Connects the DisplayPort cable to the...the OSD menu and decrease adjustment levels. Putting the switch in the off all power to the monitor. Rear and side components Component Description (1) Power button Turns the monitor on or off. (2) Back/Exit button If the OSD is open , press to navigate backward...
...Master power switch Turns off position will yield the lowest power state for the monitor when it is not in use. (7) Power connector Connects the AC power cord to the monitor. (8) Monitor release button Disengages the monitor stand from the display head. (9) DisplayPort port Connects the DisplayPort cable to the...the OSD menu and decrease adjustment levels. Putting the switch in the off all power to the monitor. Rear and side components Component Description (1) Power button Turns the monitor on or off. (2) Back/Exit button If the OSD is open , press to navigate backward...

User Guide
Page 10
...1 Getting started Make sure that the stand is properly seated. Slide the tabs on the top of the stand's mounting bracket into the slots on the display head (1), and then press the bottom of the LCD panel. Setting up the monitor Installing the monitor stand IMPORTANT: Do not touch the surface ...of the bracket down (2). If this occurs, the screen will be an audible click when the stand is properly attached to its normal condition. 1. Pressure on a flat...
...1 Getting started Make sure that the stand is properly seated. Slide the tabs on the top of the stand's mounting bracket into the slots on the display head (1), and then press the bottom of the LCD panel. Setting up the monitor Installing the monitor stand IMPORTANT: Do not touch the surface ...of the bracket down (2). If this occurs, the screen will be an audible click when the stand is properly attached to its normal condition. 1. Pressure on a flat...
User Guide
Page 11
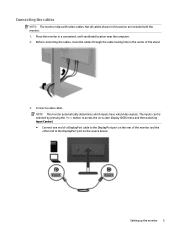
... NOTE: The monitor ships with the monitor. 1. The inputs can be selected by pressing the Menu button to access the on-screen display (OSD) menu and then selecting Input Control. ● Connect one end of a DisplayPort cable to the DisplayPort port on the rear of the stand. 3. Not ...all cables shown in a convenient, well-ventilated location near the computer. 2. NOTE: The monitor automatically determines which inputs have valid video signals.
... NOTE: The monitor ships with the monitor. 1. The inputs can be selected by pressing the Menu button to access the on-screen display (OSD) menu and then selecting Input Control. ● Connect one end of a DisplayPort cable to the DisplayPort port on the rear of the stand. 3. Not ...all cables shown in a convenient, well-ventilated location near the computer. 2. NOTE: The monitor automatically determines which inputs have valid video signals.
User Guide
Page 18
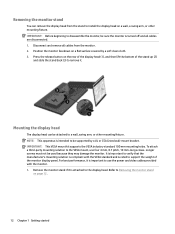
... can be attached to a wall, swing arm, or other mounting fixture. Remove the monitor stand if it is rated to support the weight of the stand up (2) and slide the stand back (3) to remove it is intended to Removing the monitor stand on a flat surface covered by a UL or CSA Listed wall-mount bracket. Disconnect and...
... can be attached to a wall, swing arm, or other mounting fixture. Remove the monitor stand if it is rated to support the weight of the stand up (2) and slide the stand back (3) to remove it is intended to Removing the monitor stand on a flat surface covered by a UL or CSA Listed wall-mount bracket. Disconnect and...
User Guide
Page 35
... to tell us about a particular assistive technology product, contact customer support for that is connected to the monitor to work with additional assistive technologies. B Accessibility HP designs, produces, and markets products and services that can be used by calling (877) 656-7058, ...a.m. to 9 p.m. to 9 p.m. Mountain Time. Supported assistive technologies HP products support a wide variety of our products and services and welcome feedback from users. Use the Search feature on a stand-alone basis or with appropriate assistive devices. NOTE: For additional information about...
... to tell us about a particular assistive technology product, contact customer support for that is connected to the monitor to work with additional assistive technologies. B Accessibility HP designs, produces, and markets products and services that can be used by calling (877) 656-7058, ...a.m. to 9 p.m. to 9 p.m. Mountain Time. Supported assistive technologies HP products support a wide variety of our products and services and welcome feedback from users. Use the Search feature on a stand-alone basis or with appropriate assistive devices. NOTE: For additional information about...


