User Guide
Page 5
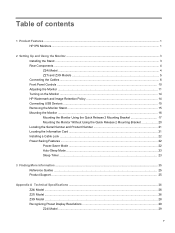
... Z30i Models ...5 Connecting the Cables ...6 Front Panel Controls ...10 Adjusting the Monitor ...11 Turning on the Monitor ...14 HP Watermark and Image Retention Policy 14 Connecting USB Devices ...15 Removing the Monitor Stand ...15 Mounting the Monitor ...16 Mounting the Monitor Using the Quick Release 2 Mounting Bracket 17 Mounting the Monitor Without Using the Quick Release 2 Mounting Bracket 20 Locating the Serial Number and Product Number 21 Locating the Information Card ...21 Installing a Cable Lock ...22 Power Saving Features ...22 Power-Saver Mode ...22 Auto-Sleep Mode ...23 Sleep...
... Z30i Models ...5 Connecting the Cables ...6 Front Panel Controls ...10 Adjusting the Monitor ...11 Turning on the Monitor ...14 HP Watermark and Image Retention Policy 14 Connecting USB Devices ...15 Removing the Monitor Stand ...15 Mounting the Monitor ...16 Mounting the Monitor Using the Quick Release 2 Mounting Bracket 17 Mounting the Monitor Without Using the Quick Release 2 Mounting Bracket 20 Locating the Serial Number and Product Number 21 Locating the Information Card ...21 Installing a Cable Lock ...22 Power Saving Features ...22 Power-Saver Mode ...22 Auto-Sleep Mode ...23 Sleep...
User Guide
Page 7
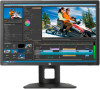
... image size while preserving original aspect ratio ● Non-glare panel with an LED backlight ● Wide viewing angle to allow viewing from a sitting or standing position, or moving from side-toside ● Tilt capability ● Pivot capability to rotate the display from landscape to portrait ● Swivel and height adjustment capabilities ● Removable stand for flexible monitor panel mounting solutions ● HP Quick Release 2 to quickly install the monitor with a simple click and remove...
... image size while preserving original aspect ratio ● Non-glare panel with an LED backlight ● Wide viewing angle to allow viewing from a sitting or standing position, or moving from side-toside ● Tilt capability ● Pivot capability to rotate the display from landscape to portrait ● Swivel and height adjustment capabilities ● Removable stand for flexible monitor panel mounting solutions ● HP Quick Release 2 to quickly install the monitor with a simple click and remove...

User Guide
Page 8
... side screen viewing (Z24i model only) ● Security slot provision on rear of monitor for optional cable lock ● Cable management feature for placement of cables and cords ● On-Screen Display (OSD) adjustments in several languages for easy setup and screen optimization ● HP Display Assistant for adjusting monitor settings and enabling theft deterrence features ● HDCP (High-Bandwidth Digital Content Protection) copy protection on all digital inputs ● Software and documentation CD that includes monitor drivers and...
... side screen viewing (Z24i model only) ● Security slot provision on rear of monitor for optional cable lock ● Cable management feature for placement of cables and cords ● On-Screen Display (OSD) adjustments in several languages for easy setup and screen optimization ● HP Display Assistant for adjusting monitor settings and enabling theft deterrence features ● HDCP (High-Bandwidth Digital Content Protection) copy protection on all digital inputs ● Software and documentation CD that includes monitor drivers and...
User Guide
Page 9
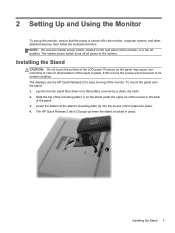
... monitor. Pressure on a flat surface covered by a clean, dry cloth. 2. The displays use the HP Quick Release 2 for easy moving of the stand's mounting plate (2) into the recess until it snaps into place. 4. Installing the Stand 3 To mount the panel onto the stand: 1. Lay the monitor panel face down on the panel may cause nonuniformity of color or disorientation of the panel. 3. Lower the bottom of the monitor. The master power switch turns off all power...
... monitor. Pressure on a flat surface covered by a clean, dry cloth. 2. The displays use the HP Quick Release 2 for easy moving of the stand's mounting plate (2) into the recess until it snaps into place. 4. Installing the Stand 3 To mount the panel onto the stand: 1. Lay the monitor panel face down on the panel may cause nonuniformity of color or disorientation of the panel. 3. Lower the bottom of the monitor. The master power switch turns off all power...
User Guide
Page 10
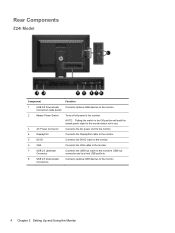
Connects the AC power cord to the monitor. Connects the DisplayPort cable to the monitor. Turns off all power to the monitor. 4 Chapter 2 Setting Up and Using the Monitor Connects optional USB devices to the monitor. NOTE: Putting the switch in the Off position will yield the lowest power state for the monitor when not in use. Connects the DVI-D cable to the monitor. Rear Components Z24i Model Component 1 USB 2.0 Downstream Connectors (side panel) 2 Master Power Switch 3 AC Power Connector 4 DisplayPort 5 DVI-D 6 VGA 7 USB 2.0 Upstream Connector 8 USB 2.0 ...
Connects the AC power cord to the monitor. Connects the DisplayPort cable to the monitor. Turns off all power to the monitor. 4 Chapter 2 Setting Up and Using the Monitor Connects optional USB devices to the monitor. NOTE: Putting the switch in the Off position will yield the lowest power state for the monitor when not in use. Connects the DVI-D cable to the monitor. Rear Components Z24i Model Component 1 USB 2.0 Downstream Connectors (side panel) 2 Master Power Switch 3 AC Power Connector 4 DisplayPort 5 DVI-D 6 VGA 7 USB 2.0 Upstream Connector 8 USB 2.0 ...

User Guide
Page 11
... Connects the VGA cable to the monitor. 6 DVI-D Connects the DVI-D cable to the monitor. 7 HDMI Connects an HDMI cable to the monitor. 8 Audio Out Connects headphones or optional HP Speaker Bar to the monitor. 9 USB 3.0 Upstream Connector Connects the USB hub cable to the monitor's USB hub connector and to a host USB port/hub. 10 USB 3.0 Downstream Connectors Connects optional USB devices to the monitor. Z27i and Z30i Models Component Function 1 USB 3.0 Downstream Connects optional USB devices to the monitor. Connectors (side panel) 2 Master Power Switch Turns...
... Connects the VGA cable to the monitor. 6 DVI-D Connects the DVI-D cable to the monitor. 7 HDMI Connects an HDMI cable to the monitor. 8 Audio Out Connects headphones or optional HP Speaker Bar to the monitor. 9 USB 3.0 Upstream Connector Connects the USB hub cable to the monitor's USB hub connector and to a host USB port/hub. 10 USB 3.0 Downstream Connectors Connects optional USB devices to the monitor. Z27i and Z30i Models Component Function 1 USB 3.0 Downstream Connects optional USB devices to the monitor. Connectors (side panel) 2 Master Power Switch Turns...
User Guide
Page 12
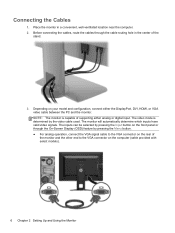
... the video cable used. The monitor will automatically determine which inputs have valid video signals. Before connecting the cables, route the cables through the On-Screen Display (OSD) feature by pressing the Input button on your model and configuration, connect either analog or digital input. The video mode is capable of supporting either the DisplayPort, DVI, HDMI, or VGA video cable between the PC and the monitor. Connecting the Cables 1. The inputs can be selected by pressing the Menu button. ● For analog operation, connect the VGA signal cable...
... the video cable used. The monitor will automatically determine which inputs have valid video signals. Before connecting the cables, route the cables through the On-Screen Display (OSD) feature by pressing the Input button on your model and configuration, connect either analog or digital input. The video mode is capable of supporting either the DisplayPort, DVI, HDMI, or VGA video cable between the PC and the monitor. Connecting the Cables 1. The inputs can be selected by pressing the Menu button. ● For analog operation, connect the VGA signal cable...

User Guide
Page 16
... the input button that chooses the video signal input If the OSD menu is in the ON position to turn on , press to optimize the screen image. NOTE: Be sure the master power switch on the rear of the monitor is on the monitor. If the OSD menu is inactive, press to activate the auto adjustment feature to select the highlighted menu item. NOTE: To view an OSD menu simulator, visit the HP Customer Self Repair Services Media...
... the input button that chooses the video signal input If the OSD menu is in the ON position to turn on , press to optimize the screen image. NOTE: Be sure the master power switch on the rear of the monitor is on the monitor. If the OSD menu is inactive, press to activate the auto adjustment feature to select the highlighted menu item. NOTE: To view an OSD menu simulator, visit the HP Customer Self Repair Services Media...

User Guide
Page 18
... full height position and tilt the monitor back to portrait orientation (2). 3. a. CAUTION: If the monitor is parallel to a comfortable position for users with the base when pivoting and potentially cause damage to the monitor, install it after pivoting the monitor. b. Adjust the monitor's height to your working posture throughout the work day. 4. Pivot the monitor clockwise 90° from landscape to portrait orientation viewing to adapt to the monitor. The speaker...
... full height position and tilt the monitor back to portrait orientation (2). 3. a. CAUTION: If the monitor is parallel to a comfortable position for users with the base when pivoting and potentially cause damage to the monitor, install it after pivoting the monitor. b. Adjust the monitor's height to your working posture throughout the work day. 4. Pivot the monitor clockwise 90° from landscape to portrait orientation viewing to adapt to the monitor. The speaker...

User Guide
Page 19
NOTE: To view information on the screen in portrait mode, you can also be rotated to portrait mode. Adjusting the Monitor 13 The position of the OSD menu can install the HP Display Assistant software included on the front panel, select OSD Control from the menu, then select Rotate OSD. To rotate the OSD menu, access the OSD menu by pressing the Menu button on the software and documentation CD.
NOTE: To view information on the screen in portrait mode, you can also be rotated to portrait mode. Adjusting the Monitor 13 The position of the OSD menu can install the HP Display Assistant software included on the front panel, select OSD Control from the menu, then select Rotate OSD. To rotate the OSD menu, access the OSD menu by pressing the Menu button on the software and documentation CD.
User Guide
Page 20
... monitor will display the default input source. NOTE: If pressing the power button has no effect, the Power Button Lockout feature may occur on all LCD screens. You can disable the power LED in the OSD by pressing the front panel Menu button and selecting Input Control > Default Input. Press the power button on . Press the Menu button on the front of the monitor to turn it on the front of the monitor, then select Management > Bezel Power LED > Off. The monitor...
... monitor will display the default input source. NOTE: If pressing the power button has no effect, the Power Button Lockout feature may occur on all LCD screens. You can disable the power LED in the OSD by pressing the front panel Menu button and selecting Input Control > Default Input. Press the power button on . Press the Menu button on the front of the monitor to turn it on the front of the monitor, then select Management > Bezel Power LED > Off. The monitor...
User Guide
Page 21
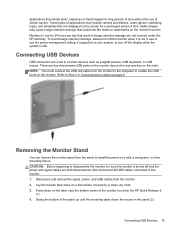
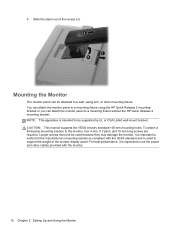
... or watermarks on a wall, a swing arm, or other mounting fixture. Refer to disassemble the monitor, be sure the monitor is idle. Removing the Monitor Stand You can remove the monitor panel from the monitor. 2. Static images may include camera surveillance, video games, marketing logos, and templates that result in Connecting the Cables on a flat surface covered by a clean, dry cloth. 3. Also disconnect all USB cables connected to turn off the monitor when it is...
... or watermarks on a wall, a swing arm, or other mounting fixture. Refer to disassemble the monitor, be sure the monitor is idle. Removing the Monitor Stand You can remove the monitor panel from the monitor. 2. Static images may include camera surveillance, video games, marketing logos, and templates that result in Connecting the Cables on a flat surface covered by a clean, dry cloth. 3. Also disconnect all USB cables connected to turn off the monitor when it is...
User Guide
Page 22
... monitor panel to a mounting fixture using the HP Quick Release 2 mounting bracket or you can be attached to support the weight of the recess (3). NOTE: This apparatus is important to use the power and video cables provided with the VESA standard and is rated to a wall, swing arm, or other mounting fixture. Longer screws must not be supported by UL or CSA Listed wall mount bracket. To attach a third-party mounting...
... monitor panel to a mounting fixture using the HP Quick Release 2 mounting bracket or you can be attached to support the weight of the recess (3). NOTE: This apparatus is important to use the power and video cables provided with the VESA standard and is rated to a wall, swing arm, or other mounting fixture. Longer screws must not be supported by UL or CSA Listed wall mount bracket. To attach a third-party mounting...

User Guide
Page 28
... Monitor Refer to the computer manual for instructions on the front of the monitor to open the OSD and select Management > Power-Saver Mode. By selecting the settings in stages to enable power savings of the monitor. To adjust the power savings, press the Menu button on setting energy saver features (sometimes called power management features). Set the power savings to one of these signals, the monitor screen is blanked, the backlight is turned off, and the power light...
... Monitor Refer to the computer manual for instructions on the front of the monitor to open the OSD and select Management > Power-Saver Mode. By selecting the settings in stages to enable power savings of the monitor. To adjust the power savings, press the Menu button on setting energy saver features (sometimes called power management features). Set the power savings to one of these signals, the monitor screen is blanked, the backlight is turned off, and the power light...

User Guide
Page 29
... 15 minutes. Press the OK button again to display the OSD Menu. 2. Press the OK button once to the monitor (for minutes. The monitor will cause the timer to reset to 00:00. Actual power reductions and screen results may vary from the sleep mode when the host PC sends an active signal to enter the adjustment mode for the USB ports. Adjusting the power saving percentages does not affect...
... 15 minutes. Press the OK button again to display the OSD Menu. 2. Press the OK button once to the monitor (for minutes. The monitor will cause the timer to reset to 00:00. Actual power reductions and screen results may vary from the sleep mode when the host PC sends an active signal to enter the adjustment mode for the USB ports. Adjusting the power saving percentages does not affect...
User Guide
Page 31
... HP LCD Monitors Reference Guide included on the CD with your monitor for additional information on: ● Optimizing monitor performance ● Safety and maintenance guidelines ● Installing software from the CD ● Using the OSD menu ● Downloading software from the Web ● Agency regulatory information ● Troubleshooting and recommended solutions to common problems For information on theft deterrence, refer to the HP Display Assistant User Guide included on using and adjusting...
... HP LCD Monitors Reference Guide included on the CD with your monitor for additional information on: ● Optimizing monitor performance ● Safety and maintenance guidelines ● Installing software from the CD ● Using the OSD menu ● Downloading software from the Web ● Agency regulatory information ● Troubleshooting and recommended solutions to common problems For information on theft deterrence, refer to the HP Display Assistant User Guide included on using and adjusting...

User Guide
Page 32
one DVI connector; one DisplayPort connector (cable inclusion varies by HP's component manufacturers; Z27i Model Display Type Viewable Image Size Maximum Weight (Unpacked) 68.58 cm wide screen IPS LCD 68.58 cm diagonal 7.6 kg 27 inches wide screen 27-inch diagonal 16.74 lbs 26 Appendix A Technical Specifications Z24i Model Display Type Viewable Image Size Maximum Weight (Unpacked) Dimensions (include base) Height (highest position) Height (lowest position) Depth Width Maximum Graphic Resolution Optimum Graphic Resolution Environmental Requirements Temperature 60...
one DVI connector; one DisplayPort connector (cable inclusion varies by HP's component manufacturers; Z27i Model Display Type Viewable Image Size Maximum Weight (Unpacked) 68.58 cm wide screen IPS LCD 68.58 cm diagonal 7.6 kg 27 inches wide screen 27-inch diagonal 16.74 lbs 26 Appendix A Technical Specifications Z24i Model Display Type Viewable Image Size Maximum Weight (Unpacked) Dimensions (include base) Height (highest position) Height (lowest position) Depth Width Maximum Graphic Resolution Optimum Graphic Resolution Environmental Requirements Temperature 60...

User Guide
Page 33
one DisplayPort connector (cable inclusion varies by region) NOTE: For the latest specifications or additional specifications on this product, go to http://www.hp.com/go/productbulletin and search for your specific display model to 140° F Power Source 100 - 240 VAC 50/60 Hz Input Terminal One VGA connector; Z27i Model 27 one HDMI connector; Dimensions (include base) Height (highest position) Height (lowest position) Depth Width Maximum Graphic Resolution Optimum Graphic Resolution Environmental...
one DisplayPort connector (cable inclusion varies by region) NOTE: For the latest specifications or additional specifications on this product, go to http://www.hp.com/go/productbulletin and search for your specific display model to 140° F Power Source 100 - 240 VAC 50/60 Hz Input Terminal One VGA connector; Z27i Model 27 one HDMI connector; Dimensions (include base) Height (highest position) Height (lowest position) Depth Width Maximum Graphic Resolution Optimum Graphic Resolution Environmental...

User Guide
Page 34
... specifications or additional specifications on this product, go to http://www.hp.com/go/productbulletin and search for your specific display model to 140° F Power Source 100 - 240 VAC 50/60 Hz Input Terminal One VGA connector; one HDMI connector; Z30i Model Display Type Viewable Image Size Maximum Weight (Unpacked) Dimensions (include base) Height (highest position) Height (lowest position) Depth Width Maximum Graphic Resolution Optimum Graphic Resolution Environmental Requirements Temperature 76.2 cm wide screen IPS LCD...
... specifications or additional specifications on this product, go to http://www.hp.com/go/productbulletin and search for your specific display model to 140° F Power Source 100 - 240 VAC 50/60 Hz Input Terminal One VGA connector; one HDMI connector; Z30i Model Display Type Viewable Image Size Maximum Weight (Unpacked) Dimensions (include base) Height (highest position) Height (lowest position) Depth Width Maximum Graphic Resolution Optimum Graphic Resolution Environmental Requirements Temperature 76.2 cm wide screen IPS LCD...
User Guide
Page 35
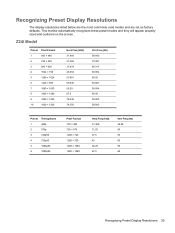
This monitor automatically recognizes these preset modes and they will appear properly sized and centered on the screen. Z24i Model Preset Pixel Format 1 640 × 480 2 720 × 400 3 800 × 600 4 1024 × 768 5 1280 × 1024 6 1440 × 900 7 1680 × 1050 8 1920 × 1080 9 ...; 1080 Horz Freq (kHz) 31.469 31.25 37.5 45 56.25 67.5 Vert Freq (Hz) 59.94 50 50 60 50 60 Recognizing Preset Display Resolutions 29 Recognizing Preset Display Resolutions The display resolutions listed below are the most commonly used modes and are set as factory defaults.
This monitor automatically recognizes these preset modes and they will appear properly sized and centered on the screen. Z24i Model Preset Pixel Format 1 640 × 480 2 720 × 400 3 800 × 600 4 1024 × 768 5 1280 × 1024 6 1440 × 900 7 1680 × 1050 8 1920 × 1080 9 ...; 1080 Horz Freq (kHz) 31.469 31.25 37.5 45 56.25 67.5 Vert Freq (Hz) 59.94 50 50 60 50 60 Recognizing Preset Display Resolutions 29 Recognizing Preset Display Resolutions The display resolutions listed below are the most commonly used modes and are set as factory defaults.


