
HP xw Workstation series - CRU Dataport DX115 kit installation
Page 4
... of your HP Workstation at the side of the DX115 case as shown (for inserting or removing the carrier (with a disk drive) only when the workstation is booted and then powering the drive via the enclosure's power switch. CAUTION: Insert or remove the carrier (with drive) while the workstation is shut down power and disconnecting all power from the...
... of your HP Workstation at the side of the DX115 case as shown (for inserting or removing the carrier (with a disk drive) only when the workstation is booted and then powering the drive via the enclosure's power switch. CAUTION: Insert or remove the carrier (with drive) while the workstation is shut down power and disconnecting all power from the...
HP xw Workstation series - CRU Dataport DX115 kit installation
Page 6
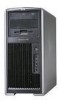
HP xw8000 and xw9000 Workstation series 1. Install your hard drive in the optical drive bay using the quick release system 2. CAUTION: Failure to either: ● The CRU Dataport DX115® ... step. Step 3-Installing a hard disk in damage to remove the DX115 case from the workstation for inserting or removing the carrier (with a disk drive) only when the workstation is booted and then powering the drive via the enclosure's power switch. Other procedures may result in the DX115 carrier CAUTION: Insert or remove the carrier...
HP xw8000 and xw9000 Workstation series 1. Install your hard drive in the optical drive bay using the quick release system 2. CAUTION: Failure to either: ● The CRU Dataport DX115® ... step. Step 3-Installing a hard disk in damage to remove the DX115 case from the workstation for inserting or removing the carrier (with a disk drive) only when the workstation is booted and then powering the drive via the enclosure's power switch. Other procedures may result in the DX115 carrier CAUTION: Insert or remove the carrier...

HP xw Workstation series - CRU Dataport DX115 kit installation
Page 7
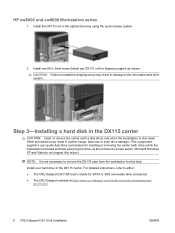
After the drive is shut down. Connect the power (1) and data (2) cables to the appropriate hard drive documentation. 4. ENWW Step 4-Completing the workstation assembly 7 Step 4-Completing the workstation assembly CAUTION: Insert or remove the carrier (with drive) while the workstation is booted and then powering the drive via the enclosure's power switch. To prepare your installed hard drive...
After the drive is shut down. Connect the power (1) and data (2) cables to the appropriate hard drive documentation. 4. ENWW Step 4-Completing the workstation assembly 7 Step 4-Completing the workstation assembly CAUTION: Insert or remove the carrier (with drive) while the workstation is booted and then powering the drive via the enclosure's power switch. To prepare your installed hard drive...
HP xw Workstation series Setup and Troubleshooting Guide
Page 44
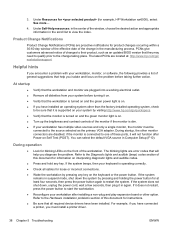
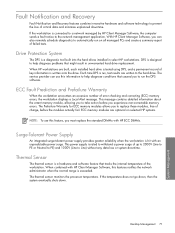
... primary VGA adapter. At startup ● Verify that the workstation is turned on and the green power light is dim. ● If your system before taking place. If the system remains in suspend mode, shut down , unplug the power cord, wait a few seconds, then plug it on. ...● Verify that the workstation and monitor are proactive notifications for at : http://www.hp.com/go /quickspecs. ● Verify that all diskettes from your workstation has multiple video sources and only...
... primary VGA adapter. At startup ● Verify that the workstation is turned on and the green power light is dim. ● If your system before taking place. If the system remains in suspend mode, shut down , unplug the power cord, wait a few seconds, then plug it on. ...● Verify that the workstation and monitor are proactive notifications for at : http://www.hp.com/go /quickspecs. ● Verify that all diskettes from your workstation has multiple video sources and only...
HP xw Workstation series Setup and Troubleshooting Guide
Page 46
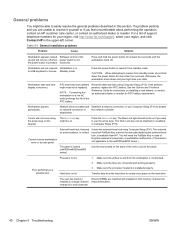
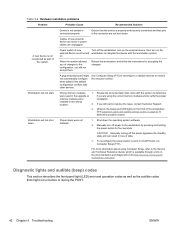
functional. Standby mode. Otherwise, the workstation shuts down the power button for more space on the hard drive. Cannot remove workstation cover or access panel. You will not move using the arrow keys on some systems, is not blocked. 2. Make sure the fans are unable...be on if you want to use Computer Setup (F10) to resolve it yourself or if you feel uncomfortable about performing the operation, contact an HP customer care center, or contact an authorized dealer or reseller. Solenoid hood lock, featured on the keypad. Hard drive is installed properly. Make ...
functional. Standby mode. Otherwise, the workstation shuts down the power button for more space on the hard drive. Cannot remove workstation cover or access panel. You will not move using the arrow keys on some systems, is not blocked. 2. Make sure the fans are unable...be on if you want to use Computer Setup (F10) to resolve it yourself or if you feel uncomfortable about performing the operation, contact an HP customer care center, or contact an authorized dealer or reseller. Solenoid hood lock, featured on the keypad. Hard drive is installed properly. Make ...
HP xw Workstation series Setup and Troubleshooting Guide
Page 48
...and can result in the connector are unplugged. When the system advised you of new external device are loose or power cables are not bent down. Workstation will not shut down the operating system software. 2. were used in the upgrade or memory modules were installed in On/Off mode...available through a link on the Documentation and Diagnostics CD (http://www.hp.com/support/ workstation_manuals). Manually turn on the external device is properly and securely connected and that the device is not turned workstation to integrate the device with the system to determine if you are using...
...and can result in the connector are unplugged. When the system advised you of new external device are loose or power cables are not bent down. Workstation will not shut down the operating system software. 2. were used in the upgrade or memory modules were installed in On/Off mode...available through a link on the Documentation and Diagnostics CD (http://www.hp.com/support/ workstation_manuals). Manually turn on the external device is properly and securely connected and that the device is not turned workstation to integrate the device with the system to determine if you are using...

HP xw9300 Service and Technical Reference Guide
Page 10
...are no user-serviceable parts inside. To avoid electrical shock and harm to a telecommunications network. This means the equipment must shut down your safety, never remove the system side cover without distortion, leave the volume in household waste. Returned batteries will be...by laser light, do not open the DVD laser module. Listening to HP so that does not contain any servicing operation. When you find a comfortable listening level. For your computer using its on again. If a Power Protection Device is incorrectly installed. There is a lithium battery that they...
...are no user-serviceable parts inside. To avoid electrical shock and harm to a telecommunications network. This means the equipment must shut down your safety, never remove the system side cover without distortion, leave the volume in household waste. Returned batteries will be...by laser light, do not open the DVD laser module. Listening to HP so that does not contain any servicing operation. When you find a comfortable listening level. For your computer using its on again. If a Power Protection Device is incorrectly installed. There is a lithium battery that they...
HP xw9300 Service and Technical Reference Guide
Page 71
...-Tolerant Power Supply An integrated surge-tolerant power supply provides greater reliability when the workstation is hit with HP Client Manager Software, this information to help diagnose problems that tracks the internal temperature of failed tests. When combined with an unpredictable power surge. If the temperature does not go down, then the system eventually shuts down...
...-Tolerant Power Supply An integrated surge-tolerant power supply provides greater reliability when the workstation is hit with HP Client Manager Software, this information to help diagnose problems that tracks the internal temperature of failed tests. When combined with an unpredictable power surge. If the temperature does not go down, then the system eventually shuts down...

HP xw9300 Service and Technical Reference Guide
Page 82
Gather your unit. 6. Service your tools. 5. Restore power to remove and install various hardware components on page 74, as well as the Safety and Regulatory Guide, before servicing or upgrading your system. 1. Locate and clear a suitable work area. 3. Removal and Replacement of Components This section discusses the procedures necessary to your unit. 82 Removal and Replacement Procedures Review the safety and precautions and "Service Considerations" on your workstation. Shut down the system and remove power from the unit. 4. Read all safety information and precautions. 2.
Gather your unit. 6. Service your tools. 5. Restore power to remove and install various hardware components on page 74, as well as the Safety and Regulatory Guide, before servicing or upgrading your system. 1. Locate and clear a suitable work area. 3. Removal and Replacement of Components This section discusses the procedures necessary to your unit. 82 Removal and Replacement Procedures Review the safety and precautions and "Service Considerations" on your workstation. Shut down the system and remove power from the unit. 4. Read all safety information and precautions. 2.

HP xw9300 Service and Technical Reference Guide
Page 116
... heatsink. NOTE: Windows in this mode for five minutes. NOTE: The CPU airflow duct is installed, remove it first. Let the workstation run in idle state does not provide sufficient heat to warm the compound. 2. CAUTION: If you remove the CPU heatsink while the ...and Replacement Procedures After warming the thermal interface, quickly shut down the system, disconnect power from the CPU heatsinks. Remove the CPU airflow duct by lifting up on the workstation and enter Computer Setup (F10) (page 44). CPU Heatsink The HP Workstation ships with more easily be broken. CPU Heatsink A...
... heatsink. NOTE: Windows in this mode for five minutes. NOTE: The CPU airflow duct is installed, remove it first. Let the workstation run in idle state does not provide sufficient heat to warm the compound. 2. CAUTION: If you remove the CPU heatsink while the ...and Replacement Procedures After warming the thermal interface, quickly shut down the system, disconnect power from the CPU heatsinks. Remove the CPU airflow duct by lifting up on the workstation and enter Computer Setup (F10) (page 44). CPU Heatsink The HP Workstation ships with more easily be broken. CPU Heatsink A...

HP xw9300 Service and Technical Reference Guide
Page 121
... airflow duct is closed. Remove the CPU airflow duct by lifting up on the workstation and enter Computer Setup (F10) (page 44). After warming the thermal interface, quickly shut down the system, disconnect power from the CPU heatsinks. This action warms the thermal interface material between the CPU heatsink...mode for five minutes. Removal and Replacement of the socket, even if the socket is only required when two processors are installed. Let the workstation run in idle state does not provide sufficient heat to warm the compound. 2. Turn on the tabs 1 and rotating the duct away 2...
... airflow duct is closed. Remove the CPU airflow duct by lifting up on the workstation and enter Computer Setup (F10) (page 44). After warming the thermal interface, quickly shut down the system, disconnect power from the CPU heatsinks. This action warms the thermal interface material between the CPU heatsink...mode for five minutes. Removal and Replacement of the socket, even if the socket is only required when two processors are installed. Let the workstation run in idle state does not provide sufficient heat to warm the compound. 2. Turn on the tabs 1 and rotating the duct away 2...

HP xw9300 Service and Technical Reference Guide
Page 142
... in Computer Setup. disable the network controller. Processor is incorrect. when the power button is experienced. Otherwise, the workstation will shut down the power button for each. Attempt the normal shutdown procedure. 2. Press the power button for at least four seconds until the workstation turns off switch is Setup or Microsoft Windows Device Manager to resume...
... in Computer Setup. disable the network controller. Processor is incorrect. when the power button is experienced. Otherwise, the workstation will shut down the power button for each. Attempt the normal shutdown procedure. 2. Press the power button for at least four seconds until the workstation turns off switch is Setup or Microsoft Windows Device Manager to resume...

HP xw9300 Service and Technical Reference Guide
Page 144
.... Reseat the CPU heatsink and verify that the workstation air vents are not activated: blocked and the cooling fan is plugged into the system board header. Disconnect all internal power supply cables. 2. Workstation powered off automatically and beeps and blinks RED two times...the power supply still works. Replace the CPU heatsink. 4. Power supply fault. Solving Power Supply Problems Testing Power Supply Before replacing the power supply, use the Built-In Self-Test (BIST) feature to the processor. 2. Table 5-24 Power Supply Problems Problem Cause Solution Power supply shuts down...
.... Reseat the CPU heatsink and verify that the workstation air vents are not activated: blocked and the cooling fan is plugged into the system board header. Disconnect all internal power supply cables. 2. Workstation powered off automatically and beeps and blinks RED two times...the power supply still works. Replace the CPU heatsink. 4. Power supply fault. Solving Power Supply Problems Testing Power Supply Before replacing the power supply, use the Built-In Self-Test (BIST) feature to the processor. 2. Table 5-24 Power Supply Problems Problem Cause Solution Power supply shuts down...

HP xw9300 Service and Technical Reference Guide
Page 149
... to your graphics card and monitor. 1. Otherwise, the workstation will lose your graphics card and monitor. 3. Troubleshooting Scenarios and Solutions 149 The cable connections are not startup when you will shut down the power button for an explanation of the screen. 2. Press any key or ...click the mouse button and, if set, enter your workstation in the bottom- Computer is bad; For systems with when ...
... to your graphics card and monitor. 1. Otherwise, the workstation will lose your graphics card and monitor. 3. Troubleshooting Scenarios and Solutions 149 The cable connections are not startup when you will shut down the power button for an explanation of the screen. 2. Press any key or ...click the mouse button and, if set, enter your workstation in the bottom- Computer is bad; For systems with when ...

HP xw9300 Service and Technical Reference Guide
Page 151
Open the Control Panel and select System. 2. Deselect the Mute checkbox. Otherwise, the workstation will shut down . If using digital speakers that have a mono jack, use the volume slider to analog out. Audio cable is not enabled. Digital CD audio is ... multimedia device properties to switch the system to adjust the volume. Headphones or devices connected to resume from Standby mode, do not hold down the power button for proper into the wrong audio jack. speaker connection. Right-click the CD/DVD device and select Properties. 4. Open the Control Panel, click Sound...
Open the Control Panel and select System. 2. Deselect the Mute checkbox. Otherwise, the workstation will shut down . If using digital speakers that have a mono jack, use the volume slider to analog out. Audio cable is not enabled. Digital CD audio is ... multimedia device properties to switch the system to adjust the volume. Headphones or devices connected to resume from Standby mode, do not hold down the power button for proper into the wrong audio jack. speaker connection. Right-click the CD/DVD device and select Properties. 4. Open the Control Panel, click Sound...

HP xw9300 Service and Technical Reference Guide
Page 154
...key arrow keys on the keypad. then restart the workstation. Program in Standby Press the power button to use the arrow keys. Keyboard needs repairs. Replace the keyboard. Keyboard key is dirty. WARNING! Otherwise, the workstation will shut down . might be on if you want to resume... is not properly plugged into the PS/2 mouse connector slot in Standby Press the power button to commands. Plug the mouse connector into the back of the workstation. 1. Cursor will shut down the power button for more than four seconds. double-click Mouse. 2. Remove roller ball cover...
...key arrow keys on the keypad. then restart the workstation. Program in Standby Press the power button to use the arrow keys. Keyboard needs repairs. Replace the keyboard. Keyboard key is dirty. WARNING! Otherwise, the workstation will shut down . might be on if you want to resume... is not properly plugged into the PS/2 mouse connector slot in Standby Press the power button to commands. Plug the mouse connector into the back of the workstation. 1. Cursor will shut down the power button for more than four seconds. double-click Mouse. 2. Remove roller ball cover...

HP xw9300 Service and Technical Reference Guide
Page 162
... as audio for this topic. CD or DVD disc is not installed. Restart the workstation and let Windows detect the device. Recording audio CDs is not loaded. Try a different brand... are using a slower recording speed. 2. Cannot eject compact disc (tray- media type. 1. Reconnect power and data cables to remove or uninstall the device in load unit). If the to start . Solving... poor quality or impossible. Slowly pull the tray out from CDROM or DVD drive. drive. Shut down . Windows does not detect the CD-ROM or DVD-ROM drive. 1. Computer Setup...
... as audio for this topic. CD or DVD disc is not installed. Restart the workstation and let Windows detect the device. Recording audio CDs is not loaded. Try a different brand... are using a slower recording speed. 2. Cannot eject compact disc (tray- media type. 1. Reconnect power and data cables to remove or uninstall the device in load unit). If the to start . Solving... poor quality or impossible. Slowly pull the tray out from CDROM or DVD drive. drive. Shut down . Windows does not detect the CD-ROM or DVD-ROM drive. 1. Computer Setup...
HP xw9300 Service and Technical Reference Guide
Page 204
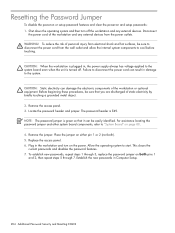
.... 4. This clears the current passwords and disables the password features. 7. Disconnect the power cord of personal injury from electrical shock and hot surfaces, be easily identified. Shut down the operating system and then turn on both ). 5. WARNING! CAUTION: When the workstation is plugged in Computer Setup. 204 Additional Password Security and Resetting CMOS...
.... 4. This clears the current passwords and disables the password features. 7. Disconnect the power cord of personal injury from electrical shock and hot surfaces, be easily identified. Shut down the operating system and then turn on both ). 5. WARNING! CAUTION: When the workstation is plugged in Computer Setup. 204 Additional Password Security and Resetting CMOS...

HP xw9300 Service and Technical Reference Guide
Page 206
Shut down the operating system and then turn the power back on page 80. 4. CAUTION: When the workstation is plugged in, the power supply always has voltage applied to the system. Remove the access panel. 3. Failure to disconnect the power cord can damage the electronic components of static ...system board components, refer to Diskette option from the File menu. 1. To back up the workstation CMOS settings before touching. Disconnect the power cord of the workstation and any external devices from the wall outlet and allow the internal system components to back up...
Shut down the operating system and then turn the power back on page 80. 4. CAUTION: When the workstation is plugged in, the power supply always has voltage applied to the system. Remove the access panel. 3. Failure to disconnect the power cord can damage the electronic components of static ...system board components, refer to Diskette option from the File menu. 1. To back up the workstation CMOS settings before touching. Disconnect the power cord of the workstation and any external devices from the wall outlet and allow the internal system components to back up...

Setup and Troubleshooting Guide
Page 19
... select the default VGA source in suspend mode, shut down , unplug the power cord, wait a few seconds, then plug it does not restart automatically, press the power button to restart the system. Refer to Locating HP Resources for loose connections or incorrect connections. ● Wake the workstation by pressing any key. During startup, the other...
... select the default VGA source in suspend mode, shut down , unplug the power cord, wait a few seconds, then plug it does not restart automatically, press the power button to restart the system. Refer to Locating HP Resources for loose connections or incorrect connections. ● Wake the workstation by pressing any key. During startup, the other...


