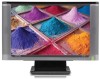
w19b, w19e, w19ev, W19q LCD Monitor - User's Guide
Page 3
... cord, use only a power source and connection compatible with this ability. Use a power strip whose manufacturer offers a damage replacement policy so you can cause damage. • Use only a power source and connection compatible with this monitor, as indicated on the power label to determine the ampere rating (Amps or A) for each device. • Install your safety, be specifically labeled as a power strip with surge protection or uninterruptible power supply (UPS). Not all power cords...
... cord, use only a power source and connection compatible with this ability. Use a power strip whose manufacturer offers a damage replacement policy so you can cause damage. • Use only a power source and connection compatible with this monitor, as indicated on the power label to determine the ampere rating (Amps or A) for each device. • Install your safety, be specifically labeled as a power strip with surge protection or uninterruptible power supply (UPS). Not all power cords...
w19b, w19e, w19ev, W19q LCD Monitor - User's Guide
Page 12
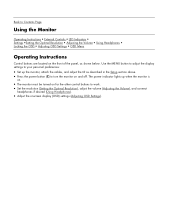
... connect headphones if desired (Using Headphones). • Adjust the onscreen display (OSD) settings (Adjusting OSD Settings). The power indicator lights up the monitor, attach the cables, and adjust the tilt as shown below. Back to Contents Page Using the Monitor Operating Instructions • External Controls • LED Indicators • Settings •Setting the Optimal Resolution • Adjusting the Volume • Using Headphones • Locking the OSD • Adjusting OSD Settings • OSD Menu Operating Instructions Control buttons are located on the front of the panel...
... connect headphones if desired (Using Headphones). • Adjust the onscreen display (OSD) settings (Adjusting OSD Settings). The power indicator lights up the monitor, attach the cables, and adjust the tilt as shown below. Back to Contents Page Using the Monitor Operating Instructions • External Controls • LED Indicators • Settings •Setting the Optimal Resolution • Adjusting the Volume • Using Headphones • Locking the OSD • Adjusting OSD Settings • OSD Menu Operating Instructions Control buttons are located on the front of the panel...
w19b, w19e, w19ev, W19q LCD Monitor - User's Guide
Page 14
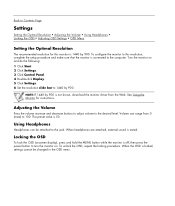
... the power button to turn the monitor on and do the following: 1 Click Start. 2 Click Settings. 3 Click Control Panel. 4 Double-click Display. 5 Click Settings. 6 Set the resolution slide bar to the desired level. Locking the OSD To lock the OSD (onscreen display), press and hold the MENU button while the monitor is 50. Volume can be changed in the OSD menu. Using Headphones Headphones can range from the Web. When headphones are attached, external sound is locked, settings cannot...
... the power button to turn the monitor on and do the following: 1 Click Start. 2 Click Settings. 3 Click Control Panel. 4 Double-click Display. 5 Click Settings. 6 Set the resolution slide bar to the desired level. Locking the OSD To lock the OSD (onscreen display), press and hold the MENU button while the monitor is 50. Volume can be changed in the OSD menu. Using Headphones Headphones can range from the Web. When headphones are attached, external sound is locked, settings cannot...
w19b, w19e, w19ev, W19q LCD Monitor - User's Guide
Page 18
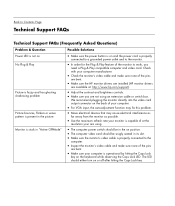
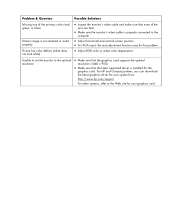
... refresh rate your monitor is capable of at : http://www.hp.com/support). • Adjust the contrast and brightness controls. • Make sure you need a Plug & Play compatible computer and video card. Check with your computer manufacturer. • Check the monitor's video cable and make sure none of the pins are bent. • Make sure the HP monitor drivers are installed (HP monitor drivers are available at the resolution your are not using . • The computer power switch should be in the on position...
... refresh rate your monitor is capable of at : http://www.hp.com/support). • Adjust the contrast and brightness controls. • Make sure you need a Plug & Play compatible computer and video card. Check with your computer manufacturer. • Check the monitor's video cable and make sure none of the pins are bent. • Make sure the HP monitor drivers are installed (HP monitor drivers are available at the resolution your are not using . • The computer power switch should be in the on position...
w19b, w19e, w19ev, W19q LCD Monitor - User's Guide
Page 19
...; Adjust horizontal and vertical screen position. • For VGA input, the auto-adjustment function may fix this problem. • Adjust RGB color or select color temperature. Unable to set the monitor to the optimal resolution • Make sure that the graphics card supports the optimal resolution (1440 x 900). • Make sure that none of the primary colors (red, green, or blue) Screen image is not centered or sized properly Picture has color defects (white does not look white) • Inspect the monitor's video cable and make sure that the latest supported driver...
...; Adjust horizontal and vertical screen position. • For VGA input, the auto-adjustment function may fix this problem. • Adjust RGB color or select color temperature. Unable to set the monitor to the optimal resolution • Make sure that the graphics card supports the optimal resolution (1440 x 900). • Make sure that none of the primary colors (red, green, or blue) Screen image is not centered or sized properly Picture has color defects (white does not look white) • Inspect the monitor's video cable and make sure that the latest supported driver...
Monitor Warranty and Support Guide
Page 4
... HAVE PAID FOR THE PRODUCT OR THE COST OF REPAIR OR REPLACEMENT OF ANY HARDWARE COMPONENTS THAT MALFUNCTION IN CONDITIONS OF NORMAL USE. No change to you have been made in connection with the product; (c) by software, interfacing, parts, or supplies not supplied by operation outside the usage parameters stated in HP sales literature or advice given to the conditions...
... HAVE PAID FOR THE PRODUCT OR THE COST OF REPAIR OR REPLACEMENT OF ANY HARDWARE COMPONENTS THAT MALFUNCTION IN CONDITIONS OF NORMAL USE. No change to you have been made in connection with the product; (c) by software, interfacing, parts, or supplies not supplied by operation outside the usage parameters stated in HP sales literature or advice given to the conditions...
Monitor Warranty and Support Guide
Page 5
... -site labor support to repair your location is a specified, fixed period commencing on instructions and documentation provided by HP. THIS LIMITED WARRANTY GIVES YOU SPECIFIC LEGAL RIGHTS. Types of , or to verify configurations, load most recent firmware, install software patches, run HP diagnostics tests, or use HP remote support solutions where applicable. On-site Warranty Service Your HP Limited Warranty service may include on -site service during the...
... -site labor support to repair your location is a specified, fixed period commencing on instructions and documentation provided by HP. THIS LIMITED WARRANTY GIVES YOU SPECIFIC LEGAL RIGHTS. Types of , or to verify configurations, load most recent firmware, install software patches, run HP diagnostics tests, or use HP remote support solutions where applicable. On-site Warranty Service Your HP Limited Warranty service may include on -site service during the...

User Guide 1506, 1706 and 1906 LCD Monitors
Page 4
Contents Optimizing Digital Conversion 4-9 Identifying Monitor Conditions 4-10 Sleep Timer Mode 4-10 HP Display LiteSaver (Available with Select Models) . 4-12 Installing the HP Display LiteSaver Software. . . . . 4-12 sRGB Support (Available with Select Models 4-14 Changing the Color Temperature 4-15 Installing the sRGB ICM File for Microsoft Windows 2000 and Windows XP 4-15 A Troubleshooting Solving Common Problems A-1 Using the Worldwide Web A-4 Preparing to call Technical Support A-5 B Technical Specifications Recognizing Preset Display Resolutions B-6 Entering User Modes B-7 ...
Contents Optimizing Digital Conversion 4-9 Identifying Monitor Conditions 4-10 Sleep Timer Mode 4-10 HP Display LiteSaver (Available with Select Models) . 4-12 Installing the HP Display LiteSaver Software. . . . . 4-12 sRGB Support (Available with Select Models 4-14 Changing the Color Temperature 4-15 Installing the sRGB ICM File for Microsoft Windows 2000 and Windows XP 4-15 A Troubleshooting Solving Common Problems A-1 Using the Worldwide Web A-4 Preparing to call Technical Support A-5 B Technical Specifications Recognizing Preset Display Resolutions B-6 Entering User Modes B-7 ...

User Guide 1506, 1706 and 1906 LCD Monitors
Page 8
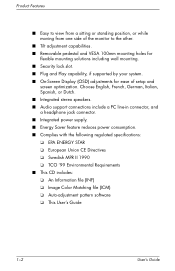
... 1706 Model ■ 17-inch (43.18 cm) viewable area display. ■ 1280 × 1024 native resolution, plus full-screen support for lower resolutions. ■ Wide viewing angle to allow viewing from a sitting or standing position, or moving side-to-side. ■ Tilt adjustment capabilities. ■ Removable pedestal and VESA 100mm mounting holes for flexible mounting solutions. ■ Plug and play capability if supported by your system. ■ On-Screen Display (OSD) adjustments in English, Dutch...
... 1706 Model ■ 17-inch (43.18 cm) viewable area display. ■ 1280 × 1024 native resolution, plus full-screen support for lower resolutions. ■ Wide viewing angle to allow viewing from a sitting or standing position, or moving side-to-side. ■ Tilt adjustment capabilities. ■ Removable pedestal and VESA 100mm mounting holes for flexible mounting solutions. ■ Plug and play capability if supported by your system. ■ On-Screen Display (OSD) adjustments in English, Dutch...

User Guide 1506, 1706 and 1906 LCD Monitors
Page 9
...; Swedish TCO 1906 Model ■ 19-inch (48.3 cm) viewable area display. ■ 1280 x 1024 native resolution, plus full-screen support for lower resolutions. ■ Wide viewing angle to allow viewing from a sitting or standing position, or moving side-to-side. ■ Tilt adjustment capabilities. ■ Removable pedestal and VESA 100mm mounting holes for flexible mounting solutions. ■ Plug and play capability if supported by your system. ■ On-Screen Display (OSD) adjustments in English, Dutch, French...
...; Swedish TCO 1906 Model ■ 19-inch (48.3 cm) viewable area display. ■ 1280 x 1024 native resolution, plus full-screen support for lower resolutions. ■ Wide viewing angle to allow viewing from a sitting or standing position, or moving side-to-side. ■ Tilt adjustment capabilities. ■ Removable pedestal and VESA 100mm mounting holes for flexible mounting solutions. ■ Plug and play capability if supported by your system. ■ On-Screen Display (OSD) adjustments in English, Dutch, French...
User Guide 1506, 1706 and 1906 LCD Monitors
Page 12
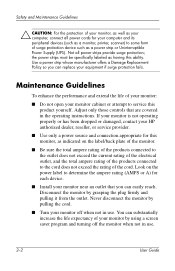
... the total ampere rating of the products connected to some form of surge protection device such as a power strip or Uninterruptible Power Supply (UPS). Adjust only those controls that you can easily reach. Maintenance Guidelines To enhance the performance and extend the life of your monitor: ■ Do not open your monitor off the monitor when not in use . 2-2 User Guide Safety and Maintenance...
... the total ampere rating of the products connected to some form of surge protection device such as a power strip or Uninterruptible Power Supply (UPS). Adjust only those controls that you can easily reach. Maintenance Guidelines To enhance the performance and extend the life of your monitor: ■ Do not open your monitor off the monitor when not in use . 2-2 User Guide Safety and Maintenance...
User Guide 1506, 1706 and 1906 LCD Monitors
Page 32
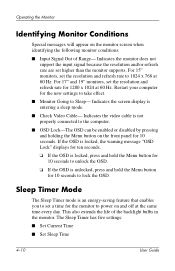
... monitor to the computer. ■ OSD Lock-The OSD can be enabled or disabled by pressing and holding the Menu button on the monitor screen when identifying the following monitor conditions: ■ Input Signal Out of the backlight bulbs in the monitor. Indicates the monitor does not support the input signal because the resolution and/or refresh rate are set a time for 1280 x 1024 at 60 Hz. Indicates the video cable is an energy-saving...
... monitor to the computer. ■ OSD Lock-The OSD can be enabled or disabled by pressing and holding the Menu button on the monitor screen when identifying the following monitor conditions: ■ Input Signal Out of the backlight bulbs in the monitor. Indicates the monitor does not support the input signal because the resolution and/or refresh rate are set a time for 1280 x 1024 at 60 Hz. Indicates the video cable is an energy-saving...

User Guide 1506, 1706 and 1906 LCD Monitors
Page 34
... the pop-up menu. 4-12 User Guide This helps protect the LCD panel against image retention. Insert the CD in the Windows system tray or right-click the icon and select Configure... Operating the Monitor 13. After installing the software, click the HP Display LiteSaver icon in the computer CD-ROM Drive. When you to place your monitor into its low power sleep mode at predefined times...
... the pop-up menu. 4-12 User Guide This helps protect the LCD panel against image retention. Insert the CD in the Windows system tray or right-click the icon and select Configure... Operating the Monitor 13. After installing the software, click the HP Display LiteSaver icon in the computer CD-ROM Drive. When you to place your monitor into its low power sleep mode at predefined times...

User Guide 1506, 1706 and 1906 LCD Monitors
Page 42
... into low-power modes. Check the monitor's OSD menu setting for power saving enable/disable controls. Some notebook computers are not compatible and the monitor power can not be set to enable to allow the monitor to : http://www.hp.com/support. The control should turn off , then your computer graphics driver is not compatible with the HP Display LiteSaver software. Possible Cause The HP Display LiteSaver may not be compatible with your system. 1. The monitor screen should be controlled. Using the...
... into low-power modes. Check the monitor's OSD menu setting for power saving enable/disable controls. Some notebook computers are not compatible and the monitor power can not be set to enable to allow the monitor to : http://www.hp.com/support. The control should turn off , then your computer graphics driver is not compatible with the HP Display LiteSaver software. Possible Cause The HP Display LiteSaver may not be compatible with your system. 1. The monitor screen should be controlled. Using the...
User's Guide FP9419 LCD Monitor
Page 8
...; Image Color Matching file (ICM) ❏ Auto-adjustment pattern software ❏ This User's Guide 1-2 User's Guide Product Features ■ Easy to view from a sitting or standing position, or while moving from one side of the monitor to the other. ■ Tilt adjustment capabilities. ■ Removable pedestal and VESA 100mm mounting holes for flexible mounting solutions including wall mounting. ■ Security lock slot. ■ Plug and Play capability, if supported by your system. ■ On-Screen Display (OSD) adjustments...
...; Image Color Matching file (ICM) ❏ Auto-adjustment pattern software ❏ This User's Guide 1-2 User's Guide Product Features ■ Easy to view from a sitting or standing position, or while moving from one side of the monitor to the other. ■ Tilt adjustment capabilities. ■ Removable pedestal and VESA 100mm mounting holes for flexible mounting solutions including wall mounting. ■ Security lock slot. ■ Plug and Play capability, if supported by your system. ■ On-Screen Display (OSD) adjustments...

User's Guide FP9419 LCD Monitor
Page 27
... helps improve the picture quality of your VGA input flat panel monitor. 4 Operating the Monitor CD Software and Utilities The CD included with this CD and can install on your computer: ■ An .INF (Information) file ■ An .ICM (Image Color Matching) file This CD also contains the Auto-Adjustment utility. See "Using the Auto-Adjustment Function." Adobe Acrobat Reader® is Windows Plug and Play compatible and the monitor will work...
... helps improve the picture quality of your VGA input flat panel monitor. 4 Operating the Monitor CD Software and Utilities The CD included with this CD and can install on your computer: ■ An .INF (Information) file ■ An .ICM (Image Color Matching) file This CD also contains the Auto-Adjustment utility. See "Using the Auto-Adjustment Function." Adobe Acrobat Reader® is Windows Plug and Play compatible and the monitor will work...
User's Guide FP9419 LCD Monitor
Page 28
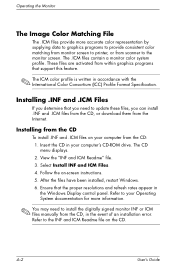
... the Windows Display control panel. Follow the on the CD. 4-2 User's Guide View the "INF and ICM Readme" file. 3. Installing from the CD To install .INF and .ICM files on your computer from scanner to the monitor screen. Refer to update these files, you determine that the proper resolutions and refresh rates appear in accordance with the International Color Consortium (ICC) Profile Format Specification. Operating the Monitor The Image Color...
... the Windows Display control panel. Follow the on the CD. 4-2 User's Guide View the "INF and ICM Readme" file. 3. Installing from the CD To install .INF and .ICM files on your computer from scanner to the monitor screen. Refer to update these files, you determine that the proper resolutions and refresh rates appear in accordance with the International Color Consortium (ICC) Profile Format Specification. Operating the Monitor The Image Color...
User's Guide FP9419 LCD Monitor
Page 37
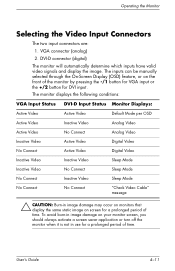
...Default Mode per OSD Active Video Inactive Video Analog Video Active Video No Connect Analog Video Inactive Video Active Video Digital Video No Connect Active Video Digital Video Inactive Video Inactive Video Sleep Mode Inactive Video No Connect Sleep Mode No Connect Inactive Video Sleep Mode No Connect No Connect "Check Video Cable" message Ä CAUTION: Burn-in use for DVI input. Operating the Monitor Selecting the Video Input Connectors The two input connectors are: 1. User's Guide 4-11 The inputs can be manually selected through the On-Screen Display (OSD...
...Default Mode per OSD Active Video Inactive Video Analog Video Active Video No Connect Analog Video Inactive Video Active Video Digital Video No Connect Active Video Digital Video Inactive Video Inactive Video Sleep Mode Inactive Video No Connect Sleep Mode No Connect Inactive Video Sleep Mode No Connect No Connect "Check Video Cable" message Ä CAUTION: Burn-in use for DVI input. Operating the Monitor Selecting the Video Input Connectors The two input connectors are: 1. User's Guide 4-11 The inputs can be manually selected through the On-Screen Display (OSD...

User's Guide FP9419 LCD Monitor
Page 38
... unlocked, press and hold the menu button for 10 seconds to lock the OSD. ■ No Signal Input - Indicates the monitor does not support the video input signal because the resolution and/or refresh rate are turned off or in the power saving mode. ■ Multiple Inputs are active - The speakers are set higher than one video input. ■ Auto Adjustment is off in Progress - Check to see if the computer or input signal source is in sleep mode. ■ Check Video Cable - If the OSD...
... unlocked, press and hold the menu button for 10 seconds to lock the OSD. ■ No Signal Input - Indicates the monitor does not support the video input signal because the resolution and/or refresh rate are turned off or in the power saving mode. ■ Multiple Inputs are active - The speakers are set higher than one video input. ■ Auto Adjustment is off in Progress - Check to see if the computer or input signal source is in sleep mode. ■ Check Video Cable - If the OSD...

User's Guide FP9419 LCD Monitor
Page 39
... as a standard analog monitor. Access the Advanced Menu OSD; See "Optimizing Analog Video". Display the adjustment pattern application provided on the CD. Optimizing Analog Video This monitor contains advanced circuitry that allows the flat panel screen to minimize video distortion or video jitter. select Image Control. 4. To restore the factory settings, access the Advanced Menu OSD, select Factory Reset, and select Yes. For more precise adjustments, run the Auto-Adjust software on the CD. 3. Use these controls only when the auto-adjust function does...
... as a standard analog monitor. Access the Advanced Menu OSD; See "Optimizing Analog Video". Display the adjustment pattern application provided on the CD. Optimizing Analog Video This monitor contains advanced circuitry that allows the flat panel screen to minimize video distortion or video jitter. select Image Control. 4. To restore the factory settings, access the Advanced Menu OSD, select Factory Reset, and select Yes. For more precise adjustments, run the Auto-Adjust software on the CD. 3. Use these controls only when the auto-adjust function does...


