Warranty and Legal Guide
Page 32
... contain important information and useful tips on the scanner. ● In this product ● Place the scanner close enough to the computer for the interface cable to avoid bodily injury - Product model number HP ScanJet Pro 2000 s2 HP ScanJet Pro 3000 s4 HP ScanJet Pro N4000 snw1 HP ScanJet Enterprise Flow 5000 s5, HP ScanJet Enterprise Flow 7000 s3 HP ScanJet Enterprise Flow N7000 snw1 Regulatory model number...
... contain important information and useful tips on the scanner. ● In this product ● Place the scanner close enough to the computer for the interface cable to avoid bodily injury - Product model number HP ScanJet Pro 2000 s2 HP ScanJet Pro 3000 s4 HP ScanJet Pro N4000 snw1 HP ScanJet Enterprise Flow 5000 s5, HP ScanJet Enterprise Flow 7000 s3 HP ScanJet Enterprise Flow N7000 snw1 Regulatory model number...

User Guide
Page 5
... ...4 Back view (N4000 snw1 models) ...5 Back view (N7000 snw1 models) ...6 Serial number and product number location 6 Control panel view (2000 s2 and 3000 s4 models 6 Control panel view (5000 s5 and 7000 s3 models 7 Touch panel view (N4000 snw1 and N7000 snw1 models 9 ... range ...12 Product hardware setup and software installation ...12 Scanner software (Windows) ...14 HP Scan software ...15 HP Scanner Tools Utility ...15 HP TWAIN ...15 ISIS ...15 WIA ...15 Scanner software (macOS) ...16 HP Easy Scan ...16 HP Utility ...16 Embedded Web Server ...16 HP Web Jetadmin ...16 ENWW iii
... ...4 Back view (N4000 snw1 models) ...5 Back view (N7000 snw1 models) ...6 Serial number and product number location 6 Control panel view (2000 s2 and 3000 s4 models 6 Control panel view (5000 s5 and 7000 s3 models 7 Touch panel view (N4000 snw1 and N7000 snw1 models 9 ... range ...12 Product hardware setup and software installation ...12 Scanner software (Windows) ...14 HP Scan software ...15 HP Scanner Tools Utility ...15 HP TWAIN ...15 ISIS ...15 WIA ...15 Scanner software (macOS) ...16 HP Easy Scan ...16 HP Utility ...16 Embedded Web Server ...16 HP Web Jetadmin ...16 ENWW iii
User Guide
Page 6
Sleep Mode and auto-off settings ...17 Change the default sleep and auto-off settings using the HP Scanner Tools Utility 17 Change the default auto-off setting using the HP Utility 17 2 Use the scanner ...19 Set up the scanner (N4000 snw1 and N7000 snw1 models 20 Set up Scan to Email ...21 Step one... 41 Load folded media (5000 s5 , 7000 s3, and N7000 snw1 models 43 Start a scan from the hardware ...44 Scan from the control panel buttons (2000 s2 and 3000 s4 models 44 Scan from the control panel buttons (5000 s5 and 7000 s3 models 44 Scan from the touch screen (N4000 snw1...
Sleep Mode and auto-off settings ...17 Change the default sleep and auto-off settings using the HP Scanner Tools Utility 17 Change the default auto-off setting using the HP Utility 17 2 Use the scanner ...19 Set up the scanner (N4000 snw1 and N7000 snw1 models 20 Set up Scan to Email ...21 Step one... 41 Load folded media (5000 s5 , 7000 s3, and N7000 snw1 models 43 Start a scan from the hardware ...44 Scan from the control panel buttons (2000 s2 and 3000 s4 models 44 Scan from the control panel buttons (5000 s5 and 7000 s3 models 44 Scan from the touch screen (N4000 snw1...

User Guide
Page 8
... ...74 4 Solve problems ...75 Basic troubleshooting tips ...75 Reset the scanner(N4000 snw1 and N7000 snw1 models 76 Interpret control panel lights and patterns (2000 s2 and 3000 s4 models 77 Scanner installation problems ...78 Check the cables ...78 Uninstall and then reinstall the HP ScanJet drivers and tools (Windows 78 Power issues ...80 Check that...
... ...74 4 Solve problems ...75 Basic troubleshooting tips ...75 Reset the scanner(N4000 snw1 and N7000 snw1 models 76 Interpret control panel lights and patterns (2000 s2 and 3000 s4 models 77 Scanner installation problems ...78 Check the cables ...78 Uninstall and then reinstall the HP ScanJet drivers and tools (Windows 78 Power issues ...80 Check that...
User Guide
Page 11
... information, visit the support home page for the scanner: ● 2000 s2 models: www.hp.com/support/sj2000s2 ● 3000 s4 models: www.hp.com/support/sj3000s4 ● N4000 snw1 models: www.hp.com/support/sjn4000snw1 ● 5000 s5 models: www.hp.com/support/sjflow5000s5 ● 7000 s3 models: www.hp.com/support/sjflow7000s3 ● N7000 snw1 models...
... information, visit the support home page for the scanner: ● 2000 s2 models: www.hp.com/support/sj2000s2 ● 3000 s4 models: www.hp.com/support/sj3000s4 ● N4000 snw1 models: www.hp.com/support/sjn4000snw1 ● 5000 s5 models: www.hp.com/support/sjflow5000s5 ● 7000 s3 models: www.hp.com/support/sjflow7000s3 ● N7000 snw1 models...

User Guide
Page 12
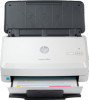
Product views This section describes the physical components of the scanners. ● Front view (2000 s2, 3000 s4 and N4000 snw1 models) ● Front view (5000 s5, 7000 s3 and N7000 snw1 models) ● Back view (2000 s2 models) ● Back view (3000 s4 models) ● Back view ...) ● Touch panel view (N4000 snw1 and N7000 snw1 models) Front view (2000 s2, 3000 s4 and N4000 snw1 models) Identify the parts on the front of the scanner. 5 5 4 4 1 3 2 3 Table 1-1 Front view (2000 s2, 3000 s4 and N4000 snw1 models) Callout Description 1 Document feeder latch 2 Control ...
Product views This section describes the physical components of the scanners. ● Front view (2000 s2, 3000 s4 and N4000 snw1 models) ● Front view (5000 s5, 7000 s3 and N7000 snw1 models) ● Back view (2000 s2 models) ● Back view (3000 s4 models) ● Back view ...) ● Touch panel view (N4000 snw1 and N7000 snw1 models) Front view (2000 s2, 3000 s4 and N4000 snw1 models) Identify the parts on the front of the scanner. 5 5 4 4 1 3 2 3 Table 1-1 Front view (2000 s2, 3000 s4 and N4000 snw1 models) Callout Description 1 Document feeder latch 2 Control ...

User Guide
Page 13
ENWW Product views 3 Front view (5000 s5, 7000 s3 and N7000 snw1 models) Identify the parts on the front of the scanner. 6 6 5 5 4 4 1 1 3 23 2 Table 1-2 Front view (5000 s5, 7000 s3 and N7000 snw1 models) Callout Description 1 Document feeder latch 2 Control panel 3 Document output ... is the default setting. ● When the button is in the folded position, the scanner is set to scan folded media or heavier, smaller media, such as embossed cards. 5 Paper guides 6 Document input tray with extension Back view (2000 s2 models) Identify the parts on the back of the...
ENWW Product views 3 Front view (5000 s5, 7000 s3 and N7000 snw1 models) Identify the parts on the front of the scanner. 6 6 5 5 4 4 1 1 3 23 2 Table 1-2 Front view (5000 s5, 7000 s3 and N7000 snw1 models) Callout Description 1 Document feeder latch 2 Control panel 3 Document output ... is the default setting. ● When the button is in the folded position, the scanner is set to scan folded media or heavier, smaller media, such as embossed cards. 5 Paper guides 6 Document input tray with extension Back view (2000 s2 models) Identify the parts on the back of the...

User Guide
Page 14
1 23 Table 1-3 Back view (2000 s2 models) Callout Description 1 Slot for a cable-type security lock 2 USB 3.0 interface port 3 Power supply input Back view (3000 s4 models) Identify the parts on the back of the scanner. 1 23 4 Table 1-4 Back view (3000 s4 models) Callout Description 1 Slot for a cable-type security lock 2 USB host for USB flash drive 3 USB 3.0 interface port 4 Power supply input Back view (5000 s5 and 7000 s3 models) Identify the parts on the back of the scanner. 4 Chapter 1 Product overview ENWW
1 23 Table 1-3 Back view (2000 s2 models) Callout Description 1 Slot for a cable-type security lock 2 USB 3.0 interface port 3 Power supply input Back view (3000 s4 models) Identify the parts on the back of the scanner. 1 23 4 Table 1-4 Back view (3000 s4 models) Callout Description 1 Slot for a cable-type security lock 2 USB host for USB flash drive 3 USB 3.0 interface port 4 Power supply input Back view (5000 s5 and 7000 s3 models) Identify the parts on the back of the scanner. 4 Chapter 1 Product overview ENWW

User Guide
Page 16
Control panel view (2000 s2 and 3000 s4 models) Use the buttons on the control panel to start or cancel a scan, and to turn the unit on the rear cover. Back view (N7000 snw1 models) Identify the parts on the back of the scanner. 1 2 32 4 5 Table 1-7 Back view (N7000 snw1models) Callout Description 1 Slot for a cable-type security lock 2 LAN port 3 USB host for USB flash drive 4 USB 3.0 interface port 5 Power supply input Serial number and product number location The serial and product numbers label is located on and off. 6 Chapter 1 Product overview ENWW
Control panel view (2000 s2 and 3000 s4 models) Use the buttons on the control panel to start or cancel a scan, and to turn the unit on the rear cover. Back view (N7000 snw1 models) Identify the parts on the back of the scanner. 1 2 32 4 5 Table 1-7 Back view (N7000 snw1models) Callout Description 1 Slot for a cable-type security lock 2 LAN port 3 USB host for USB flash drive 4 USB 3.0 interface port 5 Power supply input Serial number and product number location The serial and product numbers label is located on and off. 6 Chapter 1 Product overview ENWW

User Guide
Page 17
.... 5 Cancel button Press the Cancel button to cancel a scan in progress. 1 234 Table 1-8 Control panel view (2000 s2 and 3000 s4 models) Callout Name Description 1 Power button and LED Press the Power button to open the HP Scanner Tools Utility. Press and hold the Power button for three seconds to cancel a scan in progress... A blinking or lit Error LED indicates that an error has occurred. 4 Cancel button Press the Cancel button to turn the unit on and off the scanner. A lit Power LED indicates that the...
.... 5 Cancel button Press the Cancel button to cancel a scan in progress. 1 234 Table 1-8 Control panel view (2000 s2 and 3000 s4 models) Callout Name Description 1 Power button and LED Press the Power button to open the HP Scanner Tools Utility. Press and hold the Power button for three seconds to cancel a scan in progress... A blinking or lit Error LED indicates that an error has occurred. 4 Cancel button Press the Cancel button to turn the unit on and off the scanner. A lit Power LED indicates that the...

User Guide
Page 21
.... 2. Windows: See the software installation notes for the scanner: ● 2000 s2 models: www.hp.com/support/sj2000s2 ● 3000 s4 models: www.hp.com/support/sj3000s4 ● N4000 snw1 models: www.hp.com/support/sjn4000snw1 ● 5000 s5 models: www.hp.com/support/sjflow5000s5 ● 7000 s3 models: www.hp.com/support/sjflow7000s3 ● N7000 snw1 models...
.... 2. Windows: See the software installation notes for the scanner: ● 2000 s2 models: www.hp.com/support/sj2000s2 ● 3000 s4 models: www.hp.com/support/sj3000s4 ● N4000 snw1 models: www.hp.com/support/sjn4000snw1 ● 5000 s5 models: www.hp.com/support/sjflow5000s5 ● 7000 s3 models: www.hp.com/support/sjflow7000s3 ● N7000 snw1 models...

User Guide
Page 22
Height 2000 s2, 3000 s4 and N4000 snw1 models 154 mm (6.1 in) 5000 ... in an environment that came with earthing connection. Ensure to connect the power cord of power adapter to operate properly, the scanner must be in ) 1 2 Weight 2.7 kg (6 lb) 4.0 kg (8.8 lb) Power consumption, electrical specifications, and ... for current information. Product dimensions Make sure your scanner. Go to accommodate the scanner. 1 3 3 2 Table 1-13 Product dimensions Model 1. See www.hp.com/support for your scanner environment is sold. Do not convert operating voltages.
Height 2000 s2, 3000 s4 and N4000 snw1 models 154 mm (6.1 in) 5000 ... in an environment that came with earthing connection. Ensure to connect the power cord of power adapter to operate properly, the scanner must be in ) 1 2 Weight 2.7 kg (6 lb) 4.0 kg (8.8 lb) Power consumption, electrical specifications, and ... for current information. Product dimensions Make sure your scanner. Go to accommodate the scanner. 1 3 3 2 Table 1-13 Product dimensions Model 1. See www.hp.com/support for your scanner environment is sold. Do not convert operating voltages.

User Guide
Page 45
...then extend the tray extensions. Maximum: 216 x 3100 mm (8.5 x 122 in ) ● Custom - For the output tray, slide the tray out from underneath the scanner, unfold the first extension, and then slide the second extension outward. ENWW Load originals 35 ● JIS B5: 182 x 257 mm (7.2 x 10.1 in) &#... in) ● ISO A6: 105 x 148 mm (4.1 x 5.8 in) ● ISO A7: 74 x 104 mm (2.9 x 4.1 in) ● ISO A8: 52 x 74 mm (2 x 2.9 in ) Load documents (2000 s2, 3000 s4, and N4000 snw1 models) To load documents into the input tray, follow these steps: 1. Minimum: 50.8 x 50.8 mm (2 x 2 in) -
...then extend the tray extensions. Maximum: 216 x 3100 mm (8.5 x 122 in ) ● Custom - For the output tray, slide the tray out from underneath the scanner, unfold the first extension, and then slide the second extension outward. ENWW Load originals 35 ● JIS B5: 182 x 257 mm (7.2 x 10.1 in) &#... in) ● ISO A6: 105 x 148 mm (4.1 x 5.8 in) ● ISO A7: 74 x 104 mm (2.9 x 4.1 in) ● ISO A8: 52 x 74 mm (2 x 2.9 in ) Load documents (2000 s2, 3000 s4, and N4000 snw1 models) To load documents into the input tray, follow these steps: 1. Minimum: 50.8 x 50.8 mm (2 x 2 in) -

User Guide
Page 50
... it in the input tray. Gently set the stack in landscape orientation, with the short dimension parallel to the paper guides. 40 Chapter 2 Use the scanner ENWW Load the pages face down with the top of cards face down in the input tray. Load the stack of the pages pointing into... tap the top edge of the stack. Verify that the paper guides are aligned with a leading edge that has been folded or frayed. 7. Load cards (2000 s2, 3000 s4, and N4000 snw1 models) To load cards into the feeder and do not drop the stack into the input tray, follow these steps: 1.
... it in the input tray. Gently set the stack in landscape orientation, with the short dimension parallel to the paper guides. 40 Chapter 2 Use the scanner ENWW Load the pages face down with the top of cards face down in the input tray. Load the stack of the pages pointing into... tap the top edge of the stack. Verify that the paper guides are aligned with a leading edge that has been folded or frayed. 7. Load cards (2000 s2, 3000 s4, and N4000 snw1 models) To load cards into the feeder and do not drop the stack into the input tray, follow these steps: 1.

User Guide
Page 54
...separation. Press the Simplex Scan button or the Duplex Scan button. Figure 2-10 Thick media switch By default, it is a mechanical switch on the scanner to select the scan profile you refrain from the control panel, follow these steps: 1. If you want. Only one folded page or plastic carrier ... input tray. 2. Start a scan from the hardware Learn how to start a scan from the control panel. ● Scan from the control panel buttons (2000 s2 and 3000 s4 models) ● Scan from the control panel buttons (5000 s5 and 7000 s3 models) ● Scan from the touch screen (N4000 snw1...
...separation. Press the Simplex Scan button or the Duplex Scan button. Figure 2-10 Thick media switch By default, it is a mechanical switch on the scanner to select the scan profile you refrain from the control panel, follow these steps: 1. If you want. Only one folded page or plastic carrier ... input tray. 2. Start a scan from the hardware Learn how to start a scan from the control panel. ● Scan from the control panel buttons (2000 s2 and 3000 s4 models) ● Scan from the control panel buttons (5000 s5 and 7000 s3 models) ● Scan from the touch screen (N4000 snw1...

User Guide
Page 71
...care for and maintain the scanner. ● Test and calibrate the touch screen ● Clean the product ● Replace parts ● Order parts and accessories For the latest maintenance information, visit the product support home page: ● 2000 s2 models: www.hp.com/support/sj2000s2 ●... 3000 s4 models: www.hp.com/support/sj3000s4 ● N4000 snw1 models: www.hp.com/support/sjn4000snw1 ● 5000 s5 models: www.hp.com/support/sjflow5000s5 ● 7000 s3 models: www.hp.com/support/sjflow7000s3 ● ...
...care for and maintain the scanner. ● Test and calibrate the touch screen ● Clean the product ● Replace parts ● Order parts and accessories For the latest maintenance information, visit the product support home page: ● 2000 s2 models: www.hp.com/support/sj2000s2 ●... 3000 s4 models: www.hp.com/support/sj3000s4 ● N4000 snw1 models: www.hp.com/support/sjn4000snw1 ● 5000 s5 models: www.hp.com/support/sjflow5000s5 ● 7000 s3 models: www.hp.com/support/sjflow7000s3 ● ...

User Guide
Page 74
macOS (2000 s2 and 3000 s4 models): Press the Scan button to five times within 30 minutes. If streaks still appear, repeat steps 3 through the scanner. Clean the rollers Clean the rollers under the following conditions: ● Windows: The HP Scanner Tools Utility indicates that , the cloth will perform the scan shortcut ...: Wait two minutes for the components to dry before proceeding to the Scan button. Windows: Launch the HP Scanner Tools Utility, and then click the Maintenance tab. 5. Windows: Under Record Cleaning Paper Path, click Record Cleaning to log this cleaning activity...
macOS (2000 s2 and 3000 s4 models): Press the Scan button to five times within 30 minutes. If streaks still appear, repeat steps 3 through the scanner. Clean the rollers Clean the rollers under the following conditions: ● Windows: The HP Scanner Tools Utility indicates that , the cloth will perform the scan shortcut ...: Wait two minutes for the components to dry before proceeding to the Scan button. Windows: Launch the HP Scanner Tools Utility, and then click the Maintenance tab. 5. Windows: Under Record Cleaning Paper Path, click Record Cleaning to log this cleaning activity...

User Guide
Page 78
Parts might need to be replaced when indicated by the HP Scanner Tools Utility, or if the scanner is not working correctly. ● Replace the roller kit (2000 s2, 3000 s4 and N4000 snw1 models) ● Replace the roller kit (5000 s5, 7000 s3 and N7000 snw1 models) The roller replacement kit includes the following replacement parts: ● Pickup rollers ● Separation rollers The replacement kit also includes detailed instructions for replacing each of these parts. 68 Chapter 3 Care and maintenance ENWW Replace parts Replacing parts when necessary helps ensure high-quality scans.
Parts might need to be replaced when indicated by the HP Scanner Tools Utility, or if the scanner is not working correctly. ● Replace the roller kit (2000 s2, 3000 s4 and N4000 snw1 models) ● Replace the roller kit (5000 s5, 7000 s3 and N7000 snw1 models) The roller replacement kit includes the following replacement parts: ● Pickup rollers ● Separation rollers The replacement kit also includes detailed instructions for replacing each of these parts. 68 Chapter 3 Care and maintenance ENWW Replace parts Replacing parts when necessary helps ensure high-quality scans.

User Guide
Page 79
... is a consumable and is needed, which depends on the latch to turn off the scanner, and then disconnect the USB cable and power supply from the scanner. 2. Replace the roller kit (2000 s2, 3000 s4 and N4000 snw1 models) The following conditions: ● Windows: When the... Maintenance Recommended dialog indicates they are due for maintenance. ● If the scanner experiences repeated document jams. NOTE: HP recommends replacing the rollers...
... is a consumable and is needed, which depends on the latch to turn off the scanner, and then disconnect the USB cable and power supply from the scanner. 2. Replace the roller kit (2000 s2, 3000 s4 and N4000 snw1 models) The following conditions: ● Windows: When the... Maintenance Recommended dialog indicates they are due for maintenance. ● If the scanner experiences repeated document jams. NOTE: HP recommends replacing the rollers...

User Guide
Page 84
...-60001 and N7000 snw1 models. 74 Chapter 3 Care and maintenance ENWW Replacement pickup and separation rollers for 2000 s2, 3000 s4 6FW06-60001 and N4000 snw1 models. a. b. 2. To order maintenance parts for the scanner, see the HP scanner parts website at the same time to close the hatch. 4. Remove and replace the rollers as described...
...-60001 and N7000 snw1 models. 74 Chapter 3 Care and maintenance ENWW Replacement pickup and separation rollers for 2000 s2, 3000 s4 6FW06-60001 and N4000 snw1 models. a. b. 2. To order maintenance parts for the scanner, see the HP scanner parts website at the same time to close the hatch. 4. Remove and replace the rollers as described...


