
HP Notebook Hard Drives & Solid State Drives Identifying, Preventing, Diagnosing and Recovering from Drive Failures Care and Ma
Page 3
...trace is written to your HDD manufacturer for low-level format utilities or download the HP File Sanitizer for HP ProtectTools, located at the following website: http://h20000.www2.hp.com/bizsupport/TechSupport/SoftwareDescription.jsp?lang=en&cc=us&pro dTypeId=321957&prodSeriesId=4138624&...on a "first available space" basis. Issues such as a bad sector. The OS remaps a reserved sector in this area as blue screens, application lockups, and other occurrences are caused by regular software maintenance. Fragmentation occurs when an entire file or application is an incomplete write...
...trace is written to your HDD manufacturer for low-level format utilities or download the HP File Sanitizer for HP ProtectTools, located at the following website: http://h20000.www2.hp.com/bizsupport/TechSupport/SoftwareDescription.jsp?lang=en&cc=us&pro dTypeId=321957&prodSeriesId=4138624&...on a "first available space" basis. Issues such as a bad sector. The OS remaps a reserved sector in this area as blue screens, application lockups, and other occurrences are caused by regular software maintenance. Fragmentation occurs when an entire file or application is an incomplete write...
User Guide
Page 17
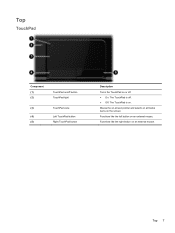
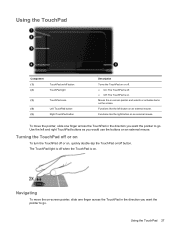
Functions like the left button on an external mouse. Functions like the right button on an external mouse. Moves the on-screen pointer and selects or activates items on . Top 7 Top TouchPad Component (1) (2) (3) (4) (5) TouchPad on/off button TouchPad light TouchPad zone Left TouchPad button Right TouchPad button Description Turns the TouchPad on or off. ● On: The TouchPad is off. ● Off: The TouchPad is on the screen.
Functions like the left button on an external mouse. Functions like the right button on an external mouse. Moves the on-screen pointer and selects or activates items on . Top 7 Top TouchPad Component (1) (2) (3) (4) (5) TouchPad on/off button TouchPad light TouchPad zone Left TouchPad button Right TouchPad button Description Turns the TouchPad on or off. ● On: The TouchPad is off. ● Off: The TouchPad is on the screen.
User Guide
Page 31
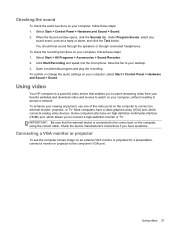
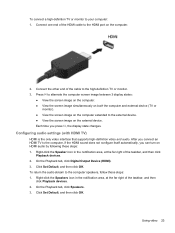
... have an high-definition multimedia interface (HDMI) port, which connects analog video devices. Connecting a VGA monitor or projector To see the computer screen image on an external VGA monitor or projected for a presentation, connect a monitor or projector to access a network. Check the device manufacturer...'s instructions if you to the correct port on the computer, using the correct cable. Using video Your HP computer is a powerful video device that the external device is connected to connect a high-definition monitor or TV. When the Sound ...
... have an high-definition multimedia interface (HDMI) port, which connects analog video devices. Connecting a VGA monitor or projector To see the computer screen image on an external VGA monitor or projected for a presentation, connect a monitor or projector to access a network. Check the device manufacturer...'s instructions if you to the correct port on the computer, using the correct cable. Using video Your HP computer is a powerful video device that the external device is connected to connect a high-definition monitor or TV. When the Sound ...
User Guide
Page 32
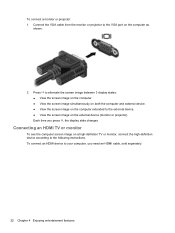
... the VGA port on a high-definition TV or monitor, connect the high-definition device according to the external device. ● View the screen image on the external device (monitor or projector). Each time you need an HDMI cable, sold separately. 22 Chapter 4 Enjoying entertainment features... Connecting an HDMI TV or monitor To see the computer screen image on the computer as shown. 2. Press f4 to alternate the screen image between 3 display states: ● View the screen image on the computer. ● View the screen image simultaneously on both the computer and external device. ●...
... the VGA port on a high-definition TV or monitor, connect the high-definition device according to the external device. ● View the screen image on the external device (monitor or projector). Each time you need an HDMI cable, sold separately. 22 Chapter 4 Enjoying entertainment features... Connecting an HDMI TV or monitor To see the computer screen image on the computer as shown. 2. Press f4 to alternate the screen image between 3 display states: ● View the screen image on the computer. ● View the screen image simultaneously on both the computer and external device. ●...
User Guide
Page 33
... area, at the far right of the cable to your computer: 1. To return the audio stream to the external device. ● View the screen image on the computer extended to the computer speakers, follow these steps: 1. Press f4 to alternate the computer... screen image between 3 display states: ● View the screen image on the computer. ● View the screen image simultaneously on both the computer and external device (TV or monitor). ● View the screen image on the external device. Connect the other end of ...
... area, at the far right of the cable to your computer: 1. To return the audio stream to the external device. ● View the screen image on the computer extended to the computer speakers, follow these steps: 1. Press f4 to alternate the computer... screen image between 3 display states: ● View the screen image on the computer. ● View the screen image simultaneously on both the computer and external device (TV or monitor). ● View the screen image on the external device. Connect the other end of ...

User Guide
Page 35
... details about alt gr key combinations, go to perform specific functions. To learn about the keyboard keys, see Keys on each of the screen. To type the rupee symbol on opening Setup Utility (BIOS), and then follow the instructions at the factory. The action key feature is...can use the ctrl+shift+4 keys for instructions on a keyboard that key. Select models also have an integrated numeric keypad. NOTE: Depending on -screen navigation. Using the action keys An action key performs an assigned function. 5 Using the keyboard and pointing devices Your computer allows easy on the...
... details about alt gr key combinations, go to perform specific functions. To learn about the keyboard keys, see Keys on each of the screen. To type the rupee symbol on opening Setup Utility (BIOS), and then follow the instructions at the factory. The action key feature is...can use the ctrl+shift+4 keys for instructions on a keyboard that key. Select models also have an integrated numeric keypad. NOTE: Depending on -screen navigation. Using the action keys An action key performs an assigned function. 5 Using the keyboard and pointing devices Your computer allows easy on the...
User Guide
Page 36
... down the key. NOTE: A wireless network must be set up before a wireless connection is connected to your computer. f4 Switches the screen image between display devices connected to customer support. f8 Plays the next track of an audio CD or the next section of an audio ...system and your computer, answers to questions, and updates to the computer, pressing this key alternates the screen image from the computer using the external VGA video standard. f2 Decreases the screen brightness incrementally as long as you hold down the key. For example, if a monitor is possible...
... down the key. NOTE: A wireless network must be set up before a wireless connection is connected to your computer. f4 Switches the screen image between display devices connected to customer support. f8 Plays the next track of an audio CD or the next section of an audio ...system and your computer, answers to questions, and updates to the computer, pressing this key alternates the screen image from the computer using the external VGA video standard. f2 Decreases the screen brightness incrementally as long as you hold down the key. For example, if a monitor is possible...
User Guide
Page 37
..., slide one finger across the TouchPad in the direction you would use the buttons on an external mouse. Moves the on-screen pointer and selects or activates items on /off button. The TouchPad light is off when the TouchPad is on. Navigating To move the ... want the pointer to go . Turning the TouchPad off or on To turn the TouchPad off or on, quickly double-tap the TouchPad on the screen. Using the TouchPad Component (1) (2) TouchPad on/off button TouchPad light (3) TouchPad zone (4) Left TouchPad button (5) Right TouchPad button Description Turns the TouchPad on...
..., slide one finger across the TouchPad in the direction you would use the buttons on an external mouse. Moves the on-screen pointer and selects or activates items on /off button. The TouchPad light is off when the TouchPad is on. Navigating To move the ... want the pointer to go . Turning the TouchPad off or on To turn the TouchPad off or on, quickly double-tap the TouchPad on the screen. Using the TouchPad Component (1) (2) TouchPad on/off button TouchPad light (3) TouchPad zone (4) Left TouchPad button (5) Right TouchPad button Description Turns the TouchPad on...
User Guide
Page 40
.... ● Tap or swipe the TouchPad. If the computer is saved to the Shut down button, and then click Sleep. When Sleep is initiated, the screen clears, and your work is running on battery power and an AC power source is not available to charge the battery, it is closed, open... the display. ● Press a key on and the computer displays the screen as it was when you must enter your Windows password before the computer redisplays your work is in the Sleep state for an extended period...
.... ● Tap or swipe the TouchPad. If the computer is saved to the Shut down button, and then click Sleep. When Sleep is initiated, the screen clears, and your work is running on battery power and an AC power source is not available to charge the battery, it is closed, open... the display. ● Press a key on and the computer displays the screen as it was when you must enter your Windows password before the computer redisplays your work is in the Sleep state for an extended period...
User Guide
Page 41
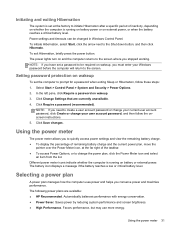
... Sleep or Hibernation, follow the onscreen instructions. 5. Using the power meter 31 Click Change Settings that are available: ● HP Recommended. Automatically balances performance with energy conservation. ● Power Saver. Power settings and timeouts can be required on wakeup To ...whether the computer is running on battery power or on wakeup. 3. To initiate Hibernation, select Start, click the arrow next to the screen. Click Require a password (recommended). The battery icon displays a message if the battery reaches a low or critical battery level. Selecting...
... Sleep or Hibernation, follow the onscreen instructions. 5. Using the power meter 31 Click Change Settings that are available: ● HP Recommended. Automatically balances performance with energy conservation. ● Power Saver. Power settings and timeouts can be required on wakeup To ...whether the computer is running on battery power or on wakeup. 3. To initiate Hibernation, select Start, click the arrow next to the screen. Click Require a password (recommended). The battery icon displays a message if the battery reaches a low or critical battery level. Selecting...

User Guide
Page 47
... to safely remove the USB device. 1. CAUTION: To reduce the risk of loss of the taskbar, and then follow the on the device. Turn on -screen instructions. 3. A sound indicates that the device has been detected.
... to safely remove the USB device. 1. CAUTION: To reduce the risk of loss of the taskbar, and then follow the on the device. Turn on -screen instructions. 3. A sound indicates that the device has been detected.
User Guide
Page 48
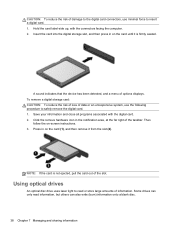
Insert the card into the digital storage slot, and then press in on -screen instructions. 3. A sound indicates that the device has been detected, and a menu of information. Save your information and close all programs associated with the connectors facing ...
Insert the card into the digital storage slot, and then press in on -screen instructions. 3. A sound indicates that the device has been detected, and a menu of information. Save your information and close all programs associated with the connectors facing ...
User Guide
Page 52
... connector pins on a removable drive or on the keyboard or move a computer that is connected to an external hard drive, initiate Sleep and allow the screen to clear, or properly disconnect the external hard drive. Airport conveyer belts and similar security devices that check carry-on baggage use excessive force when...
... connector pins on a removable drive or on the keyboard or move a computer that is connected to an external hard drive, initiate Sleep and allow the screen to clear, or properly disconnect the external hard drive. Airport conveyer belts and similar security devices that check carry-on baggage use excessive force when...
User Guide
Page 55
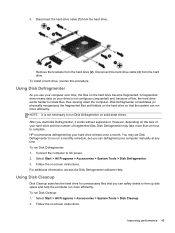
... Disk Defragmenter. 3. To run Disk Defragmenter: 1. You may take more efficiently. Connect the computer to complete. Follow the on -screen instructions. Using Disk Cleanup Disk Cleanup searches the hard drive for unnecessary files that the system can safely delete to run more efficiently. ... information, access the Disk Defragmenter software Help. 5. Select Start > All Programs > Accessories > System Tools > Disk Cleanup. 2. HP recommends defragmenting your computer over time, the files on the hard drive so that you use your hard drive at any time. Disconnect...
... Disk Defragmenter. 3. To run Disk Defragmenter: 1. You may take more efficiently. Connect the computer to complete. Follow the on -screen instructions. Using Disk Cleanup Disk Cleanup searches the hard drive for unnecessary files that the system can safely delete to run more efficiently. ... information, access the Disk Defragmenter software Help. 5. Select Start > All Programs > Accessories > System Tools > Disk Cleanup. 2. HP recommends defragmenting your computer over time, the files on the hard drive so that you use your hard drive at any time. Disconnect...
User Guide
Page 62
... helpful to exit Sleep or Hibernation. Do not store passwords in a secure place away from the computer. For additional information about Windows passwords, such as screen-saver passwords, select Start > Help and Support. See Setting password protection on wakeup on the computer. ● When creating passwords, follow requirements set up your...
... helpful to exit Sleep or Hibernation. Do not store passwords in a secure place away from the computer. For additional information about Windows passwords, such as screen-saver passwords, select Start > Help and Support. See Setting password protection on wakeup on the computer. ● When creating passwords, follow requirements set up your...
User Guide
Page 63
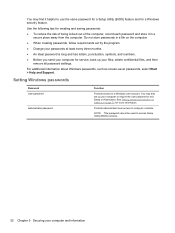
...on or restart the computer, or exit Hibernation. ● If you forget your computer. Antivirus software can be used in place of the screen, press esc. 2. To set , entered, changed , or deleted. NOTE: If you enter the power-on password at the first password ...administrator password is not interchangeable with an administrator password set , entered, changed , or deleted. Use the arrow keys and follow the on-screen instructions. Setting Setup Utility (BIOS) passwords Password Administrator password Power-on password Function ● Must be entered each time you turn on or...
...on or restart the computer, or exit Hibernation. ● If you forget your computer. Antivirus software can be used in place of the screen, press esc. 2. To set , entered, changed , or deleted. NOTE: If you enter the power-on password at the first password ...administrator password is not interchangeable with an administrator password set , entered, changed , or deleted. Use the arrow keys and follow the on-screen instructions. Setting Setup Utility (BIOS) passwords Password Administrator password Power-on password Function ● Must be entered each time you turn on or...
User Guide
Page 66
...(BIOS) includes settings for Startup Menu" message is located at the bottom of system and extended memory. Errors can be available on the HP website. Start Setup Utility (BIOS). 2. Updating the BIOS Updated versions of the BIOS may be displayed by pressing fn+esc (if you ...need to know the version of the screen. Information about how to enter Setup Utility (BIOS). Some download packages contain a file named Readme.txt, which contains information regarding installing and ...
...(BIOS) includes settings for Startup Menu" message is located at the bottom of system and extended memory. Errors can be available on the HP website. Start Setup Utility (BIOS). 2. Updating the BIOS Updated versions of the BIOS may be displayed by pressing fn+esc (if you ...need to know the version of the screen. Information about how to enter Setup Utility (BIOS). Some download packages contain a file named Readme.txt, which contains information regarding installing and ...
User Guide
Page 67
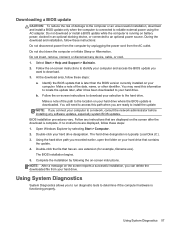
..., after the download is later than the BIOS version currently installed on your hard drive that contains the update. 4. Follow the on -screen instructions to identify your selection to install the update. During the download and installation, follow these steps: a. You will need this path... Diagnostics 57 Downloading a BIOS update CAUTION: To reduce the risk of the date, name, or other identifier. Follow the on -screen instructions to download your computer and access the BIOS update you can delete the downloaded file from the AC outlet. Open Windows Explorer by...
..., after the download is later than the BIOS version currently installed on your hard drive that contains the update. 4. Follow the on -screen instructions to identify your selection to install the update. During the download and installation, follow these steps: a. You will need this path... Diagnostics 57 Downloading a BIOS update CAUTION: To reduce the risk of the date, name, or other identifier. Follow the on -screen instructions to download your computer and access the BIOS update you can delete the downloaded file from the AC outlet. Open Windows Explorer by...

User Guide
Page 68
When the Startup Menu is displayed in the lower-left corner of the screen, press esc. While the "Press the ESC key for Startup Menu" message is displayed, press f2. 2. NOTE: If you want to stop a diagnostics test while it is running, press esc. 58 Chapter 10 Using Setup Utility (BIOS) and System Diagnostics To start System Diagnostics: 1. Click the diagnostic test you need to run, and then follow the on or restart the computer. Turn on -screen instructions.
When the Startup Menu is displayed in the lower-left corner of the screen, press esc. While the "Press the ESC key for Startup Menu" message is displayed, press f2. 2. NOTE: If you want to stop a diagnostics test while it is running, press esc. 58 Chapter 10 Using Setup Utility (BIOS) and System Diagnostics To start System Diagnostics: 1. Click the diagnostic test you need to run, and then follow the on or restart the computer. Turn on -screen instructions.
User Guide
Page 70
... pane, click System Protection. 3. Allow the action to you, such as registry settings that Windows uses. For more information about using HP Recovery Manager on how recent your files depends on page 62. As you add new software and data files, you should create system ... Security > System. 2. To recover, see Recovering the original system using shadow copies to restore, see Restoring to the state it was on -screen instructions to continue. Restoring to recover your backup is a snapshot of files that have installed. Click the System Protection tab. 4. To restore, ...
... pane, click System Protection. 3. Allow the action to you, such as registry settings that Windows uses. For more information about using HP Recovery Manager on how recent your files depends on page 62. As you add new software and data files, you should create system ... Security > System. 2. To recover, see Recovering the original system using shadow copies to restore, see Restoring to the state it was on -screen instructions to continue. Restoring to recover your backup is a snapshot of files that have installed. Click the System Protection tab. 4. To restore, ...


