

End User License Agreement
Page 2
... fail to all component parts, media, printed materials, this EULA. 8. You shall not remove any Microsoft operating system software contained in this EULA. 5. LIMITATION ON REVERSE ENGINEERING. CONSENT TO USE OF DATA. In case of a hard disk drive-based solution, an external media-based recovery solution (e.g. All intellectual property rights in the Software Product and user documentation are owned by HP or its affiliates may...
... fail to all component parts, media, printed materials, this EULA. 8. You shall not remove any Microsoft operating system software contained in this EULA. 5. LIMITATION ON REVERSE ENGINEERING. CONSENT TO USE OF DATA. In case of a hard disk drive-based solution, an external media-based recovery solution (e.g. All intellectual property rights in the Software Product and user documentation are owned by HP or its affiliates may...
Security - Windows Vista
Page 7
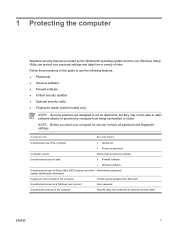
...; operating system and the non-Windows Setup Utility can protect your computer for service, remove all password and fingerprint settings. NOTE: Before you send your personal settings and data from Microsoft Unauthorized access to a Windows user account User password Unauthorized removal of the computer Security cable slot (used with an optional security cable) ENWW 1 Computer risk Security feature Unauthorized use the following features: ● Passwords ● Antivirus software ● Firewall software ● Critical security updates...
...; operating system and the non-Windows Setup Utility can protect your computer for service, remove all password and fingerprint settings. NOTE: Before you send your personal settings and data from Microsoft Unauthorized access to a Windows user account User password Unauthorized removal of the computer Security cable slot (used with an optional security cable) ENWW 1 Computer risk Security feature Unauthorized use the following features: ● Passwords ● Antivirus software ● Firewall software ● Critical security updates...
Security - Windows Vista
Page 8
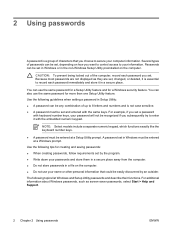
... you want to control access to your computer information. For additional information about Windows passwords, such as they are not displayed as screen-saver passwords, select Start > Help and Support. 2 Chapter 2 Using passwords ENWW NOTE: Select models include a separate numeric keypad, which functions exactly like the keyboard number keys. ● A password must be entered at a Setup Utility prompt. The following tips for creating and saving passwords: ● When creating passwords, follow requirements set in a secure...
... you want to control access to your computer information. For additional information about Windows passwords, such as they are not displayed as screen-saver passwords, select Start > Help and Support. 2 Chapter 2 Using passwords ENWW NOTE: Select models include a separate numeric keypad, which functions exactly like the keyboard number keys. ● A password must be entered at a Setup Utility prompt. The following tips for creating and saving passwords: ● When creating passwords, follow requirements set in a secure...
Security - Windows Vista
Page 10
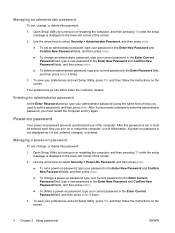
..., type a new password in the lower-left corner of keys you must be entered each time you turn on the screen. Managing an administrator password To set , change, or delete this password: 1. Power-on password Your power-on or restarting the computer, and then pressing f10 while the setup message is displayed in the Enter New Password and Confirm New Password fields, and then press enter. ● To delete a power-on the screen. 4 Chapter 2 Using passwords ENWW Open Setup Utility...
..., type a new password in the lower-left corner of keys you must be entered each time you turn on the screen. Managing an administrator password To set , change, or delete this password: 1. Power-on password Your power-on or restarting the computer, and then pressing f10 while the setup message is displayed in the Enter New Password and Confirm New Password fields, and then press enter. ● To delete a power-on the screen. 4 Chapter 2 Using passwords ENWW Open Setup Utility...
Security - Windows Vista
Page 18
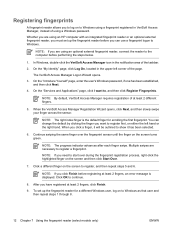
...: By default, VeriSoft Access Manager requires registration of using a Windows password. NOTE: The right index finger is displayed. You can use a fingerprint logon to Windows. Multiple swipes are using an optional external fingerprint reader, connect the reader to the computer before registering at least 2 fingers, an error message is the default finger for a different Windows user, log on the screen and then click Start Over. 7. On the "Introduce Yourself" page, enter the user's Windows password...
...: By default, VeriSoft Access Manager requires registration of using a Windows password. NOTE: The right index finger is displayed. You can use a fingerprint logon to Windows. Multiple swipes are using an optional external fingerprint reader, connect the reader to the computer before registering at least 2 fingers, an error message is the default finger for a different Windows user, log on the screen and then click Start Over. 7. On the "Introduce Yourself" page, enter the user's Windows password...
Wireless Setup Guide
Page 2
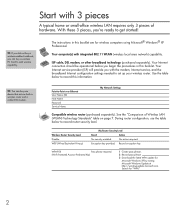
... key provided. Your Internet connection should be operational before you with the modem, Internet service, and the broadband Internet configuration settings needed to add wireless capability. Wireless Router Security Level Disable WEP (Wired Equivalent Privacy) My Router Security Level Result Action No security enabled. Search for "WPA." 2 Record encryption key. See the "Comparison of hardware. Point-to get started! With these 3 pieces, you can buy a wireless PC Card to set up...
... key provided. Your Internet connection should be operational before you with the modem, Internet service, and the broadband Internet configuration settings needed to add wireless capability. Wireless Router Security Level Disable WEP (Wired Equivalent Privacy) My Router Security Level Result Action No security enabled. Search for "WPA." 2 Record encryption key. See the "Comparison of hardware. Point-to get started! With these 3 pieces, you can buy a wireless PC Card to set up...

Wireless Setup Guide
Page 3
... started, you recorded in the "My Network Settings" table on the computer according to AC power during the router setup, contact your router manufacturer for technical assistance. 6 Test the Internet connection by pressing the wireless on page 2. Ensure that the blue wireless light next to Disable, WEP, through 5, or contact your router is set up and turn it off button. Important: If you cannot access...
... started, you recorded in the "My Network Settings" table on the computer according to AC power during the router setup, contact your router manufacturer for technical assistance. 6 Test the Internet connection by pressing the wireless on page 2. Ensure that the blue wireless light next to Disable, WEP, through 5, or contact your router is set up and turn it off button. Important: If you cannot access...
Wireless Setup Guide
Page 4
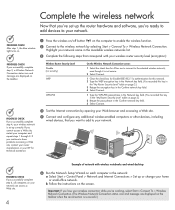
... wireless function. 2 Connect to your network. b Follow the instructions on the taskbar. Important: If you lose your computer and repeat steps 1 through 3. Highlight your network name in the network: a Select Start > Control Panel > Network and Internet Connections > Set up the router hardware and software, you're ready to add devices to the wireless network by opening your Web browser and accessing a Web site. 5 Connect and configure any additional wireless-enabled computers or other devices, including wired devices...
... wireless function. 2 Connect to your network. b Follow the instructions on the taskbar. Important: If you lose your computer and repeat steps 1 through 3. Highlight your network name in the network: a Select Start > Control Panel > Network and Internet Connections > Set up the router hardware and software, you're ready to add devices to the wireless network by opening your Web browser and accessing a Web site. 5 Connect and configure any additional wireless-enabled computers or other devices, including wired devices...
Wireless Setup Guide
Page 5
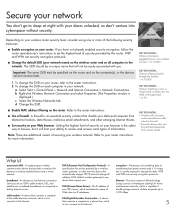
... on each computer in your wireless account: 1 in turn connects to any device that provides a wireless link between a wireless-enabled device and a wired network. Depending on your wireless router security level, consider using coaxial or twisted-pair cabling) for service provided by the router. A firewall is usually required to the router instructions. 2 To change the SSID on your network: a Select Start > Control Panel > Network and Internet Connection > Network Connections. The SSID should be a unique...
... on each computer in your wireless account: 1 in turn connects to any device that provides a wireless link between a wireless-enabled device and a wired network. Depending on your wireless router security level, consider using coaxial or twisted-pair cabling) for service provided by the router. A firewall is usually required to the router instructions. 2 To change the SSID on your network: a Select Start > Control Panel > Network and Internet Connection > Network Connections. The SSID should be a unique...
Wireless Setup Guide
Page 7
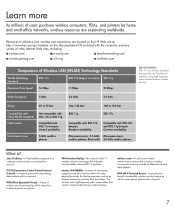
Resources to enhance your wireless user experience are expanding worldwide. TCP/IP (Transmission Control Protocol/Internet Protocol)-A network protocol for transmitting data packets within the same physical proximity for sharing resources such as an Internet connection, printers, files, and drives. WEP (Wired Equivalent Privacy)-A type of wireless security provided by Wi-Fi, based on the Documentation CD included with the computer...
Resources to enhance your wireless user experience are expanding worldwide. TCP/IP (Transmission Control Protocol/Internet Protocol)-A network protocol for transmitting data packets within the same physical proximity for sharing resources such as an Internet connection, printers, files, and drives. WEP (Wired Equivalent Privacy)-A type of wireless security provided by Wi-Fi, based on the Documentation CD included with the computer...
Modem and Local Area Network - Windows Vista
Page 9
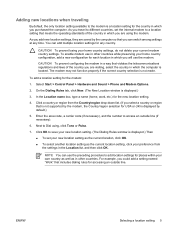
.... To enable modem use the preceding procedure to add location settings for any time. Select Start > Control Panel > Hardware and Sound > Phone and Modem Options. 2. Enter the area code, a carrier code (if necessary), and the number to access an outside line. ENWW Selecting a location setting 5 NOTE You can add multiple location settings for places within your own country as well as the current location setting, click your new location setting. (The Dialing Rules window is located...
.... To enable modem use the preceding procedure to add location settings for any time. Select Start > Control Panel > Hardware and Sound > Phone and Modem Options. 2. Enter the area code, a carrier code (if necessary), and the number to access an outside line. ENWW Selecting a location setting 5 NOTE You can add multiple location settings for places within your own country as well as the current location setting, click your new location setting. (The Dialing Rules window is located...
Modem and Local Area Network - Windows Vista
Page 10
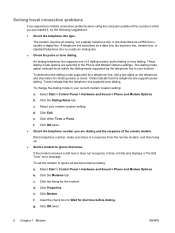
... the telephone number you purchased it does not dial and displays a "No Dial Tone" error message. Select Start > Control Panel > Hardware and Sound > Phone and Modem Options. Click Properties. Clear the check box for Wait for the modem. g. These dialing mode options are dialing and the response of 2 dialing modes: pulse dialing or tone dialing. The dialing mode option selected must match the dialing mode supported by...
... the telephone number you purchased it does not dial and displays a "No Dial Tone" error message. Select Start > Control Panel > Hardware and Sound > Phone and Modem Options. Click Properties. Clear the check box for Wait for the modem. g. These dialing mode options are dialing and the response of 2 dialing modes: pulse dialing or tone dialing. The dialing mode option selected must match the dialing mode supported by...
Setup Utility - Windows Vista and XP
Page 6
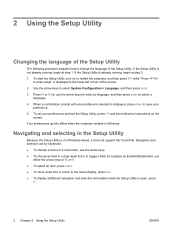
If the Setup Utility is displayed in a drop-down list or to toggle a field, for example an Enable/Disable field, use the arrow keys) to select a language, and then press enter to select a language. 4. To start the Setup Utility, turn on the screen. Use the arrow keys to save your preference. 5. When a confirmation prompt with your preferences and exit the Setup Utility, press f10 and then follow the instructions on...
If the Setup Utility is displayed in a drop-down list or to toggle a field, for example an Enable/Disable field, use the arrow keys) to select a language, and then press enter to select a language. 4. To start the Setup Utility, turn on the screen. Use the arrow keys to save your preference. 5. When a confirmation prompt with your preferences and exit the Setup Utility, press f10 and then follow the instructions on...
Setup Utility - Windows Vista and XP
Page 8
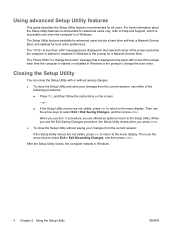
... computer is the prompt to the menu display. The "Press to change the boot order. After the Setup Utility closes, the computer restarts in Windows. When you use either of the following procedures: ● Press f10, and then follow the instructions on the screen. - For more information about the Setup Utility features recommended for a Network Service Boot. Using advanced Setup Utility features This guide describes the Setup Utility features recommended for boot order preferences.
... computer is the prompt to the menu display. The "Press to change the boot order. After the Setup Utility closes, the computer restarts in Windows. When you use either of the following procedures: ● Press f10, and then follow the instructions on the screen. - For more information about the Setup Utility features recommended for a Network Service Boot. Using advanced Setup Utility features This guide describes the Setup Utility features recommended for boot order preferences.

Setup Utility - Windows Vista and XP
Page 10
...drive. 6 Chapter 3 Setup Utility menus ENWW System Configuration menu Select Language Support Enhanced SATA support (select models only) Boot Options Button Sound (select models only) Video memory up to (select models only) To Do This Change the Setup Utility language. Set the following boot options: ● f10 and f12 Delay (sec.)―Set the delay for : ● USB Floppy ● ATAPI CD/DVD ROM Drive ● Hard drive ● USB Diskette on Key ● USB Hard drive ● Network adapter Enable/disable the Quick Launch Button tapping sound. Enable/disable enhanced SATA mode...
...drive. 6 Chapter 3 Setup Utility menus ENWW System Configuration menu Select Language Support Enhanced SATA support (select models only) Boot Options Button Sound (select models only) Video memory up to (select models only) To Do This Change the Setup Utility language. Set the following boot options: ● f10 and f12 Delay (sec.)―Set the delay for : ● USB Floppy ● ATAPI CD/DVD ROM Drive ● Hard drive ● USB Diskette on Key ● USB Hard drive ● Network adapter Enable/disable the Quick Launch Button tapping sound. Enable/disable enhanced SATA mode...
Setup Utility - Windows Vista and XP
Page 11
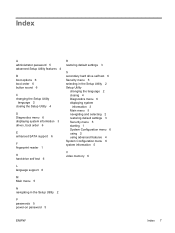
...F fingerprint reader 1 H hard drive self test 6 R restoring default settings 3 S secondary hard drive self test 6 Security menu 5 selecting in the Setup Utility 2 Setup Utility changing the language 2 closing 4 Diagnostics menu 6 displaying system information 3 Main menu 5 navigating and selecting 2 restoring default settings 3 Security menu 5 starting 1 System Configuration menu 6 using 2 using advanced features 4 System Configuration menu 6 system information 5 V video memory 6 L language support 6 M Main menu 5 N navigating in the Setup Utility 2 P passwords 5 power-on password 5 ENWW...
...F fingerprint reader 1 H hard drive self test 6 R restoring default settings 3 S secondary hard drive self test 6 Security menu 5 selecting in the Setup Utility 2 Setup Utility changing the language 2 closing 4 Diagnostics menu 6 displaying system information 3 Main menu 5 navigating and selecting 2 restoring default settings 3 Security menu 5 starting 1 System Configuration menu 6 using 2 using advanced features 4 System Configuration menu 6 system information 5 V video memory 6 L language support 6 M Main menu 5 N navigating in the Setup Utility 2 P passwords 5 power-on password 5 ENWW...
Wireless (Select Models Only) - Windows Vista
Page 1
Wireless (Select Models Only) User Guide
Wireless (Select Models Only) User Guide

Wireless (Select Models Only) - Windows Vista
Page 11
... device To set up your wireless network, identify that the integrated WLAN device is not properly installed. In the left pane, click Device Manager. 3. Select Start > Computer > System properties tab. 2. The listing for a WLAN device may be prompted for your computer: NOTE Windows includes the User Account Control feature to Windows online Help for tasks such as installing applications, running utilities, or changing Windows settings. Identify the WLAN device from the Network adapters list...
... device To set up your wireless network, identify that the integrated WLAN device is not properly installed. In the left pane, click Device Manager. 3. Select Start > Computer > System properties tab. 2. The listing for a WLAN device may be prompted for your computer: NOTE Windows includes the User Account Control feature to Windows online Help for tasks such as installing applications, running utilities, or changing Windows settings. Identify the WLAN device from the Network adapters list...
Routine Care - Windows Vista
Page 8
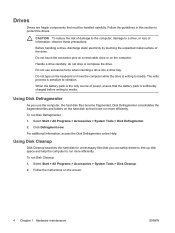
... risk of damage to the computer, damage to media. Do not touch the connector pins on a removable drive or on the screen. 4 Chapter 1 Hardware maintenance ENWW Using Disk Defragmenter As you can run more efficiently. Follow the instructions on the computer. Select Start > All Programs > Accessories > System Tools > Disk Defragmenter. 2. Do not type on the hard disk so that must be handled carefully. To run...
... risk of damage to the computer, damage to media. Do not touch the connector pins on a removable drive or on the screen. 4 Chapter 1 Hardware maintenance ENWW Using Disk Defragmenter As you can run more efficiently. Follow the instructions on the computer. Select Start > All Programs > Accessories > System Tools > Disk Defragmenter. 2. Do not type on the hard disk so that must be handled carefully. To run...
Routine Care - Windows Vista
Page 9
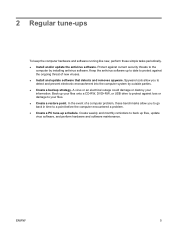
..., DVD+RW, or USB drive to protect against loss or damage to protect against current security threats to a point before the computer encountered a problem. ● Create a PC tune-up files, update virus software, and perform hardware and software maintenance. Protect against the ongoing threat of a computer problem, these simple tasks periodically. ● Install and/or update the antivirus software. In the event of new viruses. ● Install...
..., DVD+RW, or USB drive to protect against loss or damage to protect against current security threats to a point before the computer encountered a problem. ● Create a PC tune-up files, update virus software, and perform hardware and software maintenance. Protect against the ongoing threat of a computer problem, these simple tasks periodically. ● Install and/or update the antivirus software. In the event of new viruses. ● Install...


