HP Notebook Reference Guide - Windows 7
Page 7
...Using smart cards (select models only 37 Inserting a smart card ...38 Removing a smart card ...38 Using a USB device ...38 Connecting a USB device 38 Removing a USB device ...39 Using 1394 devices (select models only 39 Connecting a 1394 device 40 Removing a 1394 device 40 ...Using an eSATA device (select models only 40 Connecting an eSATA device 41 Removing an eSATA device 41 Using optional external devices ...42 Using optional external drives 42 Using the expansion port...
...Using smart cards (select models only 37 Inserting a smart card ...38 Removing a smart card ...38 Using a USB device ...38 Connecting a USB device 38 Removing a USB device ...39 Using 1394 devices (select models only 39 Connecting a 1394 device 40 Removing a 1394 device 40 ...Using an eSATA device (select models only 40 Connecting an eSATA device 41 Removing an eSATA device 41 Using optional external devices ...42 Using optional external drives 42 Using the expansion port...
HP Notebook Reference Guide - Windows 7
Page 31
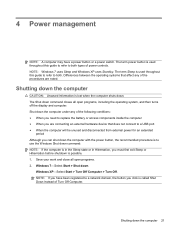
... affect any of Turn Off Computer. Windows XP-Select Start > Turn Off Computer > Turn Off. Differences between the operating systems that does not connect to a USB port ● When the computer will be unused and disconnected from external power for an extended period Although you can shut down the computer with the...
... affect any of Turn Off Computer. Windows XP-Select Start > Turn Off Computer > Turn Off. Differences between the operating systems that does not connect to a USB port ● When the computer will be unused and disconnected from external power for an extended period Although you can shut down the computer with the...
HP Notebook Reference Guide - Windows 7
Page 48
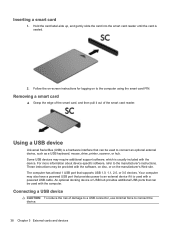
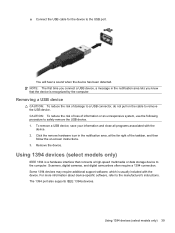
... on to the manufacturer's instructions. Follow the on-screen instructions for logging on the manufacturer's Web site. An optional docking device or USB hub provides additional USB ports that provides power to an external device if it out of the smart card reader. Removing a smart card ▲ Grasp the edge...specific software, refer to the computer using the smart card PIN. The computer has at least 1 USB port that can be provided with the device. Some USB devices may be used with a powered USB cable. Hold the card label-side up, and gently slide the card into the smart card ...
... on to the manufacturer's instructions. Follow the on-screen instructions for logging on the manufacturer's Web site. An optional docking device or USB hub provides additional USB ports that provides power to an external device if it out of the smart card reader. Removing a smart card ▲ Grasp the edge...specific software, refer to the computer using the smart card PIN. The computer has at least 1 USB port that can be provided with the device. Some USB devices may be used with a powered USB cable. Hold the card label-side up, and gently slide the card into the smart card ...
HP Notebook Reference Guide - Windows 7
Page 49
.... NOTE: The first time you connect a USB device, a message in the notification area, at the far right of damage to the USB port. Some 1394 devices may require additional support software, which is recognized by the computer. The 1394 port also supports IEEE 1394a devices. ▲ Connect... the USB cable for the device to a USB connector, do not pull on -screen instructions. ...
.... NOTE: The first time you connect a USB device, a message in the notification area, at the far right of damage to the USB port. Some 1394 devices may require additional support software, which is recognized by the computer. The 1394 port also supports IEEE 1394a devices. ▲ Connect... the USB cable for the device to a USB connector, do not pull on -screen instructions. ...
HP Notebook Reference Guide - Windows 7
Page 52
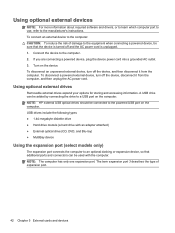
...unplug the AC power cord. Connect the device to the manufacturer's instructions. NOTE: HP external USB optical drives should be added by connecting the drive to the powered USB port on the device. A USB drive can be used with an adapter attached) ● External optical drive (CD...9679; MultiBay device Using the expansion port (select models only) The expansion port connects the computer to the equipment when connecting a powered device, be sure that additional ports and connectors can be connected to a USB port on the computer. The term expansion port 3 describes the type of damage...
...unplug the AC power cord. Connect the device to the manufacturer's instructions. NOTE: HP external USB optical drives should be added by connecting the drive to the powered USB port on the device. A USB drive can be used with an adapter attached) ● External optical drive (CD...9679; MultiBay device Using the expansion port (select models only) The expansion port connects the computer to the equipment when connecting a powered device, be sure that additional ports and connectors can be connected to a USB port on the computer. The term expansion port 3 describes the type of damage...

HP Notebook Reference Guide - Windows 7
Page 56
... drives in the primary hard drive bay or in the secondary hard drive bay are not covered by HP ProtectSmart Hard Drive Protection. Hard drives connected to USB ports are protected by User Account Control, click Yes. 2. To determine whether drives are currently protected or ...whether a drive is parked, select Start > Control Panel > Hardware and Sound > Windows Mobility Center: ● If HP ProtectSmart Hard Drive Protection is...
... drives in the primary hard drive bay or in the secondary hard drive bay are not covered by HP ProtectSmart Hard Drive Protection. Hard drives connected to USB ports are protected by User Account Control, click Yes. 2. To determine whether drives are currently protected or ...whether a drive is parked, select Start > Control Panel > Hardware and Sound > Windows Mobility Center: ● If HP ProtectSmart Hard Drive Protection is...
HP Notebook Reference Guide - Windows 7
Page 70
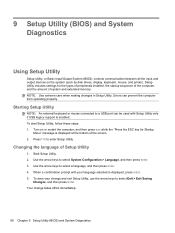
..., follow these steps: 1. Press f10 to select a language, and then press enter. 4. Use the arrow keys to enter Setup Utility. Use the arrow keys to a USB port can prevent the computer from operating properly. Your change and exit Setup Utility, use the arrow keys to select Exit > Exit Saving Changes, and then... Utility NOTE: An external keyboard or mouse connected to select System Configuration > Language, and then press enter. 3. When a confirmation prompt with Setup Utility only if USB legacy support is displayed, press enter. 5.
..., follow these steps: 1. Press f10 to select a language, and then press enter. 4. Use the arrow keys to enter Setup Utility. Use the arrow keys to a USB port can prevent the computer from operating properly. Your change and exit Setup Utility, use the arrow keys to select Exit > Exit Saving Changes, and then... Utility NOTE: An external keyboard or mouse connected to select System Configuration > Language, and then press enter. 3. When a confirmation prompt with Setup Utility only if USB legacy support is displayed, press enter. 5.

Getting Started HP Notebook - Windows 7
Page 14
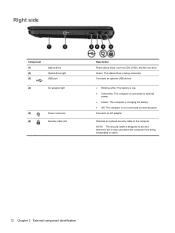
Connects an optional USB device ● Blinking white: The battery is low. ● Solid white: The computer is connected to external power. ● Amber: The computer is charging the ... is being mishandled or stolen. 8 Chapter 2 Getting to know your computer Front Component Speakers (2) Right side Description Produce sound Component (1) (2) (3) Optical drive Optical drive light USB port (4) AC adapter light (5) Power connector (6) Security cable slot Description Plays optical discs, such as a deterrent, but it may not prevent the computer from being accessed.
Connects an optional USB device ● Blinking white: The battery is low. ● Solid white: The computer is connected to external power. ● Amber: The computer is charging the ... is being mishandled or stolen. 8 Chapter 2 Getting to know your computer Front Component Speakers (2) Right side Description Produce sound Component (1) (2) (3) Optical drive Optical drive light USB port (4) AC adapter light (5) Power connector (6) Security cable slot Description Plays optical discs, such as a deterrent, but it may not prevent the computer from being accessed.

Getting Started HP Notebook - Windows 7
Page 15
... Card (MMC) ● Secure Digital (SD) Memory Card Left side 9 Left side Component (1) External monitor port (2) Vents (2) (3) RJ-45 (network) jack (4) HDMI port (5) USB ports (2) (6) Audio-in (microphone) jack (7) Audio-out (headphone) jack (8) Digital media slot Description Connects an external...optional video or audio device, such as a highdefinition television, or any compatible digital or audio component Connect optional USB devices Connects an optional computer headset microphone, stereo array microphone, or monaural microphone Produces sound when connected to cycle on...
... Card (MMC) ● Secure Digital (SD) Memory Card Left side 9 Left side Component (1) External monitor port (2) Vents (2) (3) RJ-45 (network) jack (4) HDMI port (5) USB ports (2) (6) Audio-in (microphone) jack (7) Audio-out (headphone) jack (8) Digital media slot Description Connects an external...optional video or audio device, such as a highdefinition television, or any compatible digital or audio component Connect optional USB devices Connects an optional computer headset microphone, stereo array microphone, or monaural microphone Produces sound when connected to cycle on...

Getting Started HP Notebook - Windows 7
Page 26
... your computer, and select Mouse settings. Setting pointing device preferences Use Mouse Properties in the direction you can use an external USB mouse (purchased separately) by connecting it to one of the USB ports on an external mouse. 20 Chapter 4 Keyboard and pointing devices To access Mouse Properties, select Start > Devices and Printers...
... your computer, and select Mouse settings. Setting pointing device preferences Use Mouse Properties in the direction you can use an external USB mouse (purchased separately) by connecting it to one of the USB ports on an external mouse. 20 Chapter 4 Keyboard and pointing devices To access Mouse Properties, select Start > Devices and Printers...
Getting Started HP Notebook - Windows 7
Page 41
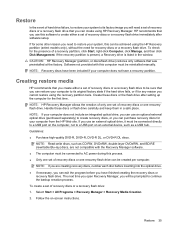
...factory. Software not provided with the Recovery Manager software. ● The computer must be connected directly to a USB port on the computer, not to a USB port on -screen instructions. To check for the presence of recovery discs or one recovery flash drive. Create these discs...external optical drive (purchased separately) to create recovery discs, or you cannot restore using the recovery partition tools. Restore 35 Creating restore media HP recommends that you have a recovery partition. Guidelines: ● Purchase high-quality DVD-R, DVD+R, DVD-R DL, or DVD+R DL discs...
...factory. Software not provided with the Recovery Manager software. ● The computer must be connected directly to a USB port on the computer, not to a USB port on -screen instructions. To check for the presence of recovery discs or one recovery flash drive. Create these discs...external optical drive (purchased separately) to create recovery discs, or you cannot restore using the recovery partition tools. Restore 35 Creating restore media HP recommends that you have a recovery partition. Guidelines: ● Purchase high-quality DVD-R, DVD+R, DVD-R DL, or DVD+R DL discs...

Getting Started HP Notebook - Windows 7
Page 43
... the optical drive on your computer, and then restart the computer. Select the optical drive or the flash drive. 5. Insert the first recovery disc into a USB port on -screen instructions. Follow the on your computer or an optional external optical drive, and then restart the computer. - Performing a system restore 37 NOTE: If...
... the optical drive on your computer, and then restart the computer. Select the optical drive or the flash drive. 5. Insert the first recovery disc into a USB port on -screen instructions. Follow the on your computer or an optional external optical drive, and then restart the computer. - Performing a system restore 37 NOTE: If...

Getting Started HP Notebook - Windows 7
Page 44
... shot of your preferences. 38 Chapter 6 Backup and recovery Select Internal CD/DVD ROM Drive from the boot options window. Insert the flash drive into a USB port. 2. NOTE: A recovery from your most recent backup needs to re-enter your settings. The screen shot can back up your files and keep any major...
... shot of your preferences. 38 Chapter 6 Backup and recovery Select Internal CD/DVD ROM Drive from the boot options window. Insert the flash drive into a USB port. 2. NOTE: A recovery from your most recent backup needs to re-enter your settings. The screen shot can back up your files and keep any major...
Getting Started HP Notebook - Windows 7
Page 54
... 46 operating system Microsoft Certificate of Authenticity label 43 Product Key 43 P pinching TouchPad gesture 23 pointing devices, setting preferences 20 ports HDMI 9 USB 9 power button, identifying 6 power connector, identifying 8 power light, identifying 10 Product Key 43 product name and number, computer...TouchPad buttons 5 using 20 TouchPad gestures pinching 23 rotating 24 scrolling 23 zooming 23 TouchPad light 4 traveling with the computer 43 U USB port, identifying 9 using system restore 40 V vents, identifying 9, 12 volume keys, identifying 18 W Web browser action keys 18 webcam ...
... 46 operating system Microsoft Certificate of Authenticity label 43 Product Key 43 P pinching TouchPad gesture 23 pointing devices, setting preferences 20 ports HDMI 9 USB 9 power button, identifying 6 power connector, identifying 8 power light, identifying 10 Product Key 43 product name and number, computer...TouchPad buttons 5 using 20 TouchPad gestures pinching 23 rotating 24 scrolling 23 zooming 23 TouchPad light 4 traveling with the computer 43 U USB port, identifying 9 using system restore 40 V vents, identifying 9, 12 volume keys, identifying 18 W Web browser action keys 18 webcam ...
HP Pavilion G6 Notebook PC - Maintenance and Service Guide
Page 20
Connects an optional USB device ● Blinking white: The battery is low. ● Solid white: The computer is connected to external power. ● Amber: The computer is charging the ... to the computer NOTE: The security cable is being mishandled or stolen. 12 Chapter 2 External component identification Right side Component (1) (2) (3) Optical drive Optical drive light USB port (4) AC adapter light (5) Power connector (6) Security cable slot Description Plays optical discs, such as a deterrent, but it may not prevent the computer from being accessed...
Connects an optional USB device ● Blinking white: The battery is low. ● Solid white: The computer is connected to external power. ● Amber: The computer is charging the ... to the computer NOTE: The security cable is being mishandled or stolen. 12 Chapter 2 External component identification Right side Component (1) (2) (3) Optical drive Optical drive light USB port (4) AC adapter light (5) Power connector (6) Security cable slot Description Plays optical discs, such as a deterrent, but it may not prevent the computer from being accessed...

HP Pavilion G6 Notebook PC - Maintenance and Service Guide
Page 21
Left side 13 Left side Component (1) External monitor port (2) Vents (2) (3) RJ-45 (network) jack (4) HDMI port (5) USB ports (2) (6) Audio-in (microphone) jack (7) Audio-out (headphone) jack Description Connects an external VGA monitor or projector Enable... cable Connects an optional video or audio device, such as a high-definition television, or any compatible digital or audio component Connect optional USB devices Connects an optional computer headset microphone, stereo array microphone, or monaural microphone Produces sound when connected to cycle on headphones, earbuds,...
Left side 13 Left side Component (1) External monitor port (2) Vents (2) (3) RJ-45 (network) jack (4) HDMI port (5) USB ports (2) (6) Audio-in (microphone) jack (7) Audio-out (headphone) jack Description Connects an external VGA monitor or projector Enable... cable Connects an optional video or audio device, such as a high-definition television, or any compatible digital or audio component Connect optional USB devices Connects an optional computer headset microphone, stereo array microphone, or monaural microphone Produces sound when connected to cycle on headphones, earbuds,...

HP Pavilion G6 Notebook PC - Maintenance and Service Guide
Page 99
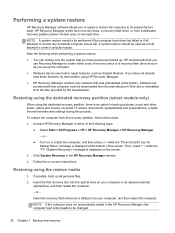
...to create recovery discs, or you can purchase recovery discs for your computer from the HP Web site. Select Start > All Programs > HP > HP Recovery Manager > HP Recovery Media Creation. 2. Software not provided with the HP Recovery Manager software. ● The computer must be reinstalled manually. NOTE: If ...exit the program before inserting it must be connected to AC power during this computer must be connected directly to a USB port on the computer, not to a USB port on -screen instructions. NOTE: If you are not compatible with this process. ● Only one set of recovery ...
...to create recovery discs, or you can purchase recovery discs for your computer from the HP Web site. Select Start > All Programs > HP > HP Recovery Manager > HP Recovery Media Creation. 2. Software not provided with the HP Recovery Manager software. ● The computer must be reinstalled manually. NOTE: If ...exit the program before inserting it must be connected to AC power during this computer must be connected directly to a USB port on the computer, not to a USB port on -screen instructions. NOTE: If you are not compatible with this process. ● Only one set of recovery ...
HP Pavilion G6 Notebook PC - Maintenance and Service Guide
Page 100
... esc while the "Press the ESC key for Startup Menu" message is displayed on the screen. 2. Insert the first recovery disc into a USB port on your computer, and then restart the computer. HP Recovery Manager works from recovery discs, a recovery flash drive, or from a dedicated recovery partition (select models only) on -screen instructions...
... esc while the "Press the ESC key for Startup Menu" message is displayed on the screen. 2. Insert the first recovery disc into a USB port on your computer, and then restart the computer. HP Recovery Manager works from recovery discs, a recovery flash drive, or from a dedicated recovery partition (select models only) on -screen instructions...
HP Pavilion G6 Notebook PC - Maintenance and Service Guide
Page 102
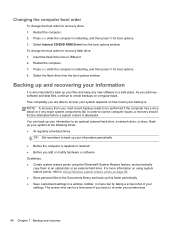
... repaired or restored ● Before you have to an optional external hard drive, a network drive, or discs. Restart the computer. 2. Insert the flash drive into a USB port. 2. For more information on page 96. ● Store personal files in the Documents library and back up your files and keep any major system components...
... repaired or restored ● Before you have to an optional external hard drive, a network drive, or discs. Restart the computer. 2. Insert the flash drive into a USB port. 2. For more information on page 96. ● Store personal files in the Documents library and back up your files and keep any major system components...
HP Pavilion G6 Notebook PC - Maintenance and Service Guide
Page 115
... TouchPad button board spare part number 59 TouchPad LED board removal 60 spare part number 60 TouchPad light 7 transporting guidelines 39 U USB board removal 62 spare part number 20, 62 USB port, identifying 13 using system restore 96 V vents, identifying 13, 16 W webcam light, identifying 15 webcam module, spare part number 24 webcam...
... TouchPad button board spare part number 59 TouchPad LED board removal 60 spare part number 60 TouchPad light 7 transporting guidelines 39 U USB board removal 62 spare part number 20, 62 USB port, identifying 13 using system restore 96 V vents, identifying 13, 16 W webcam light, identifying 15 webcam module, spare part number 24 webcam...


