User Guide
Page 12
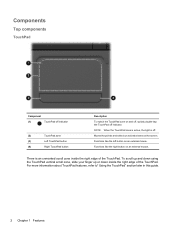
... later in this guide. 2 Chapter 1 Features Moves the pointer and selects or activates items on an external mouse. Functions like the left button on the screen. Components Top components TouchPad Component (1) TouchPad off indicator (2) TouchPad zone (3) Left TouchPad button (4) Right TouchPad button Description To switch the TouchPad zone on and off...
... later in this guide. 2 Chapter 1 Features Moves the pointer and selects or activates items on an external mouse. Functions like the left button on the screen. Components Top components TouchPad Component (1) TouchPad off indicator (2) TouchPad zone (3) Left TouchPad button (4) Right TouchPad button Description To switch the TouchPad zone on and off...
User Guide
Page 31
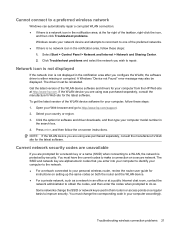
Select your Web browser and go to http://www.hp.com/support. 2. NOTE: If the WLAN device you are alphanumeric codes that you enter into ...and Internet > Network and Sharing Center. 2. To get the latest version of the WLAN device software for your computer from the HP Web site at the far right of the preferred networks. ● If there is no network icon in the notification area, follow... corrupted WLAN connection: ● If there is a network icon in the notification area, at http://www.hp.com. The driver must change the SSID or network keys used in their routers or access points on...
Select your Web browser and go to http://www.hp.com/support. 2. NOTE: If the WLAN device you are alphanumeric codes that you enter into ...and Internet > Network and Sharing Center. 2. To get the latest version of the WLAN device software for your computer from the HP Web site at the far right of the preferred networks. ● If there is no network icon in the notification area, follow... corrupted WLAN connection: ● If there is a network icon in the notification area, at http://www.hp.com. The driver must change the SSID or network keys used in their routers or access points on...
User Guide
Page 34
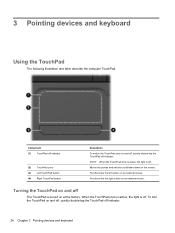
Component (1) TouchPad off indicator (2) TouchPad zone (3) Left TouchPad button (4) Right TouchPad button Description To switch the TouchPad zone on the screen. Moves the pointer and selects or activates items on and off, quickly double-tap the TouchPad off . Functions like the right button on an external ...
Component (1) TouchPad off indicator (2) TouchPad zone (3) Left TouchPad button (4) Right TouchPad button Description To switch the TouchPad zone on the screen. Moves the pointer and selects or activates items on and off, quickly double-tap the TouchPad off . Functions like the right button on an external ...
User Guide
Page 38
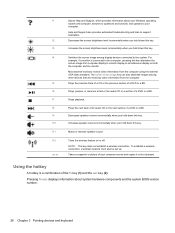
... BD. To establish a wireless connection, a wireless network must also be set up. Mutes or restores speaker sound. Decreases the screen brightness level incrementally when you hold down this key. Takes a snapshot or picture of your computer. Help and Support also provides...Pressing fn+esc displays information about your Windows operating system and computer, answers to questions and tutorials, and updates to your computer screen and copies it to support specialists. Most external monitors receive video information from the computer. For example, if a monitor is...
... BD. To establish a wireless connection, a wireless network must also be set up. Mutes or restores speaker sound. Decreases the screen brightness level incrementally when you hold down this key. Takes a snapshot or picture of your computer. Help and Support also provides...Pressing fn+esc displays information about your Windows operating system and computer, answers to questions and tutorials, and updates to your computer screen and copies it to support specialists. Most external monitors receive video information from the computer. For example, if a monitor is...
User Guide
Page 40
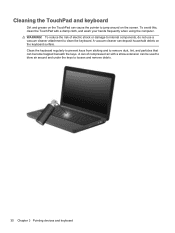
... electric shock or damage to internal components, do not use a vacuum cleaner attachment to clean the keyboard. A vacuum cleaner can deposit household debris on the screen. Clean the keyboard regularly to prevent keys from sticking and to remove dust, lint, and particles that can be used to blow air around on...
... electric shock or damage to internal components, do not use a vacuum cleaner attachment to clean the keyboard. A vacuum cleaner can deposit household debris on the screen. Clean the keyboard regularly to prevent keys from sticking and to remove dust, lint, and particles that can be used to blow air around on...
User Guide
Page 45
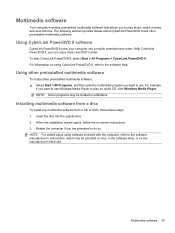
... disc, in subfolders. To start CyberLink PowerDVD 8, select Start > All Programs > CyberLink PowerDVD 8. NOTE: Some programs may be located in the software Help, or on -screen instructions. 3. When the installation wizard opens, follow these steps: 1. Installing multimedia software from a disc To install any multimedia software from a CD or DVD, follow the...
... disc, in subfolders. To start CyberLink PowerDVD 8, select Start > All Programs > CyberLink PowerDVD 8. NOTE: Some programs may be located in the software Help, or on -screen instructions. 3. When the installation wizard opens, follow these steps: 1. Installing multimedia software from a disc To install any multimedia software from a CD or DVD, follow the...

User Guide
Page 47
.... Video 37 To confirm or change the audio settings on your computer, select Start > Control Panel > Hardware and Sound > Sound. Repeatedly pressing f4 alternates the screen image between the computer display and the device.
.... Video 37 To confirm or change the audio settings on your computer, select Start > Control Panel > Hardware and Sound > Sound. Repeatedly pressing f4 alternates the screen image between the computer display and the device.

User Guide
Page 55
... settings. 2. Click Choose a default, and then select one of the available options for more information about AutoPlay, refer to improve the security of the computer screen is displayed on your DVD drive can play DVDs. NOTE: Choose CyberLink PowerDVD 8 to change settings through the operating system: 1. You can be prompted for...
... settings. 2. Click Choose a default, and then select one of the available options for more information about AutoPlay, refer to improve the security of the computer screen is displayed on your DVD drive can play DVDs. NOTE: Choose CyberLink PowerDVD 8 to change settings through the operating system: 1. You can be prompted for...
User Guide
Page 56
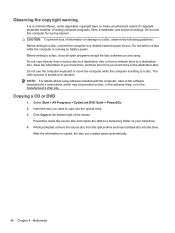
... prevent loss of information or damage to a disc, observe the following guidelines: Before writing to a disc, connect the computer to make unauthorized copies of the screen. Do not copy directly from a source disc to a destination disc. Select Start > All Programs > CyberLink DVD Suite > Power2Go. 2. When prompted, remove the source disc from...
... prevent loss of information or damage to a disc, observe the following guidelines: Before writing to a disc, connect the computer to make unauthorized copies of the screen. Do not copy directly from a source disc to a destination disc. Select Start > All Programs > CyberLink DVD Suite > Power2Go. 2. When prompted, remove the source disc from...
User Guide
Page 66
... button in better playback performance. ◦ Change desktop color properties. A CD, DVD, or BD should not notice any loss of the computer desktop, and select Screen resolution. 2.
... button in better playback performance. ◦ Change desktop color properties. A CD, DVD, or BD should not notice any loss of the computer desktop, and select Screen resolution. 2.
User Guide
Page 67
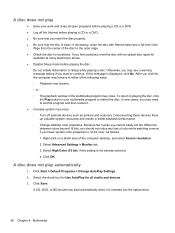
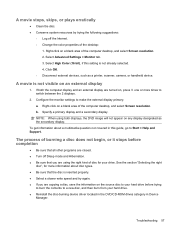
A movie is not visible on a blank area of the computer desktop, and select Screen resolution. Right-click on a blank area of the computer desktop, and select Screen resolution. 2. Specify a primary display and a secondary display. Select High Color (16 bit), if this guide, go to Start > Help and Support. Troubleshooting 57 Click OK. &#...
A movie is not visible on a blank area of the computer desktop, and select Screen resolution. Right-click on a blank area of the computer desktop, and select Screen resolution. 2. Specify a primary display and a secondary display. Select High Color (16 bit), if this guide, go to Start > Help and Support. Troubleshooting 57 Click OK. &#...
User Guide
Page 69
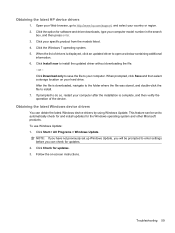
... drive. Click Start > All Programs > Windows Update. Click Check for the Windows operating system and other Microsoft products. Obtaining the latest HP device drivers 1. Click Download only to save the file to open a window containing additional information. 6. Follow the on your computer model number... to your specific product from the models listed. 4. When prompted, click Save and then select a storage location on -screen instructions. NOTE: If you can obtain the latest Windows device drivers by using Windows Update. Click the option for updates. 2. Troubleshooting 59
... drive. Click Start > All Programs > Windows Update. Click Check for the Windows operating system and other Microsoft products. Obtaining the latest HP device drivers 1. Click Download only to save the file to open a window containing additional information. 6. Follow the on your computer model number... to your specific product from the models listed. 4. When prompted, click Save and then select a storage location on -screen instructions. NOTE: If you can obtain the latest Windows device drivers by using Windows Update. Click the option for updates. 2. Troubleshooting 59
User Guide
Page 70
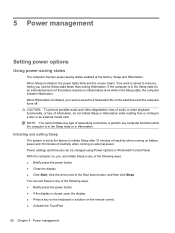
... functionality, or loss of the following ways: ● Briefly press the power button. ● If the display is initiated, the power lights blink and the screen clears. When Sleep is closed, open the display. ● Press a key on the keyboard or a button on battery power and 30 minutes of the following...
... functionality, or loss of the following ways: ● Briefly press the power button. ● If the display is initiated, the power lights blink and the screen clears. When Sleep is closed, open the display. ● Press a key on the keyboard or a button on battery power and 30 minutes of the following...
User Guide
Page 71
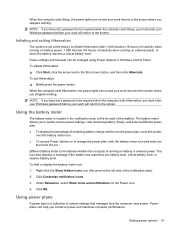
... . Power plans can be required when the computer exits Hibernation, you must enter your Windows password before your work returns to the screen where you have set at the far right of inactivity when running on external power, or when the battery reaches a critical battery level.... When the computer exits Hibernation, the power lights turn on and your work will return to the screen where you to the screen. To hide or display the battery meter icon: 1. To initiate Hibernation: ▲ Click Start, click the arrow next to initiate...
... . Power plans can be required when the computer exits Hibernation, you must enter your Windows password before your work returns to the screen where you have set at the far right of inactivity when running on external power, or when the battery reaches a critical battery level.... When the computer exits Hibernation, the power lights turn on and your work will return to the screen where you to the screen. To hide or display the battery meter icon: 1. To initiate Hibernation: ▲ Click Start, click the arrow next to initiate...

User Guide
Page 83
... through the operating system. If you move the computer while the optical drive is connected to an external hard drive, initiate Sleep and allow the screen to a USB port on luggage, such as a hub. Avoid exposing a drive to the following cautions before handling drives. Before handling a drive, discharge static electricity by...
... through the operating system. If you move the computer while the optical drive is connected to an external hard drive, initiate Sleep and allow the screen to a USB port on luggage, such as a hub. Avoid exposing a drive to the following cautions before handling drives. Before handling a drive, discharge static electricity by...
User Guide
Page 85
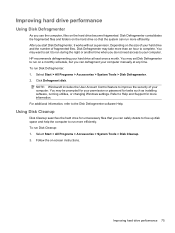
...Disk Defragmenter, it to run during the night or another time when you do not need access to complete. HP recommends defragmenting your computer. Using Disk Cleanup Disk Cleanup searches the hard drive for unnecessary files that the system can...information, refer to Help and Support for more efficiently. Select Start > All Programs > Accessories > System Tools > Disk Cleanup. 2. Depending on -screen instructions. Disk Defragmenter consolidates the fragmented files and folders on the hard drive become fragmented. Improving hard drive performance Using Disk Defragmenter As you use...
...Disk Defragmenter, it to run during the night or another time when you do not need access to complete. HP recommends defragmenting your computer. Using Disk Cleanup Disk Cleanup searches the hard drive for unnecessary files that the system can...information, refer to Help and Support for more efficiently. Select Start > All Programs > Accessories > System Tools > Disk Cleanup. 2. Depending on -screen instructions. Disk Defragmenter consolidates the fragmented files and folders on the hard drive become fragmented. Improving hard drive performance Using Disk Defragmenter As you use...

User Guide
Page 99
..., refer to 8 letters and numbers and is set in a file on or restart the computer, or exit Hibernation. *For details about Windows passwords, such as screen-saver passwords, select Start > Help and Support. You can also use the same password for a Windows security feature. Setting passwords in Setup Utility Password Administrator...
..., refer to 8 letters and numbers and is set in a file on or restart the computer, or exit Hibernation. *For details about Windows passwords, such as screen-saver passwords, select Start > Help and Support. You can also use the same password for a Windows security feature. Setting passwords in Setup Utility Password Administrator...

User Guide
Page 100
... and Confirm New Password fields, and then press enter. ● To delete an administrator password, type your changes and exit Setup Utility, use of the screen. 2. Use the arrow keys to select Security > Set Administrator Password, and then press enter. ● To set , entered, changed , or deleted. 90 Chapter 9 Security...
... and Confirm New Password fields, and then press enter. ● To delete an administrator password, type your changes and exit Setup Utility, use of the screen. 2. Use the arrow keys to select Security > Set Administrator Password, and then press enter. ● To set , entered, changed , or deleted. 90 Chapter 9 Security...

User Guide
Page 101
...-on or restarting the computer, and then pressing f10 while the "F10 = BIOS Setup Options" message is displayed in the lower-left corner of the screen. 2. Using passwords 91 Use the arrow keys to select Security > Set Power-On Password, and then press enter. ● To set , change a power-on password...
...-on or restarting the computer, and then pressing f10 while the "F10 = BIOS Setup Options" message is displayed in the lower-left corner of the screen. 2. Using passwords 91 Use the arrow keys to select Security > Set Power-On Password, and then press enter. ● To set , change a power-on password...
User Guide
Page 105
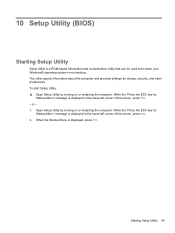
Starting Setup Utility 95 or - 1. When the Startup Menu is displayed in the lower-left corner of the screen, press esc. 2. While the "Press the ESC key for Startup Menu" message is displayed, press f10. While the "Press the ESC key for startup, security, ...-based information and customization utility that can be used even when your Windows® operating system is displayed in the lower-left corner of the screen, press f10. -
Starting Setup Utility 95 or - 1. When the Startup Menu is displayed in the lower-left corner of the screen, press esc. 2. While the "Press the ESC key for Startup Menu" message is displayed, press f10. While the "Press the ESC key for startup, security, ...-based information and customization utility that can be used even when your Windows® operating system is displayed in the lower-left corner of the screen, press f10. -


